


You also want an ePaper? Increase the reach of your titles
YUMPU automatically turns print PDFs into web optimized ePapers that Google loves.
<strong>Torq</strong> <strong>1.5</strong> <strong>User</strong> <strong>Guide</strong> Chapter 3 1 13<br />
Cue<br />
The Cue button will establish a primary Cue Point within a song. A Cue Point is a reference position within the track<br />
that you can jump to instantly, rather than having to seek through the track to find it. Typically, a DJ will set the Cue<br />
Point where the beat begins in a song. It is visible (in orange) within the Waveform Display. The Cue button abides by the<br />
following rules:<br />
1. If a song is playing, pressing the Cue button will make the song jump to the Cue Point and will pause there.<br />
2. If Cue is pressed and held again, the music will begin playing from the Cue Point. The music will stop playing<br />
when the Cue button is released and the song will jump back to the Cue Point.<br />
3. If a song is paused in a location different from the Cue Point, pressing the Cue button will set the Cue Point to<br />
the current location.<br />
4. If you hold SHIFT and press Cue, a Cue Point will be placed at the current location, even if the song is already<br />
playing.<br />
5. If you hold Cue and press the Play/Pause button, the music will continue to play after you release both buttons.<br />
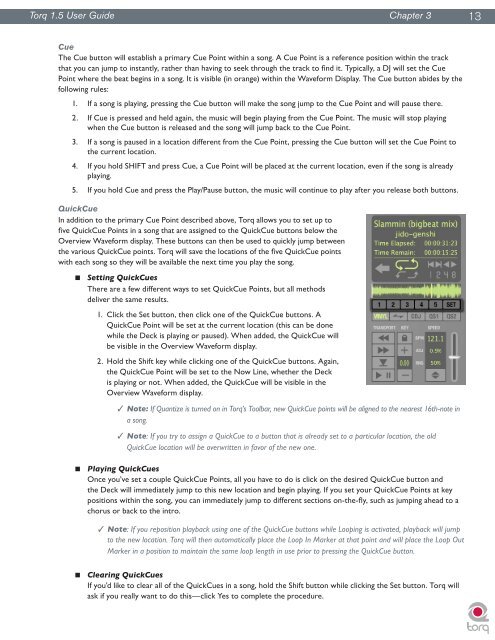
QuickCue<br />
In addition to the primary Cue Point described above, <strong>Torq</strong> allows you to set up to<br />
five QuickCue Points in a song that are assigned to the QuickCue buttons below the<br />
Overview Waveform display. These buttons can then be used to quickly jump between<br />
the various QuickCue points. <strong>Torq</strong> will save the locations of the five QuickCue points<br />
with each song so they will be available the next time you play the song.<br />
< Setting QuickCues<br />
There are a few different ways to set QuickCue Points, but all methods<br />
deliver the same results.<br />
1. Click the Set button, then click one of the QuickCue buttons. A<br />
QuickCue Point will be set at the current location (this can be done<br />
while the Deck is playing or paused). When added, the QuickCue will<br />
be visible in the Overview Waveform display.<br />
2. Hold the Shift key while clicking one of the QuickCue buttons. Again,<br />
the QuickCue Point will be set to the Now Line, whether the Deck<br />
is playing or not. When added, the QuickCue will be visible in the<br />
Overview Waveform display.<br />
✓ Note: If Quantize is turned on in <strong>Torq</strong>’s Toolbar, new QuickCue points will be aligned to the nearest 16th-note in<br />
a song.<br />
✓ Note: If you try to assign a QuickCue to a button that is already set to a particular location, the old<br />
QuickCue location will be overwritten in favor of the new one.<br />
< Playing QuickCues<br />
Once you’ve set a couple QuickCue Points, all you have to do is click on the desired QuickCue button and<br />
the Deck will immediately jump to this new location and begin playing. If you set your QuickCue Points at key<br />
positions within the song, you can immediately jump to different sections on-the-fly, such as jumping ahead to a<br />
chorus or back to the intro.<br />
✓ Note: If you reposition playback using one of the QuickCue buttons while Looping is activated, playback will jump<br />
to the new location. <strong>Torq</strong> will then automatically place the Loop In Marker at that point and will place the Loop Out<br />
Marker in a position to maintain the same loop length in use prior to pressing the QuickCue button.<br />
< Clearing QuickCues<br />
If you’d like to clear all of the QuickCues in a song, hold the Shift button while clicking the Set button. <strong>Torq</strong> will<br />
ask if you really want to do this—click Yes to complete the procedure.


