HARDSIDE FLUID SUPPORT ASSEMBLY ... - InnoMax
HARDSIDE FLUID SUPPORT ASSEMBLY ... - InnoMax
HARDSIDE FLUID SUPPORT ASSEMBLY ... - InnoMax
Create successful ePaper yourself
Turn your PDF publications into a flip-book with our unique Google optimized e-Paper software.
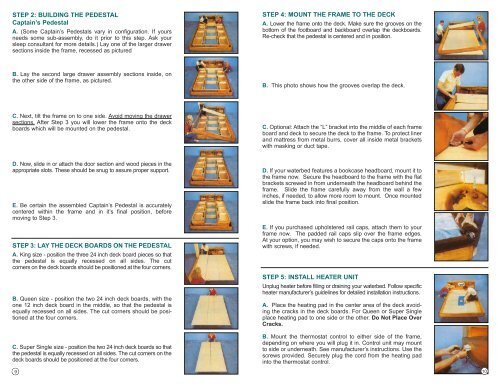
STEP 2: BUILDING THE PEDESTAL<br />
Captain’s Pedestal<br />
A. (Some Captain’s Pedestals vary in configuration. If yours<br />
needs some sub-assembly, do it prior to this step. Ask your<br />
sleep consultant for more details.) Lay one of the larger drawer<br />
sections inside the frame, recessed as pictured<br />
STEP 4: MOUNT THE FRAME TO THE DECK<br />
A. Lower the frame onto the deck. Make sure the grooves on the<br />
bottom of the footboard and backboard overlap the deckboards.<br />
Re-check that the pedestal is centered and in position.<br />
B. Lay the second large drawer assembly sections inside, on<br />
the other side of the frame, as pictured.<br />
B. This photo shows how the grooves overlap the deck.<br />
C. Next, tilt the frame on to one side. Avoid moving the drawer<br />
sections. After Step 3 you will lower the frame onto the deck<br />
boards which will be mounted on the pedestal.<br />
C. Optional: Attach the “L” bracket into the middle of each frame<br />
board and deck to secure the deck to the frame. To protect liner<br />
and mattress from metal burrs, cover all inside metal brackets<br />
with masking or duct tape.<br />
D. Now, slide in or attach the door section and wood pieces in the<br />
appropriate slots. These should be snug to assure proper support.<br />
E. Be certain the assembled Captain’s Pedestal is accurately<br />
centered within the frame and in it’s final position, before<br />
moving to Step 3.<br />
STEP 3: LAY THE DECK BOARDS ON THE PEDESTAL<br />
A. King size - position the three 24 inch deck board pieces so that<br />
the pedestal is equally recessed on all sides. The cut<br />
corners on the deck boards should be positioned at the four corners.<br />
B. Queen size - position the two 24 inch deck boards, with the<br />
one 12 inch deck board in the middle, so that the pedestal is<br />
equally recessed on all sides. The cut corners should be positioned<br />
at the four corners.<br />
C. Super Single size - position the two 24 inch deck boards so that<br />
the pedestal is equally recessed on all sides. The cut corners on the<br />
deck boards should be positioned at the four corners.<br />
9<br />
D. If your waterbed features a bookcase headboard, mount it to<br />
the frame now. Secure the headboard to the frame with the flat<br />
brackets screwed in from underneath the headboard behind the<br />
frame. Slide the frame carefully away from the wall a few<br />
inches, if needed, to allow more room to mount. Once mounted<br />
slide the frame back into final position.<br />
E. If you purchased upholstered rail caps, attach them to your<br />
frame now. The padded rail caps slip over the frame edges.<br />
At your option, you may wish to secure the caps onto the frame<br />
with screws, if needed.<br />
STEP 5: INSTALL HEATER UNIT<br />
Unplug heater before filling or draining your waterbed. Follow specific<br />
heater manufacturer’s guidelines for detailed installation instructions.<br />
A. Place the heating pad in the center area of the deck avoiding<br />
the cracks in the deck boards. For Queen or Super Single<br />
place heating pad to one side or the other. Do Not Place Over<br />
Cracks.<br />
B. Mount the thermostat control to either side of the frame,<br />
depending on where you will plug it in. Control unit may mount<br />
to side or underneath. See manufacturer’s instructions. Use the<br />
screws provided. Securely plug the cord from the heating pad<br />
into the thermostat control.<br />
10


