HARDSIDE FLUID SUPPORT ASSEMBLY ... - InnoMax
HARDSIDE FLUID SUPPORT ASSEMBLY ... - InnoMax
HARDSIDE FLUID SUPPORT ASSEMBLY ... - InnoMax

Create successful ePaper yourself
Turn your PDF publications into a flip-book with our unique Google optimized e-Paper software.
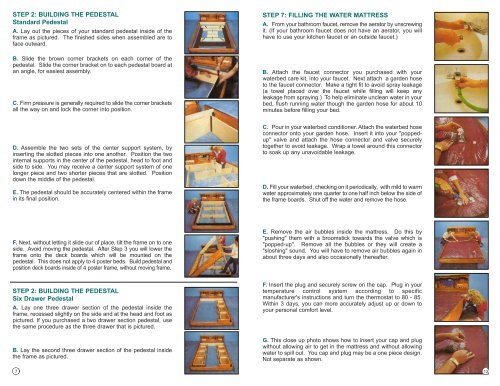
STEP 2: BUILDING THE PEDESTAL<br />
Standard Pedestal<br />
A. Lay out the pieces of your standard pedestal inside of the<br />
frame as pictured. The finished sides when assembled are to<br />
face outward.<br />
B. Slide the brown corner brackets on each corner of the<br />
pedestal. Slide the corner bracket on to each pedestal board at<br />
an angle, for easiest assembly.<br />
C. Firm pressure is generally required to slide the corner brackets<br />
all the way on and lock the corner into position.<br />
STEP 7: FILLING THE WATER MATTRESS<br />
A. From your bathroom faucet, remove the aerator by unscrewing<br />
it. (If your bathroom faucet does not have an aerator, you will<br />
have to use your kitchen faucet or an outside faucet.)<br />
B. Attach the faucet connector you purchased with your<br />
waterbed care kit, into your faucet. Next attach a garden hose<br />
to the faucet connector. Make a tight fit to avoid spray leakage<br />
(a towel placed over the faucet while filling will keep any<br />
leakage from spraying.) To help eliminate unclean water in your<br />
bed, flush running water though the garden hose for about 10<br />
minutes before filling your bed.<br />
D. Assemble the two sets of the center support system, by<br />
inserting the slotted pieces into one another. Position the two<br />
internal supports in the center of the pedestal, head to foot and<br />
side to side. You may receive a center support system of one<br />
longer piece and two shorter pieces that are slotted. Position<br />
down the middle of the pedestal.<br />
E. The pedestal should be accurately centered within the frame<br />
in its final position.<br />
C. Pour in your waterbed conditioner. Attach the waterbed hose<br />
connector onto your garden hose. Insert it into your "poppedup"<br />
valve and attach the hose connector and valve securely<br />
together to avoid leakage. Wrap a towel around this connector<br />
to soak up any unavoidable leakage.<br />
D. Fill your waterbed, checking on it periodically, with mild to warm<br />
water approximately one quarter to one half inch below the side of<br />
the frame boards. Shut off the water and remove the hose.<br />
F. Next, without letting it slide our of place, tilt the frame on to one<br />
side. Avoid moving the pedestal. After Step 3 you will lower the<br />
frame onto the deck boards which will be mounted on the<br />
pedestal. This does not apply to 4 poster beds. Build pedestal and<br />
position deck boards inside of 4 poster frame, without moving frame.<br />
E. Remove the air bubbles inside the mattress. Do this by<br />
"pushing" them with a broomstick towards the valve which is<br />
"popped-up". Remove all the bubbles or they will create a<br />
"sloshing" sound. You will have to remove air bubbles again in<br />
about three days and also occasionally thereafter.<br />
STEP 2: BUILDING THE PEDESTAL<br />
Six Drawer Pedestal<br />
A. Lay one three drawer section of the pedestal inside the<br />
frame, recessed slightly on the side and at the head and foot as<br />
pictured. If you purchased a two drawer section pedestal, use<br />
the same procedure as the three drawer that is pictured.<br />
B. Lay the second three drawer section of the pedestal inside<br />
the frame as pictured.<br />
F. Insert the plug and securely screw on the cap. Plug in your<br />
temperature control system according to specific<br />
manufacturer's instructions and turn the thermostat to 80 - 85.<br />
Within 3 days, you can more accurately adjust up or down to<br />
your personal comfort level.<br />
G. This close up photo shows how to insert your cap and plug<br />
without allowing air to get in the mattress and without allowing<br />
water to spill out. You cap and plug may be a one piece design.<br />
Not separate as shown.<br />
7 12