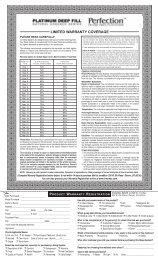
HARDSIDE FLUID SUPPORT ASSEMBLY ... - InnoMax
HARDSIDE FLUID SUPPORT ASSEMBLY ... - InnoMax
HARDSIDE FLUID SUPPORT ASSEMBLY ... - InnoMax

You also want an ePaper? Increase the reach of your titles
YUMPU automatically turns print PDFs into web optimized ePapers that Google loves.
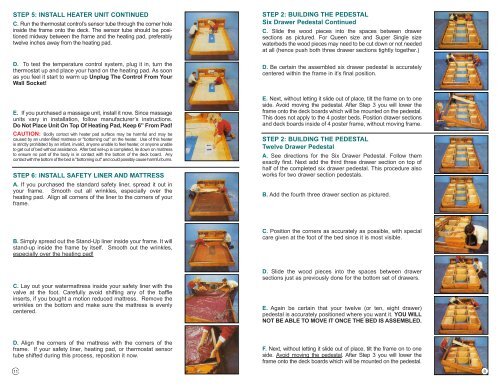
STEP 5: INSTALL HEATER UNIT CONTINUED<br />
C. Run the thermostat control’s sensor tube through the corner hole<br />
inside the frame onto the deck. The sensor tube should be positioned<br />
midway between the frame and the heating pad, preferably<br />
twelve inches away from the heating pad.<br />
D. To test the temperature control system, plug it in, turn the<br />
thermostat up and place your hand on the heating pad. As soon<br />
as you feel it start to warm up Unplug The Control From Your<br />
Wall Socket!<br />
STEP 2: BUILDING THE PEDESTAL<br />
Six Drawer Pedestal Continued<br />
C. Slide the wood pieces into the spaces between drawer<br />
sections as pictured. For Queen size and Super Single size<br />
waterbeds the wood pieces may need to be cut down or not needed<br />
at all (hence push both three drawer sections tightly together.)<br />
D. Be certain the assembled six drawer pedestal is accurately<br />
centered within the frame in it’s final position.<br />
E. If you purchased a massage unit, install it now. Since massage<br />
units vary in installation, follow manufacturer’s instructions.<br />
Do Not Place Unit On Top Of Heating Pad, Keep 6” From Pad!<br />
CAUTION: Bodily contact with heater pad surface may be harmful and may be<br />
caused by an under-filled mattress or "bottoming out" on the heater. Use of this heater<br />
is strictly prohibited by an infant, invalid, anyone unable to feel heater, or anyone unable<br />
to get out of bed without assistance. After bed set-up is completed, lie down on mattress<br />
to ensure no part of the body is in contact with the bottom of the deck board. Any<br />
contact with the bottom of the bed is "bottoming out" and could possibly cause harmful burns.<br />
STEP 6: INSTALL SAFETY LINER AND MATTRESS<br />
A. If you purchased the standard safety liner, spread it out in<br />
your frame. Smooth out all wrinkles, especially over the<br />
heating pad. Align all corners of the liner to the corners of your<br />
frame.<br />
E. Next, without letting it slide out of place, tilt the frame on to one<br />
side. Avoid moving the pedestal. After Step 3 you will lower the<br />
frame onto the deck boards which will be mounted on the pedestal.<br />
This does not apply to the 4 poster beds. Position drawer sections<br />
and deck boards inside of 4 poster frame, without moving frame.<br />
STEP 2: BUILDING THE PEDESTAL<br />
Twelve Drawer Pedestal<br />
A. See directions for the Six Drawer Pedestal. Follow them<br />
exactly first. Next add the third three drawer section on top of<br />
half of the completed six drawer pedestal. This procedure also<br />
works for two drawer section pedestals.<br />
B. Add the fourth three drawer section as pictured.<br />
B. Simply spread out the Stand-Up liner inside your frame. It will<br />
stand-up inside the frame by itself. Smooth out the wrinkles,<br />
especially over the heating pad!<br />
C. Position the corners as accurately as possible, with special<br />
care given at the foot of the bed since it is most visible.<br />
C. Lay out your watermattress inside your safety liner with the<br />
valve at the foot. Carefully avoid shifting any of the baffle<br />
inserts, if you bought a motion reduced mattress. Remove the<br />
wrinkles on the bottom and make sure the mattress is evenly<br />
centered.<br />
D. Slide the wood pieces into the spaces between drawer<br />
sections just as previously done for the bottom set of drawers.<br />
E. Again be certain that your twelve (or ten, eight drawer)<br />
pedestal is accurately positioned where you want it. YOU WILL<br />
NOT BE ABLE TO MOVE IT ONCE THE BED IS ASSEMBLED.<br />
D. Align the corners of the mattress with the corners of the<br />
frame. If your safety liner, heating pad, or thermostat sensor<br />
tube shifted during this process, reposition it now.<br />
F. Next, without letting it slide out of place, tilt the frame on to one<br />
side. Avoid moving the pedestal. After Step 3 you will lower the<br />
frame onto the deck boards which will be mounted on the pedestal.<br />
11<br />
8