99-9009 - Installer.com
99-9009 - Installer.com
99-9009 - Installer.com

Create successful ePaper yourself
Turn your PDF publications into a flip-book with our unique Google optimized e-Paper software.
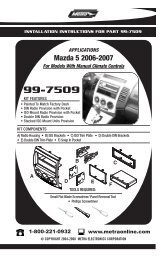
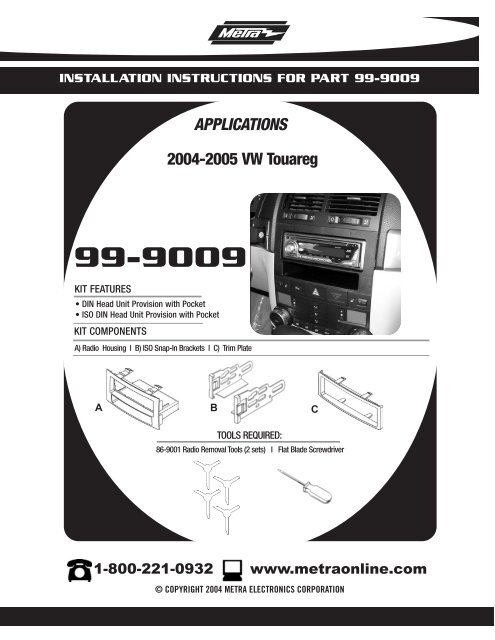
INSTALLATION INSTRUCTIONS FOR PART <strong>99</strong>-<strong>9009</strong><br />
APPLICATIONS<br />
2004-2005 VW Touareg<br />
<strong>99</strong>-<strong>9009</strong><br />
KIT FEATURES<br />
• DIN Head Unit Provision with Pocket<br />
• ISO DIN Head Unit Provision with Pocket<br />
KIT COMPONENTS<br />
A) Radio Housing l B) ISO Snap-In Brackets l C) Trim Plate<br />
A<br />
B<br />
C<br />
TOOLS REQUIRED:<br />
86-9001 Radio Removal Tools (2 sets) I Flat Blade Screwdriver<br />
1-800-221-0932 www.metraonline.<strong>com</strong><br />
© COPYRIGHT 2004 METRA ELECTRONICS CORPORATION
<strong>99</strong>-<strong>9009</strong><br />
Dash Disassembly . . . . . . . . . . . . . . . . . . . . . . . . . . . . . . . . . 1<br />
TABLE OF CONTENTS<br />
Kit Assembly . . . . . . . . . . . . . . . . . . . . . . . . . . . . . . . . . . . . . . 2-3<br />
Final Assembly . . . . . . . . . . . . . . . . . . . . . . . . . . . . . . . . . . . . 4<br />
Notes . . . . . . . . . . . . . . . . . . . . . . . . . . . . . . . . . . . . . . . . . . . 5
<strong>99</strong>-<strong>9009</strong><br />
2004-2005 VW TOUAREG<br />
1<br />
2<br />
Disconnect the negative battery<br />
terminal to prevent an accidental<br />
short circuit.<br />
Insert the long ends of the 86-9001<br />
into the slots on the factory radio<br />
and pull out to remove. (Figure A)<br />
NOTE:<br />
Flat edge of key should point outward.<br />
A<br />
DASH DISASSEMBLY<br />
1
<strong>99</strong>-<strong>9009</strong><br />
DIN HEAD UNIT PROVISIONS<br />
KIT ASSEMBLY<br />
1<br />
2<br />
Slide the DIN cage into the Radio<br />
Housing and secure by bending the<br />
metal locking tabs down. (Figure A)<br />
Slide the aftermarket head unit into<br />
the cage and secure. (Figure B)<br />
A<br />
B<br />
2
<strong>99</strong>-<strong>9009</strong><br />
ISO DIN HEAD UNIT PROVISIONS<br />
1<br />
2<br />
3<br />
Mount the ISO Brackets to the head<br />
unit with the screws supplied with<br />
the unit. (Figure A)<br />
Slide the head unit into the radio<br />
opening until the side clips engage.<br />
(Figure B)<br />
Snap the Trim plate into the Radio<br />
Housing. (Figure B)<br />
A<br />
B<br />
KIT ASSEMBLY<br />
3
<strong>99</strong>-<strong>9009</strong><br />
A<br />
FINAL ASSEMBLY<br />
B<br />
C<br />
D<br />
1 Locate the factory wiring harness in the<br />
dash. Metra re<strong>com</strong>mends using the<br />
proper mating adapter and making the<br />
connections as shown. (Isolate and individually<br />
tape off the ends of any unused<br />
wires to prevent electrical short circuit)<br />
A) Strip wire ends back 1/2"<br />
B) Twist ends together<br />
C) Solder<br />
D) Tape<br />
2 Re-connect the negative battery terminal<br />
and test the unit for proper operation.<br />
3 Reassemble radio and dash assemblies in<br />
reverse order of disassembly.<br />
4
<strong>99</strong>-<strong>9009</strong><br />
NOTES<br />
5
INST<strong>99</strong><strong>9009</strong><br />
1-800-221-0932 www.metraonline.<strong>com</strong><br />
© COPYRIGHT 2004 METRA ELECTRONICS CORPORATION