Digital Timer - Jasco Products
Digital Timer - Jasco Products
Digital Timer - Jasco Products

Create successful ePaper yourself
Turn your PDF publications into a flip-book with our unique Google optimized e-Paper software.
If your <strong>Timer</strong> looks like this,<br />
use the following instructions<br />
If your <strong>Timer</strong> does not look<br />
like this, go to the next page<br />
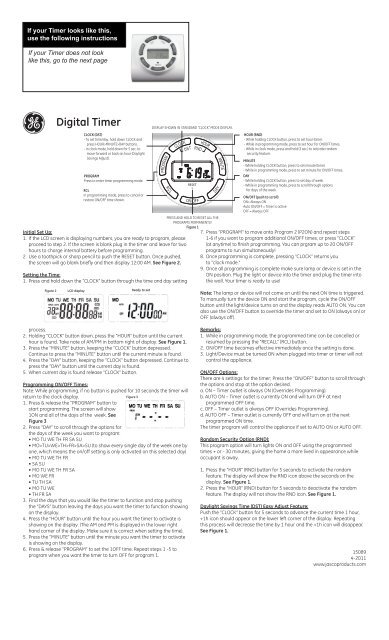
<strong>Digital</strong> <strong>Timer</strong><br />
CLOCK (DST)<br />
- To set time/day, hold down CLOCK and<br />
press HOUR>MINUTE>DAY buttons.<br />
- In clock mode, hold down for 5 sec. to<br />
move forward or back an hour (Daylight<br />
Savings Adjust).<br />
PROGRAM<br />
Press to enter timer programming mode.<br />
RCL<br />
In programming mode, press to cancel or<br />
restore ON/OFF time shown.<br />
Initial Set Up:<br />
1. If the LCD screen is displaying numbers, you are ready to program, please<br />
proceed to step 2. If the screen is blank plug in the timer and leave for two<br />
hours to charge internal battery before programming.<br />
2. Use a toothpick or sharp pencil to push the RESET button. Once pushed,<br />
the screen will go blank briefly and then display 12:00 AM. See Figure 2.<br />
Setting the Time:<br />
1. Press and hold down the “CLOCK” button through the time and day setting<br />
DISPLAY SHOWN IN STANDARD “CLOCK” MODE DISPLAY.<br />
RESET<br />
PRESS AND HOLD TO RESET ALL THE<br />
PROGRAMS PERMANENTLY<br />
Figure 1<br />
HOUR (RND)<br />
- While holding CLOCK button, press to set hour (time).<br />
- While in programming mode, press to set hour for ON/OFF times.<br />
- While in clock mode, press and hold (3 sec.) to activate random<br />
security feature.<br />
MINUTE<br />
- While holding CLOCK button, press to set minute (time).<br />
- While in programming mode, press to set minute for ON/OFF times.<br />
DAY<br />
- While holding CLOCK button, press to set day of week.<br />
- While in programming mode, press to scroll through options<br />
for days of the week.<br />
ON/OFF (push to scroll)<br />
ON= Always ON<br />
Auto ON/OFF = <strong>Timer</strong> is active<br />
OFF = Always OFF<br />
7. Press "PROGRAM" to move onto Program 2 (P2ON) and repeat steps<br />
1-6 if you want to program additional ON/OFF times, or press "CLOCK"<br />
(at anytime) to finish programming. You can prgram up to 20 ON/OFF<br />
programs to run simultaneously!<br />
8. Once programming is complete, pressing "CLOCK" returns you<br />
to "clock mode."<br />
9. Once all programming is complete make sure lamp or device is set in the<br />
ON position. Plug the light or device into the timer and plug the timer into<br />
the wall. Your timer is ready to use!<br />
Figure 2 LCD display Ready to set<br />
process.<br />
2. Holding “CLOCK” button down, press the “HOUR” button until the current<br />
hour is found. Take note of AM/PM in bottom right of display. See Figure 1.<br />
3. Press the “MINUTE” button, keeping the “CLOCK” button depressed.<br />
Continue to press the “MINUTE” button until the current minute is found.<br />
4. Press the “DAY” button, keeping the “CLOCK” button depressed. Continue to<br />
press the “DAY” button until the current day is found.<br />
5. When current day is found release "CLOCK" button.<br />
Programming ON/OFF Times:<br />
Note: While programming, if no button is pushed for 10 seconds the timer will<br />
return to the clock display.<br />
1. Press & release the “PROGRAM” button to<br />
start programming. The screen will show<br />
1ON and all of the days of the week. See<br />
Figure 3<br />
2. Press ”DAY” to scroll through the options for<br />
the days of the week you want to program:<br />
• MO TU WE TH FR SA SU<br />
Figure 3<br />
• MO>TU>WE>TH>FR>SA>SU (to show every single day of the week one by<br />
one, which means the on/off setting is only activated on this selected day)<br />
• MO TU WE TH FR<br />
• SA SU<br />
• MO TU WE TH FR SA<br />
• MO WE FR<br />
• TU TH SA<br />
• MO TU WE<br />
• TH FR SA<br />
3. Find the days that you would like the timer to function and stop pushing<br />
the “DAYS” button leaving the days you want the timer to function showing<br />
on the display.<br />
4. Press the “HOUR” button until the hour you want the timer to activate is<br />
showing on the display. (The AM and PM is displayed in the lower right<br />
hand corner of the display. Make sure it is correct when setting the time).<br />
5. Press the “MINUTE” button until the minute you want the timer to activate<br />
is showing on the display.<br />
6. Press & release “PROGRAM” to set the 1OFF time. Repeat steps 1 -5 to<br />
program when you want the timer to turn OFF for program 1.<br />
Note: The lamp or device will not come on until the next ON time is triggered.<br />
To manually turn the device ON and start the program, cycle the ON/OFF<br />
button until the light/device turns on and the display reads AUTO ON. You can<br />
also use the ON/OFF button to override the timer and set to ON (always on) or<br />
OFF (always off).<br />
Remarks:<br />
1. While in programming mode, the programmed time can be cancelled or<br />
resumed by pressing the “RECALL” (RCL) button.<br />
2. ON/OFF time becomes effective immediately once the setting is done.<br />
3. Light/Device must be turned ON when plugged into timer or timer will not<br />
control the appliance.<br />
ON/OFF Options:<br />
There are 4 settings for the timer; Press the “ON/OFF” button to scroll through<br />
the options and stop at the option desired.<br />
a. ON – <strong>Timer</strong> outlet is always ON (Overrides Programming).<br />
b. AUTO ON – <strong>Timer</strong> outlet is currently ON and will turn OFF at next<br />
programmed OFF time.<br />
c. OFF – <strong>Timer</strong> outlet is always OFF (Overrides Programming).<br />
d. AUTO OFF – <strong>Timer</strong> outlet is currently OFF and will turn on at the next<br />
programmed ON time.<br />
The timer program will control the appliance if set to AUTO ON or AUTO OFF.<br />
Random Security Option (RND):<br />
This program option will turn lights ON and OFF using the programmed<br />
times + or - 30 minutes, giving the home a more lived in appearance while<br />
occupant is away.<br />
1. Press the “HOUR” (RND) button for 5 seconds to activate the random<br />
feature. The display will show the RND icon above the seconds on the<br />
display. See Figure 1.<br />
2. Press the “HOUR” (RND) button for 5 seconds to deactivate the random<br />
feature. The display will not show the RND icon. See Figure 1.<br />
Daylight Savings Time (DST) Easy Adjust Feature:<br />
Push the “CLOCK” button for 5 seconds to advance the current time 1 hour,<br />
+1h icon should appear on the lower left corner of the display. Repeating<br />
this process will decrease the time by 1 hour and the +1h icon will disappear.<br />
See Figure 1.<br />
15089<br />
4-2011<br />
www.jascoproducts.com
If your <strong>Timer</strong> looks like this,<br />
use the following instructions<br />
If your <strong>Timer</strong> does not look like<br />
this, go to the previous page<br />
Install Set Up:<br />
<strong>Digital</strong> <strong>Timer</strong><br />
Models: 15042, 15089, and 15079<br />
1. If the time screen is completely blank it will need to be plugged into an outlet<br />
before programming can begin. If the screen is displaying numbers, it can be<br />
programmed and plugged into the wall afterwards.<br />
2. Before programming, all settings should be reset. The reset button is located<br />
just below the “HOUR” button and is identified by an “R”. Use a paper clip or<br />
ball point pen to push the “R” button. Once pushed the screen will show the<br />
display below on the screen. See Diagram A<br />
Diagram A<br />
After few seconds<br />
Manual Override Option:<br />
Independent of the programming, it is possible at any given time to advance to<br />
the next switching command by continuously pressing the key “MANUAL” ,as<br />
shown below:<br />
AUTO OFF ON AUTO ON OFF<br />
ON = Always ON;<br />
OFF = Always OFF;<br />
AUTO ON = <strong>Timer</strong> is ON and ON/OFF program is activated.<br />
AUTO OFF = <strong>Timer</strong> is OFF and ON/OFF program is activated.<br />
Programming the Countdown Feature:<br />
1. Press the “SET” button repeatedly until the CTD icon appears on the display.<br />
Refer to Diagram D<br />
2. Press the “HOUR”, “MIN” buttons to set the amount of time desired for the<br />
device to be on before turning off.<br />
3. Press the “CLOCK” button to store the setting and return to the main display.<br />
Diagram D<br />
Current Time Setting:<br />
1. Keep the “CLOCK” button pressed during the entire setting operation.<br />
2. Press the “HOUR” button to set the hours.<br />
3. Press the “MIN” button to set the minutes.<br />
4. Press the “DAY” button to select the correct day of the week.<br />
5. Release the “CLOCK” button. The time will now be set!<br />
Programming the On/Off Times:<br />
1. Press the “SET” button once. Diagram B should appear.<br />
2. 1 ON --:-- Should be the first setting. There are a total of 20 On/Off settings.<br />
Diagram B<br />
Activating the Countdown Feature:<br />
1. Press the “HOUR” and “MIN” button simultaneously to activate the<br />
countdown feature. Refer to Diagram E for more details<br />
2. Other Features of the Countdown<br />
a. Press the “MANUAL” button to pause or continue the countdown.<br />
b. Press the “CLOCK” button to switch between the clock and countdown<br />
display.<br />
c. Press “HOUR” and “MIN” button simultaneously to deactivate the<br />
countdown.<br />
Diagram E<br />
HOUR + MIN<br />
HOUR + MIN<br />
3. Press the “HOUR” and MIN” buttons to set the ON time.<br />
4. Press the “DAY” button to select the day(s) that this setting is relevant.<br />
5. Press the “SET” button to save and proceed to the 1 OFF --:-- screen.<br />
6. Repeat steps 3, 4, and 5 to set the OFF time. Pressing the “SET” button again<br />
will take you through the other 19 ON/OFF settings.<br />
Multiple Weekday Switching Groups:<br />
Apart from individual week days, pressing the “DAY” button also selects multiple<br />
day combinations such as:<br />
‧Monday thru Friday<br />
‧Tuesday & Thursday & Saturday<br />
‧Saturday & Sunday<br />
‧Monday thru Wednesday.<br />
‧Monday thru Saturday<br />
‧Thursday thru Saturday.<br />
‧Monday & Wednesday & Friday ‧Monday thru Sunday.<br />
After selecting a particular day combination, the ON/OFF selection will be in<br />
effect on the day configuration selected from above.<br />
Restart Button:<br />
1. Press the “SET” button to select the ON/OFF setting that needs to be changed<br />
2. Press the “ ” button to reset the current ON/OFF setting seen in Diagram C<br />
without having to scroll through all the hours.<br />
Diagram C<br />
Current time display<br />
Current time display<br />
Countdown pause<br />
Random, ON/OFF Setting:<br />
1. Press the “HOUR” button for 3 seconds to activate the random feature. The<br />
display will show the RND icon. See Diagram F.<br />
2. Press the “HOUR” button for 3 seconds to deactivate the random feature. The<br />
display will not show the RND icon.<br />
Diagram F<br />
MANUAL<br />
Hour<br />
CLOCK<br />
End of countdown ON<br />
Show current time<br />
Summer Time Feature (DST):<br />
Push the “CLOCK” button for 3 seconds to advance the current time 1 hour, +1h<br />
icon should appear on the display. Repeating this process will decrease the time<br />
by 1 hour and the +1h icon will disappear. Refer to Diagram G<br />
Diagram G<br />
Clock<br />
Switching Mode Indication:<br />
The actual mode is shown in the display as “ON”, “AUTO ON”, “OFF” or<br />
“AUTO OFF” together with the time of day. Use the “MANUAL” button to adjust<br />
this to the desired setting. This can be used to override the timer as explained<br />
below.<br />
Power Back Up Feature:<br />
In the event of a power failure, the timer will retain its settings for an estimated 3<br />
months assuming the power back up is fully charged.