instruction and operation manual - Jordair Compressors Inc.
instruction and operation manual - Jordair Compressors Inc.
instruction and operation manual - Jordair Compressors Inc.

Create successful ePaper yourself
Turn your PDF publications into a flip-book with our unique Google optimized e-Paper software.
AIR TEST PROCEDURES:<br />
<br />
<br />
<br />
<br />
<br />
<br />
<br />
<br />
<br />
<br />
<br />
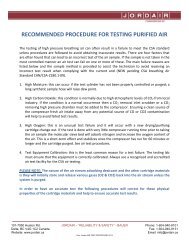
Follow the manufacturer’s recommended procedure for the filter change.<br />
Check the setting of the Pressure Maintaining Valve (PMV) <strong>and</strong> ensure it is set at 1800 PSIG to<br />
2500 PSIG to provide efficient adsorption of moisture <strong>and</strong> other impurities by the filter cartridge.<br />
Operate the compressor for 90 to 120 minutes before proceeding with the air test.<br />
In order to balance the new cartridge the filter system must be depressurized to about 200 PSIG<br />
three times to release the retained O2 <strong>and</strong> CO2 from within the desiccant cell structure.<br />
After 60 minutes of <strong>operation</strong> slowly open the lower vent valve on the PMV valve <strong>and</strong> bleed out<br />
the pressure in the filter system. This must be done slowly to avoid physical damage to the filter<br />
media due to rapid depressurization of the system.<br />
To avoid any issues of rapid decompression of the filter system it is prudent to install an orifice<br />
up-stream of the vent valve.<br />
Close the valve <strong>and</strong> allow the unit to come up to pressure, repeat this twice more to ensure any<br />
adsorbed O2 or CO2 has come out of the adsorbing materials.<br />
Connect the sample cylinder directly to the compressor discharge point located after the filter<br />
system. Using a stainless steel connecting line to the sample cylinder will ensure the most<br />
accurate test results. A long length of high-pressure flex hose can affect the moisture content of<br />
the air due to moisture migration into the material.<br />
Follow the accredited laboratory’s procedure for filling the sample cylinder. When using another<br />
sample cylinder, it is safe practice to purge <strong>and</strong> leave a positive pressure of 200 PSIG in the<br />
sample cylinder before taking the actual test sample. The positive pressure of 200 PSIG will avoid<br />
any atmospheric moisture entering the cylinder during the purging process.<br />
Now the system is ready <strong>and</strong> the test sample can be taken with the confidence that it will be<br />
accurate <strong>and</strong> provide the desired test results.<br />
Fill the test cylinder <strong>and</strong> send it to the testing lab. Best test results will be achieved by using the<br />
air test cylinder supplied by the designated Lab.<br />
101-7950 Huston Rd.<br />
Delta, BC V4G 1C2 Canada<br />
Website: www.jordair.ca<br />
JORDAIR – “RELIABILITY & SAFETY” - BAUER Phone: 1-604-940-8101<br />
Fax: 1-604-940-8131<br />
Email: info@jordair.ca<br />
Doc. <strong>Jordair</strong> AIR-TEST-PROCEDURE-2013<br />
23