11 Replacing bulbs - JustAnswer
11 Replacing bulbs - JustAnswer
11 Replacing bulbs - JustAnswer

Create successful ePaper yourself
Turn your PDF publications into a flip-book with our unique Google optimized e-Paper software.
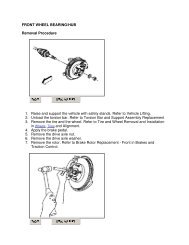
Maintenance and service<br />
<strong>Replacing</strong> <strong>bulbs</strong><br />
HB5019EB<br />
Wattage<br />
Bulb No.<br />
1 Headlight<br />
GT and OUTBACK models<br />
Low beam 12V–55W H1<br />
High beam 12V–60W 9005 (HB3)<br />
Except GT and OUTBACK models 12V–65/55W 9007 (HB5)<br />
2 Front turn signal 12V–27W <strong>11</strong>56NA (Amber)<br />
3 Spot light 12V–8W —<br />
4 Dome light 12V–8W —<br />
5 Door step light 12V–3.4W —<br />
6 Front turn signal light/<br />
parking and front side marker light 12V–27/8W <strong>11</strong>57NA (Amber)<br />
7 Front fog light<br />
Except OUTBACK 12V–55W H3<br />
OUTBACK 12V–51W 9006 (HB4)<br />
<strong>11</strong><br />
– CONTINUED –<br />
<strong>11</strong>-55
HBF013FC<br />
HBB033BC<br />
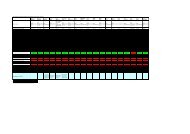
Wattage<br />
Bulb No.<br />
8 Backup light<br />
Sedan 12V–27W 3156K<br />
Station wagon 12V–27W <strong>11</strong>56<br />
9 Luggage area light 12V–13W 912<br />
Q High mount stop light<br />
Sedan 12V–16W 921<br />
Station wagon 12V–13W 912<br />
W Rear turn signal light<br />
Sedan 12V–21W —<br />
Station wagon 12V–21W 7440<br />
E Brake/tail light<br />
Sedan 12V–27/8W 3157K<br />
Station wagon 12V–27/8W <strong>11</strong>57<br />
R Licence plate light<br />
Sedan 12V–5W 168<br />
Station wagon 12V–3.8W or 5W 194 or 168<br />
T Trunk room light 12V–5W W5W<br />
<strong>11</strong>-56
Maintenance and service<br />
Headlight<br />
CAUTION<br />
Halogen headlight <strong>bulbs</strong> become very hot while in use. If you<br />
touch the bulb surface with bare hands or greasy gloves, finger<br />
prints or grease on the bulb surface develop into hot spots, causing<br />
the bulb to break. If there are finger prints or grease on the<br />
bulb surface, wipe them away with a soft cloth moistened with alcohol.<br />
NOTE<br />
If headlight aiming is required, consult your SUBARU dealer for<br />
proper adjustment of the headlight aim.<br />
For GT and OUTBACK models<br />
HBB039BA<br />
HBB040BB<br />
Remove the headlight bulb cover, by turning it counterclockwise.<br />
<strong>11</strong><br />
– CONTINUED –<br />
<strong>11</strong>-57
n Low beam light <strong>bulbs</strong><br />
HBB041BB<br />
HBB042BA<br />
1. Disconnect the electrical connector for the black cable.<br />
2. Remove the retainer spring.<br />
3. Replace the bulb, then set the retainer spring securely.<br />
4. Reconnect the electrical connector for black cable.<br />
5. Install the headlight bulb cover.<br />
n High beam light <strong>bulbs</strong><br />
HBB043BA<br />
HBB044BB<br />
1. Disconnect the electrical connector from the bulb.<br />
2. Remove the bulb from the headlight assembly by turning it counterclockwise.<br />
3. Replace the bulb with new one.<br />
4. Reconnect the electrical connector. At this time, use care not to<br />
touch the bulb surface.<br />
<strong>11</strong>-58
Maintenance and service<br />
5. To install the bulb to the headlight assembly, turn it clockwise until<br />
it clicks.<br />
6. Install the headlight bulb cover.<br />
Except GT and OUTBACK models<br />
HBB045BB<br />
HBB046BA<br />
1. Disconnect the electrical connector while pressing the lock release<br />
tab.<br />
2. Remove the bulb holder from the headlight assembly by turning it<br />
counterclockwise.<br />
3. Remove the bulb from the headlight assembly.<br />
4. Install the new bulb.<br />
5. Install the bulb holder in the headlight assembly by turning it clockwise<br />
until it locks.<br />
6. Remove the electrical connector.<br />
Front fog light (if equipped)<br />
It may be difficult to replace the <strong>bulbs</strong>. Have your SUBARU dealer<br />
replace the <strong>bulbs</strong> if necessary.<br />
<strong>11</strong><br />
Front turn signal light, parking light and side marker<br />
light<br />
The headlight assembly must be removed before the front turn signal<br />
light and parking light <strong>bulbs</strong> can be replaced. When the headlight assembly<br />
has been removed and then reinstalled, it may become necessary<br />
to make a headlight aiming adjustment. After a bulb has been replaced,<br />
it is recommended that the headlight aiming adjustment be<br />
– CONTINUED –<br />
<strong>11</strong>-59
made at a SUBARU dealer.<br />
HBB016BA<br />
1. Remove the headlight assembly mounting screws located at the top<br />
of and the front of the headlight assembly using a phillips screwdriver or<br />
an open-end wrench.<br />
2. Move the headlight assembly forward.<br />
HBB039CB<br />
HBB020BA<br />
3. Remove the bulb socket from the headlight assembly by turning it<br />
counterclockwise.<br />
4. Remove the bulb from the socket by pushing it and turning counterclockwise.<br />
Install a new bulb in the socket.<br />
5. Set the bulb socket into the headlight assembly and turn it clockwise<br />
until it locks.<br />
6. Set the headlight assembly into the vehicle body. Tighten the mounting<br />
screws.<br />
<strong>11</strong>-60
Maintenance and service<br />
Rear combination lights<br />
Sedan<br />
HBF014DA<br />
HBB034BC<br />
HBB035BB<br />
1. Open the trunk lid.<br />
2. Open the rear combination light cover.<br />
For covers on the trunk lid:<br />
Unlatch the cover by pushing the knob and open the cover.<br />
For covers on the trunk wall:<br />
Unlatch the cover by moving the knob upward and open the cover.<br />
3. Remove the bulb socket from the light assembly by turning it counterclockwise.<br />
4. Remove the bulb from the socket.<br />
Rear turn signal light: Remove the bulb from the socket by pushing<br />
it and turning it counterclockwise.<br />
Others: Pull the bulb out of the socket.<br />
<strong>11</strong><br />
– CONTINUED –<br />
<strong>11</strong>-61
5. Install a new bulb in the socket.<br />
6. Set the bulb socket into the rear combination light assembly and<br />
turn it clockwise until it locks.<br />
7. Close the cover and latch the clock.<br />
Station wagon<br />
n Brake/tail and rear turn signal light <strong>bulbs</strong><br />
It may be difficult to replace the <strong>bulbs</strong>. It is recommended that you<br />
have the <strong>bulbs</strong> replaced by your SUBARU dealer.<br />
HBB021BB<br />
HBB022BB<br />
1. Remove the light bulb replacement service hole covers at two<br />
places by prying the edge of the cover with a regular screwdriver.<br />
2. Remove the upper and lower nuts. Then, slide the rear combination<br />
lamp assembly to the rear and remove it from the vehicle.<br />
HBB070BB<br />
<strong>11</strong>-62
Maintenance and service<br />
3. Using a Phillips screwdriver, remove the upper and lower screws<br />
that secure the side cover of the rear combination light assembly.<br />
4. Remove the bulb socket from the rear combination light assembly<br />
by turning it counterclockwise.<br />
HBB048BB<br />
HBB025BB<br />
5. Remove the bulb from the socket.<br />
Turn signal light: Pull the bulb out of the socket.<br />
Brake/tail light: Remove the bulb from the socket by pushing it and<br />
turning it counterclockwise.<br />
6. Install a new bulb in the socket.<br />
7. Set the bulb holder into the rear combination light assembly and<br />
turn it clockwise until it locks.<br />
8. Using a Phillips screwdriver, install the side cover to the rear combination<br />
light assembly.<br />
9. Fit the rear combination light assembly into the vehicle body and<br />
tighten the nuts from the interior of the vehicle.<br />
10. Reinstall the light bulb replacement service hole covers.<br />
<strong>11</strong><br />
– CONTINUED –<br />
<strong>11</strong>-63
n Back-up and brake/tail light <strong>bulbs</strong><br />
HBB026BC<br />
HBB025BA<br />
1. Unlatch the rear finisher light cover by moving the knob upward.<br />
Open the cover up.<br />
2. Remove the bulb socket from the rear finisher light assembly by<br />
turning it counterclockwise.<br />
3. Remove the bulb from the socket by pushing it and turning counterclockwise.<br />
Install a new bulb in the socket.<br />
4. Set the bulb holder into the rear finisher light assembly and turn it<br />
clockwise until it locks.<br />
5. Close the cover and latch the lock.<br />
License plate light<br />
HBF013EA<br />
HBB027BA<br />
1. Remove the mounting screws using a phillips screwdriver.<br />
<strong>11</strong>-64
Maintenance and service<br />
2. Remove the cover and lens.<br />
3. Pull the bulb out of the socket. Install a new bulb.<br />
4. Reinstall the lens and cover.<br />
5. Tighten the mounting screws.<br />
Map light, dome light, luggage compartment light and<br />
door step light<br />
HBB029BD<br />
HBB068BD<br />
<strong>11</strong><br />
HSA005BB<br />
HBB067BB<br />
– CONTINUED –<br />
<strong>11</strong>-65
HBS037AB<br />
1. Remove the lens by prying the edge of the lens with a regular screwdriver.<br />
2. Pull the bulb out of the socket. Install a new bulb.<br />
3. Reinstall the lens.<br />
Trunk light<br />
HBF014FA<br />
1. Remove the cover by squeezing its sides and pulling it.<br />
2. Pull the bulb out of the socket. Install a new bulb.<br />
3. Reinstall the cover.<br />
<strong>11</strong>-66
Maintenance and service<br />
High mount stop light<br />
Sedan<br />
OM-H2350<br />
1. Remove the high mount stop light cover by prying on the edge<br />
with a screwdriver.<br />
2. Pull the bulb out of the socket. Install a new bulb.<br />
3. Reinstall the cover.<br />
Station wagon<br />
<strong>11</strong><br />
HBB028BA<br />
1. Remove the mounting screw covers by prying on the edge with a<br />
screwdriver.<br />
2. Remove the mounting screws using a phillips screwdriver and then<br />
remove the high mount stop light cover.<br />
3. Pull the bulb out of the socket. Install a new bulb.<br />
– CONTINUED –<br />
<strong>11</strong>-67
4. Reinstall the cover.<br />
5. Tighten the mounting screws then reinstall the covers.<br />
NOTE<br />
Other <strong>bulbs</strong> may be difficult to replace. Have your SUBARU dealer<br />
replace these <strong>bulbs</strong> if necessary.<br />
<strong>11</strong>-68