Rear Web Ledge Brake Assembly ITEM PART ... - JustAnswer
Rear Web Ledge Brake Assembly ITEM PART ... - JustAnswer
Rear Web Ledge Brake Assembly ITEM PART ... - JustAnswer

You also want an ePaper? Increase the reach of your titles
YUMPU automatically turns print PDFs into web optimized ePapers that Google loves.
<strong>Rear</strong> <strong>Web</strong> <strong>Ledge</strong> <strong>Brake</strong> <strong>Assembly</strong><br />
<strong>ITEM</strong> <strong>PART</strong><br />
NUMBER<br />
DESCRIPTION<br />
1<br />
(2<br />
Req'd)<br />
20310-S <strong>Rear</strong> Wheel Cylinder Retaining<br />
Bolt<br />
2 55690-S7 Locknut<br />
3 2211 <strong>Brake</strong> Backing Plate<br />
4 2262 <strong>Rear</strong> Wheel Cylinder<br />
5 2A642 Primary <strong>Brake</strong> Shoe Parking<br />
<strong>Brake</strong><br />
Lever Link<br />
6 2A601 Parking <strong>Brake</strong> Link Spring<br />
7 2A637 <strong>Rear</strong> Parking <strong>Brake</strong> Lever<br />
8 2106 Parking <strong>Brake</strong> Lever Pin Retainer<br />
9 2027 Parking <strong>Brake</strong> Lever Bolt<br />
10 2219 Secondary Shoe <strong>Assembly</strong><br />
11 2A179 Cable Guide
12 2068 <strong>Brake</strong> Shoe Hold Down Spring<br />
13 2108 Adjusting Lever Pin<br />
14 2A180 Adjusting Lever Return Spring<br />
15 2A176 <strong>Brake</strong> Shoe Adjusting Lever<br />
16 2047 <strong>Brake</strong> Shoe Adjusting Screw Nut<br />
17 2049 <strong>Brake</strong> Shoe Adjusting Screw<br />
Spring<br />
18 2041 <strong>Brake</strong> Adjuster Screw<br />
19 2200 Primary Shoe Lining<br />
20 2068 <strong>Brake</strong> Shoe Hold Down Spring<br />
21 2200 Primary Shoe<br />
22 2296 <strong>Brake</strong> Shoe Retracting Spring<br />
23 2A178 <strong>Brake</strong> Shoe Adjusting Lever<br />
Cable<br />
24 2092 <strong>Brake</strong> Adjusting Hole Cover<br />
25 2069 <strong>Brake</strong> Shoe Hold Down Spring<br />
Pin<br />
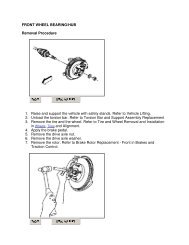
INSTALLATION<br />
1. Clean the ledge pads on the brake backing plate.<br />
2. Apply a lithium-base grease, Premium Long-Life Grease XG-1-C or -K (ESA-M1C75-B)<br />
or equivalent or Disc <strong>Brake</strong> Caliper Lubricant D7AZ-19590-A (ESA-M1C172A) or<br />
equivalent to the contacts of the brake shoe retracting spring and the brake shoe hold<br />
down spring on the rear brake shoes and linings and brake backing plate.<br />
3. Apply a lithium-base grease, Premium Long-Life Grease XG-1-C or -K (ESA-M1C75-B)<br />
or equivalent or Disc <strong>Brake</strong> Caliper Lubricant D7AZ-19590-A (ESA-M1C172A) or<br />
equivalent to the threads and socket end of the brake adjuster screw.<br />
4. Install the upper brake shoe retracting spring on the primary and secondary rear brake<br />
shoes and linings as shown above.<br />
5. Position the rear brake shoe and lining on the brake backing plate with the push rods of the<br />
rear wheel cylinder in the slots of the rear brake shoe and lining.<br />
6. Install the brake shoe hold down springs. Use Hold Down Spring Tool T73T-2300-A.<br />
7. Install the brake adjuster screw with the slot in the head of the brake adjuster screw<br />
toward the primary rear brake shoe and lining.<br />
8. Install the lower brake shoe retracting spring, adjusting lever return spring, adjusting lever<br />
assembly (part of brake shoe adjusting lever kit), and connect the rear parking brake cable<br />
to the adjusting lever.<br />
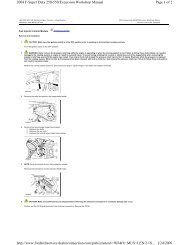
<strong>Brake</strong> Adjusting Screw
NOTE: Install the brake adjuster screws in the same locations from which they were removed.<br />
Interchanging them from one side of the vehicle to the other will cause the rear brake shoes and<br />
linings to retract rather than expand each time the automatic adjusting mechanism is operated.<br />
To prevent incorrect installation, the socket end of each adjusting screw is stamped with an R or<br />
L to indicate their installation on the right or left side of the vehicle. The adjusting pivot nuts can<br />
be distinguished by the number of lines machined around the body of the nut. Two lines indicate<br />
a right-hand nut; one line indicates a left-hand nut.<br />
9. Position the brake shoe adjusting lever cable in the cable guide and install the cable<br />
anchor fitting on the anchor pin.<br />
10. Install the rear parking brake cable in the anchor pin and washer and secure with the<br />
retaining nut behind the brake backing plate.<br />
11. Adjust the brakes before installing the brake drums.
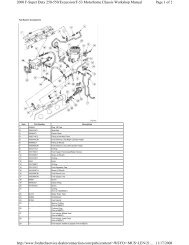
<strong>ITEM</strong> <strong>PART</strong><br />
NUMBER<br />
DESCRIPTION<br />
1 2261 <strong>Rear</strong> Wheel Cylinder<br />
2 2200 <strong>Rear</strong> <strong>Brake</strong> Shoe and Lining Secondary<br />
3 2A179 Cable Guide<br />
4 2A637 Parking <strong>Brake</strong> Lever<br />
5 2A178 <strong>Brake</strong> Shoe Adjusting Lever Cable<br />
6 -- Over Travel Spring<br />
(Part of 2A178)<br />
7 2A176 <strong>Brake</strong> Shoe Adjusting Lever Kit<br />
8 2047 <strong>Brake</strong> Shoe Adjusting Screw Nut<br />
9 2200 <strong>Rear</strong> <strong>Brake</strong> Shoe and Lining Primary<br />
10 2049 <strong>Brake</strong> Shoe Adjusting Screw Spring
11 2068 <strong>Brake</strong> Shoe Hold Down Spring<br />
12 2296 <strong>Brake</strong> Shoe Retracting Spring<br />
13 2028 <strong>Brake</strong> Shoe Anchor Pin Guide Plate<br />
14 2027 Parking <strong>Brake</strong> Lever Bolt<br />
15 4001 <strong>Rear</strong> Axle<br />
16 2248 Bolt<br />
17 384568-S100 Retainer Clamp (DRW Vehicles Use<br />
Retaining Bracket)<br />
18 34449-S312 Nut<br />
19 351453-S8 Washer