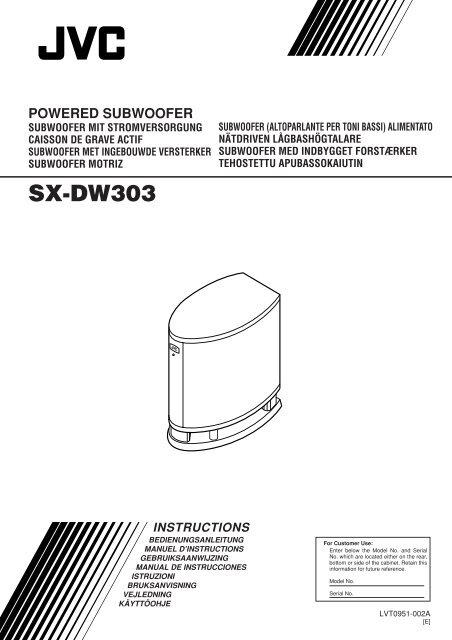
compact component system sx-dw303 powered subwoofer - JVC
compact component system sx-dw303 powered subwoofer - JVC
compact component system sx-dw303 powered subwoofer - JVC

You also want an ePaper? Increase the reach of your titles
YUMPU automatically turns print PDFs into web optimized ePapers that Google loves.
English<br />
POWERED SUBWOOFER<br />
COMPACT COMPONENT SYSTEM<br />
SUBWOOFER MIT STROMVERSORGUNG<br />
CAISSON DE GRAVE ACTIF<br />
SUBWOOFER MET INGEBOUWDE VERSTERKER<br />
SUBWOOFER MOTRIZ<br />
SX-DW303<br />
SUBWOOFER (ALTOPARLANTE PER TONI BASSI) ALIMENTATO<br />
NÄTDRIVEN LÅGBASHÖGTALARE<br />
SUBWOOFER MED INDBYGGET FORSTÆRKER<br />
TEHOSTETTU APUBASSOKAIUTIN<br />
INSTRUCTIONS<br />
BEDIENUNGSANLEITUNG<br />
MANUEL D’INSTRUCTIONS<br />
GEBRUIKSAANWIJZING<br />
MANUAL DE INSTRUCCIONES<br />
ISTRUZIONI<br />
BRUKSANVISNING<br />
VEJLEDNING<br />
KÄYTTÖOHJE<br />
– 1 –<br />
For Customer Use:<br />
Enter below the Model No. and Serial<br />
No. which are located either on the rear,<br />
bottom or side of the cabinet. Retain this<br />
information for future reference.<br />
Model No.<br />
Serial No.<br />
LVT0951-002A<br />
[E]
IMPORTANT for the U.K.<br />
DO NOT cut off the mains plug from this equipment. If the plug fitted<br />
is not suitable for the power points in your home or the cable is too<br />
short to reach a power point, then obtain an appropriate safety<br />
approved extension lead or consult your dealer.<br />
BE SURE to replace the fuse only with an identical approved type,<br />
as originally fitted.<br />
If nonetheless the mains plug is cut off ensure to remove the fuse<br />
and dispose of the plug immediately, to avoid a possible shock<br />
hazard by inadvertent connection to the mains supply.<br />
If this product is not supplied fitted with a mains plug then follow the<br />
instructions given below:<br />
IMPORTANT:<br />
DO NOT make any connection to the terminal which is marked with<br />
the letter E or by the safety earth symbol or coloured green or greenand-yellow.<br />
The wires in the mains lead on this product are coloured in<br />
accordance with the following code:<br />
Blue : Neutral<br />
Brown : Live<br />
As these colours may not correspond with the coloured markings<br />
identifying the terminals in your plug proceed as follows:<br />
The wire which is coloured blue must be connected to the terminal<br />
which is marked with the letter N or coloured black.<br />
The wire which is coloured brown must be connected to the terminal<br />
which is marked with the letter L or coloured red.<br />
IF IN DOUBT - CONSULT A COMPETENT ELECTRICIAN.<br />
— SAFETY INSTRUCTIONS —<br />
“SOME DOS AND DON’TS ON THE SAFE USE OF EQUIPMENT”<br />
This equipment has been designed and manufactured to meet<br />
international safety standards but, like any electrical equipment, care<br />
must be taken if you are to obtain the best results and safety is to be<br />
assured.<br />
Do read the operating instructions before you attempt to use the<br />
equipment.<br />
Do ensure that all electrical connections (including the mains plug,<br />
extension leads and interconnections between pieces of equipment)<br />
are properly made and in accordance with the manufacturer’s<br />
instructions. Switch off and withdraw the mains plug when making or<br />
changing connections.<br />
Do consult your dealer if you are ever in doubt about the installation,<br />
operation or safety of your equipment.<br />
Do be careful with glass panels or doors on equipment.<br />
DON’T continue to operate the equipment if you are in any doubt about<br />
it working normally, or if it is damaged in any way—switch off, withdraw<br />
the mains plug and consult your dealer.<br />
DON’T remove any fixed cover as this may expose dangerous voltages.<br />
DON’T leave equipment switched on when it is unattended unless it is<br />
specifically stated that it is designed for unattended operation or has a<br />
standby mode.<br />
Switch off using the switch on the equipment and make sure that your<br />
family know how to do this.<br />
Special arrangements may need to be made for infirm of handicapped<br />
people.<br />
DON’T use equipment such as personal stereos or radios so that you<br />
are distracted from the requirements of traffic safety. It is illegal to watch<br />
television whilst driving.<br />
DON’T listen to headphones at high volume as such use can<br />
permanently damage your hearing.<br />
DON’T obstruct the ventilation of the equipment, for example with<br />
curtains or soft furnishing.<br />
Overheating will cause damage and shorten the life of the equipment.<br />
DON’T use makeshift stands and NEVER fix legs with wood screws—<br />
to ensure complete safety always fit the manufacturer’s approved stand<br />
or legs with the fixings provided according to the instructions.<br />
DON’T allow electrical equipment to be exposed to rain or moisture.<br />
Thank you for purchasing a <strong>JVC</strong> speaker.<br />
Before you begin using it, please read the instructions carefully<br />
to be sure you get the best possible performance. If you have any<br />
questions, consult your <strong>JVC</strong> dealer.<br />
Warnings, Cautions and Others<br />
To reduce the risk of electrical shocks, fire, etc.:<br />
1. Do not remove screws, covers or cabinet.<br />
2. Do not expose this appliance to rain or moisture.<br />
Caution—POWER switch<br />
This apparatus is provided with the POWER switch to minimize<br />
power consumption for safe use. Therefore,<br />
1. Before doing initial settings, complete all the connections<br />
required, connect the mains plug into the wall outlet, then set<br />
the POWER switch to ON [ ❙ ].<br />
2. When not in use, set the POWER switch to OFF [ ‡ ].<br />
This disconnects the mains line.<br />
Cautions<br />
• Do not block the ventilation openings or holes.<br />
(If the ventilation openings or holes are blocked by a<br />
newspaper or cloth, etc., the heat may not be able to get out.)<br />
• Do not place any naked flame sources, such as lighted<br />
candles, on the apparatus.<br />
• When discarding batteries, environmental problems must be<br />
considered and local rules or laws governing the disposal of<br />
these batteries must be followed strictly.<br />
• Do not expose this apparatus to rain, moisture, dripping or<br />
splashing and that no objects filled with liquids, such as vases,<br />
shall be placed on the apparatus.<br />
Caution—Proper Ventilation<br />
To avoid risk of electric shock and fire, and to prevent damage,<br />
locate the apparatus as follows:<br />
1 Front:<br />
No obstructions and open spacing.<br />
2 Sides/ Top/ Back:<br />
No obstructions should be placed in the areas shown by the<br />
dimensions below.<br />
3 Bottom:<br />
Place on the level surface. Maintain an adequate air path<br />
for ventilation by placing on a stand with a height of 10 cm<br />
or more.<br />
Front view<br />
15 cm<br />
20 cm<br />
15 cm<br />
10 cm<br />
Side view<br />
20 cm<br />
20 cm<br />
ABOVE ALL.<br />
– NEVER let anyone, especially children, push anything into holes,<br />
slots or any other opening in the case—this could result in a fatal<br />
electrical shock;<br />
– NEVER guess or take chances with electrical equipment of any kind—<br />
it is better to be safe than sorry!<br />
– 2 –
Precautions for installation<br />
• To prevent deformation or discoloration of the<br />
cabinet, do not install the unit where it is exposed<br />
to direct sunlight or high humidity, and avoid<br />
installation near air conditioning outlets.<br />
• Speaker vibrations may cause howling. Place the<br />
unit as far away from the player as possible.<br />
• Take the occurrence of earthquakes or other<br />
physical shocks into consideration when selecting<br />
the installation place, and secure the unit<br />
thoroughly.<br />
• This unit is magnetically shielded to avoid color distortions on<br />
TVs. However, if not installed properly, it may cause color<br />
distortions. So, pay attention to the following when installing<br />
the unit.<br />
– When placing this unit near a TV set, turn off the TV’s main<br />
power switch or unplug it before installing this unit.<br />
Then wait at least 30 minutes before turning on the TV’s<br />
main power switch again.<br />
Some TVs may still be affected even though you have followed<br />
the above. If this happens, move this unit away from the TV.<br />
• Tuner reception may become noisy or hissing if this unit is<br />
installed nearby the tuner. In this case, leave a more distance<br />
between the tuner and this unit or use an outdoor antenna for<br />
better tuner reception without interference from this unit.<br />
Precautions for Daily Use<br />
• To maintain the appearance of the unit<br />
Wipe with a dry, soft cloth if the cabinet or control panel should<br />
become dirty.<br />
If very dirty, apply a small amount of water or neutral detergent<br />
to the cloth and wipe clean. Then wipe with a dry cloth.<br />
• To improve the sound field<br />
If the speakers are facing a solid wall or glass<br />
door, etc., it is recommended to furnish the wall<br />
with materials that absorb sounds, for example by<br />
hanging up thick curtains, to prevent reflections<br />
and standing waves.<br />
Checking the Supplied Accessories<br />
Check to be sure you have the following supplied accessories.<br />
The number in parenthesis indicates the quantity of the piece<br />
supplied.<br />
• Monaural audio cord (1)<br />
If the item mentioned above is missing, contact your dealer<br />
immediately.<br />
Sisältö<br />
Indhold Innehåll<br />
Indice Contenido Inhoud Contenus Inhalt<br />
Contents<br />
Warnings, Cautions and Others ........................................ 2<br />
Connections ..................................................................... 4<br />
Checking Your Amplifier ..................................................... 4<br />
Connecting to the Amplifier ............................................... 4<br />
Operations ....................................................................... 6<br />
Additional Information .................................................... 8<br />
Warnungen, Vorsichtshinweise usw. .................................. 9<br />
Anschlüsse .................................................................... 10<br />
Überprüfen Ihres Verstärkers........................................... 10<br />
Anschließen an den Verstärker........................................ 10<br />
Vorderansicht ................................................................. 12<br />
Zusätzliche Informationen ............................................ 14<br />
Avertissements, précautions et autres ............................ 15<br />
Connexions .................................................................... 16<br />
Vérification de votre amplificateur ................................... 16<br />
Connexion de l’amplificateur ........................................... 16<br />
Fonctionnement ............................................................ 18<br />
Informations complémentaires .................................... 20<br />
Waarschuwingen en andere aandachtspunten ............... 21<br />
Aansluiten ...................................................................... 22<br />
Controle van uw versterker .............................................. 22<br />
Verbinden met de versterker ........................................... 22<br />
Bediening ....................................................................... 24<br />
Extra informatie ............................................................. 26<br />
Advertencias, precauciones y notas ................................ 27<br />
Conexiones .................................................................... 28<br />
Verificación de su amplificador ........................................ 28<br />
Conexión al amplificador ................................................. 28<br />
Operaciones ................................................................... 30<br />
Información adicional ................................................... 32<br />
Avvertenze, Precauzioni e Altro ...................................... 33<br />
Collegamenti .................................................................. 34<br />
Controllo dell’amplificatore .............................................. 34<br />
Collegamento all’amplificatore ........................................ 34<br />
Funzionamento .............................................................. 36<br />
Ulteriori informazioni .................................................... 38<br />
Varningar, försiktighetsåtgärder m.m. .............................. 39<br />
Anslutningar .................................................................. 40<br />
Kontroll av förstärkaren ................................................... 40<br />
Inkoppling till förstärkaren ............................................... 40<br />
Drift ................................................................................. 42<br />
Ytterligare information .................................................. 44<br />
Advarsler, forsigtighedsregler og andet ........................... 45<br />
Forbindelser ................................................................... 46<br />
Sådan kontrollerer du din forstærker ............................... 46<br />
Sådan forbindes der til forstærkeren ............................... 46<br />
Betjening ........................................................................ 48<br />
Yderligere oplysninger ................................................. 50<br />
Varoituksia, huomautuksia ym. ........................................ 51<br />
Liitännät ......................................................................... 52<br />
Vahvistimen tarkistaminen ............................................... 52<br />
Vahvistimen liitäntä .......................................................... 52<br />
Käyttö ............................................................................. 54<br />
Lisätietoja ....................................................................... 56<br />
English<br />
Suomi Dansk Svenska Italiano Español Nederlands Français Deutesch<br />
– 3 –
MIN<br />
MAX<br />
VOLUME<br />
RIGHT<br />
RIGHT<br />
FREQUENCY<br />
50Hz<br />
200Hz<br />
AUTO POWER ON/STANDBY<br />
POWER<br />
PHASE<br />
NORMAL<br />
REVERSE<br />
OFF<br />
ON<br />
CANCEL<br />
RIGHT<br />
ON<br />
CUT OFF FILTER<br />
LEFT/MONO<br />
LEFT<br />
INPUT 2<br />
(HIGH-LEVEL)<br />
LEFT<br />
VARIABLE<br />
FIXED<br />
INPUT 1<br />
(LOW-LEVEL)<br />
TO MAIN<br />
SPEAKERS<br />
Connections<br />
Checking Your Amplifier<br />
Before connecting this unit to your amplifier (or receiver), check<br />
what types of connecting terminals your amplifier has.<br />
Follow the instructions below to find a proper connection method<br />
for your equipment.<br />
• Illustrations of jacks and terminals in this manual may be<br />
different from the ones actually used for your amplifier. The<br />
illustrations are of the most used type.<br />
First check whether your amplifier has a <strong>subwoofer</strong> output<br />
jack.<br />
It is usually named and printed as the “SUBWOOFER OUT” or<br />
“SUBWOOFER.”<br />
Before connecting this unit to the amplifier (or receiver),<br />
observe the following carefully.<br />
• Before connecting this unit to an amplifier, turn off the<br />
amplifier first.<br />
• Make all connections before plugging in this unit.<br />
• DO NOT use the INPUT 1 (LOW-LEVEL) and INPUT 2<br />
(HIGH-LEVEL) terminals on the rear of this unit at the<br />
same time; otherwise, noise will be heard and may<br />
damage the unit.<br />
• DO NOT connect this unit to the REC OUT jacks of your<br />
amplifier.<br />
If you cannot<br />
find any<br />
SUBWOOFER<br />
OUT<br />
If you find it on your amplifier, follow Connecting Method Å.<br />
Connecting to the Amplifier<br />
When connecting to your amplifier (or receiver), refer also the<br />
manual supplied for your equipment.<br />
Connecting Method Å<br />
Connect an amplifier having a <strong>subwoofer</strong> output jack to the<br />
LEFT/MONO jack of the INPUT 1 (LOW-LEVEL) terminal.<br />
Preparation:<br />
Use the supplied monaural<br />
audio cord.<br />
Next check whether your amplifier has line output jacks.<br />
They are usually named and printed as “LINE OUT” or “LINE<br />
OUTPUT.”<br />
LINE OUT<br />
Main (Front) Speakers<br />
(not supplied)<br />
L<br />
R<br />
SUBWOOFER<br />
OUT<br />
If you find them on your amplifier, follow Connecting Method<br />
ı.<br />
If you cannot<br />
find any<br />
Your Amplifier<br />
Monaural audio cord<br />
(supplied)<br />
Follow Connecting Method Ç.<br />
This connection can be used for any amplifier, by connecting the<br />
front speaker terminals of the amplifier (usually named and<br />
printed as “FRONT SPEAKERS” or “MAIN SPEAKERS”).<br />
RIGHT<br />
LEFT/MONO<br />
INPUT 1<br />
(LOW-LEVEL)<br />
FRONT SPEAKERS<br />
SX-DW303<br />
To an AC outlet<br />
RIGHT<br />
LEFT<br />
When using Connecting Method Å, no signal comes out of<br />
the TO MAIN SPEAKERS terminal.<br />
– 4 –
MIN<br />
MAX<br />
POWER<br />
VOLUME<br />
NORMAL<br />
REVERSE<br />
RIGHT<br />
RIGHT<br />
OFF<br />
FREQUENCY<br />
50Hz<br />
200Hz<br />
AUTO POWER ON/STANDBY<br />
PHASE<br />
ON<br />
CANCEL<br />
RIGHT<br />
ON<br />
CUT OFF FILTER<br />
LEFT/MONO<br />
LEFT<br />
LEFT<br />
VARIABLE<br />
FIXED<br />
INPUT 1<br />
(LOW-LEVEL)<br />
INPUT 2<br />
(HIGH-LEVEL)<br />
TO MAIN<br />
SPEAKERS<br />
MIN<br />
MAX<br />
VOLUME<br />
RIGHT<br />
RIGHT<br />
FREQUENCY<br />
50Hz<br />
200Hz<br />
AUTO POWER ON/STANDBY<br />
POWER<br />
PHASE<br />
NORMAL<br />
REVERSE<br />
OFF<br />
ON<br />
CANCEL<br />
RIGHT<br />
ON<br />
CUT OFF FILTER<br />
LEFT/MONO<br />
INPUT 1<br />
(LOW-LEVEL)<br />
LEFT<br />
INPUT 2<br />
(HIGH-LEVEL)<br />
LEFT<br />
VARIABLE<br />
FIXED<br />
TO MAIN<br />
SPEAKERS<br />
Connecting Method ı<br />
Connect an amplifier having line output jacks to the INPUT 1<br />
(LOW-LEVEL) terminal.<br />
FRONT SPEAKERS<br />
English<br />
Preparation:<br />
Purchase a stereo audio cord at<br />
an audio shop or electric shop.<br />
RIGHT<br />
LEFT<br />
Your Amplifier<br />
Speaker cords<br />
(not supplied)<br />
Main (Front) Speakers<br />
(not supplied)<br />
RIGHT<br />
LEFT<br />
INPUT 2<br />
(HIGH-LEVEL)<br />
LINE OUT<br />
L<br />
R<br />
SX-DW303<br />
To an AC<br />
outlet<br />
RIGHT<br />
LEFT<br />
TO MAIN<br />
SPEAKERS<br />
Your Amplifier<br />
SX-DW303<br />
RIGHT<br />
To an AC outlet<br />
Stereo audio cord<br />
(not supplied)<br />
LEFT/MONO<br />
INPUT 1<br />
(LOW-LEVEL)<br />
Right speaker<br />
Speaker cords<br />
(not supplied)<br />
Main (Front) Speakers<br />
(not supplied)<br />
Left speaker<br />
How to connect the speaker cords:<br />
1 Press and hold the clamp of the speaker terminal.<br />
2 Insert the end of the speaker cord into the terminal as<br />
illustrated below.<br />
• Match the polarity of the speaker terminals: ª to ª and ·<br />
to ·.<br />
3 Release the finger from the clamp.<br />
1 2 3<br />
If your amplifier has only a monaural line output (MONO)<br />
jack, connect it to the LEFT/MONO jack of the INPUT 1<br />
(LOW-LEVEL) terminal (see Connecting Method Å).<br />
Connecting Method Ç<br />
Connect an amplifier without a <strong>subwoofer</strong> output jack and line<br />
output jacks to the INPUT 2 (HIGH-LEVEL) terminal.<br />
• When this method is used, connect your main (front) speakers<br />
to the TO MAIN SPEAKERS terminal on the rear of this unit.<br />
Preparation:<br />
Purchase speaker cords at an<br />
audio shop or electric shop.<br />
• When you connect main (front) speakers to the TO MAIN<br />
SPEAKERS terminal, use the speakers within the<br />
impedance range indicated by the amplifier connected to<br />
the INPUT 2 (HIGH-LEVEL) terminal. If not, the amplifier<br />
connected to the INPUT 2 (HIGH-LEVEL) terminal may<br />
malfunction and be damaged.<br />
• DO NOT connect more than one speaker to one speaker<br />
terminal.<br />
– 5 –
Operations<br />
Front view<br />
Power<br />
lamp<br />
Turning On the Power—POWER Å<br />
Press the ON [ ❙ ] portion of the POWER switch.<br />
The main power turns on and the power lamp in the front panel<br />
lights in green.<br />
• The power lamp lights in red when the AUTO POWER ON/<br />
STANDBY places the unit into standby mode (see page 7).<br />
To completely cut off the power to this unit<br />
Press the OFF [ ‡ ] portion of the POWER switch.<br />
This will disconnect the mains lead.<br />
Rear view<br />
Adjusting the Volume—VOLUME ı<br />
Adjust the volume output level through this unit while comparing<br />
with the sounds coming out of the main (front) speakers.<br />
• Once you have adjusted the volume output level of this unit,<br />
you do not need to adjust it each time you use this unit.<br />
Adjusting the volume level on the connected amplifier will also<br />
adjust the volume level through this unit.<br />
1 Turn the VOLUME knob to the MIN position.<br />
VOLUME<br />
MIN<br />
MAX<br />
ı<br />
VOLUME<br />
Î<br />
PHASE<br />
‰<br />
AUTO POWER<br />
ON/STANDBY<br />
VOLUME FREQUENCY<br />
MIN<br />
50Hz<br />
MAX<br />
200Hz<br />
PHASE<br />
CUT OFF FILTER<br />
NORMAL<br />
VARIABLE<br />
REVERSE<br />
FIXED<br />
AUTO POWER ON/STANDBY<br />
RIGHT LEFT/MONO<br />
ON<br />
CANCEL<br />
INPUT 1<br />
(LOW-LEVEL)<br />
RIGHT<br />
LEFT<br />
INPUT 2<br />
(HIGH-LEVEL)<br />
Ç<br />
FREQUENCY<br />
Ç<br />
CUT OFF<br />
FILTER<br />
2 Turn on the connected amplifier and start playing a<br />
source.<br />
Playback sounds come out of the main (front) speakers and<br />
this unit.<br />
3 Adjust the VOLUME knob to obtain a well-balanced sound<br />
level with that of the main (front) speakers.<br />
VOLUME<br />
TO MAIN<br />
SPEAKERS<br />
MIN<br />
RIGHT<br />
LEFT<br />
Å<br />
POWER<br />
POWER<br />
OFF<br />
ON<br />
MAX<br />
If the volume is set at a high level before starting play, the<br />
sudden blast of sound energy can permanently damage<br />
your hearing and/or ruin your speakers.<br />
– 6 –
Adjusting the Crossover Frequency<br />
—CUT OFF FILTER and FREQUENCY Ç<br />
You can adjust the crossover frequency to determine the bass<br />
sound level this unit handles.<br />
• Once it is set, only the sounds below the frequency come out<br />
of the built-in speaker.<br />
When the main speakers in use are <strong>JVC</strong>’s SX-XD33<br />
Press in the CUT OFF FILTER button to set it to the _ FIX<br />
position.<br />
CUT OFF FILTER<br />
VARIABLE<br />
FIX<br />
• The FREQUENCY knob is deactivated.<br />
• When your amplifier is equipped with crossover frequency<br />
setting, set it within the range of 100 Hz to 150 Hz.<br />
• When your amplifier is equipped with speaker size setting,<br />
select “small.”<br />
If your amplifier is not provided with a crossover<br />
frequency setting:<br />
1 Press out the CUT OFF FILTER button to set it to the —<br />
VARIABLE position.<br />
Now the FREQUENCY knob is activated and you can adjust<br />
the crossover frequency on this unit.<br />
CUT OFF FILTER<br />
VARIABLE<br />
FIX<br />
2 Turn the FREQUENCY knob to obtain the best matching<br />
crossover frequency with your main speakers.<br />
Adjust the frequency (50 Hz to 200 Hz) while listening to<br />
playback sound coming out of both the main speakers and this<br />
unit.<br />
FREQUENCY<br />
50Hz<br />
Changing the Phase—PHASE Î<br />
You can change the sound phase to match your preference.<br />
Select either “NORMAL” or “REVERSE” to obtain a better bass<br />
sound.<br />
Press in or out the PHASE button to select either the<br />
NORMAL position or the REVERSE position.<br />
PHASE<br />
NORMAL<br />
REVERSE<br />
• NORMAL : Normally select this.<br />
• REVERSE: Select this when you feel the bass sound is better<br />
with this mode rather than with “NORMAL.”<br />
Operating the Unit Automatically According to the<br />
Incoming Signals—AUTO POWER ON/STANDBY ‰<br />
By using this function, this unit automatically enters standby<br />
mode even though the POWER switch is turned ON [ ❙ ].<br />
Press the AUTO POWER ON/STANDBY button to the — ON<br />
position.<br />
AUTO POWER ON / STANDBY<br />
ON<br />
CANCEL<br />
• If no sound comes in for about 10 minutes, the unit<br />
automatically enters standby mode. The power lamp lights in<br />
red. Then if the unit detects incoming signals, this unit starts<br />
operating automatically (the power lamp now lights in green).<br />
If Auto Power On/Standby does not work correctly (see<br />
“MEMO” below), press out the AUTO POWER ON/STANDBY<br />
button to set it to the _ CANCEL position. Auto Power On/<br />
Standby is canceled.<br />
AUTO POWER ON / STANDBY<br />
English<br />
200Hz<br />
• If your main speakers can reproduce the bass sound well,<br />
adjust the frequency at a lower level.<br />
• If you feel bass sounds are not sufficient, adjust the<br />
frequency at a higher level.<br />
ON<br />
CANCEL<br />
When the volume level of the amplifier is so low or the<br />
incoming signals are so weak that this unit cannot detect<br />
sounds, Auto Power On/Standby may not work correctly.<br />
• This unit may enter standby mode even though signals<br />
are coming in.<br />
• This unit may not start operating after entering standby<br />
mode, even though signals start coming in.<br />
– 7 –
Additional Information<br />
Speaker layout<br />
To obtain the best possible sound from your unit:<br />
—Place a <strong>subwoofer</strong> wherever you like since bass sound is nondirectional.<br />
Normally place it in front of you.<br />
—Place all the main speakers at the same distance from the<br />
listening position.<br />
Left front<br />
speaker<br />
Center<br />
speaker<br />
Right front<br />
speaker<br />
Subwoofer<br />
Listening position<br />
Left rear<br />
speaker<br />
Right rear<br />
speaker<br />
Troubleshooting<br />
Use this chart to help you solve daily operational problems. If there is any problem you cannot solve, contact your dealer.<br />
Symptom<br />
Possible Cause<br />
Action<br />
Power does not come on.<br />
Auto Power On/Standby does not function<br />
correctly.<br />
No sound is heard<br />
Sounds fluctuate (suddenly become loud<br />
or soft).<br />
Suddenly no sound comes out.<br />
Specifications<br />
Is the unit pugged in?<br />
Signals are too weak or volume level is too<br />
low.<br />
Is the VOLUME knob turned to the MIN<br />
position?<br />
Connections are incorrect, or loose.<br />
Audio signals through the amplifier are<br />
extremely weak.<br />
The built-in protective circuit is working.<br />
The unit is overloaded because of a large<br />
volume.<br />
Type : Powered <strong>subwoofer</strong><br />
Bass-reflex type, (magnetically shielded type)<br />
Speaker unit : 16.0 cm cone (× 1)<br />
Frequency range : 30 Hz to 200 Hz<br />
Input impedance : 50 kΩ (LOW-LEVEL)<br />
470 Ω (HIGH-LEVEL)<br />
Input terminals : INPUT 1 (LOW-LEVEL)<br />
INPUT 2 (HIGH-LEVEL)<br />
Power requirements : AC 230 V , 50 Hz<br />
Output power of built-in amp : 100 W (45 Hz, 4 Ω, 10 % THD)<br />
Power consumption : 27 W (in operation)<br />
9 W (on standby with Auto Power On/Standby)<br />
Dimensions : 217 mm (width) × 393 mm (height) × 376 mm (depth)<br />
Mass : 9.2 kg<br />
Accessories : Monaural audio cord (× 1)<br />
– 8 –<br />
Plug the AC power cord firmly into the AC<br />
outlet.<br />
This is not a malfunction. If this happens,<br />
cancel Auto Power On/Standby.<br />
Turn the VOLUME knob until a suitable<br />
volume is found.<br />
Check the connections. If incorrect, redo<br />
the corrections. (See pages 4 and 5.)<br />
Increase the volume level on the amplifier.<br />
Lower the volume level on the amplifier so<br />
that the symptom will not occur.<br />
If the power lamp lights in red (on standby).<br />
1 Turn down the volume,<br />
2 Turn off the power,<br />
3 Turn on the power again, then<br />
4 Adjust the volume.<br />
If the power lamp lights in green (in<br />
operation).<br />
1 Turn down the volume of the playing<br />
source.<br />
2 Turn off the power of the playing<br />
source,<br />
3 Turn on the power of the playing<br />
source, then<br />
4 Adjust the volume of the playing<br />
source.
VICTOR COMPANY OF JAPAN, LIMITED<br />
EN, GE, FR, NL, SP, IT, SW, DA, FI<br />
– 10 –<br />
0702NSMMDWJSC


![TH-V70R[B] revision - JVC](https://img.yumpu.com/23738839/1/184x260/th-v70rb-revision-jvc.jpg?quality=85)