Download PDF instructions for Leaf Blower Vacuum - Coopers of ...
Download PDF instructions for Leaf Blower Vacuum - Coopers of ...
Download PDF instructions for Leaf Blower Vacuum - Coopers of ...

You also want an ePaper? Increase the reach of your titles
YUMPU automatically turns print PDFs into web optimized ePapers that Google loves.
<strong>Leaf</strong> <strong>Blower</strong> Vac 9242<br />
Instructions<br />
WARNING SYMBOLS<br />
Some <strong>of</strong> the following symbols may be used on your<br />
<strong>Leaf</strong> <strong>Blower</strong> Vac. Please look at them and understand<br />
their meaning. Correct interpretation <strong>of</strong> these symbols<br />
will allow you to operate the tool safely.<br />
Symbol Explanation<br />
WARNING!<br />
This warning symbol is displayed on the leaf<br />
blower vac to remind you <strong>of</strong> the safety<br />
precautions you should take when operating it.<br />
WARNING!<br />
This leaf blower vac should only be used by<br />
those persons who have read and understood<br />
all the safety and operating instruction<br />
contained in the instruction manual. Be aware<br />
<strong>of</strong> the safety <strong>of</strong> all persons in the work area at<br />
all times.<br />
WARNING!<br />
Switch the leaf blower vac OFF and disconnect<br />
from the mains supply be<strong>for</strong>e making<br />
adjustments, cleaning blockages, or starting<br />
any cleaning and maintenance procedures.<br />
WARNING!<br />
Keep other people out <strong>of</strong> the work area!<br />
WARNING!<br />
Do not use this leaf blower vac in the rain.<br />
Avoid using it in damp conditions.<br />
WARNING!<br />
When using this leaf blower vac, always wear<br />
protective glasses and ear protectors.<br />
WARNING!<br />
Read these safety and operating <strong>instructions</strong> in<br />
this booklet and keep them in a safe place <strong>for</strong><br />
future reference.<br />
WARNING!<br />
Dangerous vacuum openings. Keep hands and<br />
feet out <strong>of</strong> the openings while the machine is<br />
running.<br />
WARNING!<br />
Rotating Fans. Keep hands and feet out <strong>of</strong> the<br />
openings while the machine is running.<br />
ENVIRONMENTAL PROTECTION<br />
Waste electrical products should not be<br />
disposed <strong>of</strong> with household waste. Please<br />
recycle where facilities exist. Check with your<br />
local authority or retailer <strong>for</strong> recycling advice.<br />
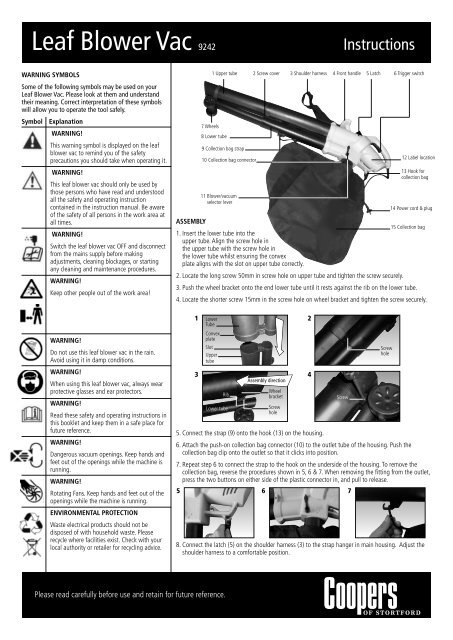
7 Wheels<br />
1 Upper tube 2 Screw cover<br />
8 Lower tube<br />
9 Collection bag strap<br />
10 Collection bag connector<br />
11 <strong>Blower</strong>/vacuum<br />
selector lever<br />
3 Shoulder harness 4 Front handle 5 Latch 6 Trigger switch<br />
12 Label location<br />
13 Hook <strong>for</strong><br />
collection bag<br />
14 Power cord & plug<br />
ASSEMBLY<br />
15 Collection bag<br />
1. Insert the lower tube into the<br />
upper tube. Align the screw hole in<br />
the upper tube with the screw hole in<br />
the lower tube whilst ensuring the convex<br />
plate aligns with the slot on upper tube correctly.<br />
2. Locate the long screw 50mm in screw hole on upper tube and tighten the screw securely.<br />
3. Push the wheel bracket onto the end lower tube until it rests against the rib on the lower tube.<br />
4. Locate the shorter screw 15mm in the screw hole on wheel bracket and tighten the screw securely.<br />
1<br />
Lower<br />
Tube<br />
Convex<br />
plate<br />
Slot<br />
Upper<br />
tube<br />
3 4<br />
Assembly direction<br />
Rib<br />
Lower tube<br />
Wheel<br />
bracket<br />
Screw<br />
hole<br />
5. Connect the strap (9) onto the hook (13) on the housing.<br />
6. Attach the push-on collection bag connector (10) to the outlet tube <strong>of</strong> the housing. Push the<br />
collection bag clip onto the outlet so that it clicks into position.<br />
7. Repeat step 6 to connect the strap to the hook on the underside <strong>of</strong> the housing. To remove the<br />
collection bag, reverse the procedures shown in 5, 6 & 7. When removing the fitting from the outlet,<br />
press the two buttons on either side <strong>of</strong> the plastic connector in, and pull to release.<br />
5 6 7<br />
8. Connect the latch (5) on the shoulder harness (3) to the strap hanger in main housing. Adjust the<br />
shoulder harness to a com<strong>for</strong>table position.<br />
2<br />
Screw<br />
Screw<br />
hole<br />
Please read carefully be<strong>for</strong>e use and retain <strong>for</strong> future reference.
BEFORE USE<br />
• Ensure you are wearing suitable clothing, footwear and safety equipment, e.g.<br />
safety glasses, ear protection and face mask if necessary.<br />
• Ensure the attachments to the leaf blower vac are correctly fitted and adjusted.<br />
• Be aware <strong>of</strong> people and animals in the area where you are to be operating the<br />
leaf blower vac.<br />
• Check the item <strong>for</strong> damage be<strong>for</strong>e use. Do NOT use if any part is damaged.<br />
• Periodically check all fixings are secure and tighten if necessary.<br />
OPERATION<br />
• Plug the power cord into an RCD unit (not supplied) and switch on.<br />
• To start the leaf blower vac, ensure the leaf blower vac nozzle is pointed in a<br />
safe direction, select the desired operation (E) by moving the blower/vacuum<br />
selector lever (11) to either blower or vacuum position and depress the trigger<br />
switch (F).<br />
• Do NOT start the tool when it is upside down or when it is not in the<br />
operating position.<br />
E<br />
F<br />
<strong>Blower</strong>/vacuum selector lever<br />
Trigger switch<br />
• To turn the leaf blower vac <strong>of</strong>f, simply release the trigger switch.<br />
• After releasing the trigger switch to turn the leaf blower <strong>of</strong>f, switch <strong>of</strong>f at the<br />
mains and remove plug from RCD socket.<br />
• When the blower operation is selected, air is drawn up through the large tube<br />
and then expelled at a much higher velocity in the lower cavity below the tube.<br />
Ensure when the blower operation is selected the leaf blower vac is directed<br />
and used in a safe manner.<br />
• When the vacuum operation is selected, air and debris are drawn up through<br />
the large vac tube, and <strong>for</strong>ced through the mulching impellor. The debris is<br />
shredded and then passed into the collection bag.<br />
• To empty the collection bag, simply open the zip and empty the contents.<br />
Ensure the zip is closed prior to operating the leaf blower vac.<br />
• For better per<strong>for</strong>mance and com<strong>for</strong>t, it is recommended the collection bag is<br />
emptied when approximately half full. This reduces the weight and also allows<br />
the leaf blower vac operation to per<strong>for</strong>m at its highest level.<br />
• Always vacuum dry leaves, cuttings or general garden debris. Wet materials are<br />
difficult to mulch and also can cause the leaf blower vac to clog.<br />
• If the leaves, etc. are damp, then use the leaf blower vac to blow the leaves<br />
etc. into one area, and vacuum the leaves when they are dry.<br />
WARNING<br />
Failure to follow all <strong>instructions</strong> listed below may result in electric shock, fire<br />
and/or serious injury.<br />
• Always ensure the collection bag is correctly attached.<br />
• This product is only designed <strong>for</strong> garden debris like leaves, twigs and garden<br />
cuttings.<br />
• Ensure any <strong>for</strong>eign objects are removed from the work area be<strong>for</strong>e use.<br />
• Keep children and pets and any other obstruction away from the work area.<br />
Maintain a safe distance <strong>of</strong> at least 5m from other people, pets or obstructions<br />
when using the leaf blower vac.<br />
• Only use in a well-lit, well ventilated area.<br />
• Do NOT use in wet weather, in damp conditions or with wet hands.<br />
• Do NOT use around flammable liquids, gases or in dusty areas.<br />
• Do NOT use with adaptor sockets.<br />
• Do NOT <strong>for</strong>ce the vacuum/blower selector lever. The lever should move with<br />
very little resistance. If the lever is difficult to move, disconnect the power<br />
supply, remove the collection bag and ensure any debris, dirt or mud has been<br />
removed from around the lever.<br />
• When selecting either functions, ensure the selector lever is correctly located in<br />
one position or the other.<br />
• Do NOT use the leaf blower vac on areas where there are stones, or other<br />
hard objects, which will cause damage to the leaf blower vac. It is also<br />
advisable not to allow the leaf blower vac to pick up soil which when<br />
combined with other garden debris can clog the leaf blower vac.<br />
• Do NOT use the leaf blower vac on loose, gravel surfaces.<br />
• Do NOT allow the leaf blower vac to pick up any burning or smouldering<br />
materials such as hot ashes, cigarette butts, etc.<br />
• The leaf blower vac is not a rubbish disposal unit. Do NOT attempt to shred<br />
any material other than general garden waste.<br />
• Do NOT carry or unplug by pulling on the power cord. Always grip the plug<br />
when unplugging.<br />
• Keep the power cord away from heat, oil, sharp edges and moving parts.<br />
• If an extension cord is required, use a suitable extension cord rated <strong>for</strong> outdoor<br />
use and that is fitted securely and cannot disconnect during use.<br />
• Do NOT direct the air flow or debris from this leaf blower vac directly or<br />
indirectly towards another person or pet.<br />
• Do NOT use while you are tired or under the influence <strong>of</strong> drugs, alcohol, or<br />
medication.<br />
• Always wear eye protection, a dust mask/faceguard, long trousers, work<br />
gloves, suitable non-slip footwear, head and ear protection.<br />
• Ensure the switch is in the <strong>of</strong>f position be<strong>for</strong>e plugging in.<br />
• Ensure a firm footing and good balance at all times during use.<br />
• Do NOT wear loose clothing or jewellery. Keep your hair, clothing and gloves<br />
away from moving parts.<br />
• Always disconnect from the power supply after use and be<strong>for</strong>e cleaning.<br />
• Store in a cool, dry place.<br />
• Keep out <strong>of</strong> the reach <strong>of</strong> children.<br />
• Do NOT use <strong>for</strong> any purpose other than those specified in this instruction<br />
manual.
• Keep all the air intakes and the blower tube free <strong>of</strong> dust, lint, hair and other<br />
material that may cause a reduction in air flow.<br />
• Do NOT use in vacuum operation without the collection bag fitted.<br />
• Do NOT try to repair the leaf blower vac, the power cord or access internal<br />
parts. Contact authorised service centres only.<br />
• The appliance is not intended to be operated by means <strong>of</strong> an external timer or<br />
separate remote-control system.<br />
• This appliance can only be used, cleaned or maintained by persons with<br />
reduced physical, sensory or mental capabilities, or lack <strong>of</strong> experience and<br />
knowledge, if they have been given supervision or instruction concerning use<br />
<strong>of</strong> the appliance.<br />
PACKAGING<br />
• Dispose <strong>of</strong> packaging at your local recycling centre.<br />
• Dispose <strong>of</strong> paper and carton separately from plastic bags at your local<br />
recycling centre.<br />
• Dispose <strong>of</strong> item at the end <strong>of</strong> its lifespan at your local authorised household<br />
waste recycling centre.<br />
CLEANING<br />
• Wipe clean only.<br />
• Do NOT use solvents.<br />
• Do NOT hose clean or submerge any parts in water.<br />
TROUBLESHOOTING<br />
Problem Potential cause Solution<br />
Motor failing to start No mains power Check socket is switched to on position.<br />
Check Fuse (13A)<br />
Connection failure<br />
To solve the problem, contact the<br />
manufacturer or an authorised company<br />
Motor or switch defect<br />
To solve the problem, contact the<br />
manufacturer or an authorised company<br />
Reduced vacuuming power Machine is clogged or blocked Clear blockage<br />
Bag is full<br />
Empty bag<br />
TECHNICAL SPECIFICATION<br />
Type<br />
Voltage<br />
Frequency<br />
Input Power<br />
Insulation<br />
Maximum Air speed<br />
Idle Speed<br />
Net weight<br />
BVT2000<br />
230-240V~<br />
50 Hz<br />
2000W<br />
Class II<br />
270 km/h<br />
14000/min<br />
3.8Kg<br />
Shredding Ratio 10:1<br />
Sound pressure level; LPA:<br />
KPA<br />
86.5 dB(A)<br />
3.0 dB(A)<br />
K 1.5 m/s 2<br />
Sound power level; LWA:<br />
103dB(A)<br />
Vibration 2.76 m/s 2
EC- Declaration <strong>of</strong> Con<strong>for</strong>mity<br />
The Enterprise Department Limited. T/A <strong>Coopers</strong> <strong>of</strong> Stort<strong>for</strong>d.<br />
Head Office, 11 Bridge Street, Bishop’s Stort<strong>for</strong>d, Hert<strong>for</strong>dshire CM23 2JU<br />
Tel: 0844 482 4400 Fax: 01279 756595<br />
We hereby declare,<br />
That the following Appliance complies with the appropriate basic safety and<br />
health requirements <strong>of</strong> the EC Directives (see item 4 below) based on its design<br />
and type, as brought into circulation by us.<br />
This declaration relates exclusively to the machinery in the state in which it was<br />
placed on the market, and excludes components which are added and/or<br />
operations carried out subsequently by the final user.<br />
1) Designation function:<br />
The leaf blower vac is <strong>for</strong> picking up debris into the debris collector or blow debris<br />
2) Type: 9242<br />
3) Batch number: 16705<br />
4) Applicable EC Directives:<br />
- EC- Machinery Directive 2006/42/EC<br />
Additional used EC Directives:<br />
- EMC Directive 2004/108/EC<br />
- Noise directive: 2000/14/EC<br />
5) Used Standards:<br />
Parts <strong>of</strong> IEC 60335-2-100:2002;<br />
Part <strong>of</strong> EN 15503:2009;<br />
EN 62233: 2008; EK9 2007-07<br />
EN61000-3-3:2008;<br />
EN61000-3-2:2006;<br />
EN55014-1:2006; EN55014-2:1997+A1:2001+A2: 2008<br />
EN ISO 3744:1994, ISO 11904:1991<br />
6) Responsible <strong>for</strong> documentation:<br />
Name and address <strong>of</strong> the person authorised to compile the technical file, must be<br />
established in the EU<br />
Measured sound power level 101.3 dB(A)<br />
Guaranteed sound power level 103 dB(A)<br />
Con<strong>for</strong>mity assessment method to Annex V/ Directive 2000/14/EC<br />
Retainer <strong>of</strong> technical documentation:<br />
The Enterprise Department Limited. T/A <strong>Coopers</strong> <strong>of</strong> Stort<strong>for</strong>d.<br />
Name: Mr. Stuart Fowler<br />
Position/Title: Imports Director<br />
27th June 2012