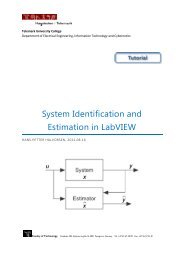
NI myDAQ User Guide and Specifications
NI myDAQ User Guide and Specifications
NI myDAQ User Guide and Specifications

Create successful ePaper yourself
Turn your PDF publications into a flip-book with our unique Google optimized e-Paper software.
13. In the Supported Physical Channels window, select<br />
audioOutputLeft from under the Devx (<strong>NI</strong> <strong>myDAQ</strong>) option. You can<br />
also press while clicking audioOutputRight to select both<br />
channels.<br />
14. Click Finish to exit the Create New Express Task dialog.<br />
15. On the Configuration tab of the DAQ Assistant front panel window,<br />
configure voltage channel 0 by selecting VoltageOut_0 in the<br />
Channel Settings pane, <strong>and</strong> setting Max to 2 <strong>and</strong> Min to -2 in the<br />
Signal Output Range pane. Repeat this step for voltage channel 1 if<br />
you configured the task for two channels.<br />
16. Under Timing Settings, set Generation Mode to Continuous<br />
Samples.<br />
17. Click OK to exit the DAQ Assistant configuration front panel. The VI<br />
builds. Click No on the Confirm Auto Loop Creation dialog box that<br />
displays.<br />
18. Wire the data output terminal of the first DAQ Assistant Express VI to<br />
the data input terminal of the second DAQ Assistant Express VI.<br />
<strong>NI</strong> <strong>myDAQ</strong> <strong>User</strong> <strong>Guide</strong> <strong>and</strong> <strong>Specifications</strong> 34 ni.com