Energi Savr Node - Lutron
Energi Savr Node - Lutron
Energi Savr Node - Lutron
You also want an ePaper? Increase the reach of your titles
YUMPU automatically turns print PDFs into web optimized ePapers that Google loves.
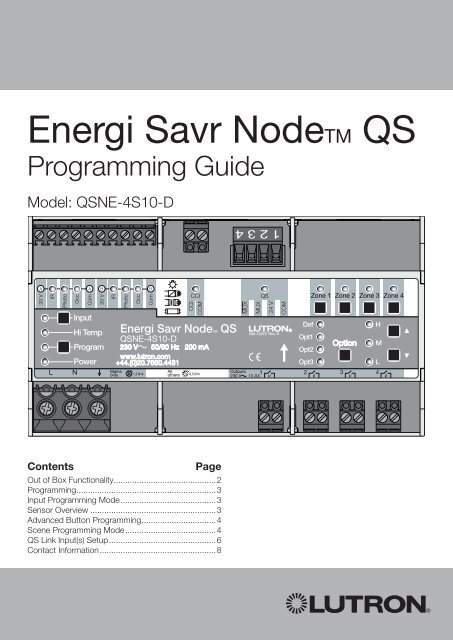
<strong>Energi</strong> <strong>Savr</strong> <strong>Node</strong>TM QS<br />
Programming Guide<br />
Model: QSNE-4S10-D<br />
Contents<br />
Page<br />
Out of Box Functionality............................................2<br />
Programming............................................................3<br />
Input Programming Mode.........................................3<br />
Sensor Overview.......................................................3<br />
Advanced Button Programming................................4<br />
Scene Programming Mode.......................................4<br />
QS Link Input(s) Setup..............................................6<br />
Contact Information..................................................8
<strong>Energi</strong> <strong>Savr</strong> <strong>Node</strong>TM QS | Programming Guide<br />
PELV<br />
Sensor<br />
Inputs<br />
Group A<br />
Sensor<br />
Inputs<br />
Group B<br />
Contact<br />
Closure<br />
Input<br />
QS<br />
Link<br />
Out of Box Functionality<br />
This section describes the default functionality that the unit will present when first installed.<br />
Sensors:<br />
• Connected to sensor group A: controls zones 1 and 2.<br />
• Connected to sensor group B: controls zones 3 and 4.<br />
Occupancy<br />
• Corresponding zones will turn on when the occupancy sensor is in the occupied state (closed) and off when in<br />
the unoccupied state.<br />
Daylight<br />
• Corresponding zones will turn on when light sensed by photo sensor falls below the factory preset level.<br />
• Corresponding zones will turn off when light sensed by photo sensor rises above the factory preset level.<br />
IR<br />
Mains<br />
Wiring<br />
• Zones respond to On, Off, and Scene commands to the <strong>Lutron</strong>® IR receiver from compatible IR transmitters<br />
(see IR Sensor literature for compatible transmitters).<br />
QS Wallstations<br />
• All seeTouch® QS wallstations are Scene keypads by default.<br />
• Scenes 1-16 will turn all the lights On.<br />
• Scene Off will turn all the lights Off.<br />
Contact Closure Input (CCI)<br />
• The CCI behaves as an Emergency Contact Closure Input.<br />
• If the CCI is open, the <strong>Energi</strong> <strong>Savr</strong> <strong>Node</strong> QS unit will enter Emergency Mode, which will turn on all loads and<br />
disable local zone control and control from sensors and QS devices.<br />
• When the CCI is closed or jumpered, <strong>Energi</strong> <strong>Savr</strong> <strong>Node</strong> QS unit zones will return to the settings or levels they<br />
were at prior to entering Emergency Mode.<br />
Troubleshooting and Maintenance Features<br />
• After installation, each zone button will toggle the zone between on and off.<br />
• Sensor status LEDs (‘Occ’, ‘Photo’, and ‘IR’) verify connections to control stations and sensors.<br />
Normal Mode Operation<br />
Zone<br />
1<br />
Zone<br />
2<br />
Zone<br />
3<br />
Zone<br />
4<br />
Input power and switched<br />
outputs to zones<br />
• Zone buttons—Used to toggle zone on and off.<br />
<strong>Energi</strong> <strong>Savr</strong> <strong>Node</strong>TM QS | Programming Guide <strong>Lutron</strong>® | 2
<strong>Energi</strong> <strong>Savr</strong> <strong>Node</strong>TM QS | Programming Guide<br />
Programming<br />
The out-of-box settings of an <strong>Energi</strong> <strong>Savr</strong> <strong>Node</strong> QS unit can be changed to customize the installation. Please<br />
follow the steps described below to adjust the settings on your <strong>Energi</strong> <strong>Savr</strong> <strong>Node</strong> QS unit.<br />
Input Programming Mode<br />
* Note: After 10 minutes without activity on the user interface, the <strong>Energi</strong> <strong>Savr</strong> <strong>Node</strong> QS unit will automatically<br />
exit the Input Programming Mode. The <strong>Energi</strong> <strong>Savr</strong> <strong>Node</strong> QS unit will retain the latest changes.<br />
Assign/Unassign zones to wired sensors<br />
1. To enter Input Programming Mode, press and hold the Program button for 3 seconds. The ‘Program’ LED will<br />
blink.<br />
2. Press Program button to sequence through each sensor input. The LED corresponding to the selected<br />
sensor input will blink. If powered by the <strong>Energi</strong> <strong>Savr</strong> <strong>Node</strong> QS unit, the sensor will flash also.*<br />
3. For each desired zone, press & hold the Zone button until the LED changes state to assign or un-assign that<br />
zone. A blinking ‘Zone’ LED indicates that a zone is assigned.<br />
4. To exit Input Programming Mode, press and hold the Program button for 3 seconds.<br />
Note: Before assigning a daylight sensor to a zone, you must first unassociate any previously assigned sensors<br />
from that zone, including those in out-of-box mode.<br />
* Only sensors powered directly from the <strong>Energi</strong> <strong>Savr</strong> <strong>Node</strong> QS unit will flash.<br />
Sensor Overview<br />
Occupancy Sensors<br />
<strong>Energi</strong> <strong>Savr</strong> <strong>Node</strong> QS units are programmable to turn lights on and off based on room occupancy detected by<br />
compatible occupancy sensors. To ensure proper operation of the <strong>Energi</strong> <strong>Savr</strong> <strong>Node</strong> QS unit:<br />
• Wire no more than 2 occupancy sensors to any one Occ connection. An auxiliary power supply must be used<br />
if the device(s) require(s) more than 50 mA.<br />
Daylight Sensors<br />
<strong>Energi</strong> <strong>Savr</strong> <strong>Node</strong> QS units are programmable to turn lights on and off based on daylight detected by<br />
compatible <strong>Lutron</strong>® daylight sensors. To ensure proper operation of the <strong>Energi</strong> <strong>Savr</strong> <strong>Node</strong> QS unit:<br />
• Use only <strong>Lutron</strong> daylight sensors (EC-DIR-WH).<br />
• Only wire one sensor to a single Photo input.<br />
Each zone output on an <strong>Energi</strong> <strong>Savr</strong> <strong>Node</strong> QS unit can be programmed to respond to a single daylight sensor.<br />
The target setpoint for turn-on/turn-off is adjustable for each zone—one sensor may be linked to multiple<br />
zones, each zone with its own unique setpoint. Please note that:<br />
• A daylight sensor wired to an <strong>Energi</strong> <strong>Savr</strong> <strong>Node</strong> QS unit can be assigned to control any or all zones on that<br />
<strong>Energi</strong> <strong>Savr</strong> <strong>Node</strong> QS unit.<br />
• Daylight sensors will not turn a zone on if an occupancy sensor assigned to that zone detects that the room is<br />
vacant.<br />
<strong>Energi</strong> <strong>Savr</strong> <strong>Node</strong>TM QS | Programming Guide <strong>Lutron</strong>® | 3
<strong>Energi</strong> <strong>Savr</strong> <strong>Node</strong>TM QS | Programming Guide<br />
Please refer to the daylight sensor installation guide for details on sensor placement.<br />
Infrared (IR) Remote Receivers<br />
<strong>Energi</strong> <strong>Savr</strong> <strong>Node</strong> QS units are programmable to turn lights on and off based on signals provided by<br />
compatible <strong>Lutron</strong>® IR transmitters and received by compatible <strong>Lutron</strong> IR receivers. To ensure proper operation<br />
of the <strong>Energi</strong> <strong>Savr</strong> <strong>Node</strong> QS unit:<br />
• Use only <strong>Lutron</strong> IR receivers (EC-DIR-WH, EC-IR-WH, CC-1BRL-WH, CC-4BRL-WH)<br />
• See <strong>Lutron</strong> IR receiver literature for compatible IR transmitters.<br />
• Only wire one receiver to a single IR input<br />
Advanced Button Programming<br />
Each <strong>Energi</strong> <strong>Savr</strong> <strong>Node</strong> QS unit zone has several parameters that can be set or adjusted. Follow the steps<br />
below to adjust a zone’s setting.<br />
Configure Zone Parameters<br />
1. Simultaneously press and hold the Program and Input buttons for 3 seconds to enter Zone Set-up Mode.<br />
‘Program’ and Group A LEDs will flash rapidly.<br />
2. Press Zone button to select the zone for which you wish to set parameters.<br />
3. Use the Option button to select a parameter to set or adjust as listed below. The option LEDs will turn on to<br />
indicate your selection:<br />
Option LED(s) Parameter Method<br />
‘Def’<br />
‘Opt1’<br />
Set zone to respond to wired Occupancy<br />
sensor as either Occupancy or Vacancy<br />
sensor<br />
Set daylight sensor setpoint for each<br />
zone<br />
Use the and buttons to select response mode.<br />
· ‘H’ LED indicates Occupancy mode (Auto on/off).<br />
· ‘M’ LED indicates Vacancy mode (Manual on/<br />
auto off)<br />
Use the<br />
Use the<br />
button to increase the set point.<br />
button to decrease the set point.<br />
4. Repeat steps 2 and 3 for each desired zone.<br />
5. Simultaneously press and hold the Program and Input buttons for 3 seconds to exit Zone Set-up Mode.<br />
Scene Programming Mode<br />
Scene Programming<br />
Each output zone on the <strong>Energi</strong> <strong>Savr</strong> <strong>Node</strong> QS unit has 16 scenes plus Off. Each scene can be programmed<br />
to turn the zone on or off, or the zone can be set to be unaffected in a scene, so that changing to that scene<br />
will not change the unaffected zone from its current level. Note: Scene Off cannot be modified.<br />
Follow the steps below and in the QS Link Input(s) Set-up section.<br />
Scenes 1-4<br />
1. Simultaneously press and hold the Program and Option buttons on the <strong>Energi</strong> <strong>Savr</strong> <strong>Node</strong> QS unit for 3<br />
seconds to enter Scene Programming Mode. ‘Program’ and Group B LEDs will flash rapidly.<br />
2. Use the Option button to select a scene to define for each zone. Option LED will be steady on, to indicate<br />
current scene selected:<br />
LED Legend: = steady on = flashing = off<br />
LEDs Scene # LEDs Scene # LEDs Scene # LEDs Scene #<br />
Scene 1 Scene 2 Scene 3 Scene 4<br />
3. Use the and buttons to set the selected scene to On or Off. The ‘H’, ‘M’, and ‘L’ LED group indicates your<br />
choice: all LEDs on = On; all LEDs off = Off.<br />
4. To make a zone unaffected, press and hold the button until only the ‘M’ LED turns on.<br />
<strong>Energi</strong> <strong>Savr</strong> <strong>Node</strong>TM QS | Programming Guide <strong>Lutron</strong>® | 4
<strong>Energi</strong> <strong>Savr</strong> <strong>Node</strong>TM QS | Programming Guide<br />
5. Exit Scene Programming Mode: Press and hold the Program and Option buttons for 3 seconds.<br />
Scenes 5-16<br />
1. Simultaneously press and hold the Program and Option buttons on the <strong>Energi</strong> <strong>Savr</strong> <strong>Node</strong> QS unit for 3<br />
seconds to enter Scene Programming Mode. ‘Program’ and Group B LEDs will flash rapidly.<br />
2. Press and hold the Option button on the <strong>Energi</strong> <strong>Savr</strong> <strong>Node</strong> QS unit for 10 seconds to access Scenes 5-16.<br />
Scene selections are indicated by flashing Option LEDs as shown ion the chart below:<br />
LED Legend: = steady on = flashing = off<br />
LEDs Scene # LEDs Scene # LEDs Scene # LEDs Scene #<br />
Scene 5 Scene 6 Scene 7 Scene 8<br />
Scene 9 Scene 10 Scene 11 Scene 12<br />
Scene 13 Scene 14 Scene 15 Scene 16<br />
3. Use the and buttons to set the selected scene to On or Off. The ‘H’, ‘M’, and ‘L’ LED group indicates your<br />
choice: all LEDs on = On; all LEDs off = Off.<br />
4. To make a zone unaffected, press and hold the button until the ‘Zone’ LED turns off and the ‘M’ LED turns<br />
on.<br />
5. If necessary, you may press and hold the Option button on the <strong>Energi</strong> <strong>Savr</strong> <strong>Node</strong> QS unit for 10 seconds to<br />
return to Scenes 1-4.<br />
6. Exit Scene Set-up Mode: Press and hold the Program and Option buttons for 3 seconds.<br />
<strong>Energi</strong> <strong>Savr</strong> <strong>Node</strong>TM QS | Programming Guide <strong>Lutron</strong>® | 5
<strong>Energi</strong> <strong>Savr</strong> <strong>Node</strong>TM QS | Programming Guide<br />
QS Link Input(s) Setup<br />
To assign a seeTouch® QS Wallstation or GRAFIK Eye® QS unit to any <strong>Energi</strong> <strong>Savr</strong> <strong>Node</strong> QS unit zone on the<br />
QS link, follow the steps below.<br />
seeTouch QS Wallstation - Scenes and Scenes + Off<br />
1. Simultaneously press and hold the top and bottom buttons on the wallstation for 3 seconds. The QS link<br />
enters Programming Mode. The sensor Group A and Group B LEDs and the ‘H’, ‘M’, and ‘L’ LEDs on the<br />
<strong>Energi</strong> <strong>Savr</strong> <strong>Node</strong> QS unit(s) will flash sequentially in groups.<br />
2. Use the Option button to select the scene wallstation type. A blinking LED indicates the selection:<br />
• ‘Def’ LED indicates a ‘scene + off’ wallstation (wallstation has a specific Off button)<br />
• ‘Opt 1’ LED indicates a ‘scene’ wallstation (wallstation has no Off button)<br />
3. To save the wallstation type, press and hold the Option button for 3 seconds. The LED for the selected<br />
wallstation type will flutter for 1 second, then remain steady.<br />
4. To assign desired zone(s) to a wallstation, press and hold the Zone button for each desired zone for<br />
3 seconds. A blinking ‘Zone’ LED indicates an assigned zone.<br />
5. Simultaneously press and hold the top and bottom buttons on the wallstation for 3 seconds to save the<br />
settings.<br />
To un-assign <strong>Energi</strong> <strong>Savr</strong> <strong>Node</strong> QS unit zones from a specific wallstation, press and hold the Zone button for<br />
the assigned zone(s) for 3 seconds. The ‘Zone’ LED will turn off to indicate success.<br />
Repeat for each desired wallstation-to-zone set-up that you wish to un-assign.<br />
seeTouch QS Wallstation - Zone Toggle Type<br />
1. Simultaneously press and hold the top and bottom buttons on the wallstation for 3 seconds. The QS link<br />
enters Programming Mode. The sensor Group A and Group B LEDs and the ‘H’, ‘M’, and ‘L’ LEDs on the<br />
<strong>Energi</strong> <strong>Savr</strong> <strong>Node</strong> QS unit(s) will flash sequentially in groups.<br />
2. Use the Option button to change the wallstation type to zone toggle. A blinking LED will indicate the selection.<br />
Select ‘Opt 2’.<br />
3. To save the wallstation type, press and hold the Option button for 3 seconds. The LED for the selected<br />
wallstation type will flutter for 1 second, then go to an on state.<br />
4. To assign a specific wallstation button(s) to an <strong>Energi</strong> <strong>Savr</strong> <strong>Node</strong> QS unit zone, press the wallstation button you<br />
wish to assign (e.g. press button 1 – LED blinks slowly).<br />
5. Press and hold the Zone button for the desired zone for 3 seconds. A blinking ‘Zone’ LED indicates an<br />
assigned zone.<br />
6. Repeat steps 4-5 for each desired button-to-zone assignment.<br />
7. Simultaneously press and hold the top and bottom buttons on the wallstation for 3 seconds to save the<br />
settings.<br />
To un-assign <strong>Energi</strong> <strong>Savr</strong> <strong>Node</strong> QS unit zones from specific wallstation buttons, press and hold the Zone<br />
button for the assigned zone(s) for 3 seconds. The ‘Zone’ LED will turn off to indicate success.<br />
GRAFIK Eye QS unit - Scenes and Scenes + Off<br />
1. Simultaneously press and hold the top and bottom scene buttons on the GRAFIK Eye QS unit for 3 seconds.<br />
The QS link enters Programming Mode. The sensor Group A and Group B LEDs and the ‘H’, ‘M’, and ‘L’ LEDs<br />
on the <strong>Energi</strong> <strong>Savr</strong> <strong>Node</strong> QS unit(s) will flash sequentially in groups.<br />
2. To assign desired zone(s) to a GRAFIK Eye QS unit, press and hold the Zone button for the desired zone for 3<br />
seconds. A blinking ‘Zone’ LED indicates an assigned zone.<br />
3. Simultaneously press and hold the top and bottom scene buttons on the GRAFIK Eye QS unit for 3 seconds to<br />
save the settings.<br />
<strong>Energi</strong> <strong>Savr</strong> <strong>Node</strong>TM QS | Programming Guide <strong>Lutron</strong>® | 6
<strong>Energi</strong> <strong>Savr</strong> <strong>Node</strong>TM QS | Programming Guide<br />
QSE-IO Association - Scene DIP configuration<br />
The <strong>Energi</strong> <strong>Savr</strong> <strong>Node</strong> QS unit can be associated to a QSE-IO (contact closure interface) that is set in a Scene<br />
DIP configuration. This can be used to change scenes on your <strong>Energi</strong> <strong>Savr</strong> <strong>Node</strong> QS unit from third party<br />
equipment (using contact closure inputs into the QSE-IO), or to monitor scene changes on your <strong>Energi</strong> <strong>Savr</strong><br />
<strong>Node</strong> QS unit from third party equipment (using contact closure outputs out of the QSE-IO). Consult the QSE-<br />
IO instructions for proper DIP configuration.<br />
To associate a QSE-IO that is set in a Scene DIP configuration to an <strong>Energi</strong> <strong>Savr</strong> <strong>Node</strong> QS unit(s), follow the<br />
steps below:<br />
1. Press and hold the Program button on the QSE-IO for 3 seconds to enter Programming Mode. The 5 output<br />
LEDs will cycle. The sensor Group A and Group B LEDs and the ‘H’, ‘M’ and ‘L’ LEDs on the <strong>Energi</strong> <strong>Savr</strong> <strong>Node</strong><br />
QS unit(s) will flash sequentially in groups.<br />
2. To assign desired zone(s) to the QSE-IO, press and hold the Zone button on the <strong>Energi</strong> <strong>Savr</strong> <strong>Node</strong> QS unit for<br />
each desired zone for 3 seconds. A blinking ‘Zone’ LED indicates an assigned zone.<br />
3. To exit Programming Mode, press and hold the Program button on the QSE-IO for 3 seconds.<br />
To un-assign zones from the QSE-IO, press and hold the Zone button on the <strong>Energi</strong> <strong>Savr</strong> <strong>Node</strong> QS unit for 3<br />
seconds. The ‘Zone’ LED will turn off to indicate success.<br />
Repeat for each zone that you wish to un-assign from the QSE-IO.<br />
QSE-IO Association - Zone Toggle and Occupancy DIP configurations<br />
The <strong>Energi</strong> <strong>Savr</strong> <strong>Node</strong> QS unit can also associated to a QSE-IO (contact closure interface) that is set in the<br />
Zone Toggle or Occupancy DIP configuration. In the Zone Toggle configuration, this can be used to toggle<br />
zones on your <strong>Energi</strong> <strong>Savr</strong> <strong>Node</strong> QS unit from third party equipment (using contact closure inputs into the<br />
QSE-IO), or to monitor the state (on or off) of the zones on your <strong>Energi</strong> <strong>Savr</strong> <strong>Node</strong> QS unit from third party<br />
equipment (using contact closure outputs out of the QSE-IO). In the Occupancy configuration, this can be<br />
used to associate additional occupancy sensors to the zones on your <strong>Energi</strong> <strong>Savr</strong> <strong>Node</strong> QS unit (to turn lights<br />
on and off based on room occupancy). Consult the QSE-IO instructions for proper DIP configuration.<br />
To associate a QSE-IO that is set in a Zone Toggle or Occupancy DIP configuration to an <strong>Energi</strong> <strong>Savr</strong> <strong>Node</strong> QS<br />
unit(s), follow the steps below:<br />
1. Press and hold the Program button on the QSE-IO for 3 seconds to enter Programming Mode. The first<br />
output LED will flash indicating input 1 is selected. The sensor Group A and Group B LEDs and the ‘H’, ‘M’<br />
and ‘L’ LEDs on the <strong>Energi</strong> <strong>Savr</strong> <strong>Node</strong> QS unit(s) will flash sequentially in groups.<br />
2. To assign desired zone(s) to input 1 of the QSE-IO, press and hold the Zone button on the <strong>Energi</strong> <strong>Savr</strong> <strong>Node</strong><br />
QS unit for each desired zone for 3 seconds. A blinking ‘Zone’ LED indicates an assigned zone.<br />
3. Press and release the Program button on the QSE-IO to select the next input. Repeat step 2 for the remaining<br />
inputs on the QSE-IO.<br />
4. To exit Programming Mode, press and hold the Program button on the QSE-IO for 3 seconds.<br />
To un-assign zones from the QSE-IO inputs, press and hold the Zone button on the <strong>Energi</strong> <strong>Savr</strong> <strong>Node</strong> QS unit<br />
for 3 seconds. The ‘Zone’ LED will turn off to indicate success.<br />
Repeat for each zone that you wish to un-assign from its respective QSE-IO input.<br />
<strong>Energi</strong> <strong>Savr</strong> <strong>Node</strong>TM QS | Programming Guide <strong>Lutron</strong>® | 7
Contact Information<br />
World headquarters<br />
<strong>Lutron</strong> Electronics Co., Inc.<br />
7200 Suter Road, Coopersburg, PA<br />
18036-1299 USA<br />
TEL +1.610.282.3800<br />
FAX +1.610.282.1243<br />
Technical Support 1.800.523.9466<br />
Toll-Free 1.888.LUTRON1<br />
European headquarters<br />
United Kingdom<br />
<strong>Lutron</strong> EA Ltd.<br />
6 Sovereign Close, London, E1W<br />
3JF UK<br />
TEL +44.(0)20.7702.0657<br />
FAX +44.(0)20.7480.6899<br />
Technical support<br />
+44.(0)20.7680.4481<br />
FREEPHONE 0800.282.107<br />
Asian headquarters<br />
Singapore<br />
<strong>Lutron</strong> GL Ltd.<br />
15 Hoe Chiang Road,<br />
#07-03 Euro Asia Centre,<br />
Singapore 089316<br />
TEL +65.6220.4666<br />
FAX +65.6220.4333<br />
Technical hotlines<br />
France: 0800.90.12.18<br />
Germany: 00800.5887.6635<br />
Italy: 800.979.208<br />
Spain: 900.948.944<br />
Northern China: 10.800.712.1536<br />
Southern China: 10.800.120.1536<br />
Hong Kong: 800.901.849<br />
Singapore: 800.120.4491<br />
Taiwan: 00.801.137.737<br />
Thailand: 001.800.120.665853<br />
Other Areas in Asia: +65.6220.4666<br />
<strong>Lutron</strong>, GRAFIK Eye, seeTouch, and the sunburst logo are<br />
registered trademarks and <strong>Energi</strong> <strong>Savr</strong> <strong>Node</strong> is a trademark of<br />
<strong>Lutron</strong> Electronics Co. Inc.<br />
© 05/2010 <strong>Lutron</strong> Electronics Co., Inc.<br />
Made and printed in the U.S.A.<br />
P/N 032-311 Rev. B<br />
<strong>Lutron</strong> Electronics Co., Inc.<br />
7200 Suter Road<br />
Coopersburg, PA 18036


