69-2041 - R182J, R482J, YHR845A,R847A ... - PexSupply.com
69-2041 - R182J, R482J, YHR845A,R847A ... - PexSupply.com
69-2041 - R182J, R482J, YHR845A,R847A ... - PexSupply.com

Create successful ePaper yourself
Turn your PDF publications into a flip-book with our unique Google optimized e-Paper software.
<strong>R182J</strong>, <strong>R482J</strong>, <strong>YHR845A</strong>,<strong>R847A</strong>, RA89A, RA832A SWITCHING RELAYS<br />
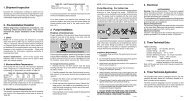
LOW VOLTAGE (CLASS 2)<br />
2-WIRE THERMOSTAT<br />
T<br />
X<br />
<strong>YHR845A</strong><br />
T<br />
T<br />
T<br />
X<br />
RELAY<br />
2 1 4 3<br />
5<br />
6<br />
24V TRANSFORMER<br />
3<br />
L2<br />
1<br />
L1<br />
HOT<br />
TO<br />
POWER<br />
1 2 1<br />
LOAD 1<br />
TO<br />
POWER LOAD 2<br />
1<br />
2<br />
POWER SUPPLY. PROVIDE OVERLOAD PROTECTION<br />
AND DISCONNECT MEANS AS REQUIRED.<br />
WHEN CONTROLLING TWO LOADS, USE 3 AND 4<br />
FOR LINE VOLTAGE LOAD AND 5 AND 6 FOR LINE<br />
OR LOW VOLTAGE LOAD.<br />
2<br />
1<br />
3<br />
IF USING LOW VOLTAGE, USE A SEPARATE<br />
TRANSFORMER.<br />
M23783<br />
3 4<br />
Fig. 8. <strong>YHR845A</strong> hookup for controlling two loads.<br />
1<br />
T<br />
L2<br />
T<br />
L2 L1 4 3<br />
1<br />
LOW VOLTAGE (CLASS 2)<br />
2-WIRE THERMOSTAT<br />
TO<br />
L1 POWER LOAD 1<br />
(HOT)<br />
1 2 1<br />
<strong>R847A</strong><br />
POWER SUPPLY. PROVIDE OVERLOAD PROTECTION<br />
AND DISCONNECT MEANS AS REQUIRED.<br />
7<br />
3<br />
6<br />
TO<br />
POWER LOAD 2<br />
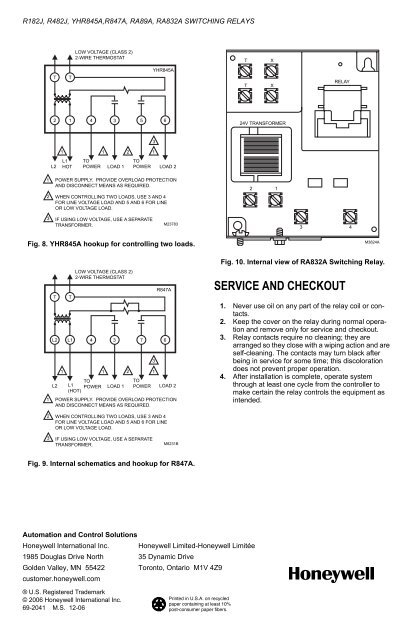
Fig. 10. Internal view of RA832A Switching Relay.<br />
SERVICE AND CHECKOUT<br />
M3824A<br />
1. Never use oil on any part of the relay coil or contacts.<br />
2. Keep the cover on the relay during normal operation<br />
and remove only for service and checkout.<br />
3. Relay contacts require no cleaning; they are<br />
arranged so they close with a wiping action and are<br />
self-cleaning. The contacts may turn black after<br />
being in service for some time; this discoloration<br />
does not prevent proper operation.<br />
4. After installation is <strong>com</strong>plete, operate system<br />
through at least one cycle from the controller to<br />
make certain the relay controls the equipment as<br />
intended.<br />
2<br />
WHEN CONTROLLING TWO LOADS, USE 3 AND 4<br />
FOR LINE VOLTAGE LOAD AND 5 AND 6 FOR LINE<br />
OR LOW VOLTAGE LOAD.<br />
3<br />
IF USING LOW VOLTAGE, USE A SEPARATE<br />
TRANSFORMER.<br />
M8231B<br />
Fig. 9. Internal schematics and hookup for <strong>R847A</strong>.<br />
Automation and Control Solutions<br />
Honeywell International Inc. Honeywell Limited-Honeywell Limitée<br />
1985 Douglas Drive North 35 Dynamic Drive<br />
Golden Valley, MN 55422 Toronto, Ontario M1V 4Z9<br />
customer.honeywell.<strong>com</strong><br />
® U.S. Registered Trademark<br />
© 2006 Honeywell International Inc.<br />
<strong>69</strong>-<strong>2041</strong> M.S. 12-06