DMX-Player S - DMX4ALL GmbH
DMX-Player S - DMX4ALL GmbH
DMX-Player S - DMX4ALL GmbH
You also want an ePaper? Increase the reach of your titles
YUMPU automatically turns print PDFs into web optimized ePapers that Google loves.
<strong>DMX</strong>-<strong>Player</strong> S<br />
USER MANUAL
<strong>DMX</strong>-<strong>Player</strong> S 2<br />
Description<br />
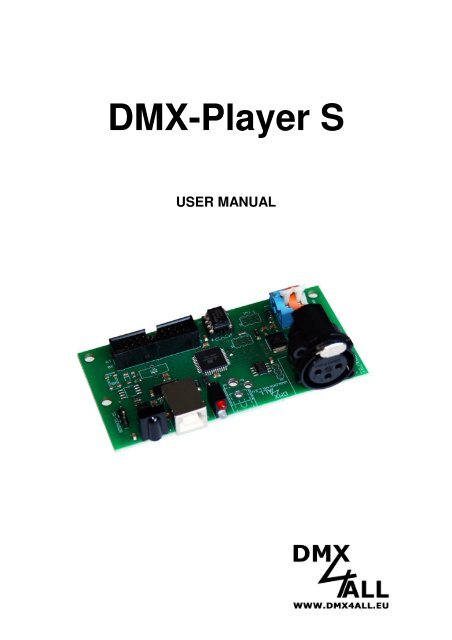
The <strong>DMX</strong>-<strong>Player</strong> S is a <strong>DMX</strong>-Stand-Alone device. The scenes provided in the PC<br />
can be loaded by USB on the device. Then without a PC the stored scenes can be<br />
reproduced. The choice of the scenes can occur with different key fields. As well as<br />
possible are single-keys, matrix-keyboards etc. An application at work with connected<br />
PC is also possible.<br />
By the easy service the application is possible in decoration and presentation areas.<br />
IR_IN<br />
IR<br />
DECODER<br />
POWER<br />
CONTROL<br />
CLOCK and<br />
RESET<br />
MEMORY<br />
SWITCH<br />
CONTROL<br />
PROGRAM<br />
CONTROL<br />
RISC<br />
CONTROLLER<br />
<strong>DMX</strong><br />
INTERFACE<br />
<strong>DMX</strong>-OUT<br />
Technical data<br />
- Power supply: 7-12V DC / 250mA<br />
- <strong>DMX</strong>-OUT: 192 channels on 3-pin XLR-connector<br />
- Brightness control by UP/DOWN push-button, Poti or IR<br />
- Replay velocity by UP/DOWN push-button, Poti or IR<br />
- Scene-selection:<br />
- first 10 by keyboard<br />
- first 16 by keybaord-Matrix 4x4<br />
- first 25 by keyboard-Matrix 5x5<br />
- up to 250 Scenen by figure keyboard with ENTER and BLACKOUT<br />
- first 10 by RC5 IR-remote control<br />
- USB-connection for transferring the Scenen or as a PC-<strong>DMX</strong>-interface in the<br />
live company<br />
- 8 Kbyte Stand-Alone-Memory (up to 32kByte with 24C256 possible)<br />
- Board dimensions: 50mm x 100mm
<strong>DMX</strong>-<strong>Player</strong> S 3<br />
Installation USB<br />
To install the <strong>DMX</strong>-<strong>Player</strong> S the following two Steps must be fulfilled.<br />
Step 1: Install the USB- driver<br />
- Connect the <strong>DMX</strong>-Interface to a free USB-<br />
Port. The Message „Found new Hardware“<br />
shows up.<br />
- Follow the introductions and select “Install from a list or specific location“.<br />
- After that, enter the file path in the combo-box or browse to it by clicking the<br />
browse button. Once the file path has been entered in the box, click next to<br />
proceed.<br />
- Windows should then display a message indicating that the installation was<br />
successful. Click "Finish" to complete the installation.<br />
Step 2: Installation Virtual COM-Port (VCP)<br />
After the installation of the USB- driver,<br />
Windows detects a new USB Serial Port<br />
automatically. The Message “Found new<br />
Hardware” shows up.<br />
- Follow the introductions and select “Install from a list or specific location“.<br />
- After that, enter the file path in the combo-box or browse to it by clicking the<br />
browse button. Once the file path has been entered in the box, click next to<br />
proceed.<br />
- Windows should then display a message indicating that the installation was<br />
successful. Click "Finish" to complete the installation.<br />
For the installation of the USB you use please the drivers on the attached data<br />
carrier. You can download the drivers in the most topical version on the internet<br />
(www.dmx4all.eu).<br />
The installation can distinguish them according to used operating system and<br />
drivers version.
Connections of the <strong>DMX</strong>-<strong>Player</strong> S<br />
<strong>DMX</strong>-<strong>Player</strong> S 4<br />
<strong>DMX</strong> Connection<br />
1 - GND<br />
2 - <strong>DMX</strong>-<br />
3 - <strong>DMX</strong>+<br />
LED-Display<br />
RED - POWER OK<br />
GREEN - <strong>DMX</strong> OK<br />
USB Connection<br />
Power supply<br />
ORANGE - + 7 - 12V DC<br />
BLUE - 0V<br />
Scene-storage<br />
EEPROM 8k (24C64)<br />
(Standard)<br />
EEPROM 32k /24C256)<br />
Connection for operational<br />
elements<br />
1 - PRG1 11 - SPD+<br />
2 - PRG2 12 - SPD-<br />
3 - PRG3 13 - INTENS+<br />
4 - PRG4 14 - INTENS-<br />
5 - PRG5 15 - PRG+<br />
6 - PRG6 16 - IR<br />
7 - PRG7 17 - SCL<br />
8 - PRG8 18 - SDA<br />
9 - PRG9 19 - GND<br />
10 - PRG10 20 - +5V<br />
For the circuit see the<br />
following sides
<strong>DMX</strong>-<strong>Player</strong> S 5<br />
Programchoice<br />
The choice of the deposited scenes can occur with different wirings. Which wiring is<br />
used, must be figured in the Setup-Menu or the <strong>DMX</strong>-Configurator (see the segment<br />
Configuration)<br />
The last selected Scene will be stored and after begun restarting automatically.<br />
►See also „Achieving to a Scene after the turning on“<br />
Choice about 10 keyboards<br />
About up to 10 keys the first 10 stored scenes can be called directly. A LED on each<br />
key is possible to display the actual running scene.<br />
Connection:<br />
PRG1<br />
PRG2<br />
PRG3<br />
PRG10<br />
+5V<br />
1 2<br />
3<br />
10<br />
PRGx<br />
1k<br />
GND<br />
GND<br />
The Choice about Keyborad-Matrix 4x4 or 5x5<br />
With one matrix-wiring can be called up to 25 programmes with each key.<br />
Connection Matrix 4x4:<br />
PRG1 PRG2 PRG3 PRG4<br />
PRG5<br />
PRG6<br />
PRG7<br />
PRG8<br />
1 2 3 4<br />
5 6 7 8<br />
9 10 11 12<br />
13 14 15 16
<strong>DMX</strong>-<strong>Player</strong> S 6<br />
Connection Matrix 5x5:<br />
PRG1 PRG2 PRG3 PRG4<br />
PRG5<br />
PRG6<br />
PRG7<br />
PRG8<br />
PRG9<br />
PRG10<br />
1 2 3 4<br />
5<br />
6 7 8 9<br />
10<br />
11 12 13 14<br />
15<br />
16 17 18 19<br />
20<br />
21 22 23 24 25<br />
Choice over figure keyboard with ENTER and BLACKOUT<br />
The input of the executive scene occurs with the figure-keyboard and followed by<br />
ENTER. The programmes from the 1 to the 250 are possible. In addition, with the<br />
BLACKOUT-key the BlackOut-function can be switched on and off. The key ENTER<br />
automatically switches off the BlackOut-function.<br />
For example: Scene 28: ‚2’ + ‚8’ + ‚ENTER’<br />
Scene 146: ‚1’ + ‚4’ + ‚6’ + ‚ENTER’<br />
Connection:<br />
PRG1 PRG2 PRG3<br />
PRG4<br />
PRG5<br />
PRG6<br />
PRG7<br />
BLACK<br />
OUT<br />
1 2 3<br />
4 5 6<br />
7 8 9<br />
0 ENTER<br />
Choice about 8-Bit-BCD signal<br />
With a BCD steering signal can be called up to 250 scenes. Thereto the 8-Bit of the<br />
BCD-signal must have to be put on the entrance PRG1 to PRG8.
<strong>DMX</strong>-<strong>Player</strong> S 7<br />
Brightness setting<br />
The brightness setting can occur by the UP/DOWN key or potentiometer.<br />
INTENS+<br />
INTENS-<br />
+5V<br />
INTENS+<br />
+ -<br />
10k<br />
GND<br />
GND<br />
INTENS-<br />
wiring with the UP/DOWN key<br />
wiring with potentiometer<br />
During the operation with the UP/DOWN-key the brightness value is stored<br />
and also retained during the switch-off <strong>DMX</strong>-<strong>Player</strong> S.<br />
Speed setting<br />
The speed setting can occur by the UP/DOWN key or potentiometer.<br />
SPD+<br />
SPD-<br />
+5V<br />
SPD+<br />
+ -<br />
10k<br />
GND<br />
GND<br />
SPD-<br />
wiring with the UP/DOWN key<br />
wiring with potentiometer<br />
During the operation with the UP/DOWN-key the speed value is stored and also<br />
retained during the switch-off <strong>DMX</strong>-<strong>Player</strong> “S”.
Programming the StandAlone function<br />
<strong>DMX</strong>-<strong>Player</strong> S 8<br />
The <strong>DMX</strong>-<strong>Player</strong> S disposes a StandAlone-function programmable from the user.<br />
The Scenen provided in the PC (programme) will transfer once to the interface and<br />
then they can be reproduced.<br />
The software <strong>DMX</strong>-Configuration serves for production and programming of the<br />
Scenen. Under the menu point Settings → Communication settings the interface<br />
above which the <strong>DMX</strong>-Configuration finds the connected hardware is adjusted.<br />
Scene<br />
administration<br />
Step<br />
administration<br />
In the left part is the Scenen-Administration. Here the Scenen can be put on and be<br />
fixed in the order.<br />
The right part is the Step-Administration. Every Scene exists of at least one step.<br />
Regulators are available to you for the setting of different <strong>DMX</strong>-values. These are<br />
marked with the channel number. To reach all 512 <strong>DMX</strong> channels, you must select<br />
the <strong>DMX</strong>-channel-area by means of the horizontal slider underneath. For every step<br />
different <strong>DMX</strong>-values of every channel can be set up.<br />
Furthermore the time of dissolving and staying is put with Fade Time and Wait Time<br />
for every step.<br />
You can write the provided Scenen in the Stand-Alone-memory of the <strong>DMX</strong>-<strong>Player</strong><br />
“S”. The transference of the Scenen to the interface is begun under the menu-point<br />
Hardware→Write data.<br />
Attention: This process can take up some time. Please, do not break off the<br />
transference and wait for the affirmation of the <strong>DMX</strong>-Configurators.
Achieve to a Scene after turning<br />
<strong>DMX</strong>-<strong>Player</strong> S 9<br />
After the turning on a certain Scene can be reproduced. Thereto in the <strong>DMX</strong>-<br />
Configurator the Default Scene on Start must be named by the setting of the Scenen.<br />
If it is given, regardless of the last selected Scene, always the selected Scene under<br />
Default Scene on Start will be achieved by turning on of the <strong>DMX</strong>-<strong>Player</strong> S.<br />
Configuring the <strong>DMX</strong>-<strong>Player</strong> S<br />
The <strong>DMX</strong>-<strong>Player</strong> S can be configured about the <strong>DMX</strong>-Configuration from the version<br />
1.4.1. Thereto please select the menu point Settings→Hardware settings with<br />
connected <strong>DMX</strong>-<strong>Player</strong> “S”. There appears the following dialogue:<br />
The first 5 choice-fields fixes<br />
the connected key<br />
configuration. Only one<br />
choice is possible..<br />
Enable BEEP switches the<br />
buzzer on the <strong>DMX</strong>-<strong>Player</strong><br />
„S“ on or off.<br />
The configuration is transferred by OK to the <strong>DMX</strong>-<strong>Player</strong> S and will be stored.
<strong>DMX</strong>-<strong>Player</strong> S 10<br />
IR-Operation<br />
The stored scenes can be called up bay IR-remote control. The <strong>DMX</strong>-<strong>Player</strong> S can<br />
be served by commercial remote control RC5 or by LED remoter control <strong>DMX</strong>4ALL.<br />
The setting which remote control is used must be carried out with the <strong>DMX</strong>-<br />
Configurator under Settings→Hardware Settings.<br />
The <strong>DMX</strong>-<strong>Player</strong> S allows an IR-mode by<br />
means of the internal IR-sensor or over an<br />
external IR-sensor. The choice occurs about<br />
the Jumper J1. If this one get closed to the<br />
internal IR-sensor the internal IR-mode is<br />
configured.<br />
An external IR-sensor is connected to the Pin 16<br />
for the operating elements.<br />
Internal IR-sensor<br />
Intern/Extern<br />
choice<br />
Instruction with RC5-remote control<br />
The used RC5-Codes are according with the following table:<br />
Function<br />
RC5-Command<br />
Device-ID 0<br />
Program + 32<br />
Program - 33<br />
Brightnesst + 16<br />
Brightness - 17<br />
Speed + 20<br />
Speed - 21<br />
BlackOut (Standby) 12<br />
Program 1 1<br />
Program 2 2<br />
Program 3 3<br />
Program 4 4<br />
Program 5 5<br />
Program 6 6<br />
Program 7 7<br />
Program 8 8<br />
Program 9 9<br />
Program 10 0
<strong>DMX</strong>-<strong>Player</strong> S 11<br />
Instruction with <strong>DMX</strong>4ALL LED-remote control<br />
The <strong>DMX</strong>4ALL LED-Remote control and a additionally IR sensor is not included.<br />
The program choice occurs about the keys 1,2,3…0 according to the programmes<br />
from 1 to 0.<br />
With the keys + and – the brightness and the speed is adjustable as well as the<br />
program choice.<br />
- On operating the key SPEED, the speed is adjustable.<br />
- On operating the key PROG SELECT, the programmes are selectable.<br />
- On operating the key R or G or B, the brightness is adjustable.<br />
A separate adjustment for for the colours red, green or blue is not possible.<br />
The key BLACK OUT activates or deactivates the BlackOut-function. Besides, the<br />
brightness setting is preserved.<br />
The key FLASH activates or deactivates the Flash-function. This function switches all<br />
channels to 100%.
<strong>DMX</strong>-<strong>Player</strong> S 12<br />
Accessoires<br />
Aluminiumbox<br />
Dimensions (LxBxH): 120x103x53 mm
<strong>DMX</strong>-<strong>Player</strong> S 13<br />
CE-conformity<br />
This assembly (board) is controlled by a microprocessor and<br />
uses high frequency (8MHz). To get the characteristics of the<br />
assembly in relation to the CE-conformity, an installation in a<br />
compact metal casing is necessary.<br />
Risk-Notes<br />
You purchased a technical product. Conformable to the best available technology the<br />
following risks should not excluded:<br />
Failure risk: The device can drop out partially or completely at any time without<br />
warning. To reduce the probability of a failure a redundant system structure is<br />
necessary.<br />
Initiation risk: For the installation of the board, the board must be connected and<br />
adjusted to foreign components according to the device paperwork. This work can<br />
only be done by qualified personnel, which read the full device paperwork and<br />
understand it.<br />
Operating risk: The Change or the operation under special conditions of the<br />
installed systems/components could as well as hidden defects cause to breakdown<br />
within the running time.<br />
Misusage risk: Any nonstandard use could cause incalculable risks and is not<br />
allowed.<br />
Warning: It is not allowed to use the device in an operation, where the safety of<br />
persons depend on this device.
<strong>DMX</strong>4ALL <strong>GmbH</strong><br />
Reiterweg 2A<br />
D-44869 Bochum<br />
Germany<br />
© Copyright 2009 <strong>DMX</strong>4ALL <strong>GmbH</strong><br />
All rights reserve. No part of this manual may be reproduced in any form (photocopy, pressure, microfilm or in another<br />
procedure) without written permission or processed, multiplied or spread using electronic systems.<br />
All information contained in this manual was arranged with largest care and after best knowledge. Nevertheless errors are to be<br />
excluded not completely. For this reason I see myself compelled to point out that I can take over neither a warranty nor the<br />
legal responsibility or any adhesion for consequences, which decrease/go back to incorrect data. This document does not<br />
contain assured characteristics. The guidance and the characteristics can be changed at any time and without previous<br />
announcement.


