Installation Guide
Installation Guide
Installation Guide

You also want an ePaper? Increase the reach of your titles
YUMPU automatically turns print PDFs into web optimized ePapers that Google loves.
Nintex Workflow for Project Server 2010 <strong>Installation</strong> <strong>Guide</strong><br />
Database Configuration 2<br />
2.1 Deploy Database Components<br />
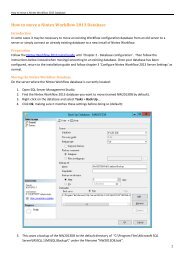
1. Navigate to “Nintex Workflow Management”. Click “Database setup” in the “Nintex Workflow for Project Server 2010” section.<br />
2. Click “Update now”, located at the top of the page, which will install the Nintex Workflow for Project Server components within the Nintex Workflow<br />
Configuration Database and Content Database(s).<br />
3. You will now see the “Version of Project Server Components” listed with the version number of the Nintex Workflow for Project Server that has been installed.<br />
Configure Nintex Workflow for Project Server 2010 Settings 3<br />
3.1 Manage Project Server Service Account Access<br />
1. Navigate to “Nintex Workflow Management”. Click on “Manage service account access” in the “Nintex Workflow for Project Server 2010” section.<br />
2. Enter the identity of the domain account that is running the Project Server Service Application.<br />
Note: See Appendix B on how to find the identity of the domain account running the Project Server Service Application.<br />
3. Click the “Grant Access” button.<br />
4. The message “Successfully granted [Project Server Service Account] access to the Nintex Workflow database” will appear when access has been successful.<br />
3.2 Web Application Activation<br />
1. Navigate to “Nintex Workflow Management”. Click “Project Web Application activation” in the “Nintex Workflow for Project Server 2010” section.<br />
2. Enter the URL of the Project Server Web application site<br />
(i.e. http://servername/pwa).<br />
3. Click the “Activate” button.<br />
4. On the Web server, open “Windows Explorer” and navigate to the following path:<br />
“C:\Program Files\Common Files\Microsoft Shared\Web Server Extensions\14\BIN\NintexWorkflow”.<br />
5. Double click on “nwpsactivate.exe”.<br />
6. In the dialog, enter the URL of the Project Server Web application site (i.e. http://servername/pwa) and press the ENTER key.<br />
7. Follow the prompts, saying “No” to restarting the services.<br />
NOTE: Steps 4, 5,6 and 7 must be performed on each Web server in the SharePoint environment.<br />
It is now possible to design and interact with Nintex Workflow for Project Server 2010.<br />
2