Heat Exchanger Cell Replacement Kit Installation Instructions - Docs ...
Heat Exchanger Cell Replacement Kit Installation Instructions - Docs ...
Heat Exchanger Cell Replacement Kit Installation Instructions - Docs ...

You also want an ePaper? Increase the reach of your titles
YUMPU automatically turns print PDFs into web optimized ePapers that Google loves.
<strong>Heat</strong> <strong>Exchanger</strong> <strong>Cell</strong><br />
<strong>Replacement</strong> <strong>Kit</strong><br />
Cancels: IIK 373-35-12<br />
IIK 373L-35-14<br />
12-15-93<br />
<strong>Installation</strong> <strong>Instructions</strong><br />
Part No. 310203-752<br />
NOTE: Read the entire instruction manual before starting the<br />
installation.<br />
INTRODUCTION<br />
This instruction covers the installation of the heat exchanger cell<br />
kit Part No. 310203-752 in models 330AAV, 331AAV, 373LAV,<br />
376CAV, 383KAV, 394HAD, 395CAV, 396HAD, 58DFA,<br />
58DHC, 58GFA, 58PAP, 58PAV, 58RAP, 58RAV, 58SSC,<br />
58TMA, 58TUA, 58WAV, 58ZAV, GA1AAD, GA2AAD,<br />
GB1AAV, and GB3AAV Gas Furnaces.<br />
SAFETY CONSIDERATIONS<br />
Installing and servicing heating equipment can be hazardous due to<br />
gas and electrical components. Only trained personnel should<br />
install or service heating equipment.<br />
Untrained personnel can perform basic maintenance functions<br />
such as cleaning coils, or cleaning and replacing filters. All other<br />
operations should be performed by trained service personnel.<br />
When working on heating equipment, observe precautions in the<br />
literature, on tags, and on labels attached to the unit.<br />
Understand the signal word DANGER, WARNING, or CAU-<br />
TION. These words are used with the safety-alert symbol. DAN-<br />
GER identifies the most serious hazards which will result in severe<br />
personal injury or death. WARNING signifies a hazard that could<br />
result in personal injury or death. CAUTION is used to identify<br />
unsafe practices which would result in minor personal injury or<br />
product and property damage. NOTE is used to highlight suggestions<br />
that will result in enhanced installation, reliability, or<br />
operation.<br />
Follow all safety codes. Wear safety glasses and work gloves.<br />
Have a fire extinguisher available.<br />
DESCRIPTION AND USAGE<br />
The heat exchanger cell replacement kit can be utilized to restore<br />
units having heat exchanger cells that require repair.<br />
This heat exchanger cell replacement kit contains the following<br />
items:<br />
<strong>Heat</strong> exchanger cell 1<br />
Fiberglass gasket 2<br />
Presstite (No. 582) sealant 1<br />
Screw 9<br />
<strong>Installation</strong> <strong>Instructions</strong> 1<br />
INSTALLATION<br />
Step 1—Remove <strong>Heat</strong> <strong>Exchanger</strong> Assembly<br />
1. Turn off gas and electrical supplies to unit.<br />
2. Remove blower and control access doors.<br />
3. Disconnect and remove vent pipe.<br />
4. On hot surface ignition models:<br />
a. unplug control box connectors from blower deck.<br />
b. Unplug inducer motor.<br />
c. Disconnect wires from pressure switch, draft safeguard<br />
switch, and primary limit switch.<br />
d. Remove wires from retainer clip on casing side.<br />
NOTE: On hot surface ignition models, it is not necessary to<br />
disconnect wires from gas valve, limit over temperature switch,<br />
hot surface ignitor, or flame sensor.<br />
5. On continuous-pilot models, disconnect all gas control compartment<br />
wiring and carefully feed wires down through the<br />
blower deck into the blower compartment.<br />
6. Remove burner control assembly mounting screws and remove<br />
assembly from furnace. Be careful not to damage hot<br />
surface ignitor or flame sensor if applicable.<br />
7. Remove screws securing relief box to top plate (upflow) or to<br />
blower shelf (downflow/horizontal).<br />
8. Remove screws securing inducer assembly to cell panel and<br />
remove inducer assembly from furnace.<br />
9. Remove auxiliary junction box and blower door interlock<br />
switch.<br />
10. Remove screws securing cell panel to casing.<br />
11. If necessary, remove 2 front screws of top plate (upflow) or 2<br />
screws of bottom plate (downflow/horizontal).<br />
12. Remove cell panel and attached heat exchanger cells through<br />
front of furnace.<br />
Step 2—Install <strong>Replacement</strong> <strong>Cell</strong>(s)<br />
1. Determine which cell(s) need to be replaced.<br />
2. Place heat exchanger on a flat surface with cell panel facing<br />
upward.<br />
3. Remove 8 screws from cell opening of cell(s) being replaced.<br />
Remove and replace 1 cell at a time.<br />
NOTE: The word "top" is stamped on cell inlet plates to aid in<br />
correct assembly.<br />
4. Using care not to damage insulation around inlet and outlet<br />
openings, remove cell from cell panel and discard.<br />
5. Install new cell as follows:<br />
a. Center fiberglass insulation gaskets over inlet and outlet<br />
openings of cell.<br />
b. Tape each end of gasket to cell using short pieces of tape.<br />
c. Position cell under cell panel.<br />
d. Align holes and start ALL 8 screws.<br />
e. After all screws are started, check position of gaskets and<br />
cell inlet plates. When materials are properly aligned,<br />
tighten screws.<br />
6. Cut away any insulation extending into cell openings. Do not<br />
drop pieces of insulation into cell.<br />
7. Repeat Step 2, items 3 through 6, for additional cells being<br />
replaced.<br />
Manufacturer reserves the right to discontinue, or change at any time, specifications or designs without notice and without incurring obligations.<br />
Book 1 4 PC 101 Catalog No. 535-899 Printed in U.S.A. Form 58DFA-10SI Pg 1 12-93 Replaces: 58DFA-6SI<br />
Tab 6a 8a
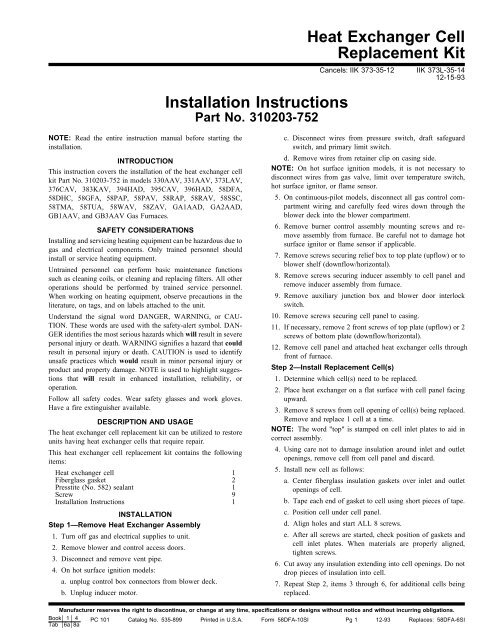
Fig. 1—<strong>Replacement</strong> <strong>Cell</strong><br />
A88384<br />
4. If collector box sealant has been damaged, remove it and<br />
apply new sealant. Contact your distributor for proper sealant.<br />
Do not drop sealant into cell openings.<br />
5. Reinstall inducer assembly.<br />
6. Reinstall auxiliary junction box and blower door interlock<br />
switch.<br />
7. Reinstall burner control assembly. Ensure that all burners are<br />
level.<br />
8. Replace screws in top plate (upflow) or bottom plate<br />
(downflow/horizontal).<br />
9. Reconnect all wiring using diagram located on blower access<br />
door. Put wiring behind retainer clip on casing side.<br />
10. Reconnect gas pipe.<br />
11. Reconnect vent pipe.<br />
12. Reinstall blower access door.<br />
13. Turn on gas supply and check for gas leaks.<br />
Never use a match or other open flame to check for gas leaks.<br />
Use a soap-and-water solution. Failure to follow this warning<br />
could result in fire, explosion, personal injury or death.<br />
8. Remove baffles from old cells (if applicable) and install on<br />
new cells. See Fig. 2 and Table 1 or 2 for baffle location.<br />
NOTE: Failure to install baffles in proper location may cause<br />
premature heat exchanger failure and/or main limit cycling.<br />
Step 3—Reinstall <strong>Heat</strong> <strong>Exchanger</strong> Assembly<br />
NOTE: Check the insulation around the top, bottom, and sides of<br />
the cell panel. The insulation must overlap enough to provide a<br />
good air seal when the assembly is installed.<br />
1. Slide heat exchanger assembly into furnace, engaging cells<br />
into cell support. Avoid bending any internal casing baffles<br />
when assembling.<br />
2. Align holes and start screws. Ensure insulation stays in place<br />
to provide the necessary air seal.<br />
3. Tighten screws into sides, top, and bottom of cell panel.<br />
WING BAFFLE<br />
14. Turn on electrical supply.<br />
Step 4—Check for Air Leaks<br />
1. Turn on blower only and block discharge air registers to create<br />
a high-static condition.<br />
2. Using a match, check around cell inlet openings, inducer<br />
housing, flue collector box, and along sides and bottom of cell<br />
panel.<br />
3. Seal any air leaks by pressing Presstite sealant (provided in<br />
kit) into area of air leak.<br />
4. After completing air leak check, unblock discharge air registers.<br />
Operate furnace through 1 complete heating cycle and<br />
check for proper operation.<br />
5. Using procedures in unit <strong>Installation</strong> <strong>Instructions</strong>, check input<br />
rate and temperature rise.<br />
6. Reinstall gas control access door.<br />
7. Set room thermostat to desired temperature.<br />
COLD SPOT BAFFLE<br />
1 2 3 4 5 6 7<br />
1 2 3 4 5<br />
UPFLOW FURNACE<br />
DOWNFLOW/HORIZONTAL FURNACE<br />
Fig. 2—Baffle and <strong>Cell</strong> Location<br />
A90226<br />
2
Table 1—Downflow Furnace Cold Spot Baffle Location<br />
UNIT*<br />
373LAV036035<br />
373LAV036050<br />
376CAV036040<br />
376CAV036050<br />
GB3AAV036035<br />
GB3AAV036050<br />
58DHC040-GC<br />
58RAV035-GC<br />
58RAV050-12<br />
58ZAV040-GC<br />
58ZAV050-12<br />
331AAV024065<br />
373LAD024055<br />
373LAD024070<br />
396HAD024055<br />
396HAD024070<br />
GA2AAD024055<br />
GA2AAD024070<br />
58DFA055-EC<br />
58DFA070-08<br />
58RAP070-08<br />
58RAP055-EC<br />
58TMA065-08<br />
331AAV036065<br />
373LAD036055<br />
373LAD036071<br />
373LAV036055<br />
373LAV036070<br />
376CAV036055<br />
376CAV036070<br />
396HAD036055<br />
396HAD036071<br />
GA2AAD036055<br />
GA2AAD036071<br />
GB3AAV036055<br />
GB3AAV036070<br />
58DFA055-GC<br />
58DFA071-12<br />
58DHC055-GC<br />
58TMA065-12<br />
58RAP055-GC<br />
58RAP071-12<br />
58RAV055-GC<br />
58RAV070-12<br />
58ZAV055-GC<br />
58ZAV070-12<br />
331AAV060105<br />
373LAV060090<br />
373LAV060115<br />
376CAV060095<br />
376CAV060115<br />
GB3AAV060090<br />
GB3AAV060115<br />
58DHC095-LC<br />
58RAV090-LC<br />
58RAV115-20<br />
58TMA105-20<br />
58ZAV095-LC<br />
58ZAV115-20<br />
BAFFLE LOCATION<br />
<strong>Cell</strong>s No. 1 and 2<br />
<strong>Cell</strong> No. 2 Only<br />
<strong>Cell</strong>s No. 1, 2, and 3<br />
<strong>Cell</strong> No. 3 Only<br />
3
UNIT*<br />
373LAD060090<br />
373LAD060110<br />
396HAD060090<br />
396HAD060110<br />
GA2AAD060090<br />
GA2AAD060110<br />
58DFA090-LC<br />
58DFA110-20<br />
58RAP090-LC<br />
58RAP110-20<br />
331AAV060125<br />
373LAD060105<br />
373LAD060135<br />
396HAD060105<br />
396HAD060135<br />
GA2AAD060105<br />
GA2AAD060135<br />
58DFA100-JC<br />
58DFA100-LC<br />
58DFA105-LC<br />
58DFA135-20<br />
58RAP105-LC<br />
58RAP135-20<br />
58TMA125-20<br />
* Only models listed are equipped with cold spot baffles.<br />
BAFFLE LOCATION<br />
<strong>Cell</strong>s No. 2 and 4<br />
<strong>Cell</strong>s No. 3 and 4<br />
4
Table 2—Upflow Furnace Wing Baffle Location<br />
UNIT *<br />
330AAV036100<br />
330AAV048100<br />
383KAD036085<br />
383KAD036105<br />
383KAD048085<br />
383KAD048105<br />
383KAD066085<br />
383KAD060105<br />
383KAV036090<br />
383KAV036110<br />
383KAV048090<br />
383KAV048111<br />
394HAD036085<br />
394HAD036105<br />
394HAD048085<br />
394HAD048105<br />
394HAD066085<br />
394HAD060105<br />
395CAV036090<br />
395CAV036110<br />
395CAV048090<br />
395CAV048111<br />
GA1AAD036085<br />
GA1AAD036105<br />
GA1AAD048085<br />
GA1AAD048105<br />
GA1AAD066085<br />
GA1AAD066105<br />
GB1AAV036090<br />
GB1AAV036110<br />
GB1AAV048090<br />
GB1AAV048111<br />
58GFA085-GC<br />
58GFA105-12<br />
58GFA085-JC<br />
58GFA105-16<br />
58GFA085-MC<br />
58GFA105-22<br />
58PAP085-GC<br />
58PAP105-12<br />
58PAP085-JC<br />
58PAP105-16<br />
58PAP085-MC<br />
58PAP105-22<br />
58PAV090-GC<br />
58PAV110-12<br />
58PAV090-JC<br />
58PAV111-16<br />
58SSC090-GC<br />
58SSC090-JC<br />
58TUA100-12<br />
58TUA100-16<br />
58WAV090-GC<br />
58WAV110-12<br />
58WAV090-JC<br />
58WAV111-16<br />
BAFFLE LOCATION<br />
<strong>Cell</strong>s No. 2 and 4<br />
5
UNIT *<br />
330AAV060120<br />
330AAV048120<br />
383KAD048100<br />
383KAD048130<br />
383KAD060100<br />
383KAD060130<br />
383KAV048110<br />
383KAV048135<br />
383KAV060110<br />
383KAV060135<br />
394HAD048100<br />
394HAD048130<br />
394HAD060100<br />
394HAD060130<br />
395CAV048110<br />
395CAV048135<br />
395CAV060110<br />
395CAV060135<br />
GA1AAD048100<br />
GA1AAD048130<br />
GA1AAD060100<br />
GA1AAD060135<br />
GB1AAV048110<br />
GB1AAV048135<br />
GB1AAV060110<br />
GB1AAV060135<br />
58GFA100-JC<br />
58GFA100-LC<br />
58PAP100-JC<br />
58PAP130-16<br />
58PAP100-LC<br />
58PAP130-20<br />
58PAV110-JC<br />
58PAV135-16<br />
58PAV110-LC<br />
58PAV135-20<br />
58SSC110-JC<br />
58SSC110-LC<br />
58TMA125-20<br />
58TUA120-16<br />
58TUA120-20<br />
58WAV110-JC<br />
58WAV135-16<br />
58WAV110-LC<br />
58WAV136-20<br />
330AAV060100<br />
383KAV060090 (Series B only)<br />
383KAV060111 (Series C only)<br />
395CAV060090 (Series C only)<br />
395CAV060111 (Series D only)<br />
GB1AAV060090<br />
GB1AAV060111<br />
58PAV090-LC (Series 111 only)<br />
58PAV111-20 (Series 121 only)<br />
58TUA100-20<br />
58WAV090-LC<br />
58WAV111-20<br />
BAFFLE LOCATION<br />
<strong>Cell</strong>s No. 2 and 5<br />
<strong>Cell</strong> No. 3 Only<br />
6
UNIT *<br />
330AAV060135<br />
383KAD060120<br />
383KAD060150<br />
383KAV060125<br />
383KAV060155<br />
394HAD060120<br />
394HAD060150<br />
395CAV060130<br />
395CAV060155<br />
GA1AAD060120<br />
GA1AAD060150<br />
GB1AAV060125<br />
GB1AAV060155<br />
58GFA120-LC<br />
58GFA150-20<br />
58PAP120-LC<br />
58PAP150-20<br />
58PAV125-LC<br />
58PAV155-20<br />
58TUA135-20<br />
58SSC130-LC<br />
58WAV130-LC<br />
58WAV155-20<br />
* Only models listed are equipped with wing baffles.<br />
BAFFLE LOCATION<br />
<strong>Cell</strong>s No. 3 and 5<br />
7
Copyright 1993 Carrier Corporation 15103<br />
Manufacturer reserves the right to discontinue, or change at any time, specifications or designs without notice and without incurring obligations.<br />
Book 1 4 PC 101 Catalog No. 535-899 Printed in U.S.A. Form 58DFA-10SI Pg 8 12-93 Replaces: 58DFA-6SI<br />
Tab 6a 8a