Download PDF instructions for Deluxe Folding Commode
Download PDF instructions for Deluxe Folding Commode
Download PDF instructions for Deluxe Folding Commode

Create successful ePaper yourself
Turn your PDF publications into a flip-book with our unique Google optimized e-Paper software.
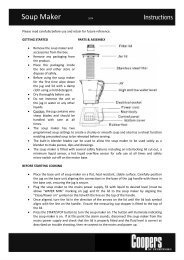
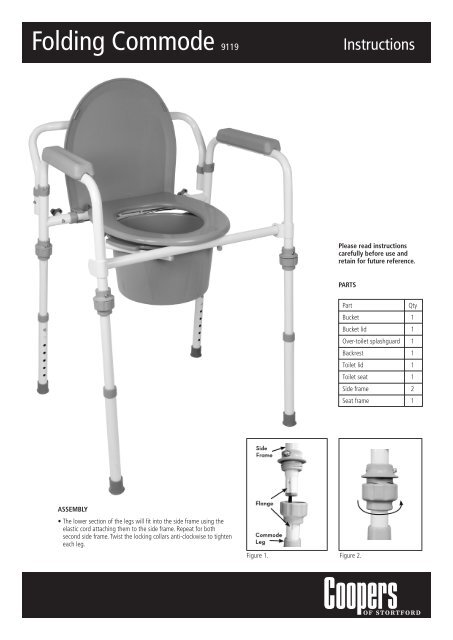
<strong>Folding</strong> <strong>Commode</strong> 9119<br />
Instructions<br />
Please read <strong>instructions</strong><br />
carefully be<strong>for</strong>e use and<br />
retain <strong>for</strong> future reference.<br />
PARTS<br />
Part<br />
Qty<br />
Bucket 1<br />
Bucket lid 1<br />
Over-toilet splashguard 1<br />
Backrest 1<br />
Toilet lid 1<br />
Toilet seat 1<br />
Side frame 2<br />
Seat frame 1<br />
ASSEMBLY<br />
• The lower section of the legs will fit into the side frame using the<br />
elastic cord attaching them to the side frame. Repeat <strong>for</strong> both<br />
second side frame. Twist the locking collars anti-clockwise to tighten<br />
each leg.<br />
Figure 1. Figure 2.
• Slide the seat frame into the side frame until the push pin snaps into<br />
place. Once in place, tighten the locking knob. Repeat <strong>for</strong> the second<br />
side frame.<br />
• Adjust legs to the desired height, ensuring the<br />
push pins pop into place and that all 4 legs are<br />
the same height. Check legs are secure<br />
be<strong>for</strong>e use.<br />
Figure 3.<br />
Bucket Support<br />
Frame<br />
USE<br />
• Suitable <strong>for</strong> use as a portable folding commode<br />
or as a frame over an existing toilet to raise the<br />
seating position. When using as a commode<br />
always, use the bucket. When using as a frame<br />
over an existing toilet, use the splashguard.<br />
• The toilet seat must be in the down position<br />
be<strong>for</strong>e use.<br />
Figure 4.<br />
• Fold out the side frames and lift the seat frame. Slide the seat frame into<br />
the side frames until the push pins snap into place ensuring the bucket<br />
frame is on the underside of the seat frame.<br />
Bucket Support<br />
Frame<br />
Figure 5.<br />
WARNING<br />
• Check all parts <strong>for</strong> damage be<strong>for</strong>e use.<br />
• Do NOT use if damaged.<br />
• Check that all push pins are securely in position be<strong>for</strong>e each use.<br />
• Always ensure all 4 legs are set at the same height be<strong>for</strong>e use.<br />
• Do NOT use on an incline as this may result in spillage.<br />
• Take care during use and during transportation to avoid spills.<br />
• Always carry bucket by the carry handle.<br />
• Ensure you do not contravene public order legislation when<br />
using this product.<br />
• Empty the bucket into a toilet at the earliest convenience<br />
after use.<br />
• Periodically check to ensure all fixings are secure and tighten<br />
if necessary.<br />
• Ensure the commode is stable and that all 4 feet touch the<br />
ground simultaneously.<br />
• Users with limited physical strength should be assisted or<br />
supervised when using this item.<br />
• Maximum bucket capacity: 5.68L (10pts)<br />
• Do NOT exceed maximum capacity.<br />
• Maximum weight load capcity 120kg (18st 8lb).<br />
Figure 6.<br />
• Attach the backrest to the main<br />
frame ensuring the push pins pop<br />
into place.<br />
Bottom<br />
• Place the bucket or splashguard into<br />
the frame. Clip the seat and lid onto<br />
the back of the frame.<br />
CLEANING<br />
• Clean after each use using bleach or household toilet cleaner.<br />
• Always empty fully be<strong>for</strong>e cleaning.<br />
If <strong>for</strong> any reason you need to return this item, please<br />
ensure the item is cleaned fully be<strong>for</strong>e you do so. For<br />
health and safety reasons, we are unable to accept any<br />
soiled returns.<br />
PACKAGING DISPOSAL:<br />
• Dispose of packaging at your local recycling centre.<br />
• Dispose of paper and carton separately from plastic bags at your<br />
local recycling centre.<br />
• Dispose of item at the end of its lifespan at your local authorised<br />
household waste recycling centre.<br />
Figure 7. Figure 8.