METAL DETECTOR WITH HEADPHONES - Coopers of Stortford
METAL DETECTOR WITH HEADPHONES - Coopers of Stortford
METAL DETECTOR WITH HEADPHONES - Coopers of Stortford

Create successful ePaper yourself
Turn your PDF publications into a flip-book with our unique Google optimized e-Paper software.
<strong>METAL</strong> <strong>DETECTOR</strong> <strong>WITH</strong> <strong>HEADPHONES</strong><br />
8042<br />
Head Office:<br />
11 Bridge Street<br />
Bishops <strong>Stortford</strong><br />
Hertfordshire<br />
CM23 2JU<br />
Customer Services:<br />
Tel: 0844 482 4400<br />
Fax: 01279 713695
CONTENTS<br />
Pg<br />
Features……………………………………………………………………... 3<br />
Preparation………………………………………………………………….. 3<br />
Assembling the detector………………………………………………… 3<br />
Installing the batteries…………………………………………………… 4<br />
Using headphones……………………………………………………….. 4<br />
Listening safely…………………………………………………………… 4<br />
Functions and indications………………………………………………….. 5<br />
A quick look at the detector……………………………………………… 5<br />
Displays…………………………………………………………………… 5<br />
Tones……………………………………………………………………… 6<br />
Operation……………………………………………………………………. 6<br />
Turning on the detector………………………………………………… 6<br />
Setting the operation mode……………………………………………… 6<br />
Testing and using the detector………………………………………….. 7<br />
Indoor testing and use………………………………………………… 7<br />
Outdoor testing and use………………………………………………. 7<br />
Search coil sweeping hints………………………………………………. 7<br />
Adjusting sensitivity……………………………………………………… 8<br />
Application Hints……………………………………………………………. 8<br />
Pinpointing the target……………………………………………………. 8<br />
Factors that affect the detecting………………………………………… 9<br />
Care and maintenance……………………………………………………... 9<br />
2
With your Metal Detector with Headphones, you can hunt for coins, relics, jewellery, gold, and silver just about anywhere.<br />
The detector is versatile and easy to use.<br />
The detector’s features include:<br />
LCD Display—shows the probable type <strong>of</strong> metal with an arrow, the depth <strong>of</strong> the target, DISC/NOTCH range, the level <strong>of</strong><br />
SENS with segment, the operating mode, and low battery indication.<br />
Three Tone Audio Discrimination—sounds distinctive tones for different types <strong>of</strong> metal.<br />
Notch—ignores scrap metal and finds valuable items by setting the disc and notch range.<br />
Super Slow Sweep Identification—with a very slow sweep <strong>of</strong> the search coil to discriminate against different types <strong>of</strong><br />
metal.<br />
Headphone Jack—lets you connect headphones (supplied) to the metal detector.<br />
Waterpro<strong>of</strong> Search coil—lets you use the detector coil under water.<br />
Note: Your metal detector requires 2 x 9-Volt alkaline batteries (not supplied).<br />
PREPARATION<br />
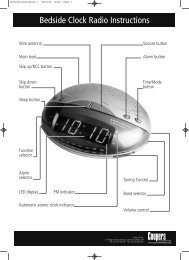
ASSEMBLING THE <strong>DETECTOR</strong><br />
Assembling your detector is easy and does not require any special tools. Just follow these steps.<br />
1. Turn the stem’s lock nut clockwise until it loosens.<br />
2. Lengthen or shorten so when you stand upright with the detector in your hand, the search coil is level with and about<br />
1.2-5cm (1/2 to 2 inches) above the ground with your arm relaxed at your side.<br />
3. Turn the stem’s lock nut counter-clockwise to lock it in place.<br />
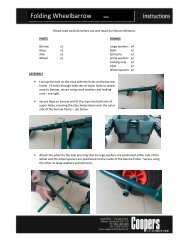
4. Unscrew the knob on the search coil and remove the knob connector. Insert the stem and align the holes on the<br />
search coil bracket and the stem. Push the connector through the holes and tighten the knob.<br />
5. Wind the search coil cable around the stem. Leave enough slack in the cable.<br />
6. Insert the search coil’s plug into the search coil jack on the detector’s control housing.<br />
Caution:<br />
<br />
The search coil’s plug fits into the connector only one way. Do not force the plug you could damage it.<br />
SEARCHCOIL<br />
KNOB CONNECTOR<br />
STEM<br />
LOCK NUT<br />
CABLE<br />
ARM SUPPORT<br />
3
7. Loosen the knob at the search coil’s end, and then adjust the search coil to the desired angle so that it is parallel with<br />
the ground. Then tighten the knob.<br />
Caution: Do not over-tighten the search coil or use tools such as pliers to tighten it.<br />
8. Insert the arm support into the end <strong>of</strong> the stem and tighten the lock screw.<br />
INSTALLING THE BATTERIES<br />
Cautions:<br />
<br />
<br />
Use only fresh 9V alkaline batteries.<br />
Do not mix the old and new batteries or different types <strong>of</strong> batteries.<br />
1. Slide the left and right battery covers <strong>of</strong>f in the direction <strong>of</strong> the arrow.<br />
2. Place a 9V battery into the battery compartment matching the polarity symbols (+ and -) marked inside.<br />
3. Switch on using the POWER button.<br />
Warning:<br />
<br />
Dispose <strong>of</strong> old batteries promptly and according to local authority waste disposal guidelines. Never bury or burn<br />
them.<br />
Caution:<br />
<br />
<br />
If you plan not to use the unit for a week or more at a time, remove the batteries. Batteries can leak chemicals that<br />
can destroy electronic parts if left for extended periods <strong>of</strong> time.<br />
To extend the battery life, swap the left and right battery after 3-4hours <strong>of</strong> operation.<br />
USING <strong>HEADPHONES</strong><br />
1. Insert the headphones’ 3.5mm plug into the PHONE jack. At this time the internal speaker disconnects.<br />
2. Set the VOLUME to the desired setting.<br />
Headphone jack<br />
Listening Safely<br />
<br />
<br />
<br />
To protect your hearing, set the volume to the lowest setting before you plug the headphones in. Adjust the volume<br />
to a comfortable level.<br />
Do not listen at extremely high volume levels. Extended high volume listening can lead to permanent hearing loss or<br />
damage to hearing.<br />
Do not wear headphones while operating your detector near high-traffic areas. Pay attention to traffic safety.<br />
4
FUNCTIONS AND INDICATIONS<br />
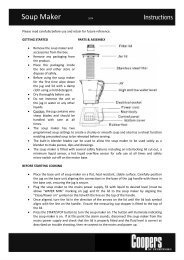
1. A QUICK LOOK AT THE <strong>DETECTOR</strong><br />
TARGET INDICATOR<br />
LCD SCREEN<br />
INDICATION PANEL<br />
VOLUME CONTROL<br />
FUNCTION PANEL<br />
OPERATION MODE<br />
BUTTONS<br />
UP & DOWN<br />
SENSITIVITY<br />
DISC/NOTCH<br />
POWER<br />
2. DISPLAYS<br />
The target indicator includes target icons and LCD displays and is located at the top <strong>of</strong> the detector. It can indicate<br />
coins <strong>of</strong> different type, gold, silver etc. When the detector detects an object, an arrow appears below the target icon <strong>of</strong><br />
probable type <strong>of</strong> metal being detected. Also displays the depth <strong>of</strong> the target. If the detector receives a strong signal, the<br />
arrow appears steadily. If the signal is weak, the arrow blinks or does not appear.<br />
Note:<br />
<br />
<br />
<br />
If the detecting pauses for about 5 seconds, the arrow will disappear.<br />
If an arrow points to a coin denomination, the detector might be detecting either a coin or another type <strong>of</strong> metal<br />
(such as jewellery, tokens, medals, or even scrap metal) about same size and type as a coin.<br />
Since the indications are approximations, the detector may not have actually found the item it indicates. The<br />
indicator is only a visual reference to help you decide if an item is worth investigating.<br />
<strong>METAL</strong> ICONS<br />
TARGET INDICATION<br />
SENSITIVITY LEVEL<br />
LOW BATT<br />
DISC/NOTCH RANGE<br />
DEPTH<br />
OPERATION MODE<br />
BUTTONS<br />
SENSITIVITY DISC/NOTCH<br />
CONTROL INDICATION<br />
GOLD Range<br />
IRON FOIL—indicates that the target is probably iron or foil. Some rusty iron might register somewhere within the<br />
SILVER range.<br />
5¢(NICKEL)—indicates that the target has a high nickel content.<br />
PULL TAB—indicates that the target is probably a pull tab from aluminium can. Some rough gold items might register<br />
within PULL TAB category.<br />
S-CAPS—indicate that the target is probably a type <strong>of</strong> metal like bottle cap with whorl. Some small gold items might<br />
register within this category.<br />
1¢—indicates that the target might be a zinc or copper coin. Some large gold items might register within 1¢ category.<br />
5
SILVER Range<br />
1¢ 25¢--indicates that the target possibly has a silver content. Some large aluminium coins might register within 1¢ 25¢<br />
category.<br />
TONES<br />
If the detector is set to the ALL <strong>METAL</strong> target mode, it sounds a single tone when it detects any type <strong>of</strong> metal. If you set<br />
the detector to the DISC or NOTCH modes, the built in audio identification system sounds a unique audio tone for each <strong>of</strong><br />
three categories <strong>of</strong> metal. This makes it easier to identify the metal being detected.<br />
The detector sounds a low tone when it detects small gold items, nails, bottle caps or nickel items. A medium tone for<br />
aluminium pull tabs, zinc or copper items. A high tone is for brass or silver items.<br />
Notes:<br />
<br />
<br />
<br />
When you set the detector to DISC or NOTCH mode, the detector sounds a medium or high tone when it detects<br />
highly rusted iron. An arrow appears in medium or high tone area.<br />
Depending on the alloys used to make them, about 15 percent <strong>of</strong> gold rings cause the detector to sound a medium<br />
tone.<br />
LOW TONE<br />
MEDIUM TONE<br />
OPERATION<br />
TURNING ON THE <strong>DETECTOR</strong><br />
1. Switch the POWER switch to ON. The unit displays all symbols on the LCD screen. The detector sounds low, medium<br />
& high tones respectively. After a few seconds the detector enters stand-by mode.<br />
At this time the LCD displays ALL <strong>METAL</strong> and SENS. The value <strong>of</strong> SENS on the segment is 5. The range from MIN to<br />
MAX for DISC/NOTCH is available.<br />
2. SETTING THE OPERATING MODE<br />
The detector comes with three operating modes <strong>of</strong> ALL <strong>METAL</strong>, DISC and NOTCH. You can select the desired mode<br />
by pressing the relevant button.<br />
a. ALL <strong>METAL</strong>—used for detecting any type <strong>of</strong> metal. When the detector detects any type <strong>of</strong> metal, it sounds a tone.<br />
Note: When you operate in this mode, controls <strong>of</strong> DISC and NOTCH do not function, except SENS. To adjust the<br />
sensitivity, first press SENS and UP to increase the sensitivity, then press DN to decrease it.<br />
b. DISC—used for target discrimination. You can set the target range from MAX to MIN by pressing DISC/NOTCH and<br />
UP & DN keys. The detector can detect the metal type indicated on the display. Meanwhile the detector ignores other<br />
metal types without displaying on the screen. For example, press DN key, 4 levels on segment from Max to Min is<br />
increased. Now, the detector can detect S- CAPS, 1¢ and also 25¢, other types <strong>of</strong> metal are ignored.<br />
c. NOTCH—to ignore the metal type you do not want. You can select the metal type desired by pressing the UP and DN<br />
keys. The LCD segment will indicate the selected types <strong>of</strong> metal. The detector will then only detect the selected metal<br />
type.<br />
6
TESTING AND USING THE <strong>DETECTOR</strong><br />
To learn how the detector reacts to different metals, you should test it before you use it the first time. You can test the<br />
detector indoors and outdoors.<br />
Indoor Testing and Use<br />
1. Switch the POWER switch to ON.<br />
2. Set the operating mode.<br />
3. Place the detector on a wooden or plastic table, and then remove any watches, rings, or metal jewellery you are<br />
wearing.<br />
4. Adjust the search coil so the flat part points towards the ceiling.<br />
Note:<br />
Never test the detector on a floor inside a building. Most buildings have metal <strong>of</strong> some kind in the floor, which might<br />
interfere with the objects you’re testing or mask the signal completely.<br />
5. Slowly sweep a sample <strong>of</strong> the material you want the detector to find (such as a gold ring or coin) 2-3 inches or more<br />
above the face <strong>of</strong> the search coil. When the detector detects any metal, it sounds a tone and an arrow appears below<br />
the target icon. Also LCD displays the depth <strong>of</strong> the target.<br />
Note:<br />
If you are using a coin, the detector will detect it more easily if you hold it so a flat side is parallel with the flat side <strong>of</strong> the<br />
search coil. A sweep with the side <strong>of</strong> coin over search coil might cause false indication and unstable display <strong>of</strong> arrow.<br />
Outdoor Testing and Use<br />
1. Switch POWER to ON. Set the operating mode.<br />
2. Find an area on the ground outside where there is no metal.<br />
3. Place a sample <strong>of</strong> the material you want the detector to find (such as a gold ring or a coin) on the ground.<br />
Note:<br />
If you are using valuable metal such as gold to test the detector, mark the area where you place the item, to help you find<br />
it later. Do not place it in tall grass or underneath dense foliage!<br />
4. Hold the search coil level to the ground about 2.5-5cm (1-2 inches) above the surface, slowly move the search coil<br />
over the area where you placed the sample, sweeping the search coil in a side-to-side motion.<br />
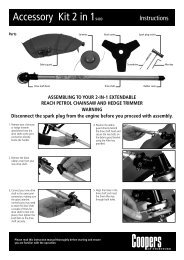
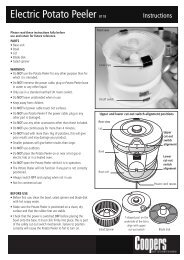
Search coil Sweeping Hints:<br />
<br />
Never sweep the search coil as if it were a pendulum. Raising the search coil while sweeping or at the end <strong>of</strong> a<br />
sweep will cause false readings.<br />
7
Correct<br />
Incorrect<br />
<br />
<br />
Sweep slowly. Hurrying will cause you to miss targets.<br />
It is better you sweep the search coil from side to side in an arc line <strong>of</strong> 7.5cm (3 inches) motion and keep the search<br />
coil parallel with the ground.<br />
If the detector detects the item, it sounds a tone. An arrow and the depth appear on the display below the target<br />
icon. If the detector does not detect the item, make sure that the target mode is set correctly for the type <strong>of</strong> metal<br />
you’re searching for. Also make sure that you’re moving the search coil correctly.<br />
Notes:<br />
<br />
<br />
<br />
The detector responds with a signal when it detects most valuable metal objects. If a signal does not repeat<br />
after you sweep the search coil over the target a few times, the target is probably scrap metal.<br />
False signals can be caused by litter-strewn ground, electrical interference, or a large irregular-shaped piece <strong>of</strong><br />
scrap metal.<br />
False signals are usually broken or intermittent.<br />
Adjusting SENSITIVITY<br />
After you become familiar with how your detector works, it’s important to fine tune the sensitivity to get the best<br />
performance. Press the button SENS button on the panel. Then press UP or DN key to increase or decrease the<br />
sensitivity. The level on the segment will be displayed from high to low position.<br />
Note:<br />
In order to detect the target deeply buried, you can adjust the SENS to a higher position. Setting the level <strong>of</strong> SENS<br />
to Max position, may cause the detector to receive interference and false signals from broadcast antenna and other<br />
electronic lines. The detector may have unstable arrow and irregular tone indications.<br />
Application Hints<br />
Pinpointing the Target<br />
Accurately pinpointing a target makes digging it up easier. But this takes practice. We suggest you practice finding<br />
sample on your own property before you search in other locations.<br />
8
Follow these steps to pinpoint a target:<br />
1. When the detector detects a buried target, continue sweeping the search coil over the target in a narrowing<br />
side-to-side motion.<br />
2. Make a visual note <strong>of</strong> exact spot on the ground where the detector beeps.<br />
3. Stop the search coil directly over this point on the ground. Then move the search coil straight forward away from you<br />
and straight back towards you a couple <strong>of</strong> times.<br />
4. Repeat steps 1-3 at a right angle to the original search line. Make a mark <strong>of</strong> “X”. The target will be directly below the<br />
“X” at the point <strong>of</strong> the beep response.<br />
Factors That Affect the Detecting<br />
If it’s difficult to get an accurate result, sometimes detecting may be restricted by external factors.<br />
Conditions for the Target Being Detected<br />
<br />
<br />
<br />
<br />
<br />
The angle <strong>of</strong> the target buried in the soil.<br />
The depth <strong>of</strong> the target.<br />
The level <strong>of</strong> rust on the target.<br />
The size <strong>of</strong> the target.<br />
Electro-magnetic and electrical interference surrounding the target.<br />
If you detect patiently and correctly and keep practicing, you’ll get satisfactory results.<br />
CARE AND MAINTENANCE<br />
The following suggestions will help you care for your metal detector so you can enjoy it for years.<br />
Handle the detector gently and carefully. Dropping it can damage circuit boards and the case and will<br />
cause the detector to work improperly.<br />
Use the detector only in normal temperature environments. Temperature extremes can shorten the life <strong>of</strong><br />
electronic devices, plus damage the cases <strong>of</strong> the detector.<br />
Keep the detector away from dust and dirt, which can cause premature wear <strong>of</strong> parts.<br />
Wipe the detector with a damp cloth occasionally to keep it looking new. Do not use abrasive chemicals,<br />
cleaning solvents, or strong detergents to clean the detector.<br />
9