Download PDF instructions for Home Help Alarm - Coopers of ...
Download PDF instructions for Home Help Alarm - Coopers of ...
Download PDF instructions for Home Help Alarm - Coopers of ...

You also want an ePaper? Increase the reach of your titles
YUMPU automatically turns print PDFs into web optimized ePapers that Google loves.
<strong>Help</strong> <strong>Alarm</strong> 9281<br />
Getting Started:<br />
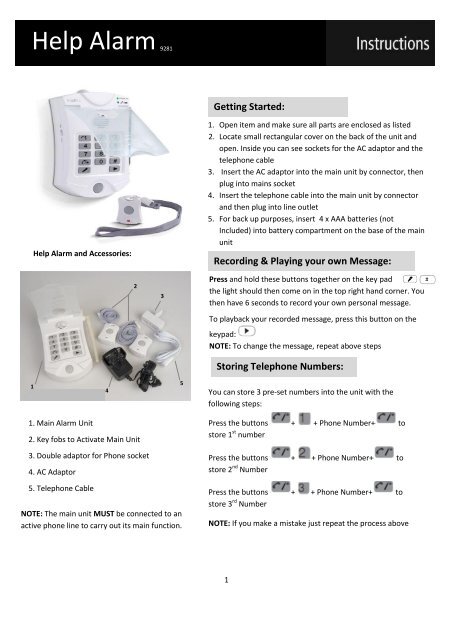
<strong>Help</strong> <strong>Alarm</strong> and Accessories:<br />
1. Open item and make sure all parts are enclosed as listed<br />
2. Locate small rectangular cover on the back <strong>of</strong> the unit and<br />
open. Inside you can see sockets <strong>for</strong> the AC adaptor and the<br />
telephone cable<br />
3. Insert the AC adaptor into the main unit by connector, then<br />
plug into mains socket<br />
4. Insert the telephone cable into the main unit by connector<br />
and then plug into line outlet<br />
5. For back up purposes, insert 4 x AAA batteries (not<br />
Included) into battery compartment on the base <strong>of</strong> the main<br />
unit<br />
Recording & Playing your own Message:<br />
2<br />
3<br />
Press and hold these buttons together on the key pad red LED<br />
the light should then come on in the top right hand corner. You<br />
then have 6 seconds to record your own personal message.<br />
To playback your recorded message, press this button on the<br />
keypad:<br />
NOTE: To change the message, repeat above steps<br />
Storing Telephone Numbers:<br />
#<br />
1<br />
4<br />
5<br />
You can store 3 pre-set numbers into the unit with the<br />
following steps:<br />
1. Main <strong>Alarm</strong> Unit<br />
2. Key fobs to Activate Main Unit<br />
3. Double adaptor <strong>for</strong> Phone socket<br />
4. AC Adaptor<br />
5. Telephone Cable<br />
NOTE: The main unit MUST be connected to an<br />
active phone line to carry out its main function.<br />
Press the buttons + + Phone Number+ to<br />
store 1 st number<br />
Press the buttons + + Phone Number+ to<br />
store 2 nd Number<br />
Press the buttons + + Phone Number+ to<br />
store 3 rd Number<br />
NOTE: If you make a mistake just repeat the process above<br />
1
Operation:<br />
The help alarm works as follows;<br />
Press round button on key fob or on the main<br />
unit, the main unit will then automatically dial<br />
the 3 pre-set numbers in turn until one answers<br />
the call<br />
NOTE: The key fob can be used up to 50 Meters<br />
from the main unit<br />
It will call each <strong>of</strong> the 3 numbers <strong>for</strong> 45 seconds.<br />
If the receiver does not answer the phone, it will<br />
keep dialling in the same cycle 5 times and then<br />
turn to standby mode<br />
When the receiver picks up the call from the<br />
help alarm they will hear your pre-recorded<br />
message<br />
Once the pre-recorded message has been<br />
played, the receiver <strong>of</strong> the call can open up a<br />
two way communication by pressing any button<br />
on their telephones keypad. This means the<br />
receiver can listen in on the caller’s property.<br />
If the receiver does not press a button on their<br />
keypad, the <strong>Help</strong> <strong>Alarm</strong> will then dial the next<br />
number. Thias means that if the first number<br />
diverts to voicemail or answer phone, the <strong>Help</strong><br />
<strong>Alarm</strong> will continue to seek help<br />
After communication has been open <strong>for</strong> approx.<br />
45 seconds, there will be a 3 beep tone to<br />
prompt the receiver to extend the talk and listen<br />
time. To extend the time, the receiver must<br />
press any key on their phones keypad when<br />
they hear the 3 beeps, this will extend the talk<br />
and listen time by 60 seconds<br />
Warnings:<br />
Main unit to Key Fob range can be up to 50<br />
Metres. The building construction, walls, & doors<br />
can reduce the range <strong>of</strong> the <strong>Help</strong> <strong>Alarm</strong><br />
depending on their material, thickness, etc.<br />
It is advisable to test the <strong>Help</strong> <strong>Alarm</strong> in the<br />
desired location to check it operates correctly<br />
be<strong>for</strong>e final installation.<br />
Use only the appropriate size batteries<br />
If unit is not used <strong>for</strong> a long period <strong>of</strong> time,<br />
remove the batteries to prevent possible battery<br />
leakage<br />
When red LED <strong>of</strong> main unit is on, the back up<br />
battery is low<br />
When key fob button is pressed the light will<br />
appear green, if it appears red battery is low.<br />
This is NOT a toy, keep away from children.<br />
Technical Specification:<br />
Contact distance within 50M in open area<br />
Radio frequency: 433.92MHz<br />
AC adapter: input 110~240V AC, output 6V DC<br />
Power back up: 4pcs AAA alkaline batteries (not<br />
included)<br />
Dimensions: 120mm x 165mm x 42mm<br />
(W×H×D)<br />
Packaging:<br />
Dispose <strong>of</strong> packaging at your local<br />
recycling centre.<br />
Dispose <strong>of</strong> paper and carton separately<br />
from plastic bags at your local recycling<br />
centre.<br />
Dispose <strong>of</strong> item at the end <strong>of</strong> its lifespan<br />
at your local authorised household waste<br />
recycling centre.<br />
When receiver hangs up the call the main unit<br />
will go into standby mode<br />
Once a call is answered, the main unit will stop<br />
dialling the other pre-set numbers<br />
2