Certificate of Analysis - Andreescu Labor & Soft
Certificate of Analysis - Andreescu Labor & Soft
Certificate of Analysis - Andreescu Labor & Soft
Create successful ePaper yourself
Turn your PDF publications into a flip-book with our unique Google optimized e-Paper software.
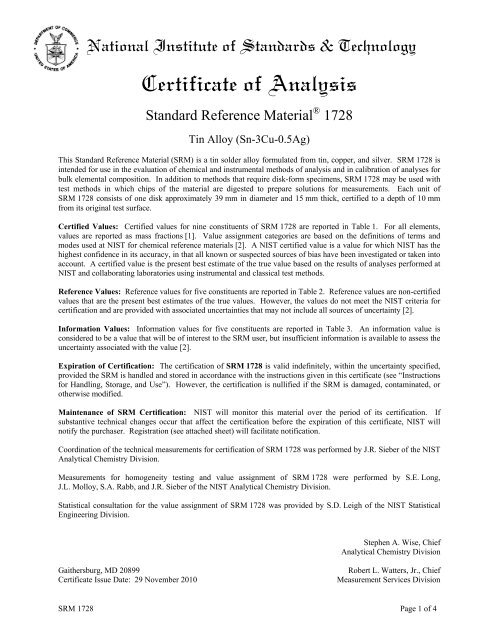
National Institute <strong>of</strong> Standards & Technology<br />
<strong>Certificate</strong> <strong>of</strong> <strong>Analysis</strong><br />
Standard Reference Material ® 1728<br />
Tin Alloy (Sn-3Cu-0.5Ag)<br />
This Standard Reference Material (SRM) is a tin solder alloy formulated from tin, copper, and silver. SRM 1728 is<br />
intended for use in the evaluation <strong>of</strong> chemical and instrumental methods <strong>of</strong> analysis and in calibration <strong>of</strong> analyses for<br />
bulk elemental composition. In addition to methods that require disk-form specimens, SRM 1728 may be used with<br />
test methods in which chips <strong>of</strong> the material are digested to prepare solutions for measurements. Each unit <strong>of</strong><br />
SRM 1728 consists <strong>of</strong> one disk approximately 39 mm in diameter and 15 mm thick, certified to a depth <strong>of</strong> 10 mm<br />
from its original test surface.<br />
Certified Values: Certified values for nine constituents <strong>of</strong> SRM 1728 are reported in Table 1. For all elements,<br />
values are reported as mass fractions [1]. Value assignment categories are based on the definitions <strong>of</strong> terms and<br />
modes used at NIST for chemical reference materials [2]. A NIST certified value is a value for which NIST has the<br />
highest confidence in its accuracy, in that all known or suspected sources <strong>of</strong> bias have been investigated or taken into<br />
account. A certified value is the present best estimate <strong>of</strong> the true value based on the results <strong>of</strong> analyses performed at<br />
NIST and collaborating laboratories using instrumental and classical test methods.<br />
Reference Values: Reference values for five constituents are reported in Table 2. Reference values are non-certified<br />
values that are the present best estimates <strong>of</strong> the true values. However, the values do not meet the NIST criteria for<br />
certification and are provided with associated uncertainties that may not include all sources <strong>of</strong> uncertainty [2].<br />
Information Values: Information values for five constituents are reported in Table 3. An information value is<br />
considered to be a value that will be <strong>of</strong> interest to the SRM user, but insufficient information is available to assess the<br />
uncertainty associated with the value [2].<br />
Expiration <strong>of</strong> Certification: The certification <strong>of</strong> SRM 1728 is valid indefinitely, within the uncertainty specified,<br />
provided the SRM is handled and stored in accordance with the instructions given in this certificate (see “Instructions<br />
for Handling, Storage, and Use”). However, the certification is nullified if the SRM is damaged, contaminated, or<br />
otherwise modified.<br />
Maintenance <strong>of</strong> SRM Certification: NIST will monitor this material over the period <strong>of</strong> its certification. If<br />
substantive technical changes occur that affect the certification before the expiration <strong>of</strong> this certificate, NIST will<br />
notify the purchaser. Registration (see attached sheet) will facilitate notification.<br />
Coordination <strong>of</strong> the technical measurements for certification <strong>of</strong> SRM 1728 was performed by J.R. Sieber <strong>of</strong> the NIST<br />
Analytical Chemistry Division.<br />
Measurements for homogeneity testing and value assignment <strong>of</strong> SRM 1728 were performed by S.E. Long,<br />
J.L. Molloy, S.A. Rabb, and J.R. Sieber <strong>of</strong> the NIST Analytical Chemistry Division.<br />
Statistical consultation for the value assignment <strong>of</strong> SRM 1728 was provided by S.D. Leigh <strong>of</strong> the NIST Statistical<br />
Engineering Division.<br />
Stephen A. Wise, Chief<br />
Analytical Chemistry Division<br />
Gaithersburg, MD 20899<br />
<strong>Certificate</strong> Issue Date: 29 November 2010<br />
Robert L. Watters, Jr., Chief<br />
Measurement Services Division<br />
SRM 1728 Page 1 <strong>of</strong> 4
Support aspects involved in the issuance <strong>of</strong> this SRM were coordinated through the NIST Measurement Services<br />
Division.<br />
INSTRUCTIONS FOR HANDLING, STORAGE, AND USE<br />
Each disk <strong>of</strong> SRM 1728 is certified to a depth <strong>of</strong> 10 mm from the original, as-delivered, certified surface, which is the<br />
surface opposite to the side marked with the SRM number and NIST logo. The last 5 mm <strong>of</strong> the disk is not certified.<br />
NIST has created the surfaces on each disk using a machine cutting technique. If it is necessary to create a new<br />
surface finish on a disk, it is recommended to use a technique such as fly cutting or lathe cutting. Lubricants and<br />
coolants are not recommended. Abrasive grinding is not recommended because particles <strong>of</strong> abrasive may become<br />
embedded in the alloy. In addition, pressure and localized heating are likely to cause smearing <strong>of</strong> one or more<br />
constituent elements, thus altering the composition <strong>of</strong> the surface.<br />
Store the SRM in a cool, dry location, preferably in its original container. The material is subject to superficial<br />
corrosion, and there is some possibility <strong>of</strong> microstructural changes due to recrystallization. However, it will<br />
otherwise remain stable provided adequate precautions are taken to protect it from contamination, extremes <strong>of</strong><br />
temperature, and moisture.<br />
To relate the results <strong>of</strong> analysis to the assigned values and associated uncertainty estimates for SRM 1728, it is<br />
recommended to use a minimum <strong>of</strong> 0.25 g <strong>of</strong> chipped material for destructive test methods. For X-ray fluorescence<br />
spectrometry, common spectrometer designs incorporate measurement areas ≥ 2 cm 2 , which is expected to be<br />
adequate for this material. For optical emission spectrometers, such as glow discharge and arc-spark designs, the use<br />
<strong>of</strong> the average <strong>of</strong> multiple measurements is recommended for a single determination. User experience indicates that<br />
four or more “burns,” each ≥ 3 mm diameter, are necessary.<br />
PREPARATION AND ANALYSIS 1<br />
The material for SRM 1728 was prepared using a chill casting procedure at Universal Scientific <strong>Labor</strong>atory Pty. Ltd.,<br />
Milperra, Australia under the direction <strong>of</strong> W. Ting. Design consultation and manufacturing quality assurance were<br />
provided by C. Eveleigh <strong>of</strong> MBH Analytical, Barnet, UK. Preparation <strong>of</strong> the disks to their final size was<br />
accomplished at NIST under the direction <strong>of</strong> M. Cronise <strong>of</strong> the NIST Measurement Services Division. The<br />
unidirectional solidification effects associated with semi-chill casting have led to segregation and heterogeneity in the<br />
portion <strong>of</strong> the disk beyond the first 10 mm.<br />
Measurements for homogeneity testing <strong>of</strong> SRM 1728 were performed at NIST by X-ray fluorescence spectrometry<br />
and inductively coupled plasma optical emission spectrometry. The material has not been evaluated for use with<br />
techniques for microanalysis. However, preliminary measurements using an X-ray fluorescence spectrometer having<br />
a small X-ray beam (nominally 50 m diameter) revealed the existence <strong>of</strong> small volumes within the alloy (nominally<br />
300 m diameter) that are enriched in either Fe or Pb.<br />
Quantitative determinations were performed using both the solid disks and chips prepared from the certified portions<br />
<strong>of</strong> the disks. The test methods employed by NIST were the following:<br />
Inductively coupled plasma optical emission spectrometry: Ag, As, Bi, Cd, Co, Cr, Cu, Fe, Hg, In, Ni,<br />
Pb, S, Sb, Zn<br />
Cold vapor isotope dilution inductively coupled plasma mass spectrometry: Hg<br />
X-ray fluorescence spectrometry: Ag, Al, As, Bi, Cd, Cr, Cu, Fe, Ni, P, Pb, S, Si, Sn, Zn<br />
The value assignments for SRM 1728 are traceable through calibrations <strong>of</strong> the measurement processes to composition<br />
values <strong>of</strong> primary reference materials maintained by NIST and to NIST SRMs for tin and solder alloys.<br />
1 Certain commercial equipment, instruments, or materials are identified in this certificate in order to specify adequately the<br />
experimental procedure. Such identification does not imply recommendation or endorsement by the National Institute <strong>of</strong><br />
Standards and Technology or the other named parties, nor does it imply that the materials or equipment identified are necessarily<br />
the best available for the purpose.<br />
SRM 1728 Page 2 <strong>of</strong> 4
Table 1. Certified Mass Fraction Values for SRM 1728 Tin Alloy (Sn-3Cu-0.5Ag)<br />
Constituent<br />
Mass Fraction (a)<br />
(%)<br />
Ag 0.4591 0.0031<br />
Cu 3.06 0.12<br />
Constituent<br />
Mass Fraction (a)<br />
(mg/kg)<br />
As 96 20<br />
Cd 58.2 7.2<br />
Fe 111 17<br />
Hg 111.98 0.61<br />
Ni 81.7 3.6<br />
Pb 544 50<br />
S 34.9 0.5<br />
(a) Each certified value is a weighted mean <strong>of</strong> the results from four to five analytical methods [3,4]. The uncertainty <strong>of</strong> a certified<br />
value is an expanded uncertainty about the mean, U, with coverage factor 2 (approximately 95 % confidence) calculated by<br />
combining a between-method variance incorporating inter-method bias with a pooled, within-method variance following the<br />
ISO Guide [5,6].<br />
Table 2. Reference Mass Fraction Values for SRM 1728 Tin Alloy (Sn-3Cu-0.5Ag)<br />
Constituent<br />
Mass Fraction<br />
(mg/kg)<br />
Bi (a) 128 53<br />
Co (b) 57 2<br />
Cr (a) 1.2 0.2<br />
In (b) 31 2<br />
Sb (b) 87 3<br />
(a) Each reference value is a weighted mean <strong>of</strong> the results from four to five analytical methods [3,4]. The uncertainty <strong>of</strong> a certified<br />
value is an expanded uncertainty about the mean, U, with coverage factor 2 (approximately 95 % confidence) calculated by<br />
combining a between-method variance incorporating inter-method bias with a pooled, within-method variance following the<br />
ISO Guide [5,6].<br />
(b)<br />
Each reference value is the mean <strong>of</strong> individual results from a single NIST method. The uncertainty is expressed as an expanded<br />
uncertainty, U, and is calculated according to the method described in the ISO Guide [6] as U = ku c , where u c is a combined<br />
uncertainty calculated at the level <strong>of</strong> one standard deviation. The coverage factor, k = 2, was chosen to approximate 95 %<br />
confidence [7].<br />
Table 3. Information Mass Fraction Values for SRM 1728 Tin Alloy (Sn-3Cu-0.5Ag)<br />
Constituent<br />
Mass Fraction<br />
(%)<br />
Sn 96.3<br />
Constituent<br />
Mass Fraction<br />
(mg/kg)<br />
Al 12<br />
P 10<br />
Si 45<br />
Zn 156<br />
SRM 1728 Page 3 <strong>of</strong> 4
REFERENCES<br />
[1] Thompson, A.; Taylor, B.N.; Guide for the Use <strong>of</strong> the International System <strong>of</strong> Units (SI); NIST Special<br />
Publication 811; U.S. Government Printing Office: Washington, DC (2008); available at<br />
http://ts.nist.gov/WeightsAndMeasures/Metric/mpo_pubs.cfm (accessed Nov 2010).<br />
[2] May, W.; Parris, R.; Beck II, C.; Fassett, J.; Greenberg, R.; Guenther, F.; Kramer, G.; Wise, S.; Gills, T.;<br />
Colbert, J.; Gettings, R.; MacDonald, B.; Definition <strong>of</strong> Terms and Modes Used at NIST for Value-Assignment <strong>of</strong><br />
Reference Materials for Chemical Measurements; NIST Special Publication 260-136 (2000); available at<br />
http://ts.nist.gov/MeasurementServices/ReferenceMaterials/PUBLICATIONS.cfm (accessed Nov 2010).<br />
[3] Rukhin, A.L., Weighted means statistics in interlaboratory studies, Metrologia, Vol. 46, pp. 323–331 (2009).<br />
[4] DerSimonian, R.; Laird, N.; Meta-analysis in Clinical Trials, Control Clin. Trials, Vol. 7, pp. 177–188 (1986).<br />
[5] Horn, R.A., Horn, S.A.; Duncan, D.B.; Estimating Heteroscedastic Variance in Linear Models; J. Am. Stat.<br />
Assoc., Vol. 70, pp. 380–385 (1975).<br />
[6] JCGM 100:2008; Evaluation <strong>of</strong> Measurement Data — Guide to the Expression <strong>of</strong> Uncertainty in Measurement<br />
(ISO GUM 1995 with Minor Corrections); Joint Committee for Guides in Metrology (2008); available at<br />
http://www.bipm.org/utils/common/documents/jcgm/JCGM_100_2008_E.pdf (accessed Nov 2010); see also<br />
Taylor, B.N.; Kuyatt, C.E.; Guidelines for Evaluating and Expressing the Uncertainty <strong>of</strong> NIST Measurement<br />
Results; NIST Technical Note 1297; U.S. Government Printing Office: Washington, DC (1994); available at<br />
http://www.nist.gov/physlab/pubs/index.cfm (accessed Nov 2010).<br />
[7] Hahn, G.J.; Meeker, W.Q.; Statistical Intervals: A Guide for Practitioners; John Wiley & Sons, Inc.: New York<br />
(1991).<br />
Users <strong>of</strong> this SRM should ensure that the <strong>Certificate</strong> <strong>of</strong> <strong>Analysis</strong> in their possession is current. This can be<br />
accomplished by contacting the SRM Program: telephone (301) 975-2200; fax (301) 926-4751; e-mail<br />
srminfo@nist.gov; or via the Internet http://www.nist.gov/srm.<br />
SRM 1728 Page 4 <strong>of</strong> 4


