Please click here for the RP4-GM11 instruction manual - PAC Audio
Please click here for the RP4-GM11 instruction manual - PAC Audio
Please click here for the RP4-GM11 instruction manual - PAC Audio

Create successful ePaper yourself
Turn your PDF publications into a flip-book with our unique Google optimized e-Paper software.
<strong>RP4</strong>-<strong>GM11</strong><br />
Radio Replacement & Steering Wheel Control Interface<br />
<strong>for</strong> General MotorsVehicles<br />
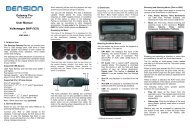
Introduction & Features<br />
The <strong>RP4</strong>-<strong>GM11</strong> interface allows <strong>the</strong> replacement of a factory radio in select General Motors vehicles with Class II radios.<br />
Using this interface will retain factory features such as steering wheel controls (SWC), Warning Chimes, Rear Seat<br />
Controls (RSC, select vehicles) and <strong>the</strong> BOSE amplifier (Standard or Premium) when <strong>the</strong> original radio is removed. The<br />
<strong>RP4</strong>-<strong>GM11</strong> also provides data bus driven outputs such as retained accessory power (RAP), vehicle speed sensor (VSS),<br />
illumination, reverse trigger and parking brake.<br />
Important Notes<br />
1. The radio select rotary switch on <strong>the</strong> side of <strong>the</strong> interface must be adjusted to <strong>the</strong> proper radio setting be<strong>for</strong>e plugging <strong>the</strong> interface into <strong>the</strong><br />
vehicle (see below <strong>for</strong> setting chart).<br />
2. The interface comes pre-programmed <strong>for</strong> all of <strong>the</strong> vehicles factory SWC functions and does not require programming unless you wish to<br />
re-assign <strong>the</strong> SWC functions to different buttons. The SWC can always be restored to default settings by pressing and releasing <strong>the</strong> program<br />
button on <strong>the</strong> side of <strong>the</strong> interface once and waiting 7 seconds <strong>for</strong> <strong>the</strong> LED to flash 4 times. PLEASE NOTE: Due to <strong>the</strong> many different<br />
possible OEM SWC configurations, some applications may need to be reprogrammed <strong>for</strong> <strong>the</strong> SWC assignments to make sense.<br />
3. RSC buttons that are identical to <strong>the</strong> SWC will mimic <strong>the</strong> SWC one <strong>for</strong> one.<br />
4. To prevent over driven audio when installing into a vehicle with a Bose system and <strong>the</strong> aftermarket radio does not have low level outputs<br />
<strong>the</strong>n an LOC (part # SNI-35 or OEM-2) is recommended to match <strong>the</strong> input voltage or you can create an audio attenuation circuit (see diagram<br />
2 below <strong>for</strong> audio attenuation wiring).<br />
5. To prevent ground loop or engine noise when installing aftermarket radios that use a common ground on <strong>the</strong> outer shield of <strong>the</strong> low level<br />
outputs will require a ground loop isolator (part # SNI-1)<br />
6. The LED will flash whenever a SWC button is pressed.<br />
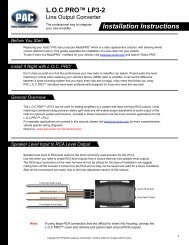
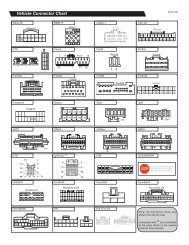
Wiring Connection Chart<br />
Interface Connector<br />
Vehicle Connector<br />
SWC Connector<br />
Red / White<br />
Purple / White<br />
Blue / White<br />
Red<br />
Orange / White<br />
Parking Brake<br />
Output (-)*<br />
Vehicle Speed<br />
Output *<br />
Amp Turn On Input<br />
Accessory Output<br />
Illumination Output<br />
(+)<br />
Green Reverse Output (+)*<br />
*Not all radios will have <strong>the</strong>se<br />
connections. <strong>Please</strong> insulate<br />
<strong>the</strong>se wires when not used.<br />
Yellow Battery +12v<br />
Black<br />
Ground<br />
White Front L + input<br />
White / Black Front L - input<br />
Grey Front R + input<br />
Grey / Black Front R - input<br />
Green Rear L + input<br />
Green / Black Rear L - input<br />
Purple Rear R + input x4<br />
Purple / Black Rear R - input<br />
Blue/Yellow<br />
3.5mm Jack<br />
Kenwood, Newer<br />
JVC, OEM or<br />
Blaupunkt<br />
Alpine, JVC,<br />
Clarion, Fusion,<br />
Pioneer, Sony,<br />
Valor, Boyo, Dual,<br />
Lightning <strong>Audio</strong>,<br />
Visteon or Advent<br />
Illustration / Schematic<br />
Wiring<br />
SWC Connection<br />
®<br />
Aftermarket<br />
Radio<br />
Connections<br />
SWC Connection<br />
Vehicle<br />
Connections<br />
Cut <strong>for</strong> Non-Bose systems<br />
See above chart <strong>for</strong><br />
different radio type<br />
connections<br />
Pacific Accessory Corporation<br />
Pacific Accessory Corporation ® | Santa Ana, Cali<strong>for</strong>nia 92705 | Ph. 866-931-8021 | support@pac-audio.com<br />
©2013 Pacific Accessory Corporation<br />
www.pac-audio.com<br />
Rev. 050313<br />
Page 1
1 2 3 4 5 6 7 8 9 0<br />
1 2 3 4 5 6 7 8 9 0<br />
<strong>RP4</strong>-<strong>GM11</strong><br />
Radio Replacement & Steering Wheel Control Interface<br />
<strong>for</strong> General Motors Vehicles<br />
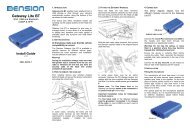
Installation Steps<br />
SET RADIO SELECT SWITCH<br />
Alpine Blaupunkt Clarion Fusion JVC Kenwood OEM Pioneer/Sony/O<strong>the</strong>r Valor<br />
1 8 4 9 2 3 6 7 5<br />
O<strong>the</strong>r = Advent, BOYO, Dual, Lightning <strong>Audio</strong>, Visteon,<br />
1.The radio select rotary switch on <strong>the</strong> side of <strong>the</strong> interface must be adjusted to <strong>the</strong> proper radio<br />
setting be<strong>for</strong>e plugging <strong>the</strong> interface into <strong>the</strong> vehicle.<br />
2. Make all connections as described in <strong>the</strong> chart on page 1. If t<strong>here</strong> is a Bose® <strong>Audio</strong> system present: Connect <strong>the</strong> RCA inputs to <strong>the</strong><br />
aftermarket radios pre-amp output. The audio level will vary depending on <strong>the</strong> new radios pre-amp output voltage (2-4 volts is recommended).<br />
If t<strong>here</strong> is not a Bose® <strong>Audio</strong> system present: Cut <strong>the</strong> RCA inputs off and connect <strong>the</strong> aftermarket radios speaker outputs to <strong>the</strong> remaining<br />
wire according to <strong>the</strong> chart on page 1.<br />
3. Connect <strong>the</strong> SWC wire according to <strong>the</strong> chart on page 1 (aftermarket radio MUST support a wired remote input).<br />
4. If you wish to reassign functions to <strong>the</strong> SWC follow <strong>the</strong> programming <strong>instruction</strong>s in <strong>the</strong> next section.<br />
Optional Steering Wheel Control Programming<br />
IMPORTANT! The interface comes pre-programmed <strong>for</strong> <strong>the</strong> functions listed in <strong>the</strong> chart below and does not require programming unless you<br />
wish to re-assign <strong>the</strong> SWC functions to different buttons. The SWC can always be restored to default settings by pressing <strong>the</strong> program button<br />
on <strong>the</strong> side of <strong>the</strong> interface once and waiting <strong>for</strong> <strong>the</strong> timeout. PLEASE NOTE: Due to <strong>the</strong> many different possible OEM SWC configurations,<br />
some applications may need to be reprogrammed <strong>for</strong> <strong>the</strong> SWC assignments to make sense.<br />
Default SWC Button Assignments (Trucks & SUVs)<br />
Alpine JVC Kenwood Clarion Valor OEM Sony/Pioneer Fusion Blaupunkt<br />
Volume + Volume + Volume + Volume + Volume + Volume + Volume + Volume + Volume + Volume +<br />
Volume - Volume - Volume - Volume - Volume - Volume - Volume - Volume - Volume - Volume -<br />
Source Up Source Source Disc/FM+ Source Source Source Source Source Source<br />
Source Down Band Preset + Disc/AM N/P N/P Answer Band Off N/P<br />
Seek Up Track + Track + Track + Search + Track + Next Track + Track + Track +<br />
Seek Down Track - Track - Track - Search - Track - Previous Track - Track - Track -<br />
Voice Mute Mute Mute Mute Mute Mute Mute Mute Mute<br />
Prog Preset Up Preset - Source Band OK OK Preset + <strong>Audio</strong> Disc +<br />
Default SWC Button Alpine Assignments JVC (Corvette) Kenwood Clarion Valor OEM Sony/Pioneer Fusion Blaupunkt<br />
Volume + Volume + Volume + Volume + Volume + Volume + Volume + Volume + Volume + Volume +<br />
Volume - Volume - Volume - Volume - Volume - Volume - Volume - Volume - Volume - Volume -<br />
Seek Up Track + Track + Track + Search + Track + Next Track + Track + Track +<br />
Seek Down Track - Track - Track - Search - Track - Previous Track - Track - Track -<br />
Voice Mute Mute Mute Mute Mute Mute Mute Mute Mute<br />
End Source Source Source Source Source Source Source Source Source<br />
If you wish to re-assign <strong>the</strong> SWC functions, <strong>the</strong> interface must be programmed in <strong>the</strong> specific order shown in <strong>the</strong> chart below. If you<br />
come across a function in <strong>the</strong> chart that your steering wheel does not have, or you do not want to program, press and release <strong>the</strong><br />
program button on <strong>the</strong> side of <strong>the</strong> interface to skip that function. The LED will flash off and on confirming that you have successfully<br />
skipped that function and are ready to proceed to <strong>the</strong> next one.<br />
SET RADIO SELECT SWITCH<br />
Alpine Blaupunkt Clarion Fusion JVC Kenwood OEM Pioneer/Sony/O<strong>the</strong>r Valor<br />
1 8 4 9 2 3 6 7 5<br />
O<strong>the</strong>r = Advent, BOYO, Dual, Lightning <strong>Audio</strong>, Visteon,<br />
Pacific Accessory Corporation<br />
Pacific Accessory Corporation ® | Santa Ana, Cali<strong>for</strong>nia 92705 | Ph. 866-931-8021 | support@pac-audio.com<br />
©2013 Pacific Accessory Corporation<br />
www.pac-audio.com<br />
Rev. 050313<br />
Page 2
<strong>RP4</strong>-<strong>GM11</strong><br />
Radio Replacement & Steering Wheel Control Interface<br />
<strong>for</strong> General MotorsVehicles<br />
Optional 2/20/2013 - Steering 11:03 AM Wheel Control Programming swi-rc (cont.) radio and button chart.xls<br />
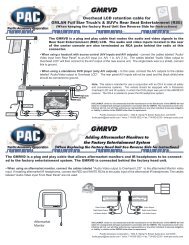
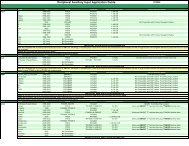
Optional Programming Order<br />
Radio Alpine JVC Kenwood Clarion Valor OEM Sony/O<strong>the</strong>r Pioneer Blaupunkt Fusion<br />
1 Volume + Volume + Volume + Volume + Volume + Volume + Volume + Volume + Volume + Volume +<br />
2 Volume - Volume - Volume - Volume - Volume - Volume - Volume - Volume - Volume - Volume -<br />
3 Mute Mute Mute Mute Mute Mute Mute Mute Mute Mute<br />
4 Preset + Source Source Source Source Source Preset + Preset + Source Source<br />
5 Preset - Track + Play Search + Track + Next Preset - Preset - Track + Track +<br />
6 Source Track - Track + Search - Track - Previous Source Source Track - Track -<br />
7 Track + Band/Disc + Track - Band Up Cursor Play/Ok Track + Track + Disc + <strong>Audio</strong><br />
8 Track - Preset/Disc - Disc/FM + Send/End Down Cursor Band Track - Track - Disc - Power<br />
9 Power Select Disc/AM - Send Ok Up Cursor Band Band Ok<br />
10 Enter/Play Attenuation Answer End Down Cursor Phone Menu<br />
11 Band/Program Phone Receive Voice Dial BT Answer Answer Call<br />
12 Receive Phone Reject On Hook BT Hangup End Call<br />
13 End Voice Dial Off Hook Voice Activation<br />
14 Power Mute (only<br />
supported on<br />
Multimedia units)<br />
O<strong>the</strong>r = Advent, Boyo, Dual, Lightning <strong>Audio</strong> & Visteon<br />
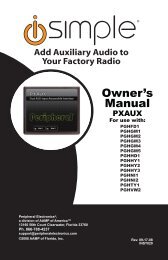
Step A.<br />
Turn <strong>the</strong> vehicle ignition to<br />
<strong>the</strong> ON position.<br />
ACC<br />
OFF<br />
IGN<br />
STRT<br />
Step B.<br />
Press and<br />
hold <strong>the</strong><br />
programming<br />
button.<br />
x4<br />
LED will turn off.<br />
Step C.<br />
Release <strong>the</strong><br />
programming<br />
button. The<br />
LED will turn<br />
back on.<br />
Step D.<br />
Within 7 seconds,<br />
press and release <strong>the</strong><br />
button that is to be<br />
learned on <strong>the</strong> steering<br />
wheel.<br />
VOL<br />
x4<br />
x4<br />
The LED will<br />
turn off during<br />
this process.<br />
x4<br />
Step E.<br />
Release <strong>the</strong> button.<br />
VOL<br />
The LED will turn back<br />
on.<br />
SWC Connection<br />
SWC Connection<br />
Step F.<br />
If you need to program more buttons,<br />
repeat steps D & E <strong>for</strong> each SWC additional<br />
Connection<br />
audio function on <strong>the</strong> steering wheel.<br />
Program<br />
remaining buttons<br />
See above chart <strong>for</strong><br />
different radio type<br />
connections<br />
Step G.<br />
After all buttons are<br />
programmed<br />
See above chart <strong>for</strong><br />
different radio type<br />
connections<br />
x4<br />
x4<br />
Once programming is<br />
completed, wait 7 seconds.<br />
The LED will flash four<br />
times indicating <strong>the</strong> end of<br />
programming.<br />
SWC Connection<br />
See above chart <strong>for</strong><br />
different radio type<br />
connections<br />
Pacific Accessory Corporation<br />
Pacific Accessory Corporation ® | Santa Ana, Cali<strong>for</strong>nia 92705 | Ph. 866-931-8021 | support@pac-audio.com<br />
©2013 Pacific Accessory Corporation<br />
www.pac-audio.com<br />
See above chart <strong>for</strong><br />
different radio type<br />
Rev. 050313<br />
connections<br />
Page 3
<strong>RP4</strong>-<strong>GM11</strong><br />
Radio Replacement & Steering Wheel Control Interface<br />
<strong>for</strong> General Motors Vehicles<br />
Testing & Verification<br />
1. Turn <strong>the</strong> ignition on. The LED on <strong>the</strong> interface will turn on & <strong>the</strong> +12v accessory wire will turn on.<br />
2. Turn on <strong>the</strong> radio & check balance & fade. Note: Premium Factory amplified Systems will not fade as nei<strong>the</strong>r <strong>the</strong><br />
aftermarket radio or <strong>the</strong> RP interface have <strong>the</strong> ability to control <strong>the</strong> amplifier’s fader.<br />
3. Verify that <strong>the</strong> factory subwoofer (if present) is playing<br />
4. Verify that all SWC are functioning properly.<br />
4. Turn off vehicle & remove key. RAP will be active & keep <strong>the</strong> radio on <strong>for</strong> 10 minutes or until <strong>the</strong> drivers door is opened.<br />
5. The LED & radio will turn off when RAP turns off or <strong>the</strong> drivers door is opened.<br />
Rear Seat Entertainment (RSE); If equipped<br />
1. Vehicles equipped with a DVD player built into <strong>the</strong> rear screen assembly:<br />
The <strong>RP4</strong>-<strong>GM11</strong> will allow <strong>the</strong> VES DVD player and rear screen to function as if <strong>the</strong> factory radio were present. A/V will be passed<br />
from <strong>the</strong> factory DVD player to <strong>the</strong> rear screen and audio can be heard through <strong>the</strong> headphones. A/V cannot be passed from <strong>the</strong><br />
factory DVD player to <strong>the</strong> aftermarket head unit.<br />
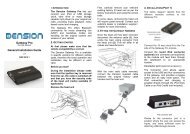
Product Updates (Firmware)<br />
The <strong>RP4</strong>-<strong>GM11</strong> can be updated with new firmware as it becomes available using <strong>the</strong> <strong>PAC</strong>-UP interface updater (sold separately).<br />
<strong>Please</strong> visit www.pac-audio.com/firmware <strong>for</strong> available updates.<br />
Pacific Accessory Corporation<br />
Pacific Accessory Corporation ® | Santa Ana, Cali<strong>for</strong>nia 92705 | Ph. 866-931-8021 | support@pac-audio.com<br />
©2013 Pacific Accessory Corporation<br />
www.pac-audio.com<br />
Rev. 050313<br />
Page 4