2006 March (529kB) - Pacific Soaring Council
2006 March (529kB) - Pacific Soaring Council
2006 March (529kB) - Pacific Soaring Council

Create successful ePaper yourself
Turn your PDF publications into a flip-book with our unique Google optimized e-Paper software.
some power lines. Floating back to earth under an open<br />
parachute certainly beats trying to grow feathers on the<br />
way down, but if you just drift at the mercy of the wind,<br />
you can still be seriously injured on landing. Steering<br />
your parachute to avoid life-threatening obstacles and to<br />
face into the wind for landing gives you the best chance<br />
to avoid, or at least minimize, injuries on landing.<br />
GET A GRIP<br />
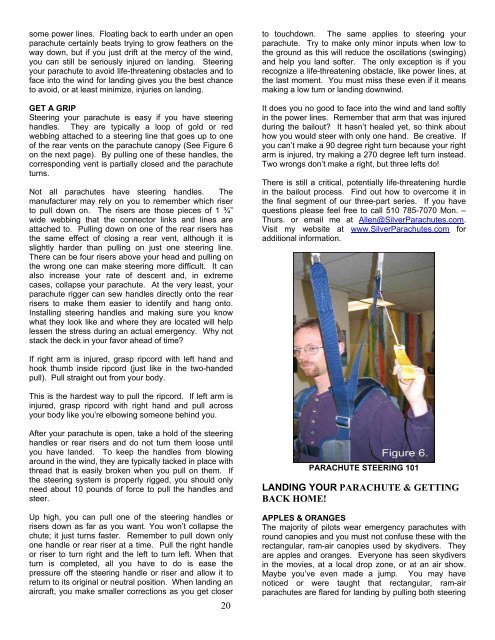
Steering your parachute is easy if you have steering<br />
handles. They are typically a loop of gold or red<br />
webbing attached to a steering line that goes up to one<br />
of the rear vents on the parachute canopy (See Figure 6<br />
on the next page). By pulling one of these handles, the<br />
corresponding vent is partially closed and the parachute<br />
turns.<br />
Not all parachutes have steering handles. The<br />
manufacturer may rely on you to remember which riser<br />
to pull down on. The risers are those pieces of 1 ¾”<br />
wide webbing that the connector links and lines are<br />
attached to. Pulling down on one of the rear risers has<br />
the same effect of closing a rear vent, although it is<br />
slightly harder than pulling on just one steering line.<br />
There can be four risers above your head and pulling on<br />
the wrong one can make steering more difficult. It can<br />
also increase your rate of descent and, in extreme<br />
cases, collapse your parachute. At the very least, your<br />
parachute rigger can sew handles directly onto the rear<br />
risers to make them easier to identify and hang onto.<br />
Installing steering handles and making sure you know<br />
what they look like and where they are located will help<br />
lessen the stress during an actual emergency. Why not<br />
stack the deck in your favor ahead of time?<br />
to touchdown. The same applies to steering your<br />
parachute. Try to make only minor inputs when low to<br />
the ground as this will reduce the oscillations (swinging)<br />
and help you land softer. The only exception is if you<br />
recognize a life-threatening obstacle, like power lines, at<br />
the last moment. You must miss these even if it means<br />
making a low turn or landing downwind.<br />
It does you no good to face into the wind and land softly<br />
in the power lines. Remember that arm that was injured<br />
during the bailout? It hasn’t healed yet, so think about<br />
how you would steer with only one hand. Be creative. If<br />
you can’t make a 90 degree right turn because your right<br />
arm is injured, try making a 270 degree left turn instead.<br />
Two wrongs don’t make a right, but three lefts do!<br />
There is still a critical, potentially life-threatening hurdle<br />
in the bailout process. Find out how to overcome it in<br />
the final segment of our three-part series. If you have<br />
questions please feel free to call 510 785-7070 Mon. –<br />
Thurs. or email me at Allen@SilverParachutes.com.<br />
Visit my website at www.SilverParachutes.com for<br />
additional information.<br />
If right arm is injured, grasp ripcord with left hand and<br />
hook thumb inside ripcord (just like in the two-handed<br />
pull). Pull straight out from your body.<br />
This is the hardest way to pull the ripcord. If left arm is<br />
injured, grasp ripcord with right hand and pull across<br />
your body like you’re elbowing someone behind you.<br />
After your parachute is open, take a hold of the steering<br />
handles or rear risers and do not turn them loose until<br />
you have landed. To keep the handles from blowing<br />
around in the wind, they are typically tacked in place with<br />
thread that is easily broken when you pull on them. If<br />
the steering system is properly rigged, you should only<br />
need about 10 pounds of force to pull the handles and<br />
steer.<br />
Up high, you can pull one of the steering handles or<br />
risers down as far as you want. You won’t collapse the<br />
chute; it just turns faster. Remember to pull down only<br />
one handle or rear riser at a time. Pull the right handle<br />
or riser to turn right and the left to turn left. When that<br />
turn is completed, all you have to do is ease the<br />
pressure off the steering handle or riser and allow it to<br />
return to its original or neutral position. When landing an<br />
aircraft, you make smaller corrections as you get closer<br />
20<br />
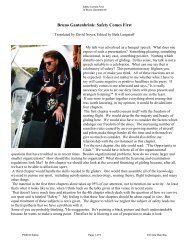
PARACHUTE STEERING 101<br />
LANDING YOUR PARACHUTE & GETTING<br />
BACK HOME!<br />
APPLES & ORANGES<br />
The majority of pilots wear emergency parachutes with<br />
round canopies and you must not confuse these with the<br />
rectangular, ram-air canopies used by skydivers. They<br />
are apples and oranges. Everyone has seen skydivers<br />
in the movies, at a local drop zone, or at an air show.<br />
Maybe you’ve even made a jump. You may have<br />
noticed or were taught that rectangular, ram-air<br />
parachutes are flared for landing by pulling both steering