Instructions - Pentron Clinical
Instructions - Pentron Clinical
Instructions - Pentron Clinical

You also want an ePaper? Increase the reach of your titles
YUMPU automatically turns print PDFs into web optimized ePapers that Google loves.
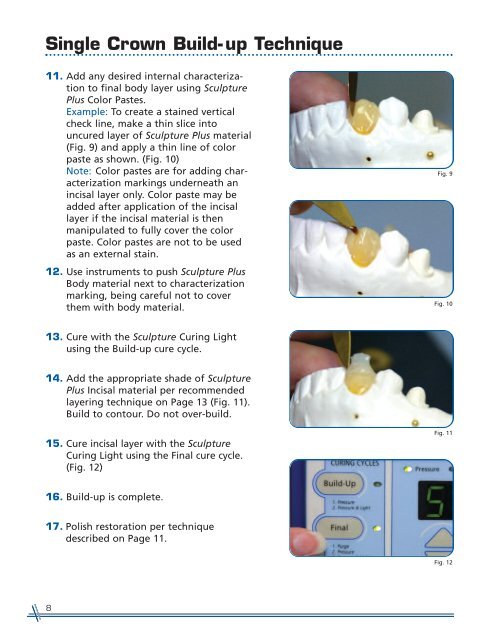
Single Crown Build- up Technique<br />
11. Add any desired internal characterization<br />
to final body layer using Sculpture<br />
Plus Color Pastes.<br />
Example: To create a stained vertical<br />
check line, make a thin slice into<br />
uncured layer of Sculpture Plus material<br />
(Fig. 9) and apply a thin line of color<br />
paste as shown. (Fig. 10)<br />
Note: Color pastes are for adding characterization<br />
markings underneath an<br />
incisal layer only. Color paste may be<br />
added after application of the incisal<br />
layer if the incisal material is then<br />
manipulated to fully cover the color<br />
paste. Color pastes are not to be used<br />
as an external stain.<br />
12. Use instruments to push Sculpture Plus<br />
Body material next to characterization<br />
marking, being careful not to cover<br />
them with body material.<br />
Fig. 9<br />
Fig. 10<br />
13. Cure with the Sculpture Curing Light<br />
using the Build-up cure cycle.<br />
14. Add the appropriate shade of Sculpture<br />
Plus Incisal material per recommended<br />
layering technique on Page 13 (Fig. 11).<br />
Build to contour. Do not over-build.<br />
15. Cure incisal layer with the Sculpture<br />
Curing Light using the Final cure cycle.<br />
(Fig. 12)<br />
Fig. 11<br />
16. Build-up is complete.<br />
17. Polish restoration per technique<br />
described on Page 11.<br />
Fig. 12<br />
8