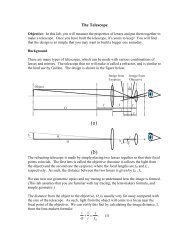
Ohm's law
Ohm's law
Ohm's law

You also want an ePaper? Increase the reach of your titles
YUMPU automatically turns print PDFs into web optimized ePapers that Google loves.
<strong>Ohm's</strong> Law<br />
(Revised May 25, 2012)<br />
GOALS<br />
(1) To understand Ohm’s <strong>law</strong>, used to describe the behavior of electrical conduction in many<br />
materials and circuits.<br />
(2) To calculated the electrical power dissipated as heat in electrical components called<br />
“resistors.”<br />
(3) To understand and use a rheostat, or variable resistor, in an electrical circuit.<br />
(4) To learn how to connect electrical circuits to allow the electrical current to flow around the<br />
circuit, and to learn how to use, connect, and read ammeters (current reading instruments)<br />
and voltmeters (voltage reading instruments).<br />
(5) To measure and observe the behavior of the electrical voltage and corresponding current for a<br />
simple resistor (electronic component) and a standard tungsten-filament light bulb.<br />
INTRODUCTION<br />
One of the most basic electrical circuits is a resistor connected to a voltage source, such as a<br />
battery or power supply. A quantity called the resistance, R, of a component is defined as the<br />
ratio of the potential difference, ΔV, in volts (V) across the component to the current, I, in<br />
amperes (A) flowing through the component, or<br />
R = ΔV I<br />
[in the SI units of ohms (Ω)]<br />
The power, P, dissipated by that component in the form of heat is given by<br />
P = IΔV = I 2 R =<br />
(ΔV )2<br />
R<br />
[in the SI units of watts (W)]<br />
Ohm’s <strong>law</strong> states that for some materials the resistance is constant over a wide range of voltages<br />
and currents. When a material behaves in this way, it is called “ohmic.” Electrical components<br />
made from ohmic materials are called resistors.<br />
By measuring the current flowing through a component as a function of the voltage across the<br />
component, one can determine whether the ratio of ΔV/I is a constant or not. If it is constant, then<br />
the component is ohmic and the constant resistance in ohms can be determined. If the voltage to<br />
current ratio is not constant, the device is not ohmic and does not obey Ohm’s <strong>law</strong>. A voltmeter<br />
is used to measure voltage and an ammeter is used to measure current. Ideal voltmeters and<br />
ammeters will not affect the currents or voltages in circuits as the measurements are being made.<br />
Real meters only approximate this ideal.
A voltmeter measures the electric potential or voltage difference between the two points to which<br />
it is connected. Thus to measure the voltage across a particular device in a circuit, one wire from<br />
the voltmeter is connected to one end of the device and a second wire from the voltmeter is<br />
connected to the other end of the device. This type of connection is called a “parallel”<br />
connection. The voltmeter in Figure 1 is represented by a box marked with the letter “V”.<br />
An ammeter measures the electrical current that flows through it. To measure the current flowing<br />
through a particular device in a circuit, the ammeter must be connected in such a way that the<br />
same current flows through the ammeter as through the device. The ammeter is simply a flow<br />
meter for the electrical current, so the wire at one end of the device must be disconnected and the<br />
ammeter inserted. The disconnected wire end is now connected to one terminal of the ammeter<br />
and a new wire is connected between the second terminal of the ammeter and the device to<br />
restore the flow of current through the circuit. This type of connection is called a “series”<br />
connection. The ammeter in Figure 1 is represented by a box marked with the letter “A”.<br />
CAUTION: If current flows backwards through the ammeter, the ammeter tries to respond<br />
by registering a negative current. Since the meter needle can only show<br />
positive values, this can damage the meter. To check that the ammeter is<br />
connected with the correct polarity, quickly “tap” the switch (see Figure 1)<br />
before closing it completely. If the meter does try to deflect in the negative<br />
direction, interchange the connections of the two wires connected to the<br />
ammeter.<br />
EXERCISE 1—CURRENT AND VOLTAGE FOR A NOMINAL 100 Ω RESISTOR<br />
In this exercise the voltage across and the current through a known resistor are measured as the<br />
current through the circuit is varied. The power supply voltage is kept the same, but the current<br />
flowing in the circuit can be controlled by using a variable resistor, also called a rheostat. (See<br />
Figure 1.) The rheostat has three terminals. Two terminals are on the ends of the device and are<br />
fixed, and the third is connected to a sliding contact that can be moved from one end of the<br />
device to the other. The resistance between the end terminals has a fixed value, but the resistance<br />
between the one of the end terminals and the sliding contact can be varied from zero to the fixed<br />
value of whole device.<br />
Figure 1. Circuit connections.
(1) Preliminary Calculations<br />
Assuming that the power supply voltage is fixed at 5.0 V, calculate the following quantities to<br />
two significant digits:<br />
(a) The current through the nominally 100 Ω resistor when the resistance of the rheostat is a<br />
maximum (340 or 360 Ω—your rheostat is marked with the actual value to use here), and<br />
when the resistance of the rheostat is zero.<br />
(b) The maximum power dissipated as heat by the 100 Ω resistor. The rated maximum power<br />
for this resistor is 0.50 W. If the power you calculate exceeds 0.50 W, please ask your TA<br />
for help before proceeding!<br />
(2) Set up<br />
(a) Turn the current knob on the power supply to the straight-up or 12 o’clock position, and<br />
set the power supply voltage to 5.0 V.<br />
(b) Build the circuit shown in Figure 1, leaving the switch open, that is, not making electrical<br />
contact. Be sure to use an ammeter scale with a current rating large enough to measure<br />
the maximum current you calculated above in Step 2(a). By convention ammeters read<br />
positive when electrical current flows into the positive terminal of the meter and<br />
then flows out of the negative terminal of the meter.<br />
(c) Set the rheostat for maximum resistance by moving the slide so that the current must<br />
travel through the entire coil.<br />
(d) “Tap” the switch to make sure that the ammeter connections are correct. If all is well,<br />
then close the switch. Both the ammeter and voltmeter should read non-zero values.<br />
(3) Data collection<br />
(a) Make at least ten different measurements of the voltage and corresponding current by<br />
adjusting the rheostat between its minimum and maximum resistance. To obtain data<br />
points at low currents, you can lower the voltage supplied to the circuit by the power<br />
supply to some value less than 5 V. Ask your TA for help as necessary.<br />
(b) How does the current measured by the ammeter change if the ammeter is connected<br />
between the power supply and the rheostat instead of between the rheostat and the<br />
resistor? What if it is connected between the power supply and the switch? Verify your<br />
answers experimentally.<br />
(4) Data analysis<br />
(a) Make a graph of the voltage across the nominal 100 Ω resistor as a function of the<br />
corresponding current flowing through it.<br />
(b) How would you characterize this graph? Draw a best fit smooth line through your data<br />
points, and from your graph find an equation for ΔV as a function of I in SI units.
(c) Does the resistor exhibit ohmic behavior? Explain your reasoning. If so, what is the<br />
“real” value of the resistance? How does your value compare to the nominal 100 Ω value<br />
as indicated by the “color code” painted on it?<br />
EXERCISE 2—CURRENT AND VOLTAGE FOR A LIGHT BULB<br />
(1) Getting started:<br />
CAUTION: Be sure to leave the switch open while you construct the new circuit.<br />
(a) Build a circuit analogous to the one in Figure 1, but use the 22 Ω rheostat instead of the<br />
340 or 360 Ω one used above and replace the 100 Ω resistor with the small light bulb.<br />
(b) Use to the highest current scale on the ammeter to begin with. You can always change to<br />
a more sensitive scale if the current turns out to be small enough.<br />
(c) Make sure that the power supply is still set at 5 volts.<br />
(d) Before closing the switch, have your TA check your circuit!<br />
(2) Data collection<br />
(a) Make at least ten different measurements of the voltage and corresponding current by<br />
adjusting the rheostat between its minimum and maximum resistance.<br />
(b) Does current flow through the light bulb even when the bulb is not glowing? Be sure to<br />
take data over the full range of possible values whether the bulb glows or not.<br />
(3) Data analysis<br />
(a) Make a graph of the voltage difference between the light bulb terminals as a function of<br />
current. What is the current flowing through the light bulb if the voltage across it is zero?<br />
Be sure to plot this point on your graph!<br />
(b) What is the maximum power (primarily in the form of heat but also some as visible light)<br />
dissipated by the light bulb? What is the power dissipated by the bulb when it first begins<br />
to glow?<br />
(c) Is the light bulb ohmic? Explain your reasoning. If so, what is its resistance? If not, what<br />
are the minimum and maximum values of its resistance?<br />
SUMMARY<br />
Compare and contrast the electrical behavior of the resistor and the light bulb. Consult a textbook<br />
and try to find a reason why the light bulb exhibits more complicated behavior than the resistor.<br />
Explain this in your report.
Before you leave the lab<br />
Turn off the power to all the equipment.<br />
Disassemble the circuit and place the small components in the plastic tray.<br />
Straighten up your lab station.<br />
Report any problems or suggest improvements to your TA.