Electric Ice Cream Maker - PickYourOwn.org
Electric Ice Cream Maker - PickYourOwn.org
Electric Ice Cream Maker - PickYourOwn.org

You also want an ePaper? Increase the reach of your titles
YUMPU automatically turns print PDFs into web optimized ePapers that Google loves.
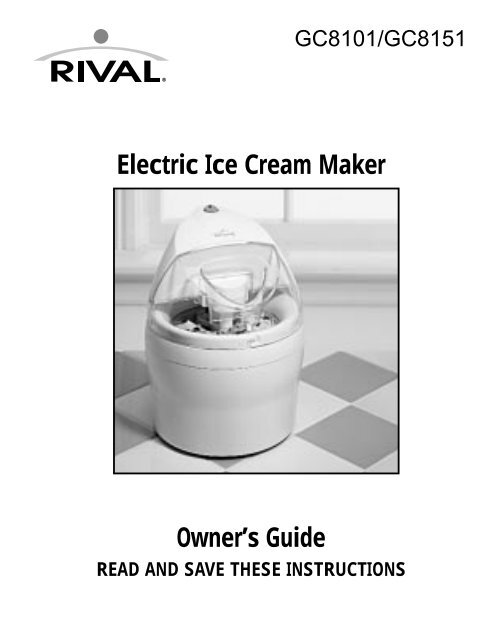
GC8101/GC8151<br />
<strong>Electric</strong> <strong>Ice</strong> <strong>Cream</strong> <strong>Maker</strong><br />
Owner’s Guide<br />
READ AND SAVE THESE INSTRUCTIONS
IMPORTANT SAFEGUARDS<br />
When using electrical appliances, basic safety precautions should<br />
always be followed, including the following:<br />
1. Read all instructions before using.<br />
2. To protect against fire, electric shock and personal injury, do not<br />
immerse appliance, its cord or plug, in water or other liquid.<br />
3. Close supervision is necessary when any appliance is used by or<br />
near children.<br />
4. Unplug from outlet when not in use, before putting on or taking off<br />
parts, and before cleaning.<br />
5. Avoid contact with moving parts. Keep hands, hair, clothing, as well<br />
as spatulas and other utensils away during operation to reduce the<br />
risk of injury to persons and/or damage to the appliance.<br />
6. Do not operate any appliance with a damaged cord or plug, or<br />
after appliance malfunctions or is dropped or damaged in any<br />
manner. Return appliance (see warranty) for examination, repair or<br />
electrical or mechanical adjustment.<br />
7. The use of attachments not recommended by the appliance<br />
manufacturer may result in fire, electric shock or personal injury.<br />
8. Do not use outdoors.<br />
9. Do not let cord hang over edge of table or counter, or touch hot<br />
surfaces, including the stove.<br />
10. To disconnect, unplug from wall outlet.<br />
11. Do not operate unit dry. Always have ice cream mixture in the<br />
canister when you plug in the unit.<br />
12. The freezer canister should be thoroughly towel-dried after use and<br />
washing.<br />
13. Keep hands and utensils out of freezer canister while in use to reduce<br />
the risk of injury to persons and damage to the appliance. DO NOT<br />
USE SHARP OBJECTS OR UTENSILS INSIDE THE FREEZER<br />
CANISTER! Sharp objects will scratch and damage the inside of the<br />
Freezer Canister. A rubber spatula or wooden spoon may be used,<br />
when the appliance is in the “OFF” position.<br />
14. Be sure that the voltage indicated on the name plate matches with<br />
your home’s voltage.<br />
15. During operation keep your hands and the cord away from hot parts<br />
of the appliance during operation.<br />
16. Never clean with scouring powders or hard implements.<br />
17. Do not place or use the appliance on hot surfaces, such as stoves,<br />
hotplates, or near open gas flames.<br />
18. Do not expose the Freezer Canister to temperatures above 105°<br />
F/41°C. Do not clean Freezer Canister in dishwasher.<br />
19. Do not place any part of the Unit in the dishwasher.<br />
SAVE THESE INSTRUCTIONS<br />
This appliance is for HOUSEHOLD USE ONLY. No user-serviceable parts<br />
inside. Power Unit never needs lubrication. Do not attempt to service this<br />
product.<br />
POLARIZED PLUG<br />
This appliance has a polarized plug (one blade is wider<br />
than the other). As a safety feature, this plug will fit in a<br />
polarized outlet only one way. If the plug does not fit fully<br />
in the outlet, reverse the plug. If it still does not fit, contact a<br />
qualified electrician. Do not attempt to defeat this safety feature.<br />
-3-<br />
-2-
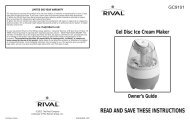
KNOW YOUR ICE CREAM MAKER<br />
ON/OFF SWITCH<br />
BEFORE YOU USE YOUR ICE CREAM MAKER<br />
Remove all literature and packing materials from inside the ice cream<br />
maker. Wash the Freezer Canister, Cover, and Paddle in warm, soapy<br />
water. Be sure to rinse and dry all parts thoroughly. DO NOT IMMERSE<br />
MOTOR UNIT IN WATER. To clean, wipe with a damp cloth.<br />
FREEZING THE FREEZER CANISTER<br />
The most important step in making frozen desserts is to make sure the<br />
Freezer Canister is properly frozen. Your <strong>Ice</strong> <strong>Cream</strong> <strong>Maker</strong> features a<br />
double insulated bowl and requires thorough freezing. For best results,<br />
the Canister should be wrapped in a plastic bag and placed upright in<br />
the back of your freezer, where the temperature is the coldest. Wrapping<br />
your Canister in a plastic bag will guard against freezer burn. The length<br />
of time necessary to properly freeze the Canister will depend on how<br />
cold the freezer temperature is.<br />
As there is liquid in between the Canister walls, shake the Canister to<br />
check the ideal freezing condition; you should not hear any liquid<br />
moving within the walls.<br />
NOTE: Continually storing the Freezer Canister in the freezer allows you<br />
the flexibility to make your favorite frozen dessert at a moment’s notice.<br />
MOTOR UNIT<br />
MIXING FEEDER<br />
COVER<br />
PADDLE EXTENDER<br />
PADDLE<br />
FREEZER CANISTER<br />
FREEZER TEMPERATURE<br />
-30°C/-22°F<br />
-25°C/-13°F<br />
-18°C/0°F<br />
-15°C/5°F<br />
APPROX. MIN. FREEZING TIME<br />
8–9 hours<br />
12–13 hours<br />
20–22 hours<br />
24 hours or more<br />
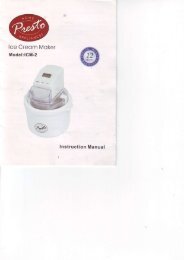
HOW TO USE YOUR ICE CREAM MAKER<br />
Model GC8101 can make up to 1 quart of ice cream.<br />
Model GC8151 makes up to 1.5 quarts of ice cream.<br />
Due to an increase in volume during preparation, the<br />
maximum amount must not exceed .5 quarts of liquid<br />
for model GC8101, and<br />
1 quart of liquid for model GC8151. If using your own<br />
recipes, adapt the volume of mixture to<br />
FIG. 1<br />
these amounts.<br />
1. Make sure unit switch is in off position.<br />
2. To assemble the ice cream maker, slide the Motor<br />
Unit onto the Cover until it locks in place, two tabs<br />
underneath will “click” into place (Fig.1).<br />
3. Insert Paddle extender into Motor Unit opening<br />
FIG. 2<br />
(Fig. 2).<br />
4. Remove Freezer Canister from freezer.<br />
5. Insert Paddle into Canister (Fig. 3).<br />
6. Place Motor and Cover together on top of Canister so<br />
that all the locking tabs are<br />
aligned and the extender fits<br />
into the Paddle. Once you<br />
have made certain<br />
FIG. 3<br />
FIG. 4 FIG. 5<br />
everything is properly together, rotate the<br />
Cover clockwise slightly until the tabs<br />
“snap” into place (Fig. 4). Insert the plug<br />
into outlet, then turn the Unit on<br />
immediately (Fig. 5). This will prevent the<br />
Paddle from freezing onto the Canister.<br />
-4-<br />
-5-
7. Pour the prepared ice cream mixture through the Mixing Feeder in<br />
the Canister.<br />
Note: It is extremely important that the Canister be used immediately<br />
after it is removed from the freezer, as it begins to thaw once<br />
removed. First, make sure that the ice cream mixture is ready, then<br />
remove the Canister from freezer.<br />
8. Leave the machine on for approximately 20–40 minutes, or until the<br />
mixture reaches the desired consistency. Do not turn the appliance<br />
off during use, as the mixture may freeze and prevent the movement<br />
of the Paddle. After 40 minutes turn unit off. See page 8 for further<br />
instructions.<br />
9. To add ingredients after the freezing process has begun, gently add<br />
them through the Mixing Feeder.<br />
10. To avoid overheating the Motor, the direction of the rotation will<br />
change if the mixture becomes too thick. If the direction of rotation<br />
continues to change, the mixture is completely prepared, turn off<br />
unit immediately.<br />
11. Remove Paddle from ice cream. Only use rubber, plastic, or wooden<br />
utensils to serve from the Canister bowl. Metal spoons may damage<br />
the bowl.<br />
12. To further harden the ice cream, you may put the Canister with the<br />
ice cream contents into the freezer for a short period of time (no<br />
more than 30 minutes). Long term freezing, however, should be<br />
done in an airtight container.<br />
HOW TO CLEAN YOUR ICE CREAM MAKER<br />
The Freezer Canister should be cleaned in warm water and mild<br />
detergent, then dried thoroughly.<br />
Never replace Canister in Freezer if it is still wet. Do not use sharp<br />
utensils, scouring pads or abrasive detergents when cleaning<br />
Freezer Canister.<br />
The Motor Unit can be cleaned by using a damp cloth. Never immerse<br />
Motor Unit in water.<br />
Do not place canister in dishwasher!<br />
HELPFUL HINTS<br />
• Some recipes require the mixture to be pre-cooked. Make the recipe<br />
at least one day ahead. This will allow the mixture to cool completely<br />
and adds volume.<br />
• Uncooked recipes will yield best results when an electric mixer is<br />
used to cream the eggs and sugar. This helps increase volume in<br />
the ice cream mixture. Eggs must be cooked properly. See our<br />
egg-based recipes for instructions.<br />
• Most ice cream recipes are a combination of cream, milk, eggs and<br />
sugar. You can use any type of cream you like, but the type of cream<br />
you use will affect the flavor and texture. The higher percentage of<br />
fat, the richer the ice cream and the softer the texture. For example,<br />
heavy cream has at least 36% fat, followed by: whipping cream<br />
(30%), coffee or light cream (18%) and half & half (10%). Any<br />
combination can be used, but make sure the liquid measurement<br />
remains the same. For example, lighter ice creams can be made by<br />
using more milk than cream, or by eliminating cream altogether.<br />
Skim milk may be used, but there will be a noticeable difference in<br />
texture and taste.<br />
• The ice cream mixture will stay fresh in the refrigerator for several<br />
days. Be sure to shake well before adding to the Canister.<br />
• When pouring mixture into the Canister, be sure to stop at least 1"<br />
(2.5 cm) from the top, as mixture will increase in volume during the<br />
freezing process.<br />
• Alcohol inhibits the freezing process. To add alcohol to a recipe, add<br />
when the mixture is semi-stiff.<br />
• The flavor of a sorbet will depend greatly on the ripeness and<br />
sweetness of the fruit and/or juice. If fruit is too tart, add sugar; if the<br />
fruit is very ripe, decrease or omit the sugar. Freezing subdues<br />
sweetness, so the recipe will not be quite as sweet when frozen.<br />
-6- -7-
• Artificial sweeteners can be used as a substitute for sugar. NOTE:<br />
Heat affects the sweetness of artificial sweetener. Only add artificial<br />
sweeteners to mixture that are cold or have been completely cooled.<br />
When a recipe calls for heating liquid to dilute sugar, omit the<br />
heating process and simply stir in the sweetener until it is well<br />
dissolved.<br />
1 packet of sweetener = 2 teaspoons (10ml) sugar<br />
6 packets = 1/4 cup (60ml)<br />
8 packets = 1/3 cup (75ml)<br />
12 packets = 1/2 (125ml)<br />
• The ice cream mixture should be liquid when preparation starts. Do<br />
not use stiff mixtures (i.e. whipped cream, frozen liquids).<br />
• When adapting your own recipes to the maximum amount of<br />
1 quart, you should change all ingredients to the<br />
same percentage.<br />
• Do not operate the appliance longer than required. If after 40<br />
minutes, the mixture is not yet solid, or has thawed again,<br />
do not continue.<br />
Possible reasons for mixture not freezing:<br />
- the Freezer Canister was not cold enough<br />
- the mixture was too warm<br />
- the proportion of ingredients was incorrect<br />
• Do not store prepared ice cream in the Freezer Canister for more<br />
than a few days.<br />
HINT FOR LOWER-FAT RECIPES<br />
RECIPES<br />
DELICIOUS HOMEMADE ICE CREAM<br />
For great tasting homemade ice cream,<br />
use Rival’s Quick and Easy <strong>Ice</strong> <strong>Cream</strong><br />
Mixes to create your favorite recipes.<br />
It’s fast, easy, and tastes great!<br />
Rival’s ice cream mixes are packed in<br />
convenient 8 oz packets. Each packet<br />
makes up to 2 quarts of delicious ice cream.<br />
Available at many retail stores or for more information please visit<br />
www.rivalproducts.com.<br />
For lower fat content, substitute 1% milk for whole milk, whole milk for half<br />
and half; and evaporated skim milk for whipping cream. Higher fat dairy<br />
products – such as whipping cream – create a smooth, rich and creamy<br />
dessert. Lower fat dairy products create a lighter dessert with a slightly<br />
different texture.<br />
WASTE DISPOSAL<br />
The liquid in the Freezer Canister contains no toxic materials. Dispose as<br />
normal household waste.<br />
-8- -9-
RECIPES<br />
EASY VANILLA ICE CREAM<br />
Model 8101 (1 Quart Capacity)<br />
Model 8151 (1 1 /2 Quart Capacity)<br />
1 cup whole milk 11/2 cup whole milk<br />
1<br />
/2 cup sugar 3<br />
/4 cup sugar<br />
dash salt<br />
dash salt<br />
2<br />
/3 cup half and half 1 cup half and half<br />
1<br />
/3 cup whipping cream 1<br />
/2 cup whipping cream<br />
1<br />
/2 teaspoon vanilla extract 1 teaspoon vanilla extract<br />
Combine milk, sugar and salt. Stir with a wire whisk until sugar is dissolved.<br />
Stir in half and half, whipping cream and vanilla.<br />
Pour into canister and freeze as directed on pages 4–5.<br />
OLD FASHIONED VANILLA ICE CREAM<br />
Model 8101 (1 Quart Capacity)<br />
Model 8151 (1 1 /2 Quart Capacity)<br />
1<br />
/2 cup sugar 3<br />
/4 cup sugar<br />
dash salt<br />
1<br />
/8 teaspoon salt<br />
1 cup whole milk 1 3 /4 cup whole milk<br />
1 egg, beaten 2 eggs, beaten<br />
1 cup whipping cream 1 1 /2 cup whipping cream<br />
2 teaspoons pure vanilla extract 1 tablespoon pure vanilla extract<br />
Combine sugar, salt and milk in saucepan. Cook over medium heat, stirring<br />
occasionally until mixture almost boils. Reduce heat to low.<br />
Gradually stir about 1 /2 cup of hot milk into the beaten eggs. Add eggs to remaining<br />
hot mixture. Cook over low heat, stirring constantly until slightly thickened, about 2–3<br />
minutes. Remove from heat and refrigerate at least 2 hours.<br />
Combine whipping cream, vanilla and chilled mixture, stirring with a wire whisk<br />
to combine.<br />
Pour into canister and freeze as directed on pages 4–5.<br />
Variations: Add a variety of ingredients to the ice cream during the last 5 minutes of<br />
freezing. Use 1 /2 cup of any of the following: chocolate chips, crumbles chocolate<br />
sandwich cookies, M&M’s, crushed peppermint candies, chocolate covered peanuts, etc.<br />
Fruit: Add 1 cup of pureed fruit such as strawberries, bananas, peaches, blueberries, etc.<br />
PRALINE ALMOND FUDGE ICE CREAM<br />
Model 8101 (1 Quart Capacity)<br />
Model 8151 (1 1 /2 Quart Capacity)<br />
1<br />
/2 cup light brown sugar 3<br />
/4 cup light brown sugar<br />
dash salt<br />
1<br />
/8 teaspoon salt<br />
1 1 / 2 cups whole milk 2 1 /4 cups whole milk<br />
1 egg, beaten 2 eggs, beaten<br />
2<br />
/3 cup whipping cream 1 cup whipping cream<br />
2 teaspoons pure vanilla extract 1 tablespoon pure vanilla extract<br />
1<br />
/2 cup slivered almonds 3<br />
/4 cup slivered almonds<br />
1 tablespoon butter 2 tablespoons butter<br />
1<br />
/3 cup chocolate fudge topping 1<br />
/2 cup chocolate fudge topping<br />
Combine brown sugar, salt and milk in a saucepan. Cook over medium heat until<br />
mixture starts to bubble around the edges. Gradually stir about 1 cup of hot milk into<br />
the beaten eggs. Add to remaining hot milk, stirring constantly. Continue cooking 1<br />
minute. Remove from heat. Refrigerate 2 hours.<br />
Combine whipping cream and vanilla in large bowl; add chilled mixture, stirring with<br />
a wire whisk to combine.<br />
Saute almonds in butter over low heat about 5 minutes. Stir into ice cream mixture.<br />
Pour into canister and freeze as directed on pages 4–5. During last 5 minutes of<br />
freezing pour chocolate fudge topping through opening in top of lid to combine into<br />
the ice cream.<br />
STRAWBERRY SORBET<br />
Model 8101 (1 Quart Capacity)<br />
Model 8151 (1 1 /2 Quart Capacity)<br />
2 2 /3 cups fresh or frozen (thawed) strawberries, 4 cups fresh or frozen (thawed) strawberries,<br />
pureed<br />
pureed<br />
1<br />
/3 cup sugar 1<br />
/2 cup sugar<br />
2<br />
/3 cup water 1 cup water<br />
2 teaspoons lemon juice 1 tablespoon lemon juice<br />
Combine sugar and water in a small saucepan. Heat to boiling. Reduce heat and<br />
simmer until sugar dissolves. Remove from heat and cool completely (1– 2 hours).<br />
Combine with pureed strawberries and lemon juice.<br />
Pour into canister and freeze as directed on pages 4–5.<br />
-10-<br />
-11-
EASY CHOCOLATE ICE CREAM<br />
Model 8101 (1 Quart Capacity)<br />
Model 8151 (1 1 /2 Quart Capacity)<br />
1 1 /3 cups chocolate milk 2 cups chocolate milk<br />
1<br />
/4 cup sweetened, condensed milk 1<br />
/3 cup sweetened, condensed milk<br />
1<br />
/3 cup whipped dessert topping 1<br />
/2 cup whipped dessert topping<br />
Combine all ingredients. Pour into canister and freeze as directed on<br />
pages 4–5.<br />
CHOCOLATE ICE CREAM<br />
Model 8101 (1 Quart Capacity)<br />
Model 8151 (1 1 /2 Quart Capacity)<br />
1 1 /2 cups whole milk 2 1 /4 cup whole milk<br />
2<br />
/3 cup sugar 1 cup sugar<br />
dash salt<br />
dash salt<br />
2 ounces semisweet chocolate squares, 3 ounces semisweet chocolate squares,<br />
finely chopped<br />
finely chopped<br />
1 egg, beaten 2 eggs, beaten<br />
1<br />
/2 cup half and half 3<br />
/4 cup half and half<br />
1<br />
/3 cup whipping cream 1<br />
/2 cup whipping cream<br />
1<br />
/2 teaspoon vanilla extract 1 teaspoon vanilla extract<br />
Combine milk, sugar, salt and chocolate in a saucepan. Cook over medium heat,<br />
stirring constantly, until chocolate is melted and mixture almost boils. Gradually stir<br />
about 1 cup of the hot mixture into the beaten eggs. Add the eggs to remaining hot<br />
mixture. Cook and stir over low heat until slightly thickened (2 minutes). Stir in half<br />
and half, whipping cream and vanilla. Cover and refrigerate for 2 hours.<br />
Pour into canister and freeze as directed on pages 4–5.<br />
CINNAMON WALNUT ICE CREAM<br />
Model 8101 (1 Quart Capacity)<br />
Model 8151 (1 1 /2 Quart Capacity)<br />
1 cups whole milk 1 1 /2 cups whole milk<br />
2<br />
/3 cup half and half 1 cup half and half<br />
1<br />
/3 cup whipping cream 1<br />
/2 cup whipping cream<br />
1<br />
/2 cup sugar 3<br />
/4 cup sugar<br />
2<br />
/3 cup chopped walnuts 1 cup chopped walnuts<br />
3<br />
/4 teaspoons vanilla extract 1 1 /4 teaspoons vanilla extract<br />
1<br />
/4 teaspoon cinnamon 1<br />
/3 teaspoon cinnamon<br />
dash salt<br />
dash salt<br />
Thoroughly combine all ingredients. Pour into canister and freeze as directed on<br />
pages 4–5.<br />
DOUBLE ALMOND CHOCOLATE ICE CREAM<br />
Model 8101 (1 Quart Capacity)<br />
Model 8151 (1 1 /2 Quart Capacity)<br />
1 cup whole milk 1 1 /2 cup whole milk<br />
1<br />
/2 cup sugar 3<br />
/4 cup sugar<br />
dash salt<br />
dash salt<br />
2 ounces semisweet chocolate square, 2 ounces semisweet chocolate square,<br />
finely chopped<br />
finely chopped<br />
1 egg, beaten 2 eggs, beaten<br />
1 cup whipping cream 1 1 /2 cup whipping cream<br />
1<br />
/2 teaspoon vanilla extract 1 teaspoon vanilla extract<br />
1<br />
/2 teaspoon almond extract 2 teaspoons almond extract<br />
1<br />
/2 cup chopped almonds 1 cup chopped almonds<br />
Combine milk, sugar, salt and chocolate in saucepan. Cook over medium heat,<br />
stirring constantly, until chocolate is melted and mixture almost boils. Gradually stir 1<br />
cup of the hot mixture into the beaten egg. Pour eggs into the remaining hot mixture<br />
and continue cooking over low heat until slightly thickened (2–3 minutes). Remove<br />
from heat.<br />
Stir in whipping cream, vanilla, almond extract and chopped almonds.<br />
Cover and refrigerate 2 hours.<br />
Pour into canister and freeze as directed on pages 4–5.<br />
-12- -13-
NOTES<br />
-14-
LIMITED ONE-YEAR WARRANTY<br />
Rival ® warrants this product to be free from defects in materials or workmanship for one (1) year from date of<br />
original purchase. If you have a claim under this warranty please follow these procedures:<br />
1) Within the first 45 days from date of original purchase, defective product should be returned to original<br />
place of purchase for replacement (with proof-of-purchase).<br />
2) Within the first 12 months from date of purchase Rival will repair or replace (at no charge) the defective<br />
product if it is delivered freight prepaid during that period to an authorized service station. To obtain warranty<br />
service visit:<br />
www.rivalproducts.com<br />
Or, you may write to Rival c/o The Holmes Group, attention: Consumer Returns, 32 B Spur Drive, El Paso, TX<br />
79906. Proof of purchase is required when requesting warranty service - SAVE YOUR SALES RECEIPT. This<br />
warranty is extended only to the original purchaser and does not apply to commercial use, unreasonable use,<br />
or to damage to the product (not resulting from defect or malfunction) while in the possession of the<br />
consumer. Rival disclaims all responsibility for consequential, incidental, or commercial losses caused<br />
by the use of this product. Some states do not allow this exclusion or limitation of incidental or<br />
consequential losses, so the foregoing disclaimer may not apply to you. This warranty gives you specific legal<br />
rights, and you may also have other legal rights which vary from state to state.<br />
©2001, Rival<br />
A Division of The Holmes Group<br />
Printed in China<br />
GC8101/GC8151/428-0304