Ready Welder II Operation Manual. - Pirate4x4.Com
Ready Welder II Operation Manual. - Pirate4x4.Com
Ready Welder II Operation Manual. - Pirate4x4.Com
You also want an ePaper? Increase the reach of your titles
YUMPU automatically turns print PDFs into web optimized ePapers that Google loves.
MIG MACHINE AS THE RW-<strong>II</strong> POWER SOURCE<br />
As stated, battery is the best source of power for the RW-<strong>II</strong> because it is pure DC and constant voltage. The second<br />
best is MIG because it offers DC/CV (constant voltage) power source.<br />
You must remember that MIG machines have a contactor control which we need to close so that the MIG becomes<br />
the DC/CV power source for the RW-<strong>II</strong>. Several methods can accomplish this. The easiest is to tape or strap down the<br />
trigger on the MIG gun. When you tum the machine on you will hear the connector close. NOTE: Everything that<br />
you do must be done with the power switch off.<br />
The next method is to follow the trigger leads from the end of the MIG gun to their attachment to the welder. Some<br />
connections are the (2) wires plugged in with simple solderless crimp on spade terminals. Unplug the terminals and<br />
make a jumper lead about 4” long with proper terminals, crimped on each end. Then plug these into the proper location.<br />
NOTE: Remove the welding wire from the drive roller and turn wire speed control to “0”, zero.<br />
Some MIG welders have actual plugs or amphenol plugs on the face of the machine. Unplug the trigger lead and there<br />
will be (2) male pins showing. Find the (2) female corresponding pinholes on the machine and with a short jumper<br />
wire , plug it into the pinholes.<br />
If you would like to control the MIG drive motor during your use with the RW-<strong>II</strong>, you can install a toggle switch with<br />
either of these conversion methods and be able to turn off the MIG drive motor.<br />
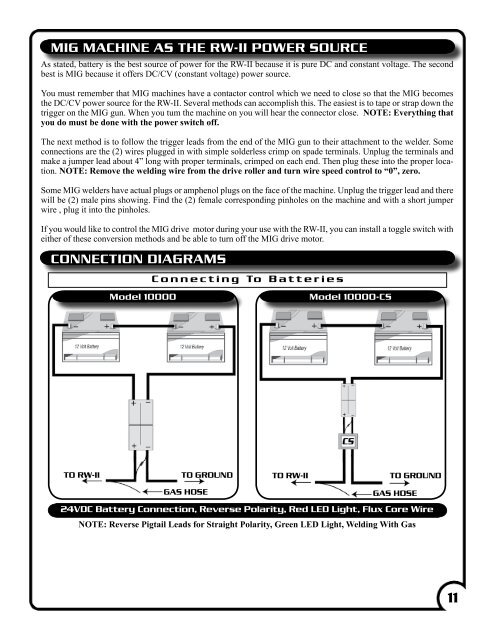
CONNECTION DIAGRAMS<br />
Connecting To Batteries<br />
Model 10000<br />
Model 10000-CS<br />
TO RW-<strong>II</strong><br />
TO GROUND<br />
TO RW-<strong>II</strong><br />
TO GROUND<br />
GAS HOSE<br />
GAS HOSE<br />
24VDC Battery Connection, Reverse Polarity, Red LED Light, Flux Core Wire<br />
NOTE: Reverse Pigtail Leads for Straight Polarity, Green LED Light, Welding With Gas<br />
11


