Ready Welder II Operation Manual. - Pirate4x4.Com
Ready Welder II Operation Manual. - Pirate4x4.Com
Ready Welder II Operation Manual. - Pirate4x4.Com

You also want an ePaper? Increase the reach of your titles
YUMPU automatically turns print PDFs into web optimized ePapers that Google loves.
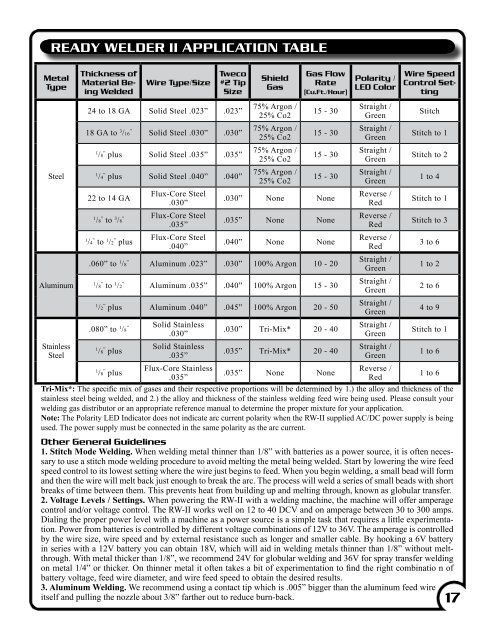
READY WELDER <strong>II</strong> APPLICATION TABLE<br />
Metal<br />
Type<br />
Thickness of<br />
Material Being<br />
Welded<br />
Wire Type/Size<br />
Tweco<br />
#2 Tip<br />
Size<br />
Shield<br />
Gas<br />
Gas Flow<br />
Rate<br />
(Cu.Ft./Hour)<br />
Polarity /<br />
LED Color<br />
Wire Speed<br />
Control Setting<br />
Steel<br />
Aluminum<br />
Stainless<br />
Steel<br />
24 to 18 GA Solid Steel .023” .023”<br />
18 GA to 3 /16 ” Solid Steel .030” .030”<br />
1<br />
/8 ” plus Solid Steel .035” .035”<br />
1<br />
/4 ” plus Solid Steel .040” .040”<br />
22 to 14 GA<br />
Flux-Core Steel<br />
.030”<br />
1<br />
/8 ” to 3 /8 ” Flux-Core Steel<br />
.035”<br />
1<br />
/4 ” to 1 /2 ” plus<br />
Flux-Core Steel<br />
.040”<br />
75% Argon /<br />
25% Co2<br />
75% Argon /<br />
25% Co2<br />
75% Argon /<br />
25% Co2<br />
75% Argon /<br />
25% Co2<br />
15 - 30<br />
15 - 30<br />
15 - 30<br />
15 - 30<br />
.030” None None<br />
.035” None None<br />
.040” None None<br />
.060” to 1 /8 ” Aluminum .023” .030” 100% Argon 10 - 20<br />
1<br />
/8 ” to 1 /2 ” Aluminum .035” .040” 100% Argon 15 - 30<br />
1<br />
/2 ” plus Aluminum .040” .045” 100% Argon 20 - 50<br />
.080” to 1 /8 ” Solid Stainless<br />
.030”<br />
1<br />
/8 ” plus<br />
1<br />
/8 ” plus<br />
Solid Stainless<br />
.035”<br />
Flux-Core Stainless<br />
.035”<br />
.030” Tri-Mix* 20 - 40<br />
.035” Tri-Mix* 20 - 40<br />
.035” None None<br />
Straight /<br />
Green<br />
Straight /<br />
Green<br />
Straight /<br />
Green<br />
Straight /<br />
Green<br />
Reverse /<br />
Red<br />
Reverse /<br />
Red<br />
Reverse /<br />
Red<br />
Straight /<br />
Green<br />
Straight /<br />
Green<br />
Straight /<br />
Green<br />
Straight /<br />
Green<br />
Straight /<br />
Green<br />
Reverse /<br />
Red<br />
Stitch<br />
Stitch to 1<br />
Stitch to 2<br />
1 to 4<br />
Stitch to 1<br />
Stitch to 3<br />
3 to 6<br />
1 to 2<br />
2 to 6<br />
4 to 9<br />
Stitch to 1<br />
Tri-Mix*: The specific mix of gases and their respective proportions will be determined by 1.) the alloy and thickness of the<br />
stainless steel being welded, and 2.) the alloy and thickness of the stainless welding feed wire being used. Please consult your<br />
welding gas distributor or an appropriate reference manual to determine the proper mixture for your application.<br />
Note: The Polarity LED Indicator does not indicate arc current polarity when the RW-<strong>II</strong> supplied AC/DC power supply is being<br />
used. The power supply must be connected in the same polarity as the arc current.<br />
Other General Guidelines<br />
1. Stitch Mode Welding. When welding metal thinner than 1/8” with batteries as a power source, it is often necessary<br />
to use a stitch mode welding procedure to avoid melting the metal being welded. Start by lowering the wire feed<br />
speed control to its lowest setting where the wire just begins to feed. When you begin welding, a small bead will form<br />
and then the wire will melt back just enough to break the arc. The process will weld a series of small beads with short<br />
breaks of time between them. This prevents heat from building up and melting through, known as globular transfer.<br />
2. Voltage Levels / Settings. When powering the RW-<strong>II</strong> with a welding machine, the machine will offer amperage<br />
control and/or voltage control. The RW-<strong>II</strong> works well on 12 to 40 DCV and on amperage between 30 to 300 amps.<br />
Dialing the proper power level with a machine as a power source is a simple task that requires a little experimentation.<br />
Power from batteries is controlled by different voltage combinations of 12V to 36V. The amperage is controlled<br />
by the wire size, wire speed and by external resistance such as longer and smaller cable. By hooking a 6V battery<br />
in series with a 12V battery you can obtain 18V, which will aid in welding metals thinner than 1/8” without meltthrough.<br />
With metal thicker than 1/8”, we recommend 24V for globular welding and 36V for spray transfer welding<br />
on metal 1/4” or thicker. On thinner metal it often takes a bit of experimentation to find the right combinatio n of<br />
battery voltage, feed wire diameter, and wire feed speed to obtain the desired results.<br />
3. Aluminum Welding. We recommend using a contact tip which is .005” bigger than the aluminum feed wire<br />
itself and pulling the nozzle about 3/8” farther out to reduce burn-back.<br />
1 to 6<br />
1 to 6<br />
17