ADP TimeSaver Instructions - Salary Employees
ADP TimeSaver Instructions - Salary Employees
ADP TimeSaver Instructions - Salary Employees

Create successful ePaper yourself
Turn your PDF publications into a flip-book with our unique Google optimized e-Paper software.
<strong>ADP</strong> <strong>TimeSaver</strong> <strong>Instructions</strong> for SALARY EMPLOYEES<br />
Polytechnic Institute of NYU has chosen <strong>ADP</strong> <strong>TimeSaver</strong> to manage all of its Payroll data<br />
collection and time tracking needs. <strong>ADP</strong> <strong>TimeSaver</strong> is a simple, flexible online application that<br />
be accessed through the Internet at anytime from anywhere.<br />
All <strong>Salary</strong> <strong>Employees</strong> at Polytechnic Institute of NYU are required to enter their Sick Time,<br />
Vacation Time, Personal Time, Holiday Time etc. usage in <strong>ADP</strong> <strong>TimeSaver</strong> every pay period.<br />
By default, if no action is taken, <strong>Salary</strong> <strong>Employees</strong> will automatically be entered in for a<br />
standard pay period’s hours. However, if you do not enter in your time off properly, the<br />
discrepancy will be caught by your manager in the approval phase.<br />
To access <strong>ADP</strong> <strong>TimeSaver</strong>, you will require a Username and Password – to obtain these<br />
credentials, please sent an email to Cathy Holmes with your full name on file, the first four<br />
digits of your Social Security Number and your Polytechnic Institute of NYU employee/student<br />
ID number.<br />
All questions, issues, or problems should be directed to the Payroll Department:<br />
Cathy Holmes 718-260-3117 cholmes@poly.edu<br />
P AGE | 1
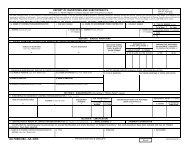
Step #1: Login to <strong>ADP</strong> <strong>TimeSaver</strong><br />
1<br />
2<br />
3<br />
1. To access <strong>ADP</strong> <strong>TimeSaver</strong>, please go to http://timesaver.poly.edu using Microsoft Internet<br />
Explorer – this easy to remember website should automatically forward you to <strong>ADP</strong>’s<br />
<strong>TimeSaver</strong> website located at https://ts1.adp.com/bn5s/TS/login.php.<br />
2. Under User Type, select Employee.<br />
3. Enter in your Username and Password, and then click Submit.<br />
Notes:<br />
Your <strong>ADP</strong> <strong>TimeSaver</strong> Username and initial Password will be given to you by Cathy Holmes of the Payroll<br />
Department.<br />
When you log on to <strong>ADP</strong> <strong>TimeSaver</strong> for the first time, you will be forced to change your password.<br />
When changing your <strong>ADP</strong> <strong>TimeSaver</strong> password, please keep in mind:<br />
Your password must be between 8 and 20 characters, and must contain at least one letter and one<br />
number.<br />
Your password cannot be the same as your username, nor can it include three repeating characters.<br />
P AGE | 2
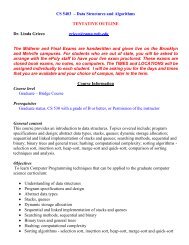
Step #2: Submit Your Time Online<br />
Once you successfully log into <strong>ADP</strong> <strong>TimeSaver</strong>, you will see a screen similar to the following:<br />
Logout<br />
1<br />
Pencil<br />
Trash<br />
2<br />
1. To enter your time for the current pay period, please make sure that Time Period is set to<br />
Current Period.<br />
2. Click Add New Entry icon on the day that you wish to enter your time for.<br />
Note: If you have entered in a Time Entry inaccurately, you can click on the Pencil icon to edit your Time<br />
Entry to correct any mistakes or you can click on the Trash icon to delete that Time Entry entirely.<br />
You must click the Save button to successfully delete the Time Entry.<br />
You can add notes to the time that you have entered by clicking on the Notes icon<br />
Click Logout when you have completed entering in your Time Entries.<br />
P AGE | 3
3a<br />
3b<br />
4<br />
3c<br />
3d<br />
3e<br />
3. On the New Entry row, please enter the appropriate values for:<br />
Note:<br />
If you have mistakenly clicked on the Add New Entry, you can undo the entry by<br />
clicking on the Undo icon.<br />
a. Entry Date – this represents the day on which the time is being taken (you may click<br />
the Calendar icon<br />
to the right to help you)<br />
b. Site – this is the location where your employment is at<br />
c. Department/Position – this represents to which department your time should be<br />
allocated against<br />
d. Pay Code – this represents the type of time that you are entering.<br />
Note:<br />
Click on the Pay Codes List button to get a list of the available Pay Codes.<br />
1. H – Holiday<br />
2. J – Jury Duty<br />
3. O – Summer Days<br />
P AGE | 4
4. P – Personal<br />
5. S - Sick<br />
6. V - Vacation<br />
7. X – Bereavement<br />
e. Hours – this represents the amount of time being taken (in hours)<br />
4. Click the Save icon to complete / submit this entry. You will now see entry that you<br />
have just entered and the Pencil and Trash icons appear where you can edit and/or delete<br />
this entry.<br />
5. If you have any addition time to report for this pay period, please repeat steps 2 - 4 as<br />
needed. Once you have completed all entries, click on the Save button to submit your time.<br />
Note:<br />
If you do not click on the Save button, all of your time entries will be lost.<br />
6. If you wish to logout, click Logout to end your <strong>ADP</strong> <strong>TimeSaver</strong> session.<br />
Logout<br />
5<br />
P AGE | 5
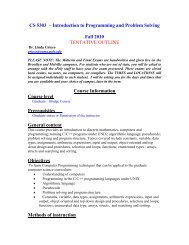
Step #3: Print Your Time Online<br />
Once you successfully submitted your time entries, you will see a screen similar to the<br />
following:<br />
1<br />
2<br />
1. Click to change the pay period that you wish to view or print.<br />
1. Current Period – Current pay period<br />
2. Previous Period – Show the previous pay period only from the current<br />
pay period<br />
3. Next Period – Shows the next pay period only from the current pay<br />
period<br />
4. Date Range – Retrieves any entries in the system<br />
2. Click on the Print button to print a copy of your time.<br />
a. A new window will appear for the pay periods that you are viewing in the previous<br />
step. You can print the report as if you would print a webpage.<br />
P AGE | 6
P AGE | 7