Sekonic L-758DR & DTS V3.0 - Professional Photographer Magazine
Sekonic L-758DR & DTS V3.0 - Professional Photographer Magazine
Sekonic L-758DR & DTS V3.0 - Professional Photographer Magazine

Create successful ePaper yourself
Turn your PDF publications into a flip-book with our unique Google optimized e-Paper software.
THE GOODS: PRO REVIEW<br />
Can this light meter and calibration software help you<br />
hit the optimum exposure every time? Yes, it can.<br />
BY STAN SHOLIK<br />
Dynamic ranger<br />
SEKONIC L-<strong>758DR</strong> AND <strong>DTS</strong> <strong>V3.0</strong><br />
All images ©Stan Sholik<br />
Can a light meter make you a better photographer?<br />
If your meter is a <strong>Sekonic</strong> L-<strong>758DR</strong><br />
and you use the free Digital Transfer Software<br />
(<strong>DTS</strong>) <strong>V3.0</strong> calibration program, the<br />
answer is yes.<br />
Achieving optimum exposure by using<br />
your digital camera’s built-in meter, histogram,<br />
or blinking highlights is impossible.<br />
Among camera makers in recent years,<br />
there’s been a trend in biasing the autoexposure<br />
settings (e.g., program, shutter priority,<br />
and aperture priority) toward underexposure.<br />
Current DSLRs deliver darker files<br />
(including files in raw format) than older<br />
models to avoid getting blown-out highlights.<br />
That renders images with a lower<br />
signal-to-noise ratio than necessary, which<br />
the current cameras compensate for with<br />
improved and more aggressive noise reduction<br />
algorithms.<br />
In addition, the automatic settings don’t<br />
know, for example, whether the reflection<br />
off a car bumper should or shouldn’t be held<br />
with detail, so just in case, the overall exposure<br />
is lowered to do just that. The blinking<br />
highlights and the camera’s histogram are<br />
based on the camera’s interpretation of<br />
the JPEG produced from a raw capture,<br />
a poor representation of the actual raw<br />
data present.<br />
Setting the exposure manually can solve<br />
these problems, but without knowing the<br />
dynamic range of your camera’s sensor,<br />
you still won’t know if you’re making the<br />
optimum exposure. The optimum exposure<br />
places all the scene’s exposure values<br />
within the dynamic range of your camera’s<br />
sensor. The optimum exposure also places<br />
all the scene’s exposure values that you want<br />
to reproduce in proper relation to other<br />
scene values within the clipping points of<br />
your sensor.<br />
No digital camera gives you the information<br />
you need to produce the optimum exposure.<br />
As with your monitor, printer, and<br />
scanner, your camera’s digital sensor needs<br />
to be calibrated to ensure that it produces<br />
accurate, consistent results. The <strong>Sekonic</strong> L-<br />
<strong>758DR</strong> light meter and its associated <strong>DTS</strong><br />
<strong>V3.0</strong> software provide the tools you need to<br />
calibrate your camera for ISO accuracy as<br />
well as the limits of its dynamic range and<br />
clipping points.<br />
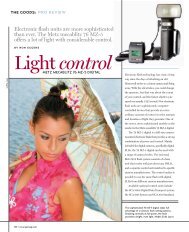
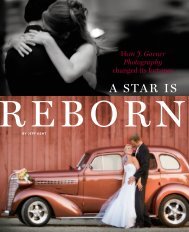
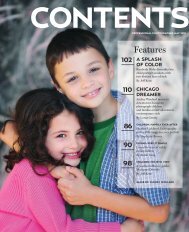
After calibrating the meter and Nikon D3s camera, I shot a test outside my studio. The incident light<br />
meter reading was 1/320 second at f/8. In reality, even though the image on the camera LCD indicated<br />
a completely blown out sky and overexposed shadows, this is the final uncorrected capture. Lightroom<br />
showed only the brightest areas of the clouds to be clipped.<br />
CALIBRATION PROCESS<br />
The fairly easy calibration procedure takes<br />
15 to 30 minutes. To get started, you need a<br />
test target. The accessory <strong>Sekonic</strong> Exposure<br />
78 • www.ppmag.com
THE GOODS: PRO REVIEW<br />
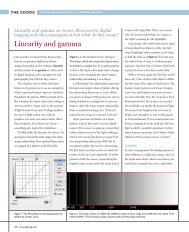
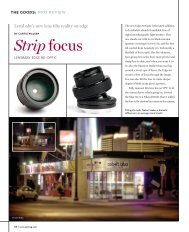
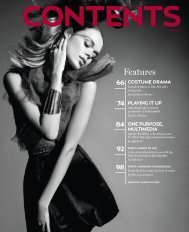
Shadow Spot Reading<br />
Highlight Spot Reading<br />
Averaged Reading<br />
Using the L-758 spot meter, I measured the darkest area of the trees and the brightest areas of the clouds. In the scale at the bottom of the meter’s LCD,<br />
it shows where these readings fall relative to the limits of the dynamic range and the clipping points determined during the calibration, shown by small<br />
triangles. The meter averages the readings to place them within the clipping points. The adjusted exposure shows the reading within the clipping points on<br />
the shadow side and right on the clipping point on the highlight side.<br />
Profile Target II is the easiest to use. You can<br />
also use the less expensive <strong>Sekonic</strong> Exposure<br />
Profile Target or an X-Rite ColorChecker<br />
Classic. After measuring and recording the<br />
incident and reflected light readings (they’ll<br />
be different, but the test procedure also calibrates<br />
your meter to make future readings<br />
identical) and performing an in-camera<br />
white balance, you photograph the Target II<br />
chart in your camera’s raw file format. You<br />
need one exposure at the incident light reading,<br />
one that’s three stops underexposed,<br />
and one that’s three stops overexposed.<br />
Load these captures into your raw image<br />
processing software (I use Lightroom 4.1),<br />
perform a white balance, and output the<br />
three files as TIFFs or JPEGs. After connecting<br />
the L-758 to your Mac or Windows computer<br />
with the supplied USB 2.0 cable, load<br />
the image files in the <strong>Sekonic</strong> <strong>DTS</strong> software.<br />
The software quickly analyzes the data<br />
and creates a chart showing the sensor’s<br />
dynamic range for that ISO setting, with<br />
clipping points based on <strong>Sekonic</strong> criteria for<br />
highlight and shadow clipping. I found these<br />
points somewhat conservative, particularly<br />
for the Nikon D800E, so in later testing I<br />
manually adjusted them closer to the dynamic<br />
range endpoints. You can also adjust the<br />
dynamic range endpoints to set them to the<br />
dynamic range of your output media (fourcolor<br />
lithographic printing, for example).<br />
Measuring your digital sensor at one ISO<br />
80 • www.ppmag.com
accurately calibrates it for that ISO only, but<br />
you needn’t calibrate it for every ISO. By calibrating<br />
the sensor at its lowest native ISO<br />
and one other, such as ISO 400, the <strong>DTS</strong><br />
software combines the two readings to produce<br />
calibrations from ISO 3 to ISO 3200. I<br />
did this for my Nikon D3s. It’s quick and the<br />
results seem accurate.<br />
When you’re satisfied with the calibrations,<br />
upload them from the <strong>DTS</strong> software to<br />
your L-758 meter. The meter’s memory can<br />
hold three calibrations; more memory would<br />
be nice, as <strong>Sekonic</strong> recommends separate calibrations<br />
for daylight, tungsten, and flash<br />
because the sensor response is different for<br />
each. If you use only one camera model,<br />
then one calibration in the meter for each<br />
illuminant is sufficient; however, most of us<br />
use several models.<br />
Does calibrating your digital sensor really<br />
make a difference? If you are a studio photographer<br />
and have total control over your<br />
lighting, the most important part of the calibration<br />
is probably calibrating your meter<br />
and sensor to the ISO setting of your camera,<br />
as it’s unlikely you’d exceed the dynamic<br />
range of your camera’s sensor unless your<br />
lighting was extremely high contrast. It<br />
would certainly help in that situation, however,<br />
to know the upper and lower limits of<br />
areas where detail is held.<br />
For photographers shooting on location<br />
in lighting conditions they cannot control,<br />
calibrating the sensor with the L-758 meter<br />
and <strong>DTS</strong> software makes a big difference.<br />
For landscape and wedding photographers<br />
who constantly deal with high-contrast situations,<br />
it seems essential.<br />
TESTING PHASE<br />
After calibrating my D3s for multiple ISOs,<br />
I went outside my studio to shoot a test. I<br />
wanted to hold detail in the shadow areas of<br />
the trees and in the distant clouds. The incident<br />
meter reading from the calibrated L-758<br />
was 1/320 second at f/8, ISO 200, and I<br />
captured an image at those settings. On the<br />
camera’s LCD, the entire sky was blinking<br />
red and the capture was very overexposed.<br />
The D3’s meter wanted an exposure of<br />
1/640 second at f/9 to eliminate the overexposure<br />
in the sky.<br />
Saving the reading from the L-758 (1/320<br />
second at f/8) as my base exposure, I used<br />
the meter’s spot meter to measure the<br />
shadow area of the tree, which fell well<br />
within the underexposure clipping range<br />
indicated on the meter’s calibration scale.<br />
October 2012 • <strong>Professional</strong> <strong>Photographer</strong> • 81
THE GOODS: PRO REVIEW<br />
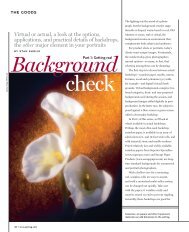
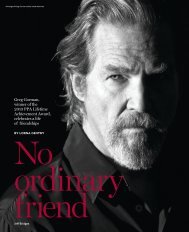
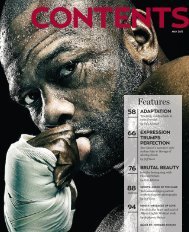
To perform the digital camera sensor calibration, load and align the test chart captures in the <strong>Sekonic</strong><br />
<strong>DTS</strong> program.<br />
When I measured the cloud, however, the<br />
meter indicated that it was beyond the highlight<br />
clipping point of the sensor. Pressing<br />
the averaging button on the meter produced<br />
a suggested exposure of 1/400 second at<br />
f/8.2, and I made a capture at this exposure.<br />
The camera LCD still indicated a completely<br />
blown-out sky.<br />
After loading the captures into Lightroom,<br />
sure enough, the brightest part of the<br />
clouds in the initial setting of 1/320 second<br />
at f/8 exposure were shown as clipping but<br />
not the entire sky as suggested by the camera<br />
LCD. Opening the capture in Lightroom<br />
with the adjusted exposure of 1/400 second<br />
at f/8 showed no clipping in the clouds.<br />
Now I could make a further highlight<br />
adjustment without losing the actual tonal<br />
balance in the clouds. Detail in the shadow<br />
areas of the trees was still good, as the meter<br />
had indicated.<br />
Getting the exposure right during digital<br />
capture is essential to producing the highest<br />
image quality. Using the <strong>Sekonic</strong> L-<strong>758DR</strong><br />
meter and <strong>DTS</strong> software to calibrate<br />
your camera sensor can ensure that captures<br />
make maximum use of your sensor’s<br />
dynamic range, producing the lowest signalto-noise<br />
ratio and highest image quality<br />
without resorting to post-processing.<br />
The suggested retail price of the <strong>Sekonic</strong><br />
L-<strong>758DR</strong> is $634, and the accessory Exposure<br />
Target II is $132. ■<br />
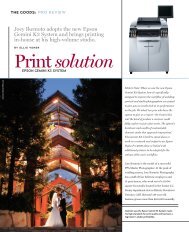
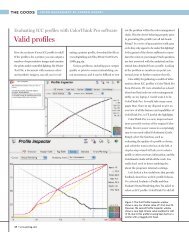
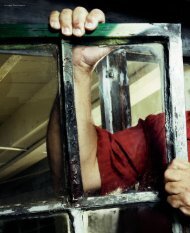
After the <strong>DTS</strong> software analyzes the test charts, it produces a graph of the results. This is the graph for<br />
my Nikon D800E at ISO 100. The dynamic range is 7.2EV from -3.8EV below the middle gray exposure<br />
to 3.4EV above. I found the clipping points at -2.5 EV and +2.6EV to be too conservative, so I manually<br />
adjusted them closer to the limits of the dynamic range.<br />
Stan Sholik is a commercial/advertising<br />
photographer in Santa Ana, Calif.,<br />
specializing in still life and macro<br />
photography. His latest book is “Lightroom<br />
4 FAQs” (Wiley Publishing).<br />
82 • www.ppmag.com