âFreeCaptureâ- A PC remote control program for GDS-800 SERIES ...
âFreeCaptureâ- A PC remote control program for GDS-800 SERIES ...
âFreeCaptureâ- A PC remote control program for GDS-800 SERIES ...

You also want an ePaper? Increase the reach of your titles
YUMPU automatically turns print PDFs into web optimized ePapers that Google loves.
“FreeCapture”- A <strong>PC</strong> <strong>remote</strong> <strong>control</strong> <strong>program</strong> <strong>for</strong> <strong>GDS</strong>-<strong>800</strong><br />
<strong>SERIES</strong> (RS-232/GPIB)<br />
Version 2.0<br />
Overview<br />
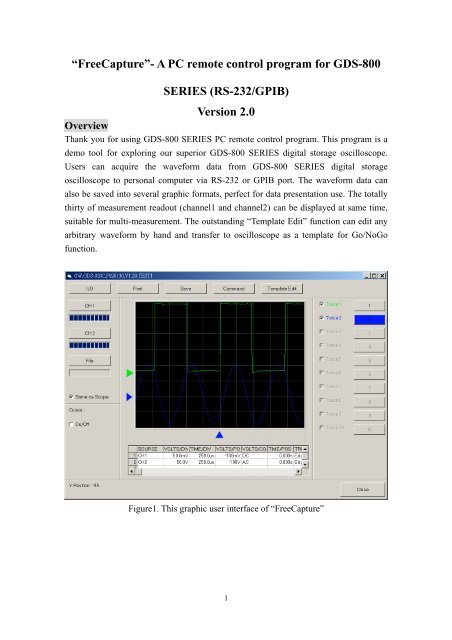
Thank you <strong>for</strong> using <strong>GDS</strong>-<strong>800</strong> <strong>SERIES</strong> <strong>PC</strong> <strong>remote</strong> <strong>control</strong> <strong>program</strong>. This <strong>program</strong> is a<br />
demo tool <strong>for</strong> exploring our superior <strong>GDS</strong>-<strong>800</strong> <strong>SERIES</strong> digital storage oscilloscope.<br />
Users can acquire the wave<strong>for</strong>m data from <strong>GDS</strong>-<strong>800</strong> <strong>SERIES</strong> digital storage<br />
oscilloscope to personal computer via RS-232 or GPIB port. The wave<strong>for</strong>m data can<br />
also be saved into several graphic <strong>for</strong>mats, perfect <strong>for</strong> data presentation use. The totally<br />
thirty of measurement readout (channel1 and channel2) can be displayed at same time,<br />
suitable <strong>for</strong> multi-measurement. The outstanding “Template Edit” function can edit any<br />
arbitrary wave<strong>for</strong>m by hand and transfer to oscilloscope as a template <strong>for</strong> Go/NoGo<br />
function.<br />
Figure1. This graphic user interface of “FreeCapture”<br />
1
Features<br />
1. The graphic user interface is friendly, easy to use. Even un-training person can<br />
easily to operate our software.<br />
2. This <strong>program</strong> can save your wave<strong>for</strong>m image as<br />
-BMP,<br />
-<strong>PC</strong>X,<br />
-TIFF,<br />
-PNG<br />
-JPEG<br />
Users can embedded these images into any application <strong>for</strong> their own particular<br />
purpose. For instance, users can embed the image into Microsoft ® Word <strong>program</strong><br />
and make an impressive document.<br />
3. The saved image files (10 sets maximum) can be re-loaded into <strong>PC</strong> monitor screen,<br />
perfect <strong>for</strong> wave<strong>for</strong>m evaluation and comparison.<br />
4. Thirty measurements (channel 1+channel 2) can be display simultaneously. This<br />
feature can display your specific measurement items on the screen in the same time!<br />
Users can monitor all necessary measurement items simultaneously. Best <strong>for</strong> the<br />
production lines of manufacturers.<br />
5. The printout data sheet will include the details of horizontal and vertical data.<br />
Make your report more precisely, that is great <strong>for</strong> your data reports!<br />
6. The wave image can input any text descriptions as you like. This feature is good<br />
<strong>for</strong> users who want to make descriptions on the wave<strong>for</strong>m image files.<br />
7. The supreme “Template Edit” function can input maximum one hundred arbitrary<br />
wave<strong>for</strong>ms into the oscilloscopes as the templates <strong>for</strong> “GO/NoGO” judgments.<br />
The ”FreeCapture” <strong>PC</strong> <strong>remote</strong> <strong>control</strong> <strong>program</strong> is plenty of features that make<br />
measurements as easy as possible!<br />
2
Requirement<br />
This <strong>program</strong> can be executed under WIN98, WIN2000 and XP now.<br />
You must have at least 10MB of available hard-disk space. This <strong>program</strong> has been<br />
tested on the <strong>PC</strong> with:<br />
a. CPU: Celeron 1.8GHz, DDR DRAM:256MB, Hard disk 40GB<br />
b. CPU: <strong>800</strong>MHz PIII, DRAM: 128MB, Hard disk: 20G<br />
c. CPU: AMD K6 400MHz PIII, DRAM: 128MB, Hard disk: 20GB<br />
If you use Windows 2000/XP, you must be an administrator to install ”FreeCapture” <strong>PC</strong><br />
<strong>remote</strong> <strong>control</strong> <strong>program</strong>.<br />
3
Installation<br />
Note: If you had any old version of “FreeCapture” 2.0 on your <strong>PC</strong>, please uninstall<br />
the old one be<strong>for</strong>e install this <strong>program</strong>.<br />
To install “FreeCapture” <strong>PC</strong> <strong>remote</strong> <strong>control</strong> <strong>program</strong>,<br />
1. Unzip the “fc200.zip”<br />
2. click to “package” directory<br />
3. Double clicking the “setup.exe” file, the installation will start and you will have to<br />
follow the instructions displayed on screen.<br />
4. The initial procedures <strong>for</strong> installation will go on in advance.<br />
5. The welcome message screen will be display and click the “OK” to continue the<br />
installation.<br />
4
6. Select the <strong>program</strong> location and press the install button.<br />
7. Select the <strong>program</strong> group and press “Continue” button.<br />
5
8. The installation is proceeding.<br />
9. If there are some “Version Conflict” happened, press “Yes” button to keep the<br />
original file.<br />
6
10. The “FreeCapture” is installed on the target computer already.<br />
7
Removing “FreeCapture” <strong>PC</strong> <strong>remote</strong> <strong>control</strong> <strong>program</strong><br />
To remove “FreeCapture” <strong>PC</strong> <strong>remote</strong> <strong>control</strong> <strong>program</strong> from your computer system, go<br />
to Start->Settings->Control Panel->Add/Remove Programs, “FreeCapture” <strong>PC</strong><br />
<strong>remote</strong> <strong>control</strong> <strong>program</strong> will be listed as “FreeCapture”. The removal system is<br />
automated and requires very little user intervention (Simply click OK to confirm that<br />
you wish to remove “FreeCapture” <strong>PC</strong> <strong>remote</strong> <strong>control</strong> <strong>program</strong>).<br />
8
Starting this <strong>program</strong><br />
1. Turn on <strong>GDS</strong>-<strong>800</strong> <strong>SERIES</strong> and setup the RS-232 (or GPIB) communication<br />
settings.<br />
2. On the Windows operating system the “FreeCapture” can be found in the Start<br />
menu > Programs> Shortcut> FreeCapture. By clicking on the name of the<br />
software it will be started.<br />
3. The “FreeCapture” <strong>PC</strong> <strong>remote</strong> <strong>program</strong>’s RS232 (or GPIB) setting is following:<br />
a. Click the “I/O” icon. The “I/O Setup” dialog window is appeared.<br />
b. Select all the proper settings which have to be identical with oscilloscope<br />
settings and press “OK” button.<br />
9
c. If all settings are correct, the oscilloscope identification messages will appear.<br />
The initialization of “FreeCapture” is done <strong>for</strong> now!<br />
10
Operation<br />
1. Press “CH1” or “CH2” button can get the wave<strong>for</strong>m data from oscilloscope’s<br />
channel one or channel two individually.<br />
After “CH1” or “CH2” button pressed, the wave<strong>for</strong>ms data of oscilloscope just<br />
transferred to <strong>PC</strong> automatically. User can shift these colored triangles by mouse in<br />
order to move the traces to upper or lower position.<br />
11
2. Save Wave<strong>for</strong>m data: The two input wave<strong>for</strong>ms can be saved as CSV <strong>for</strong>mat file<br />
or erased from <strong>PC</strong> monitor. Users just right click on the numeric button (1~10), a<br />
small dialog box with “Save” and “Delete” will be displayed. The “Save” function<br />
can save the specific wave<strong>for</strong>m data into CSV <strong>for</strong>mat file; the “Delete” function<br />
will remove the specific image from <strong>PC</strong> monitor. The wave<strong>for</strong>m data image can be<br />
temporal removed from <strong>PC</strong> monitor by just click on the “Trace X” box.<br />
The saved CSV <strong>for</strong>mat files can be also recalled and displayed on the <strong>PC</strong> monitor.<br />
Users press the “File” button and select the target file. The target file will be<br />
displayed on <strong>PC</strong> monitor after few seconds.<br />
12
3. Printing: The all wave<strong>for</strong>m date display area on the <strong>PC</strong> monitor can be printed out.<br />
Press the “Print” button that the data will be printed out from the default printer.<br />
The all relative to wave<strong>for</strong>m data will be also printed out too. The standard printing<br />
sheet is same as below figure.<br />
13
4. Save Wave<strong>for</strong>m image:save your wave<strong>for</strong>m image as a BMP, <strong>PC</strong>X, TIFF, PNG or<br />
JPEG <strong>for</strong>mat.<br />
A “save” dialog box will appear after “Save” button pressed. Select the suitable<br />
<strong>for</strong>mat and the file name and location afterward.<br />
14
5. Manually operation: Press “Command” button, all the oscilloscope’s <strong>remote</strong><br />
<strong>control</strong> commands will be listed. Users can input command manually.<br />
The “Command List” dialog box is following. A brief description <strong>for</strong> each<br />
command will also be indicated on the top of dialog box. Please refer to<br />
“Programming Manual” <strong>for</strong> the details of all <strong>remote</strong> commands.<br />
15
6. Click the “Same as Scope” box, the “FreeCapture” will only display 250 dots on<br />
the <strong>PC</strong> monitor. Otherwise, all 500 dots will be display simultaneously.<br />
16
7. Cursor: Click the “Cursor On/Off” box, the vertical and horizontal cursors will be<br />
appeared. The in<strong>for</strong>mation relative to the cursors will also be shown. Left chick<br />
any of the yellow cursor line can move the line upper or lower (left or right).<br />
17
Template Editing<br />
1. Press “Template” button can active the “template edit” function.<br />
The “template Edit” graphic user interface (GUI) look like below.<br />
18
2. File Open/Save: Open an existing file or save the current template file.<br />
Note: The saved template file can only modify dot by dot from the “Data Array<br />
(250 dots)”.<br />
3. I/O: Upload/download template file to/from oscilloscope. The oscilloscope can<br />
accept maximum one hundred template files from “FreeCapture”.<br />
19
4. Edit: The main editing function. Users can design any preferred wave<strong>for</strong>m<br />
template here. “FreeCapture” provides four of sine, triangle, square and line<br />
editing function. The “Phase Adjustment” can adjust the phase of target wave<strong>for</strong>m<br />
template only during the wave<strong>for</strong>m template editing, The “Clear” button will erase<br />
the current wave<strong>for</strong>m template only during the wave<strong>for</strong>m template editing too. The<br />
wave<strong>for</strong>m template can be also added the text comments (38 letters maximum).<br />
5. Send/Read: Press “Send/Read” button will send/read the current wave<strong>for</strong>m<br />
template to/from the specific oscilloscope’s template storage location.<br />
6. Close: Close the “Template Edit” window. If another template editing is necessary,<br />
please close “Template Edit” window and press the “Template Edit” button again.<br />
20
Example 1: Edit an arbitrary wave<strong>for</strong>m template and transfer to the<br />
oscilloscope.<br />
1. Open oscilloscope and setup all communication settings.<br />
2. Open “FreeCapture” and check the “I/O” settings.<br />
3. Click “Template” button and “Template Edit” window opened.<br />
4. Click the “upload” box from “I/O” function and select the preferred oscilloscope’s<br />
storage location (1~100). We select location “10” here.<br />
5. Click “Add” button, the default wave<strong>for</strong>m is a sine wave.<br />
21
6. However, we select a triangle wave<strong>for</strong>m by click the triangle wave<strong>for</strong>m pattern.<br />
The triangle wave<strong>for</strong>m can be modified the scale by move the two cross red line.<br />
7. Just click “Add” button again in order to add another new pattern after the first<br />
pattern is ready. We select the sine wave<strong>for</strong>m here. The sine wave<strong>for</strong>m can also be<br />
modified the scale by move the two cross red line too.<br />
22
8. Click the “Last” button <strong>for</strong> the final pattern. We pick square wave<strong>for</strong>m here and<br />
change the phase a little. We can input some comment here, the sentence “This is<br />
my first template” is typed.<br />
The final template wave<strong>for</strong>m is below:<br />
23
9. Un<strong>for</strong>tunately, this template wave<strong>for</strong>m is not perfect. There<strong>for</strong>e we click the “Fine<br />
Adjustment” button and revise the wave<strong>for</strong>m slightly.<br />
a. Click the “Fine Adjustment” button and shift the two red and blue triangle<br />
markers to the preferred position in advance. There two red and blue dots are<br />
also relative to the two triangle markers which shown on the template<br />
wave<strong>for</strong>m area.<br />
Note: the “Fine Adjustment” only modifies wave<strong>for</strong>m area between the area of<br />
two red and blue triangle markers<br />
24
. We can modify the shape of wave<strong>for</strong>m manually now. Just move the two cross<br />
red line to the area between two red and blue markers and modify the shape as<br />
we like.<br />
10. The template wave<strong>for</strong>m is perfect now. We save the template wave<strong>for</strong>m as file in<br />
the first place. Click the “Save” button and save to preferred directory.<br />
25
11. We can send the final template wave<strong>for</strong>m to the oscilloscope by click “Send”<br />
button now.<br />
12. Check the oscilloscope, press UTILITY→F5 (More) →F3 (Go-No Go Menu) →<br />
F1 (Template Edit) →F2 (Source) →rotate the VARIABLE knob to number 10.<br />
The template wave<strong>for</strong>m has been complete transferred to oscilloscope!<br />
26