VB Tutorial - TIBBO Technology
VB Tutorial - TIBBO Technology
VB Tutorial - TIBBO Technology

Create successful ePaper yourself
Turn your PDF publications into a flip-book with our unique Google optimized e-Paper software.
<strong>VB</strong> <strong>Tutorial</strong><br />
Tibbo<br />
TECHNOLOGY<br />
Using Visual Basic (<strong>VB</strong>) to communicate with the<br />
DS100 and EM100<br />
Please, register at www.tibbo.com to receive update notifications<br />
Version: 2.0a<br />
Tibbo <strong>Technology</strong>, Inc. 2001, 2002
Table of Contents<br />
1. Introduction 3<br />
1.1. What is WinSock? 3<br />
1.2. Required tools 3<br />
2. Preparing the DS100/EM100SK 4<br />
2.1. Connecting cables 4<br />
2.2. Choosing an IP-address 5<br />
2.3. Installing the HyperTerminal 7<br />
2.4. Setting up the HyperTerminal 8<br />
2.5. Setting up the DS100/EM100SK 9<br />
2.6. Testing the LAN link 10<br />
3. Creating the WinSock Demo 12<br />
3.1. WinSock Demo action plan 12<br />
3.2. Step 1: creating a simple UDP/IP Demo 12<br />
3.3. Step 2: learning to control the DS100/EM100 over the network 15<br />
3.4. Step 3: TCP/IP communications 18
1. Introduction<br />
1.1. What is WinSock?<br />
WinSock ActiveX control is a part of a standard Visual Basic 6 (<strong>VB</strong>6) distribution. WinSock dramatically<br />
simplifies the development of TCP/IP-based applications. Since the DS100 Serial Device Server and the<br />
EM100 Ethernet Module from Tibbo <strong>Technology</strong> support standard UDP and TCP protocols the WinSock<br />
can also be used to build applications that communicate with and control the DS100 and EM100.<br />
This <strong>Tutorial</strong> provides step-by-step instructions on using <strong>VB</strong> to create three rudimentary programs<br />
(called “WinSock Demos”) that communicate with and program the DS100/EM100 over the network. The<br />
Demos are not a complete fully-functional programs but rather a “templates” that show you the basic steps<br />
of building your own applications with the WinSock. Complete <strong>VB</strong> projects for each WinSock Demo (packed<br />
into a ZIP archives and named “WinSock Demo Step1”, “WinSock Demo Step2”, and “WinSock Demo<br />
Step3”.) can be downloaded from www.tibbo.com/downloads.htm.<br />
1.2. Required tools<br />
• DS100 Serial Device Server or EM100SK Starter Kit<br />
• WAS-1455 or similar serial cable to connect the DS100/EM100 to the PC*<br />
• WAS-1498 or WAS-1499 Ethernet cable may be needed to connect the DS100/EM100 to the LAN*<br />
• Power adaptor (220V or 120V depending on your locality)*<br />
• Windows PC with one unused Serial port and an Ethernet port<br />
• Visual Basic 6.0 from Microsoft<br />
• HyperTerminal for Windows (part of a standard Windows distribution)<br />
*These accessories are supplied with the DS100-KIT and EM100SK Products.
2. Preparing the DS100/EM100SK<br />
2.1. Connecting cables<br />
To test out the WinSock Demos you will need to connect the Ethernet port of the DS100/EM100SK to<br />
the LAN (to which your test PC is also connected), and the RS232 port- to the PC’s COM port. Our WinSock<br />
Demos will communicate with the DS100/EM100SK directly via the Ethernet (which is a TCP/IP network).<br />
RS232 side of the link will be served by the HyperTerminal- a standard Windows software used to send and<br />
receive the serial data.<br />
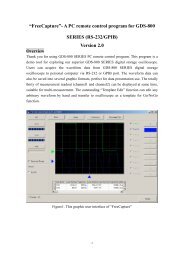
Assembly the network as follows (Fig. 1):<br />
• Connect the RS232 port of the DS100/EM100SK to the unused Serial port of your PC with the<br />
WAS-1455 serial cable<br />
• Connect the Ethernet port of the DS100/EM100SK to your office LAN or directly to your PC using<br />
the WAS-1499 or WAS-1498 cable (see below for more information)<br />
• Power the DS100/EM100SK up using the power adaptor.<br />
There are two ways to connect the Ethernet side of the DS100/EM100SK to the PC:<br />
• Via LAN. If you have a LAN installed in your office and your PC is already connected to this LAN,<br />
then you will need a spare cable (coming out of the network hub) to connect the DS100/EM100SK.<br />
If no spare cable is readily available, then our WAS-1499 Device-to-Hub cable can be used. Plug<br />
one side of the cable into the unused 10BaseT connector on your hub, another one- into the<br />
DS100/EM100SK Ethernet port<br />
• Directly. You can bypass the LAN and the Hub using our WAS-1498 Device-to-Device cable. Plug<br />
one side of the cable into your PC’s Ethernet port (yes, you need to disconnect your PC from the<br />
office network first), another side- into the Ethernet port on the DS100/EM100SK.
Note: The Ethernet port of the DS100/EM100SK is of 10BaseT type, not 100BaseT. You can use the<br />
DS100/EM100SK on “10” or “Auto 10/100” LANs, but not on “100” LANs.<br />
5<br />
WinSock<br />
Demo<br />
Hyper<br />
Terminal<br />
WinSock<br />
Demo<br />
Hyper<br />
Terminal<br />
LAN<br />
COM<br />
LAN<br />
COM<br />
Test PC<br />
Test PC<br />
Hub<br />
WAS-1455<br />
WAS-1498<br />
WAS-1455<br />
WAS-1499<br />
DS100<br />
DS100<br />
Connecting via Hub<br />
Connecting directly<br />
Fig. 1. Test arrangement<br />
2.2. Choosing an IP-address<br />
Each DS100/EM100 you use must be assigned a network-unique IP-address. Most LANs have<br />
restrictions on the range of permitted IP-addresses, so you cannot just use any random address. One<br />
reliable way to obtain a “good” IP-address is to ask your IT guy ☺. If there is no such person in your building<br />
then you can follow this (many times proven) method:
• Use our WAS-1498 cable to directly connect your PC to the DS100/EM100SK. This way you will<br />
disconnect from the rest of the LAN (a lot of possible problems will be cut out…)<br />
6<br />
• Use the WINIPCFG program to find out the IP-address of your PC (see explanation below). In 99%<br />
of cases, choosing the address for the DS100/EM100SK that differs slightly from your PC’s IPaddress<br />
in the last digit produces a workable result. That is, if your PC’s address is 192.168.100.39<br />
then choosing 192.168.100.40 for your DS100/EM100 will most probably work fine!<br />
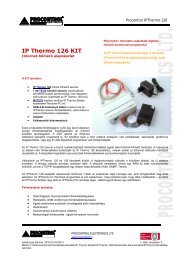
Using WINIPCFG to find out the IP-address of your PC<br />
Fig. 2. WINIPCFG window<br />
• Choose Run… from the Start menu of Windows- the Run dialog will open<br />
• Type winipcfg into the Open textbox and press OK- the WINPCCFG dialog will open
• From a drop-down box at the top of the dialog select a network adaptor that is used to connect your<br />
PC to the Ethernet network. All available adaptors are listed by their actual model number. Usually<br />
there is only one Ethernet adaptor in the PC so you need to find some line with the word “Ethernet”<br />
in it. For example if the drop-down box contains two entries: “PPP Adapter” and “D-Link DFE-<br />
530TX PCI Fast Ethernet Adapter” then you know which one you need to choose, right ? (just in<br />
case, it is the second one).<br />
7<br />
• After you have selected correct adapter note an IP-address displayed below and click OK- the<br />
dialog will close<br />
• Choose an IP-address that is close to the one set for your PC. Procedures below assume that this<br />
new IP-address is 192.168.100.40.<br />
2.3. Installing the HyperTerminal<br />
One side of the test link we are building is served by (as yet to be created) a WinSock Demo program,<br />
another one- by a standard serial communications software called HyperTerminal. This program is also used<br />
here to setup the DS100/EM100SK. Actually, there is a setup software called DS Manager (part of Tibbo<br />
Device Server Toolkit available for download from www.tibbo.com/downloads.htm) that can be used to setup<br />
the DS100/EM100SK. However, we are deliberately choosing to make you type all the setup commands<br />
manually. This way you will familiarize yourself with the structure and use of actual commands sent to the<br />
DS100/EM100SK. Later in this <strong>Tutorial</strong> we will show you how to setup the DS100/EM100SK through the<br />
network so the knowledge of programming commands will be quite handy!<br />
The HyperTerminal is normally found in the Start" Programs" Accessories" Communications"<br />
HyperTerminal folder. If it is not there, then you must have opted it out when installing Windows on your PC.<br />
Follow the instructions below to add HyperTerminal to your system (be sure to have your Windows<br />
distribution CD handy!):<br />
• Go to the Control Panel (Start" Settings" Control Panel) and double-click on the Add/Remove<br />
Programs icon- the Add/Remove Programs dialog will open
• Click on Windows Setup tab to view the list of optional installation components<br />
8<br />
• Choose Communications in the Components list and click Details<br />
• In the Communications window, select the HyperTerminal (it must be “checked”)<br />
• Press OK to close Communications window, press OK again to close Add/Remove Programs<br />
• You will possibly be asked to insert the Windows CD at this point. Do this and follow the<br />
instructions on the screen.<br />
2.4. Setting up the HyperTerminal<br />
Once the HyperTerminal is installed (or found ☺), launch it and follow the procedure below:<br />
• When the Connection Description dialog opens, type any descriptive string (like “DS100”) and<br />
press OK<br />
• When the Connect to dialog opens, select an appropriate COM port from the Connect Using dropdown<br />
box (for example, “Direct to COM1”)<br />
• When the COM Properties dialog appears, set communications parameters as follows: Bits per<br />
second: 38400, Data bits: 8, Parity: None, Stop bits: 1, Flow control: None. Click OK when donethe<br />
HyperTerminal’s main window will appear<br />
• Choose File"Properties from the Main menu- the Properties dialog will open<br />
• Click on the Settings tab and press the ASCII Setup button- the ASCII Setup dialog will open<br />
• “Check” (enable) three options: Echo typed characters locally, Send line feeds with line ends, and<br />
Append line feeds to incoming line ends<br />
• Click OK twice to close both dialogs<br />
• Optional (but strongly recommended): you may want to Save (File"Save in Main menu) this<br />
HyperTerminal configuration so that you don’t have to set all the parameters again in the future!
• Connect the power to the DS100/EM100SK and wait until it enters the Normal mode (Red and<br />
Green Status LEDs blink three times)<br />
9<br />
• Push the Setup Button (it is on the back of the DS100 and on the PCB of the EM100SK) - both<br />
Status LEDs will start blinking (Red-Green-Red-Green-…)- the DS100 is now in the Serial<br />
Programming mode (read all about it in Section 4.2. of the DS100 Tech Manual)<br />
• Try this command: in the HyperTerminal’s window press (to mark the beginning of a new<br />
command packet; the character on the screen will look like a smiley face), then capital “V” , then<br />
. The DS100 will respond with its firmware version string:<br />
☺V<br />
☺A<br />
Input all other commands is a similar way: start every command with a and finish it off by<br />
pressing . Note, that you cannot correct input errors by pressing , , etc. If you’ve<br />
made a mistake you have to start the whole command over again (press , etc.).<br />
2.5. Setting up the DS100/EM100SK<br />
To make sure that all the Settings of the DS100/EM100SK are correct you are advised to initialize the<br />
DS100 first. This will bring the DS100 back to its default factory state. After that, you only need to change<br />
one Setting: IP-address of the DS100. Procedure below assumes that the desired IP-address is<br />
192.168.100.40:<br />
☺I<br />
/you initialize the DS100/EM100SK<br />
☺A<br />
/OK<br />
☺SIP192.168.100.40<br />
/you set new IP-address<br />
☺A<br />
/OK<br />
☺GIP<br />
/you verify new IP-address<br />
☺A192.168.100.40 /yes, it is 192.168.100.40
After the initialization the DS100 is set to work in the Slave Routing Mode, with the UDP/IP<br />
communications protocol. The data exchange is to be effected with Data Port #1001.<br />
10<br />
OK, now disconnect the DS100’s power and then connect it again- the unit will resume operation with<br />
the new functioning parameters.<br />
Do not exit the HyperTerminal at this time- you will need it to exchange the data with the WinSock<br />
Demo.<br />
2.6. Testing the LAN link<br />
Final step before we start creating the Demo is to make sure that your PC can “find” the<br />
DS100/EM100SK on the network. Use PING program to check this:<br />
• Choose Run… from the Start menu of Windows- the Run dialog will open<br />
• Type ping 192.168.100.40 into the Open textbox and press OK<br />
• The ping program will send four messages to the DS100/EM100SK. If there is no reply from the<br />
DS100/EM100SK then the program output will look like this:<br />
Pinging 192.168.100.40 with 32 bytes of data<br />
Request timed out.<br />
Request timed out.<br />
Request timed out.<br />
Request timed out.<br />
• If the DS100/EM100SK does reply to your PC’s “pinging” then the output from the ping program will<br />
look somewhat like this:<br />
Pinging 192.168.100.40 with 32 bytes of data<br />
Reply from 192.168.100.40: bytes=32, time=9ms, TTL=255<br />
Reply from 192.168.100.40: bytes=32, time=9ms, TTL=255<br />
Reply from 192.168.100.40: bytes=32, time=9ms, TTL=255
Reply from 192.168.100.40: bytes=32, time=9ms, TTL=255<br />
11<br />
Note: “time” and “TTL” parameters are not important. The only important point is that the<br />
DS100/EM100SK does, indeed, reply to your PC’s “pinging”.<br />
Obtaining a “good ping” from the DS100/EM100SK is a required step in setting up your test<br />
network. Nothing will work as expected unless your PC can find the DS100/EM100SK by “pinging” it.
3. Creating the WinSock Demo<br />
3.1. WinSock Demo action plan<br />
We will show you the basics of communicating with the DS100/EM100SK in three steps:<br />
• In step 1 we will create a very simple program that will be able to exchange the data with the Data<br />
Port of the DS100/EM100SK using an UDP/IP protocol<br />
• In step 2 we will show how to program (setup) the DS100/EM100 over the network. Same UDP/IP<br />
protocol will be used, but this time to communicate with the Command Port of the DS100/EM100SK<br />
• In step 3 we will show how to exchange data with the DS100/EM100 using the TCP/IP protocol.<br />
Supporting TCP/IP is slightly more difficult so we will do this at the end of the <strong>Tutorial</strong>.<br />
You can follow our instructions step-by-step or you can download a completed project for each of the<br />
steps from www.tibbo.com/downloads.htm. The projects are archived (.zip) and named “WinSock Demo<br />
Step1”, “WinSock Demo Step2”, and “WinSock Demo Step3”. Important: you may need to change the<br />
RemoteHost property of the WinSock control in each project to the actual IP-address you’ve set for your<br />
DS100/EM100.<br />
3.2. Step 1: creating a simple UDP/IP Demo<br />
Follow the instructions below to complete the first step of our action plan:<br />
• Lunch the Visual Basic (<strong>VB</strong>), choose the Standard EXE project<br />
• Rename the default form (Form1) to FormMain, set its caption to “WinSock Demo”<br />
• Save the project (and do use the Save button often!)<br />
• Add the WinSock control to your Project:<br />
o<br />
Choose Project"Components from the main menu- Components dialog will open
o<br />
o<br />
Scroll down to Microsoft Winsock Control 6.0 and “check” it<br />
Click OK- the Winsock control will be added to your project’s Toolbox<br />
13<br />
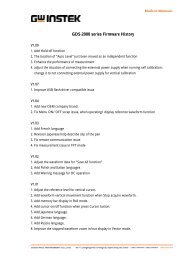
• Add the following controls to your Project’s form (see Fig. 3):<br />
Fig. 3. Controls for the Demo, step 1<br />
o<br />
o<br />
o<br />
o<br />
o<br />
CmdSend CommandButton (change its Caption property to “Send”)<br />
TxtSend TextBox (change its Text property to “”, i.e. empty string)<br />
LblRcv Label (change its Caption property to “Receive:”)<br />
TxtRcv TextBox (change its Text property to “”, i.e. empty string) and set its MultiLine property to<br />
“True”. Make this TextBox span several lines as shown on Fig. 3<br />
CmdClear CommandButton (change its Caption property to “Clear”)
o<br />
o<br />
o<br />
o<br />
WinSock control, adjust its properties as follows:<br />
Protocol: 1-sckUDPProtocol<br />
RemoteHost: 192.168.100.40 (or whatever IP-address you’ve set for the DS100/EM100SK)<br />
RemotePort: 1001 (must be specified!)<br />
14<br />
• Add the following code to the project:<br />
o<br />
For the Click event of the CmdSend button:<br />
Private Sub CmdSend_Click()<br />
WinSock.SendData TxtSend.Text<br />
End Sub<br />
o<br />
For the DataArrival event of the WinSock control:<br />
Private Sub WinSock_DataArrival(ByVal bytesTotal As Long)<br />
WinSock.GetData s$<br />
TxtRcv.Text = TxtRcv.Text + s$<br />
End Sub<br />
o<br />
For the Click event of the CmdClear button:<br />
Private Sub CmdClear_Click()<br />
TxtRcv.Text = ""<br />
End Sub<br />
That’s it! The Project is done! Save it and proceed to testing!<br />
• Run the Demo you have created, run the HyperTerminal and configure it as explained in Setting<br />
up the HyperTerminal if necessary<br />
• Type any string in the Send textbox and press Send
At this point you will likely be shown… an error message saying some nonsense like “Address family is not<br />
supported” or just an error code without any explanation. This is a peculiar bug in the WinSock control. Manual way<br />
around this situation is to stop the program and simply click once on the WinSock control in your FormMain form (in<br />
the design mode). Next time you run the Demo this problem won’t show up! This is not a solution for a “real”<br />
application you are probably starting to develop. One way to avoid this annoying message is to use the OnError<br />
statement to filter out the error.<br />
15<br />
• Well, again (if necessary ☺)… run the Demo, type any string and press Send- the string will appear<br />
in the HyperTerminal’s window<br />
• Type anything in the HyperTerminal’s window- the same string will appear in the Receive textbox of<br />
your Demo.<br />
• Congratulations! Step 1 successfully completed!<br />
3.3. Step 2: learning to control the DS100/EM100 over the network<br />
The DS100/EM100 can be programmed (setup) over the network (see Section 4.3 of the DS100 Tech<br />
Manual). Programming commands are sent as UDP datagrams (one datagram per command) to the<br />
DS100/EM100’s Command Port whose number is fixed at 65535. Most of the commands are the<br />
same as the ones you can issue via the serial port in the Serial Programming Mode. In addition there<br />
are many commands that can only be sent over the network. The difference in command and reply<br />
formats is that you don’t have to type and for the network commands. Let’s test this<br />
out:<br />
• Stop the Demo<br />
• Change the RemotePort property of the WinSock control to 65535<br />
• Make the contents of each datagram arriving from the DS100/EM100 appear in the TxtRcv<br />
textbox on a separate line. Change the code for the DataArrival event of the WinSock as follows:<br />
Private Sub WinSock_DataArrival(ByVal bytesTotal As Long)
WinSock.GetData s$<br />
TxtRcv.Text = TxtRcv.Text + s$ + Chr$(13) + Chr$(10)<br />
End Sub<br />
16<br />
• Run the Demo again<br />
• In the Send textbox type “V” and click Send, the DS100/EM100 will respond with its version<br />
string, i.e. “V2.20”<br />
You can type most commands like this. Right now we will show you how to change the Transport<br />
Protocol (i.e. the protocol the DS100/EM100 uses to receive and send the data) from UDP/IP to<br />
TCP/IP.<br />
• To change any Setting of the DS100/EM100 over the network you need to login. Login password<br />
of the freshly initialized DS100/EM100 is NULL (empty string) but login is still necessary. Type<br />
“L” and press Send. The DS100/EM100 will respond with “A”<br />
• To select the TCP/IP transport protocol send this command: “STP1”. Again, the DS100/EM100<br />
will respond with “A”<br />
• End the Network Setup Session by sending “E”. The DS100/EM100SK will not respond to this<br />
command but simply reboot. The DS100/EM100SK is now using TCP/IP.<br />
One last thing that remains to be demonstrated is the use of broadcast commands. Broadcast<br />
commands are sent using Ethernet broadcast packets. These packets reach all devices attached to<br />
the same network segment as your PC. Broadcast commands allow you to find all locally attached<br />
DS100/EM100s and also assign a new IP-address to any of these devices. The latter is very<br />
important- you can setup the DS100/EM100 even when its IP-address is not suitable for the current<br />
network and regular “IP” communications is not possible. Example below shows the use of the<br />
broadcast commands:<br />
• Stop the Demo
• Change the RemoteHost property of the WinSock to 255.255.255.255. Such an IP-address is, in<br />
fact, invalid. For the WinSock control it means that all packets must be sent in the broadcast<br />
mode<br />
• Modify the code (add a line) for the Click event of the Send button:<br />
Private Sub CmdSend_Click()<br />
WinSock.RemoteHost = "255.255.255.255" 'takes care of the bug<br />
WinSock.SendData TxtSend.Text<br />
End Sub<br />
There is another bug in the WinSock control. Without the line that repeatedly assigns “255.255.255.255” each time<br />
you are about to send the datagram the WinSock will not always process all the replies from all the DS100/EM100s!<br />
• Run the Demo<br />
• Send “X” command. If you have several DS100/EM100s attached to the local network segment<br />
you will get a reply from each device! For example:<br />
A0.2.3.4.12.250/1001<br />
A.0.2.3.4.23.126/1000<br />
A.1.2.3.4.23.127/1001<br />
Each reply contains the Ethernet (MAC) address of the DS100/EM100 and its current Data Port<br />
number. The Ethernet address is important because it is unique for every DS100/EM100 (and, in<br />
fact, for every other Ethernet device connected to your network). You can use the Ethernet<br />
address to reference a specific DS100/EM100 whose IP-address you want to change!<br />
• You can now assign a new IP-address to the DS100/EM100 you are playing with (make sure you<br />
choose correct new IP-address). For example, if the Ethernet address of this DS100/EM100SK is<br />
1.2.3.4.23.127 and you want to change the IP-address to 192.168.100.41 then send this<br />
command: “A0.2.3.4.23.126//192.168.100.41” (the empty field in the middle is for login password<br />
which is now NULL). The DS100/EM100 will reply with “A” and start using the new IP-address<br />
17
3.4. Step 3: TCP/IP communications<br />
18<br />
Finally, let’s modify the Demo to communicate with the DS100/EM100 using the TCP/IP protocol. This<br />
protocol has many advantages over the UDP/IP. Naturally, this also implies a somewhat more complicated<br />
programming.<br />
• Stop the Demo<br />
Fig. 4. Controls for the Demo, step 3<br />
• If you have assigned a new IP-address to the DS100/EM100 in the previous section then change<br />
the RemoteHost property of the WinSock control accordingly<br />
• Change the RemotePort property of the WinSock back to 1001
• Change the Protocol property of the WinSock control to “0- sckTCPProtocol” (you have already<br />
switched the DS100/EM100 to TCP/IP earlier)<br />
19<br />
• Change the Enabled property of the CmdSend button to “Disabled” (because the data cannot be<br />
sent unless the connection is established)<br />
• The TCP/IP is a connection-oriented protocol so we will need to add a button to connect to/<br />
disconnect from the remote host. Add CmdConnect CommandButton to your form, set its<br />
Caption to “Connect” (see Fig. 4)<br />
• Also add another Label named LblState- this will be used to track the change in TCP/IP<br />
connection states. Set this Label’s Caption to “-------”<br />
• Add one Timer, Timer1, to the form too. Set the Timer’s Interval to 100 (i.e. 10 times/second)<br />
• Add the code below to the Timer event of Timer1 This code does three things. 1) It periodically<br />
updates the status of the TCP/IP connection. 2) Dynamically changes the Caption of the<br />
CmdConnect button: when the connection is closed (WinSock.State=0) the Caption reads<br />
“Connect”, when the connection is not closed the Caption reads “Disconnect”. This way the<br />
button can be used as a “toggle switch”. 3) The code also disables or enables the CmdSend<br />
button- the data can be sent only when connection is established<br />
Private Sub Timer1_Timer()<br />
'display current connection state<br />
Select Case WinSock.State<br />
Case 0: LblState.Caption = "Closed"<br />
Case 1: LblState.Caption = "Open"<br />
Case 2: LblState.Caption = "Listening"<br />
Case 3: LblState.Caption = "Connection pending"<br />
Case 4: LblState.Caption = "Resolving host"<br />
Case 5: LblState.Caption = "Host resolved"<br />
Case 6: LblState.Caption = "Connecting"<br />
Case 7: LblState.Caption = "Connected"
Case 8: LblState.Caption = "Peer closing"<br />
Case Else: LblState.Caption = "Error"<br />
End Select<br />
20<br />
'set the caption of the "Connect" button<br />
If WinSock.State = 0 Then<br />
CmdConnect.Caption = "Connect"<br />
Else<br />
CmdConnect.Caption = "Disconnect"<br />
End If<br />
'enable or disable the "Send" button<br />
If WinSock.State = 7 Then<br />
CmdSend.Enabled = True<br />
Else<br />
CmdSend.Enabled = False<br />
End If<br />
End Sub<br />
• Add the code below to the Click event of the CmdConnect button. This code selects open the<br />
connection when it is closed and to close the connection when it is not closed:<br />
Private Sub CmdConnect_Click()<br />
If WinSock.State = 0 Then<br />
WinSock.Connect<br />
Else<br />
WinSock.Close<br />
End If<br />
End Sub
• “Comment out” disable the line in the Click event of the Send button (we have added this line to<br />
make the WinSock correctly display all the replies from the devices in the broadcast mode. In our<br />
current TCP/IP test this is not only unnecessary, but erroneous- in TCP/IP you cannot change the<br />
IP-address after the connection has been established!):<br />
Private Sub CmdSend_Click()<br />
'WinSock.RemoteHost = "255.255.255.255" Comment out for TCP test<br />
WinSock.SendData TxtSend.Text<br />
End Sub<br />
• Finally, “comment out” the CR/LF addition to every packet received from the DS100/EM100. It is<br />
convenient for the Network Setup but will look strange for a “normal” data exchange:<br />
Private Sub WinSock_DataArrival(ByVal bytesTotal As Long)<br />
WinSock.GetData s$<br />
TxtRcv.Text = TxtRcv.Text + s$ ‘+ Chr$(13) + Chr$(10) Comment out<br />
End Sub<br />
Now you can test your TCP/IP Demo!<br />
• Run the Demo. The Status of the TCP/IP connection will be “Closed”. The Send button will not be<br />
active<br />
• Click Connect button. The Status will change to “Connecting”, then to “Connected”. If the program<br />
cannot connect to the DS100/EM100 (because the device is off, because you are connecting to a<br />
wrong IP-address, because somebody is already connected to this DS100/EM100, etc. etc.) then<br />
the Status will hang on “Connecting” for a while, then change to “Error”<br />
• With TCP/IP connection established the Send button will be enabled and you can exchange the<br />
data between the Demo and the HyperTerminal<br />
And this is the end of our <strong>Tutorial</strong>. Hope this wasn’t too boring! ☺<br />
21