Instruction Manual - Camon
Instruction Manual - Camon
Instruction Manual - Camon

Create successful ePaper yourself
Turn your PDF publications into a flip-book with our unique Google optimized e-Paper software.
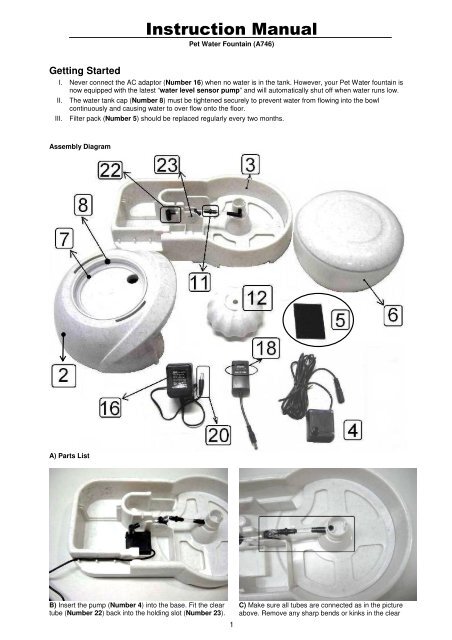
<strong>Instruction</strong> <strong>Manual</strong><br />
Pet Water Fountain (A746)<br />
Getting Started<br />
I. Never connect the AC adaptor (Number 16) when no water is in the tank. However, your Pet Water fountain is<br />
now equipped with the latest “water level sensor pump” and will automatically shut off when water runs low.<br />
II. The water tank cap (Number 8) must be tightened securely to prevent water from flowing into the bowl<br />
continuously and causing water to over flow onto the floor.<br />
III. Filter pack (Number 5) should be replaced regularly every two months.<br />
Assembly Diagram<br />
A) Parts List<br />
B) Insert the pump (Number 4) into the base. Fit the clear<br />
tube (Number 22) back into the holding slot (Number 23).<br />
1<br />
C) Make sure all tubes are connected as in the picture<br />
above. Remove any sharp bends or kinks in the clear
Place the power cord in the wire holders down the side.<br />
tube or water flow could be reduced.<br />
D) Align the filter pack (Number 5) into the corner slots and press down into the water chamber. Use the correct slot and<br />
do not use excessive force.<br />
E) Feed the power wire through the square hole in the<br />
back of the water tank stand (Number 2). Make sure the<br />
power wire is secured by the wire holders on the side of<br />
the water bowl.<br />
F) Then carefully slide the water bowl into the water tank<br />
stand gently pulling the power wire out the back of the<br />
water tank stand. Make sure all the wire comes out the<br />
back.<br />
G) Screw cap (Number 8) into unit (Number 6) with a<br />
gentle, turning motion. Do not apply excessive pressure on<br />
the cap as this may damage the incorporated gasket (7).<br />
H) With the black water outlet on the water tank pointing<br />
to the hole, insert water tank into the water tank stand<br />
I) Assemble the mushroom head (Number 12) onto the<br />
mushroom stand<br />
2<br />
J) Connect AC Adaptor (Number 16) to the timer unit<br />
(Number 17) the to the water pump (Number 4). If you<br />
do not want to use the timer you can remove it.
Operation<br />
1) Make sure the AC adaptor is disconnected from the wall outlet<br />
2) Fill the water bowl (Number 3) until half full.<br />
3) Unscrew the black water outlet, fill the water tank as much as you want. Tighten the black water outlet when<br />
finished. Don’t forget the rubber gasket… Do not over tighten !!!<br />
Note:<br />
a) Only unscrew the large cap from the water tank when you need get inside the tank for cleaning. Make sure this<br />
large cap is screwed on tight when replacing. Do not forget the Rubber Gasket !<br />
b) For regular water filling, use the small black water outlet.<br />
4) Water will now flow from the tank into the bowl until the water reaches the factory preset level.<br />
5) Plug the AC adaptor into the wall outlet. The pump should start and water will come out from the nozzle or from the<br />
mushroom head. If you have problems check your connections.<br />
6) Check the position of the Timer Switch (Number 18) on the timer unit. Slide the switch to 30min to turn the pump<br />
ON for 30 minutes and OFF for 30 minutes repeatedly. Or slide the switch to 60min to turn the pump ON for 60<br />
minutes and OFF for 60 minutes repeatedly.<br />
Or you many side the switch to the OFF position to turn off the pump. It is recommended to unplug the transformer<br />
if the water fountain will not be used for long periods.<br />
7) Water flow speed can be adjusted by sliding the small window located on the pumps side next to where the water<br />
comes out.<br />
a) remove the water tank<br />
b) pull the water bowl away from the base slowly until the pump can be reached<br />
c) With water still in the bowl, turn the pump ON and side the small window left or right to adjust the water flow<br />
Optional Water Nozzle<br />
Dogs and larger pets will probably prefer that you remove the mushroom water fall and replace it with the included water<br />
nozzle.<br />
Installing the Optional Water Nozzles<br />
1) Remove the mushroom and its base. You must also separate the clear tube by unplugging the 90 degree fitting<br />
that plugs into the bottom of the mushroom base.<br />
2) Separate the 2 clear tubes at the black union (Number 11) taking away the black union and the short length of<br />
clear tube.<br />
3) Slip the male end of the nozzle into the longest length of clear tube that connects to the water pump.<br />
4) Turn on the pump and adjust the water stream by razing or lowering the black lever (Number 23) which the<br />
Spray Nozzle, assembled<br />
Fountain Nozzle with spray cover removed<br />
clear tube passes through.<br />
3