

AT-GS950/xxPS PoE Series Installation Guide Rev B - Allied Telesis
AT-GS950/xxPS PoE Series Installation Guide Rev B - Allied Telesis
AT-GS950/xxPS PoE Series Installation Guide Rev B - Allied Telesis

You also want an ePaper? Increase the reach of your titles
YUMPU automatically turns print PDFs into web optimized ePapers that Google loves.
<strong>AT</strong>-<strong>GS950</strong>/48PS<br />
<strong>AT</strong>-<strong>GS950</strong>/16PS<br />
<strong>AT</strong>-<strong>GS950</strong>/10PS<br />
Gigabit Ethernet <strong>PoE</strong>+ Switches<br />
<strong>Installation</strong> <strong>Guide</strong><br />
613-001768 <strong>Rev</strong> A
Copyright © 2013 <strong>Allied</strong> <strong>Telesis</strong>, Inc.<br />
All rights reserved. No part of this publication may be reproduced without prior written permission from <strong>Allied</strong> <strong>Telesis</strong>,<br />
Inc.<br />
<strong>Allied</strong> <strong>Telesis</strong> and the <strong>Allied</strong> <strong>Telesis</strong> logo are trademarks of <strong>Allied</strong> <strong>Telesis</strong>, Incorporated. All other product names,<br />
company names, logos or other designations mentioned herein are trademarks or registered trademarks of their respective<br />
owners.<br />
<strong>Allied</strong> <strong>Telesis</strong>, Inc. reserves the right to make changes in specifications and other information contained in this document<br />
without prior written notice. The information provided herein is subject to change without notice. In no event shall <strong>Allied</strong><br />
<strong>Telesis</strong>, Inc. be liable for any incidental, special, indirect, or consequential damages whatsoever, including but not limited<br />
to lost profits, arising out of or related to this manual or the information contained herein, even if <strong>Allied</strong> <strong>Telesis</strong>, Inc. has<br />
been advised of, known, or should have known, the possibility of such damages.
Electrical Safety and Emissions Standards<br />
This product meets the following standards.<br />
U.S. Federal Communications Commission<br />
Radiated Energy<br />
Note: This equipment has been tested and found to comply with the limits for a Class A digital device pursuant to Part 15<br />
of FCC Rules. These limits are designed to provide reasonable protection against harmful interference when the<br />
equipment is operated in a commercial environment. This equipment generates, uses, and can radiate radio frequency<br />
energy and, if not installed and used in accordance with this instruction manual, may cause harmful interference to radio<br />
communications. Operation of this equipment in a residential area is likely to cause harmful interference in which case<br />
the user will be required to correct the interference at his own expense.<br />
Note: Modifications or changes not expressly approved of by the manufacturer or the FCC, can void your right to operate<br />
this equipment.<br />
Industry Canada<br />
This Class A digital apparatus meets all requirements of the Canadian Interference-Causing Equipment Regulations.<br />
Cet appareil numérique de la classe A respecte toutes les exigences du Règlement sur le matériel brouilleur du Canada.<br />
RFI Emissions<br />
FCC Class A, EN55022 Class A, EN61000-3-2, EN61000-3-3, C-TICK,<br />
CE<br />
Warning: In a domestic environment this product may cause radio interference in<br />
which case the user may be required to take adequate measures.<br />
Immunity<br />
EN55024<br />
Electrical Safety EN60950 (TUV), UL 60950 ( C UL US )<br />
Laser Safety<br />
EN60825<br />
3
Translated Safety Statements<br />
Important: The indicates that a translation of the safety statement is available in a PDF<br />
document titled Translated Safety Statements posted on the <strong>Allied</strong> <strong>Telesis</strong> website at<br />
www.alliedtelesis.com.<br />
4
Contents<br />
<strong>AT</strong>-<strong>GS950</strong>/10PS, <strong>AT</strong>-<strong>GS950</strong>/16PS, and <strong>AT</strong>-<strong>GS950</strong>/48PS Switches <strong>Installation</strong> <strong>Guide</strong><br />
Preface............................................................................................................................................................... 3<br />
Symbol Conventions .................................................................................................................................... 4<br />
Contacting <strong>Allied</strong> <strong>Telesis</strong>.............................................................................................................................. 5<br />
Chapter 1: Features ......................................................................................................................................... 8<br />
Twisted Pair Ports ................................................................................................................................. 8<br />
SFP Slots............................................................................................................................................... 8<br />
LEDs...................................................................................................................................................... 8<br />
<strong>Installation</strong> Options ................................................................................................................................ 9<br />
Power Conservation .............................................................................................................................. 9<br />
MAC Address Table .............................................................................................................................. 9<br />
Front and Back Panels............................................................................................................................... 10<br />
Management Software............................................................................................................................... 12<br />
Twisted Pair Ports...................................................................................................................................... 13<br />
Power over Ethernet (<strong>PoE</strong>) ........................................................................................................................ 14<br />
............................................................................................................................................................. 14<br />
Combo Ports .............................................................................................................................................. 15<br />
LEDs .......................................................................................................................................................... 16<br />
PWR/SYS LEDs .................................................................................................................................. 16<br />
10/100/1000 BaseT Link Activity LEDs ............................................................................................... 18<br />
SFP LEDs............................................................................................................................................ 20<br />
<strong>PoE</strong> LEDs ............................................................................................................................................ 22<br />
eco-Friendly Button.................................................................................................................................... 25<br />
eco-Friendly Button Operation............................................................................................................. 25<br />
Reboot/Reset the Switch ..................................................................................................................... 26<br />
Power Supply............................................................................................................................................. 27<br />
Fans ........................................................................................................................................................... 28<br />
Chapter 2: <strong>Rev</strong>iewing Safety Precautions ..................................................................................................... 30<br />
Selecting a Site for the Switch ................................................................................................................... 32<br />
Cable Specifications................................................................................................................................... 33<br />
Unpacking the Switch................................................................................................................................. 34<br />
Installing the Switch on a Desktop ............................................................................................................. 36<br />
Installing the Switch in an Equipment Rack ............................................................................................... 37<br />
Installing the Switch on a Wall ................................................................................................................... 39<br />
Installing Optional SFP Transceivers ......................................................................................................... 42<br />
Cabling the Switch ..................................................................................................................................... 45<br />
Powering On the Switch............................................................................................................................. 46<br />
Chapter 3: Appendix A: Physical Specifications .......................................................................................... 51<br />
Dimensions.......................................................................................................................................... 51<br />
Weight ................................................................................................................................................. 51<br />
Environmental Specifications..................................................................................................................... 51<br />
Power Specifications.................................................................................................................................. 52<br />
<strong>PoE</strong> Specifications ..................................................................................................................................... 52<br />
Safety and Electromagnetic Emissions Certifications ................................................................................ 52<br />
Connectors and Port Pinouts ..................................................................................................................... 53<br />
5
Contents<br />
6
Figures<br />
Figure 1: <strong>AT</strong>-<strong>GS950</strong>/10PS, <strong>AT</strong>-<strong>GS950</strong>/16PS, and <strong>AT</strong>-<strong>GS950</strong>/48PS Front Panels............................................................. 10<br />
Figure 2: <strong>AT</strong>-<strong>GS950</strong>/10PS Back Panel................................................................................................................................ 11<br />
Figure 3: <strong>AT</strong>-<strong>GS950</strong>/16PS Back Panel................................................................................................................................ 11<br />
Figure 4: <strong>AT</strong>-<strong>GS950</strong>/48PS Back Panel................................................................................................................................ 11<br />
Figure 5: PWR LED on <strong>AT</strong>-<strong>GS950</strong>/10PS ............................................................................................................................ 16<br />
Figure 6: SYSTEM LED on <strong>AT</strong>-<strong>GS950</strong>/16PS...................................................................................................................... 17<br />
Figure 7: SYS LED on <strong>AT</strong>-<strong>GS950</strong>/48PS.............................................................................................................................. 17<br />
Figure 8: <strong>AT</strong>-<strong>GS950</strong>/10PS Link/Activity and Speed LEDs................................................................................................... 18<br />
Figure 9: <strong>AT</strong>-<strong>GS950</strong>/16PS Link/Activity/Speed LEDs.......................................................................................................... 19<br />
Figure 10: <strong>AT</strong>-<strong>GS950</strong>/48PS Link/Activity/Speed Port LED.................................................................................................. 19<br />
Figure 11: <strong>AT</strong>-<strong>GS950</strong>/10PS SFP Speed and Link/Activity LEDs......................................................................................... 20<br />
Figure 12: <strong>AT</strong>-<strong>GS950</strong>/16PS SFP Status LEDs.................................................................................................................... 21<br />
Figure 13: <strong>AT</strong>-<strong>GS950</strong>/48PS SFP Status LEDs.................................................................................................................... 21<br />
Figure 14: <strong>AT</strong>-<strong>GS950</strong>/10PS <strong>PoE</strong> and <strong>PoE</strong> MAX LEDs........................................................................................................ 23<br />
Figure 15: <strong>AT</strong>-<strong>GS950</strong>/16PS <strong>PoE</strong> and <strong>PoE</strong> MAX LEDs........................................................................................................ 23<br />
Figure 16: <strong>AT</strong>-<strong>GS950</strong>/48PS <strong>PoE</strong> and <strong>PoE</strong> MAX LEDs........................................................................................................ 23<br />
Figure 17: eco-Friendly Button ............................................................................................................................................ 25<br />
Figure 18: Shipping Package Contents ............................................................................................................................... 35<br />
Figure 19: Attaching the Rubber Feet ................................................................................................................................. 36<br />
Figure 20: Attaching the Rack-Mount Brackets to the Switch.............................................................................................. 37<br />
Figure 21: Attaching the Rack-Mount Brackets to the Switch (Continued).......................................................................... 38<br />
Figure 22: Mounting the Switch in an Equipment Rack....................................................................................................... 38<br />
Figure 23: Attaching the Brackets to Install the Switch on a Wall........................................................................................ 39<br />
Figure 24: Marking the Screw Hole Locations..................................................................................................................... 40<br />
Figure 25: Securing the Switch to the Wall.......................................................................................................................... 41<br />
Figure 26: Removing the Dust Plug from an SFP Slot ........................................................................................................ 42<br />
Figure 27: Inserting the SFP................................................................................................................................................ 43<br />
Figure 28: Positioning the SFP Handle in the Upright Position ........................................................................................... 43<br />
Figure 29: Plugging in the AC Power Cord.......................................................................................................................... 46<br />
Figure 30: RJ-45 Connector and Port Pin Layout................................................................................................................ 53<br />
1
List of Figures<br />
2
Tables<br />
Table 1. Max Ports Supported per <strong>PoE</strong> Class ....................................................................................................................14<br />
Table 2. Combo Ports .........................................................................................................................................................15<br />
Table 3. <strong>AT</strong>-<strong>GS950</strong>/10PS PWR LED Functional Descriptions ..........................................................................................16<br />
Table 4. <strong>AT</strong>-<strong>GS950</strong>/16PS and <strong>AT</strong>-<strong>GS950</strong>/48PS SYS LED Functional Descriptions .........................................................17<br />
Table 5. <strong>AT</strong>-<strong>GS950</strong>/10PS L/A and SPD LEDs Functional Descriptions .............................................................................18<br />
Table 6. <strong>AT</strong>-<strong>GS950</strong>/16PS and <strong>AT</strong>-<strong>GS950</strong>/48PS L/A LED Functional Descriptions ...........................................................20<br />
Table 7. SFP Slot LED Functional Descriptions ................................................................................................................22<br />
Table 8. <strong>PoE</strong> Status LED Functional Descriptions ............................................................................................................23<br />
Table 9. Twisted Pair Cabling and Distances .....................................................................................................................33<br />
Table 10. Chassis Dimensions ...........................................................................................................................................51<br />
Table 11. Chassis Weight ...................................................................................................................................................51<br />
Table 12. Environmental Specifications ..............................................................................................................................51<br />
Table 13. Power Specifications ..........................................................................................................................................52<br />
Table 14. Max Ports Supported per <strong>PoE</strong> Class ..................................................................................................................52<br />
Table 15. Safety and Electromagnetic Emissions Certifications .........................................................................................52<br />
Table 16. MDI Pin Signals (10Base-T or 100Base-TX) ......................................................................................................53<br />
Table 17. MDI-X Pin Signals (10Base-T or 100Base-TX) ..................................................................................................53<br />
Table 18. RJ-45 1000Base-T Connector Pinouts ...............................................................................................................54<br />
1
List of Tables<br />
2
Preface<br />
This guide contains the installation instructions for the <strong>AT</strong>-<strong>GS950</strong>/10PS,<br />
<strong>AT</strong>-<strong>GS950</strong>/16PS, and <strong>AT</strong>-<strong>GS950</strong>/48PS Gigabit Ethernet <strong>PoE</strong>+ Switches.<br />
This preface contains the following sections:<br />
“Symbol Conventions” on page 4<br />
“Contacting <strong>Allied</strong> <strong>Telesis</strong>” on page 5<br />
3
Symbol Conventions<br />
This document uses the following conventions:<br />
Note<br />
Notes provide additional information.<br />
Caution<br />
Cautions inform you that performing or omitting a specific action<br />
may result in equipment damage or loss of data.<br />
Warning<br />
Warnings inform you that performing or omitting a specific action<br />
may result in bodily injury.<br />
Warning<br />
Warnings inform you that an eye and skin hazard exists due to the<br />
presence of a Class 1 laser device.<br />
4
<strong>AT</strong>-<strong>GS950</strong>/10PS, <strong>AT</strong>-<strong>GS950</strong>/16PS, and <strong>AT</strong>-<strong>GS950</strong>/48PS Switches <strong>Installation</strong> <strong>Guide</strong><br />
Contacting <strong>Allied</strong> <strong>Telesis</strong><br />
If you need assistance with this product, you may contact <strong>Allied</strong> <strong>Telesis</strong><br />
technical support by going to the Support & Services section of the <strong>Allied</strong><br />
<strong>Telesis</strong> web site at www.alliedtelesis.com/support. You can find links for<br />
the following services on this page:<br />
• 24/7 Online Support - Enter our interactive support center to<br />
search for answers to your questions in our knowledge database,<br />
check support tickets, learn about RMAs, and contact <strong>Allied</strong><br />
<strong>Telesis</strong> technical experts.<br />
• USA and EMEA phone support - Select the phone number that<br />
best fits your location and customer type.<br />
• Hardware warranty information - Learn about <strong>Allied</strong> <strong>Telesis</strong><br />
warranties and register your product online.<br />
• Replacement Services - Submit a Return Merchandise<br />
Authorization (RMA) request via our interactive support center.<br />
• Documentation - View the most recent installation guides, user<br />
guides, software release notes, white papers and data sheets for<br />
your product.<br />
• Software Updates - Download the latest software releases for your<br />
product.<br />
For sales or corporate contact information, go to<br />
www.alliedtelesis.com/purchase and select your region.<br />
5
Chapter 1<br />
Overview<br />
This chapter provides descriptions of the <strong>AT</strong>-<strong>GS950</strong>/10PS, <strong>AT</strong>-<strong>GS950</strong>/<br />
16PS, and <strong>AT</strong>-<strong>GS950</strong>/48PS Layer 2 Gigabit Ethernet Switches and<br />
contains the following sections:<br />
“Features” on page 8<br />
“Front and Back Panels” on page 10<br />
“Management Software” on page 12<br />
“Twisted Pair Ports” on page 13<br />
“Power over Ethernet (<strong>PoE</strong>)” on page 14<br />
“Combo Ports” on page 15<br />
“LEDs” on page 16<br />
“eco-Friendly Button” on page 25<br />
“Power Supply” on page 27<br />
“Fans” on page 28<br />
7
Chapter 1: Overview<br />
Features<br />
Here are the hardware features of the <strong>AT</strong>-<strong>GS950</strong>/10PS, <strong>AT</strong>-<strong>GS950</strong>/16PS<br />
and <strong>AT</strong>-<strong>GS950</strong>/48PS Gigabit Ethernet Switches.<br />
Twisted Pair<br />
Ports<br />
SFP Slots<br />
Here are the basic features of the 10/100/1000 Mbps twisted-pair ports:<br />
• 10, 16, or 48 ports per switch<br />
• 10, 16, or 24 <strong>PoE</strong> ports per switch<br />
• 10Base-TX, 100Base-T and 1000Base-T compliant<br />
• IEEE 802.3u Auto-Negotiation compliant<br />
• Auto-MDI/MDIX<br />
• 100 meters (328 feet) maximum operating distance<br />
• IEEE 802.3x Flow Control in 10/100Base-TX full-duplex operation<br />
• IEEE 802.3x Back Pressure in 10/100Base-TX half-duplex<br />
operation<br />
• IEEE803.3z 1000Base-T Flow Control<br />
• Support for Jumbo frames up to 10KB<br />
• RJ-45 connectors<br />
All three switches support both 100Base-FX and 1000Base-SX/LX<br />
transceivers. The switches support either two or four slots for SFPs:<br />
• Two SFP slots on the <strong>AT</strong>-<strong>GS950</strong>/10PS and <strong>AT</strong>-<strong>GS950</strong>/16PS<br />
Switches<br />
• Four SFP slots on the <strong>AT</strong>-<strong>GS950</strong>/48PS Switch<br />
Note<br />
The SFP slots are paired with twisted pair ports on the switch to<br />
form combo ports. For more information, see “Combo Ports” on<br />
page 15.<br />
Note<br />
You must purchase SFP transceivers separately. For a list of<br />
supported transceivers, contact your <strong>Allied</strong> <strong>Telesis</strong> distributor or<br />
reseller.<br />
Note<br />
See the product data sheets for the specific <strong>AT</strong>I SFP modules<br />
supported by the <strong>AT</strong>-<strong>GS950</strong> series switches.<br />
LEDs<br />
Here is a brief description of the port LEDs:<br />
8
<strong>AT</strong>-<strong>GS950</strong>/10PS, <strong>AT</strong>-<strong>GS950</strong>/16PS, and <strong>AT</strong>-<strong>GS950</strong>/48PS Switches <strong>Installation</strong> <strong>Guide</strong><br />
• Power LED/SYS; refer to “PWR/SYS LEDs” on page 16.<br />
• Speed and link/activity LEDs for the twisted pair ports; see “10/100/<br />
1000 BaseT Link Activity LEDs” on page 18.<br />
• Link/activity LEDs for the SFP slots; see “SFP LEDs” on page 20.<br />
• ecoFriendly button turns off the LEDs to conserve electricity; see<br />
“<strong>PoE</strong> LEDs” on page 22.<br />
<strong>Installation</strong><br />
Options<br />
Power<br />
Conservation<br />
MAC Address<br />
Table<br />
The <strong>AT</strong>-<strong>GS950</strong>/10PS, <strong>AT</strong>-<strong>GS950</strong>/16PS, and <strong>AT</strong>-<strong>GS950</strong>/48PS switches<br />
can be installed in the following ways:<br />
• Rack mounted in a19-inch equipment rack<br />
• Mounted on a Desk or tabletop<br />
• Wall mounted for the <strong>AT</strong>-<strong>GS950</strong>/10PS and <strong>AT</strong>-<strong>GS950</strong>/16PS only.<br />
The <strong>AT</strong>-<strong>GS950</strong>/10PS, <strong>AT</strong>-<strong>GS950</strong>/16PS, and <strong>AT</strong>-<strong>GS950</strong>/48PS switches<br />
have the following power conservation features:<br />
• eco-Friendly button to turn off the port LEDs when the system is<br />
not being monitored<br />
• High-efficiency power supply<br />
• Power scaling based on traffic loads on ports operating at 1000<br />
Mbps (Port power scaling not available at 10 or 100 Mbps)<br />
• Power shutdown on unused ports<br />
Here are the basic features of the MAC address table:<br />
• Storage capacity up to16KB MAC address entries<br />
• Automatic learning and aging<br />
9
Chapter 1: Overview<br />
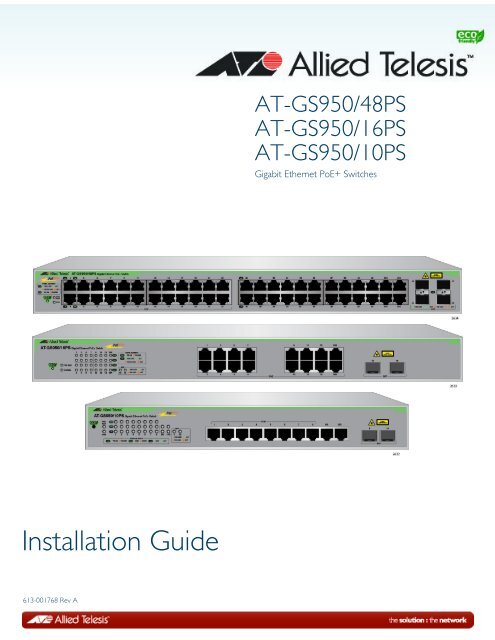
Front and Back Panels<br />
Figure 1 illustrates the front panels of the <strong>AT</strong>-<strong>GS950</strong>/10PS, <strong>AT</strong>-<strong>GS950</strong>/<br />
16PS, and <strong>AT</strong>-<strong>GS950</strong>/48PS Gigabit Ethernet Switches.<br />
<strong>AT</strong>-<strong>GS950</strong>/10PS<br />
eco-Friendly<br />
Button<br />
Port and<br />
System LEDs<br />
10/100/1000Base-T<br />
Twisted Pair Ports<br />
SFP Slots<br />
<strong>AT</strong>-<strong>GS950</strong>/16PS<br />
<strong>AT</strong>-<strong>GS950</strong>/16<br />
eco-Friendly<br />
Button<br />
Port and<br />
System LEDs<br />
10/100/1000Base-T<br />
Twisted Pair Ports<br />
SFP Slots<br />
<strong>AT</strong>-<strong>GS950</strong>/48PS<br />
eco-Friendly<br />
Button<br />
System LEDs<br />
10/100/1000Base-T<br />
Twisted Pair Ports<br />
SFP Slots<br />
Figure 1. <strong>AT</strong>-<strong>GS950</strong>/10PS, <strong>AT</strong>-<strong>GS950</strong>/16PS, and <strong>AT</strong>-<strong>GS950</strong>/48PS Front<br />
Panels<br />
10
<strong>AT</strong>-<strong>GS950</strong>/10PS, <strong>AT</strong>-<strong>GS950</strong>/16PS, and <strong>AT</strong>-<strong>GS950</strong>/48PS Switches <strong>Installation</strong> <strong>Guide</strong><br />
See Figure 2 for an example of the <strong>AT</strong>-<strong>GS950</strong>/10PS back panel.<br />
AC Input<br />
Figure 2. <strong>AT</strong>-<strong>GS950</strong>/10PS Back Panel<br />
See Figure 3 for an example of the <strong>AT</strong>-<strong>GS950</strong>/16PS back panel.<br />
Figure 3. <strong>AT</strong>-<strong>GS950</strong>/16PS Back Panel<br />
See Figure 4 for an example of the <strong>AT</strong>-<strong>GS950</strong>/48PS back panel.<br />
AC Input<br />
AC Input<br />
Figure 4. <strong>AT</strong>-<strong>GS950</strong>/48PS Back Panel<br />
11
Chapter 1: Overview<br />
Management Software<br />
The switches are shipped with the management software pre-installed.<br />
The software provides a web-browser interface for in-band, over-thenetwork<br />
management. Although the three models have the same features,<br />
each has a different management software program. The programs are:<br />
• <strong>AT</strong>-S110 Management Software Web User’s <strong>Guide</strong> for the<br />
<strong>AT</strong>-<strong>GS950</strong>/10PS Switch<br />
• <strong>AT</strong>-S111 Management Software Web User’s <strong>Guide</strong> for the<br />
<strong>AT</strong>-<strong>GS950</strong>/48PS Switch<br />
• <strong>AT</strong>-S112 Management Software Web User’s <strong>Guide</strong> for the<br />
<strong>AT</strong>-<strong>GS950</strong>/16PS Switch<br />
In the unlikely event that the management software becomes corrupted or<br />
damaged on the switch, you can download the software from the <strong>Allied</strong><br />
<strong>Telesis</strong> corporate web site and reinstall it on the switch. For instructions on<br />
how to install new management software, see the product documentation.<br />
12
<strong>AT</strong>-<strong>GS950</strong>/10PS, <strong>AT</strong>-<strong>GS950</strong>/16PS, and <strong>AT</strong>-<strong>GS950</strong>/48PS Switches <strong>Installation</strong> <strong>Guide</strong><br />
Twisted Pair Ports<br />
The <strong>AT</strong>-<strong>GS950</strong>/10PS, <strong>AT</strong>-<strong>GS950</strong>/16PS, and <strong>AT</strong>-<strong>GS950</strong>/48PS Layer 2<br />
Gigabit Ethernet Switches feature 10, 16, and 48 twisted pair ports,<br />
respectively. All ports are 10Base-T, 100Base-TX, and 1000Base-TX<br />
compliant. You can set the port speeds and duplex modes either<br />
automatically with IEEE 802.3u Auto-Negotiation or manually with the<br />
management software.<br />
The twisted pair ports feature 8-pin RJ-45 connectors. For the port pinouts,<br />
see “Connectors and Port Pinouts” on page 52.<br />
The ports have a maximum operating distance of 100 m (328 feet). For 10<br />
Mbps operation, the ports require Category 3 or better 100 ohm shielded<br />
or unshielded twisted pair cabling. For 100 or 1000 Mbps operation, the<br />
ports require Category 5 or Enhanced Category 5 (5E) 100 ohm shielded<br />
or unshielded twisted pair cabling.<br />
The ports feature auto-MDI, which automatically configures the ports as<br />
MDI or MDI-X. This feature allows you to use straight-through twisted pair<br />
cables regardless of the wiring configurations of the ports on the end<br />
nodes.<br />
Note<br />
A switch port connected to an end node that is not using Auto-<br />
Negotiation should not use Auto-Negotiation to set the speed and<br />
duplex mode, because a duplex mode mismatch may occur. In this<br />
case, disable Auto-Negotiation and set the port’s speed and duplex<br />
mode manually.<br />
13
Chapter 1: Overview<br />
Power over Ethernet (<strong>PoE</strong>)<br />
Power over Ethernet technology permits both power and data to be<br />
transmitted over an Ethernet cable. Both <strong>PoE</strong> (IEEE802.3af) and <strong>PoE</strong>+<br />
(IEEE802.3at) are supported on the 10/100/1000T ports on the<br />
<strong>AT</strong>-<strong>GS950</strong>/10PS, <strong>AT</strong>-<strong>GS950</strong>/16PS, and <strong>AT</strong>-<strong>GS950</strong>/48PS switches. Here<br />
is a summary of the <strong>PoE</strong> feature:<br />
• Powered device classes 0,1, 2, 3 and 4 are supported.<br />
• Port prioritization is provided on all <strong>PoE</strong> ports.<br />
• The default configuration is DISABLED on all <strong>PoE</strong> switch ports.<br />
• The <strong>PoE</strong> configuration parameters can be set through the switch’s<br />
web management interface.<br />
The maximum number of ports that the <strong>AT</strong>-<strong>GS950</strong>xx/PS switches will<br />
support when only one class of service is required from the powered<br />
devices connected to the <strong>PoE</strong> ports is shown in Table 1.<br />
Note<br />
Each switch can support any combination of <strong>PoE</strong> classes 0 - 4<br />
simultaneously up to the maximum <strong>PoE</strong> power that is available from<br />
the switch.<br />
Table 1. Max Ports Supported per <strong>PoE</strong> Class<br />
Switch<br />
<strong>PoE</strong> Ports<br />
Max <strong>PoE</strong><br />
Power<br />
Available<br />
Class 2<br />
IEEE 802.3af<br />
(7W per Port)<br />
Class 3<br />
IEEE 802.3af<br />
(15.4W per Port)<br />
Class 4<br />
IEEE 802.3at<br />
(30W per Port)<br />
<strong>AT</strong>-<strong>GS950</strong>/10PS Ports 1 - 8 75 W 8 Ports 4 Ports 2 Ports<br />
<strong>AT</strong>-<strong>GS950</strong>/16PS Ports 1 - 16 150W 16 Ports 12 Ports 6 ports<br />
<strong>AT</strong>-<strong>GS950</strong>/48PS Ports 1 - 24 370W 24 Ports 24 Ports 12 ports<br />
Port Power Priority<br />
When the power budget for the switch is reached, each port is allotted<br />
power according to its priority level. You can set the power priority of each<br />
<strong>PoE</strong> port to one of three levels: Low, High, and Critical. The default is Low.<br />
If the priority level of all the ports is set to the same value, the lowest port<br />
number has the highest port power priority. For instance, if you connect<br />
eight class 4 powered devices to ports 1 - 8 on a <strong>AT</strong>-<strong>GS950</strong>/16PS switch,<br />
the <strong>PoE</strong> power budget is exceeded and some ports will have the <strong>PoE</strong><br />
power turned off, The ports allowed to transmit power are determined by<br />
the Port Priority feature. In this case, port 1 has the highest power priority<br />
level and transmits <strong>PoE</strong> power followed by port 2, etc.through port 6 while<br />
ports 7 and 8 are not allowed to transmit any <strong>PoE</strong> power.<br />
14
<strong>AT</strong>-<strong>GS950</strong>/10PS, <strong>AT</strong>-<strong>GS950</strong>/16PS, and <strong>AT</strong>-<strong>GS950</strong>/48PS Switches <strong>Installation</strong> <strong>Guide</strong><br />
Combo Ports<br />
The <strong>AT</strong>-<strong>GS950</strong>/8 and <strong>AT</strong>-<strong>GS950</strong>/48PS Switches have two combo ports<br />
and the <strong>AT</strong>-<strong>GS950</strong>/16PS Switch has four combo ports. Each combo port<br />
consists of one 10/100/1000Base-T twisted pair port and one slot for an<br />
optional 100Base-FX or 1000Base-SX/LX SFP transceiver. The twisted<br />
pair ports are identified with the letter “R” for “Redundant” on the front<br />
faceplates of the units. The ports and slots are listed in Table 2.<br />
Table 2. Combo Ports<br />
Switch Twisted Pair Port SFP Slot<br />
<strong>AT</strong>-<strong>GS950</strong>/10PS<br />
<strong>AT</strong>-<strong>GS950</strong>/16PS<br />
<strong>AT</strong>-<strong>GS950</strong>/48PS<br />
9R 9<br />
10R 10<br />
15R 15<br />
16R 16<br />
45R 45<br />
46R 46<br />
47R 47<br />
48R 48<br />
The combo ports have the guidelines listed here:<br />
• Only one port in a pair, either the twisted pair port or a<br />
corresponding SFP module, can be active at a time.<br />
• The twisted pair port is the active port when its SFP slot is empty,<br />
or when an SFP module is installed but has not established a link<br />
to an end node.<br />
• The twisted pair port automatically changes to the redundant status<br />
mode when an SFP module establishes a link with an end node.<br />
• A twisted pair port automatically transitions back to the active<br />
status when the link is lost on the SFP module.<br />
• In nearly all cases, a twisted pair port and an SFP module share<br />
the same configuration settings, including port settings, VLAN<br />
assignments, access control lists, and spanning tree.<br />
• An exception to the shared settings is port speed. If you disable<br />
Auto-Negotiation on a twisted pair port and set the speed and<br />
duplex mode manually, the speed reverts to Auto-Negotiation<br />
when an SFP module establishes a link with an end node.<br />
15
Chapter 1: Overview<br />
LEDs<br />
There are four types of LEDs on the <strong>AT</strong>-<strong>GS950</strong> Switches:<br />
“PWR/SYS LEDs” on page 16<br />
“10/100/1000 BaseT Link Activity LEDs” on page 18<br />
“<strong>PoE</strong> LEDs” on page 22<br />
“SFP LEDs” on page 20<br />
PWR/SYS LEDs<br />
The PWR LED reports the status of AC power and is located on the left<br />
side of the front panel of the <strong>AT</strong>-<strong>GS950</strong>/10PS switch. See Figure 5.<br />
Note<br />
All of the port LEDs are off when the switch is operating in the low<br />
power mode. To toggle on the LEDs, use the eco-Friendly button.<br />
See “eco-Friendly Button” on page 25 for more information.<br />
PWR LED<br />
Figure 5. PWR LED on <strong>AT</strong>-<strong>GS950</strong>/10PS<br />
Table 3 describes the PWR LEDs for the <strong>AT</strong>-<strong>GS950</strong>/10PS switch.<br />
Table 3. <strong>AT</strong>-<strong>GS950</strong>/10PS PWR LED Functional Descriptions<br />
LED State Description<br />
PWR<br />
Off<br />
Steady<br />
Green<br />
Indicates either the switch is not receiving<br />
AC power or the AC input power is operating<br />
outside the normal range.<br />
The switch is receiving AC input power and is<br />
operating normally.<br />
On the <strong>AT</strong>-<strong>GS950</strong>/16PS and <strong>AT</strong>-<strong>GS950</strong>/48PS switches, the power and<br />
FAN status is indicated with a system or SYS LED. See Figure 6 and<br />
Figure 7.<br />
16
<strong>AT</strong>-<strong>GS950</strong>/10PS, <strong>AT</strong>-<strong>GS950</strong>/16PS, and <strong>AT</strong>-<strong>GS950</strong>/48PS Switches <strong>Installation</strong> <strong>Guide</strong><br />
SYSTEM LED<br />
Figure 6. SYSTEM LED on <strong>AT</strong>-<strong>GS950</strong>/16PS<br />
SYS LED<br />
Figure 7. SYS LED on <strong>AT</strong>-<strong>GS950</strong>/48PS<br />
Table 4 describes the functions for the SYS LED for the <strong>AT</strong>-<strong>GS950</strong>/16PS<br />
and <strong>AT</strong>-<strong>GS950</strong>/48PS switches.<br />
Table 4. <strong>AT</strong>-<strong>GS950</strong>/16PS and <strong>AT</strong>-<strong>GS950</strong>/48PS SYS LED Functional<br />
Descriptions<br />
LED State Description<br />
SYS<br />
Off<br />
Steady<br />
Green<br />
Steady<br />
Red<br />
Indicates either the switch is not receiving<br />
power or the AC input power is operating<br />
outside the normal range.<br />
The switch is receiving AC input power and is<br />
operating normally.<br />
Indicates the system is experiencing a fan<br />
failure.<br />
17
Chapter 1: Overview<br />
10/100/1000<br />
BaseT Link<br />
Activity LEDs<br />
The Link Activity (L/A) LEDs provide information about the 10/100/<br />
1000Base-T ports.<br />
<strong>AT</strong>-<strong>GS950</strong>/10PS Link/Activity and Speed LEDs<br />
The <strong>AT</strong>-<strong>GS950</strong>/10PS switch indicates L/A (link activity) and SPD (speed)<br />
with two LEDs for each port. See Figure 8.<br />
Note<br />
All of the port LEDs are off when the switch is operating in the low<br />
power mode. To toggle on the LEDs, use the eco-Friendly button.<br />
See “eco-Friendly Button” on page 25 for more information.<br />
Speed (SPD)<br />
and<br />
Link/Activity (L/A)<br />
LEDs<br />
Figure 8. <strong>AT</strong>-<strong>GS950</strong>/10PS Link/Activity and Speed LEDs<br />
See Table 5 for a description for the <strong>AT</strong>-<strong>GS950</strong>/10PS Link/Activity and<br />
Speed LEDs.<br />
.<br />
Table 5. <strong>AT</strong>-<strong>GS950</strong>/10PS L/A and SPD LEDs Functional Descriptions<br />
LED State Description<br />
Link/Activity<br />
(L/A)<br />
Speed<br />
(SPD)<br />
Off<br />
Blinking<br />
Green<br />
Off<br />
Steady<br />
Amber<br />
Steady<br />
Green<br />
The port has not established a link with a<br />
network device.<br />
The port is transmitting or receiving<br />
network packets.<br />
The port has not established a link with a<br />
network device.<br />
The maximum operating speed of the<br />
port is 10 or 100 Mbps.<br />
The maximum operating speed of the<br />
port is 1000 Mbps.<br />
<strong>AT</strong>-<strong>GS950</strong>/16PS Link/Activity LEDs<br />
The <strong>AT</strong>-<strong>GS950</strong>/16PS switch has one LED per port on the front panel to<br />
indicate link, activity and speed status. See Figure 9.<br />
18
<strong>AT</strong>-<strong>GS950</strong>/10PS, <strong>AT</strong>-<strong>GS950</strong>/16PS, and <strong>AT</strong>-<strong>GS950</strong>/48PS Switches <strong>Installation</strong> <strong>Guide</strong><br />
Speed (SPD)<br />
and<br />
Link/Activity (L/A)<br />
LEDs<br />
Figure 9. <strong>AT</strong>-<strong>GS950</strong>/16PS Link/Activity/Speed LEDs<br />
The <strong>AT</strong>-<strong>GS950</strong>/48PS switch has one LED per port to indicate port’s link,<br />
activity and speed status. These LEDs are located next to each port. See<br />
Figure 10.<br />
Link/Activity<br />
(L/A) LEDs<br />
Figure 10. <strong>AT</strong>-<strong>GS950</strong>/48PS Link/Activity/Speed Port LED<br />
See Table 6 for a description for the <strong>AT</strong>-<strong>GS950</strong>/16PS and <strong>AT</strong>-<strong>GS950</strong>/<br />
48PS Link/Activity and Speed LEDs.<br />
19
Chapter 1: Overview<br />
Table 6. <strong>AT</strong>-<strong>GS950</strong>/16PS and <strong>AT</strong>-<strong>GS950</strong>/48PS L/A LED Functional<br />
Descriptions<br />
LED State Description<br />
L/A (link/<br />
activity)<br />
Off<br />
Steady<br />
Green<br />
Blinking<br />
Green<br />
Steady<br />
Amber<br />
Blinking<br />
Amber<br />
The port on the has not established a link.<br />
The port has established a 1000Mbps link to<br />
a network device, but it is not transmitting or<br />
receiving network packets.<br />
Indicates the port transmitting or receiving<br />
network packets at 1000 Mbps.<br />
The SFP transceiver has established a link at<br />
either 10 or 100 Mbps with a network device,<br />
but is not transmitting or receiving network<br />
packets.<br />
Indicates the port is transmitting or receiving<br />
network packets at 10 or 100 Mbps.<br />
SFP LEDs<br />
The SFP LEDs indicate the Link/Activity and Speed status of each SFP<br />
slot.<br />
Note<br />
All of the port LEDs are off when the switch is operating in the low<br />
power mode. To toggle on the LEDs, use the eco-Friendly button.<br />
See “eco-Friendly Button” on page 25 for more information.<br />
The <strong>AT</strong>-<strong>GS950</strong>/10PS and <strong>AT</strong>-<strong>GS950</strong>/16PS switches have the SFP LEDs<br />
on the front panel. See Figure 11 and Figure 12.<br />
Speed and<br />
Link/Activity<br />
SFP LEDs<br />
Figure 11. <strong>AT</strong>-<strong>GS950</strong>/10PS SFP Speed and Link/Activity LEDs<br />
20
<strong>AT</strong>-<strong>GS950</strong>/10PS, <strong>AT</strong>-<strong>GS950</strong>/16PS, and <strong>AT</strong>-<strong>GS950</strong>/48PS Switches <strong>Installation</strong> <strong>Guide</strong><br />
Speed and<br />
Link/Activity<br />
SFP LEDs<br />
Figure 12. <strong>AT</strong>-<strong>GS950</strong>/16PS SFP Status LEDs<br />
The <strong>AT</strong>-<strong>GS950</strong>/48PS SFP LEDs can be found on between the upper and<br />
lower SFP slots. See Figure 13.<br />
Speed and<br />
Link/Activity<br />
SFP LEDs<br />
Figure 13. <strong>AT</strong>-<strong>GS950</strong>/48PS SFP Status LEDs<br />
Table 7 describes the Link LEDs for the SFP slots.<br />
21
Chapter 1: Overview<br />
Table 7. SFP Slot LED Functional Descriptions<br />
LED State Description<br />
SFP<br />
Off<br />
Blinking<br />
Green<br />
Steady<br />
Green<br />
Blinking<br />
Amber<br />
Steady<br />
Amber<br />
The port on the SFP transceiver has not<br />
established a link with an end node or the<br />
transceiver slot is empty.<br />
The SFP transceiver is transmitting or<br />
receiving network packets at 1000 Mbps.<br />
The SFP transceiver has established a link<br />
with a network device at 1000 Mbps, but is<br />
not transmitting or receiving network packets.<br />
The SFP transceiver is transmitting or<br />
receiving network packets at 100 Mbps.<br />
The SFP transceiver has established a link<br />
with a network device at 100 Mbps, but is not<br />
transmitting or receiving network packets.<br />
<strong>PoE</strong> LEDs<br />
All three <strong>PoE</strong> switches have two types of <strong>PoE</strong> LEDs indicating the <strong>PoE</strong><br />
status for each port and maximum power limit of the switch’s <strong>PoE</strong> power<br />
supply.<br />
Each switch model has individual <strong>PoE</strong> LEDs indicating the <strong>PoE</strong> status of<br />
each individual port. Each chassis also has one <strong>PoE</strong> MAX LED which is<br />
used to determine if you have exceeded the maximum power that the<br />
chassis is capable of supplying to the powered devices (PDs).<br />
<strong>AT</strong>-<strong>GS950</strong>/10PS and <strong>AT</strong>-<strong>GS950</strong>/16PS <strong>PoE</strong> Status LEDs<br />
The <strong>AT</strong>-<strong>GS950</strong>/10PS switch can supply <strong>PoE</strong> power to PDs on ports 1 - 8.<br />
See Figure 14 on page 23 for the locations of the <strong>PoE</strong> LEDs.<br />
The <strong>AT</strong>-<strong>GS950</strong>/16PS switch can supply <strong>PoE</strong> power to PDs on ports 1 - 16.<br />
See Figure 15 on page 23 for the location of the <strong>PoE</strong> LEDs.<br />
The <strong>AT</strong>-<strong>GS950</strong>/48PS switch can supply <strong>PoE</strong> power to PDs on ports1 - 24.<br />
See Figure 16 on page 23 for the location of the <strong>PoE</strong> status LEDs.<br />
Note<br />
See “Power over Ethernet (<strong>PoE</strong>)” on page 14 for more information<br />
about this <strong>PoE</strong> feature.<br />
Note<br />
All of the port LEDs are off when the switch is operating in the low<br />
power mode. To toggle on the LEDs, use the eco-Friendly button.<br />
See “eco-Friendly Button” on page 25 for more information.<br />
22
<strong>AT</strong>-<strong>GS950</strong>/10PS, <strong>AT</strong>-<strong>GS950</strong>/16PS, and <strong>AT</strong>-<strong>GS950</strong>/48PS Switches <strong>Installation</strong> <strong>Guide</strong><br />
<strong>PoE</strong> Port LEDs<br />
<strong>PoE</strong> MAX LED<br />
Figure 14. <strong>AT</strong>-<strong>GS950</strong>/10PS <strong>PoE</strong> and <strong>PoE</strong> MAX LEDs<br />
<strong>PoE</strong> Port LEDs<br />
<strong>PoE</strong> MAX LED<br />
Figure 15. <strong>AT</strong>-<strong>GS950</strong>/16PS <strong>PoE</strong> and <strong>PoE</strong> MAX LEDs<br />
<strong>PoE</strong> MAX LED<br />
<strong>PoE</strong> Port LEDs<br />
Figure 16. <strong>AT</strong>-<strong>GS950</strong>/48PS <strong>PoE</strong> and <strong>PoE</strong> MAX LEDs<br />
See Table 8 for a functional description of the <strong>PoE</strong> status LEDs.<br />
Table 8. <strong>PoE</strong> Status LED Functional Descriptions<br />
LEDs State Description<br />
<strong>PoE</strong><br />
MAX<br />
Red<br />
Off<br />
Indicates the total <strong>PoE</strong> output power for all ports<br />
on the switch exceeds the maximum <strong>PoE</strong> power<br />
that the switch can deliver.<br />
Indicates the switch has spare power for a new<br />
PD.<br />
23
Chapter 1: Overview<br />
Table 8. <strong>PoE</strong> Status LED Functional Descriptions<br />
LEDs State Description<br />
<strong>PoE</strong><br />
Green<br />
Amber<br />
Off<br />
<strong>PoE</strong> power is being supplied to the PD normally.<br />
Indicates the total <strong>PoE</strong> output power for this port<br />
exceeds the maximum power budget for the<br />
switch.<br />
<strong>PoE</strong> power is not being supplied.<br />
24
<strong>AT</strong>-<strong>GS950</strong>/10PS, <strong>AT</strong>-<strong>GS950</strong>/16PS, and <strong>AT</strong>-<strong>GS950</strong>/48PS Switches <strong>Installation</strong> <strong>Guide</strong><br />
eco-Friendly Button<br />
The eco-Friendly button serves multiple functions. See Figure 17 for its<br />
location.<br />
By pressing this button, you can:<br />
• Toggle the front panel LEDs on and off to conserve electricity when<br />
you are not physically monitoring the switch.<br />
• Reboot your switch while maintaining the current configuration<br />
• Reset your switch configuration to the factory default values.<br />
eco-Friendly<br />
Button<br />
Figure 17. eco-Friendly Button<br />
Note<br />
The eco-Friendly button does not control the Power LED.<br />
eco-Friendly<br />
Button Operation<br />
The button operates as follows:<br />
• Conserve energy: When you press the eco-Friendly button for 1 to<br />
4 seconds, the front panel port LEDs are disabled. You may use<br />
the button to turn off the LEDs when you are not monitoring the<br />
switch. To turn the port LEDs on, press the eco-Friendly button for<br />
1 to 4 seconds again. Toggling the LEDs does not affect the<br />
network operations of the switch.<br />
• Reboot the switch: By pressing the button for 5 to 9 seconds, you<br />
can initiate a software reboot of the switch.<br />
• Reset the switch to factory default settings: By pressing the button<br />
for more than 10 seconds, you initiate a software reboot of the<br />
switch followed by a reset of the switch to its factory settings.<br />
Rebooting the Switch and Resetting Factory Defaults<br />
25
Chapter 1: Overview<br />
Reboot/Reset the<br />
Switch<br />
Use the following procedure to reboot the switch or reboot the switch and<br />
reset the switch to its factory default settings with the eco-Friendly button:<br />
Caution<br />
This procedure causes the switch to reboot. The switch does not<br />
forward network traffic during the reboot process. Some network<br />
traffic may be lost.<br />
1. To reset the switch, press the eco-Friendly button for 5 to 9 seconds.<br />
Rebooting takes approximately 1 to 2 minutes before the switch comes<br />
back on line and is ready to transmit Ethernet traffic again.<br />
2. To reboot the switch and reset the switch to its factory default settings,<br />
press the eco-Friendly button for more than 10 seconds.<br />
This initiates a software reboot of the switch and resets all of the<br />
configuration parameters of the switch to the factory default settings,<br />
including the management IP address which reverts to 192.168.1.1. If<br />
your browser is configured for another IP address, you must<br />
reconfigure your browser and workstation before you can connect to<br />
the switch again.<br />
Note<br />
In the management software, you can disable both the reboot and<br />
factory default reset functions for the eco-Friendly button. For more<br />
information, see “Management Software” on page 12 for a list of the<br />
manuals.<br />
26
<strong>AT</strong>-<strong>GS950</strong>/10PS, <strong>AT</strong>-<strong>GS950</strong>/16PS, and <strong>AT</strong>-<strong>GS950</strong>/48PS Switches <strong>Installation</strong> <strong>Guide</strong><br />
Power Supply<br />
Each switch has an internal power supply with a single AC power supply<br />
socket on the back panel. To power the switch on or off, connect or<br />
disconnect the power cord provided with the switch. A power cord is<br />
supplied with the switch.<br />
Note<br />
For the power requirements, see the “Power Specifications” on<br />
page 52.<br />
27
Chapter 1: Overview<br />
Fans<br />
Both the <strong>AT</strong>-<strong>GS950</strong>/16PS and <strong>AT</strong>-<strong>GS950</strong>/48PS switches have internal<br />
fans. You cannot remove or replace these fans in the field. The fan status<br />
is indicated with the SYSTEM LED. See “PWR/SYS LEDs” on page 16 for<br />
more information.<br />
Note<br />
The <strong>AT</strong>-<strong>GS950</strong>/10PS switch does not have a fan.<br />
28
Chapter 2<br />
<strong>Installation</strong><br />
This chapter contains the following sections:<br />
“<strong>Rev</strong>iewing Safety Precautions” on page 30<br />
“Selecting a Site for the Switch” on page 32<br />
“Cable Specifications” on page 33<br />
“Unpacking the Switch” on page 34<br />
“Installing the Switch on a Desktop” on page 36<br />
“Installing the Switch in an Equipment Rack” on page 37<br />
“Installing the Switch on a Wall” on page 39<br />
“Installing Optional SFP Transceivers” on page 42<br />
“Cabling the Switch” on page 45<br />
“Powering On the Switch” on page 46<br />
29
Chapter 2: <strong>Installation</strong><br />
<strong>Rev</strong>iewing Safety Precautions<br />
Please review the following safety precautions before you begin to install<br />
the chassis or any of its components.<br />
Note<br />
The indicates that a translation of the safety statement is<br />
available in a PDF document titled Translated Safety Statements.<br />
Warning<br />
To prevent electric shock, do not remove the cover. No userserviceable<br />
parts inside. This unit contains hazardous voltages and<br />
should only be opened by a trained and qualified technician. To<br />
avoid the possibility of electric shock, disconnect electric power to<br />
the product before connecting or disconnecting the cables. E1<br />
Warning<br />
Do not work on equipment or cables during periods of lightning<br />
activity. E2<br />
Warning<br />
Power cord is used as a disconnection device. To de-energize<br />
equipment, disconnect the power cord. E3<br />
Warning<br />
Class I Equipment. This equipment must be earthed. The power<br />
plug must be connected to a properly wired earth ground socket<br />
outlet. An improperly wired socket outlet could place hazardous<br />
voltages on accessible metal parts. E4<br />
Pluggable Equipment. The socket outlet shall be installed near the<br />
equipment and shall be easily accessible. E5<br />
Caution<br />
Air vents must not be blocked and must have free access to the<br />
room ambient air for cooling. E6<br />
Operating Temperature. This product is designed for a maximum<br />
ambient temperature of 40° degrees C. E7<br />
30
<strong>AT</strong>-<strong>GS950</strong>/10PS, <strong>AT</strong>-<strong>GS950</strong>/16PS, and <strong>AT</strong>-<strong>GS950</strong>/48PS Switches <strong>Installation</strong> <strong>Guide</strong><br />
All Countries: Install product in accordance with local and National<br />
Electrical Codes. E8<br />
Circuit Overloading: Consideration should be given to the<br />
connection of the equipment to the supply circuit and the effect that<br />
overloading of circuits might have on overcurrent protection and<br />
supply wiring. Appropriate consideration of equipment nameplate<br />
ratings should be used when addressing this concern. E21<br />
Warning<br />
Mounting of the equipment in the rack should be such that a<br />
hazardous condition is not created due to uneven mechanical<br />
loading. E25<br />
If installed in a closed or multi-unit rack assembly, the operating<br />
ambient temperature of the rack environment may be greater than<br />
the room ambient temperature. Therefore, consideration should be<br />
given to installing the equipment in an environment compatible with<br />
the manufacturer’s maximum rated ambient temperature (Tmra). <br />
E35<br />
Caution<br />
<strong>Installation</strong> of the equipment in a rack should be such that the<br />
amount of air flow required for safe operation of the equipment is not<br />
compromised. E36<br />
Warning<br />
Reliable earthing of rack-mounted equipment should be maintained.<br />
Particular attention should be given to supply connections other than<br />
direct connections to the branch circuits (e.g., use of power strips).<br />
E37<br />
31
Chapter 2: <strong>Installation</strong><br />
Selecting a Site for the Switch<br />
Observe the following requirements when choosing a site for your switch:<br />
• If you plan to install the switch in an equipment rack, verify that the<br />
rack is safely secured and will not tip over. Devices in a rack<br />
should be installed starting at the bottom, with the heavier devices<br />
near the bottom of the rack.<br />
• If you are installing the switch on a table, verify that the table is<br />
level and secure.<br />
• The power outlet for the switch should be located near the unit and<br />
should be easily accessible.<br />
• The site should provide for easy access to the ports on the front of<br />
the switch. This will make it easier for you to connect and<br />
disconnect cables, as well as view the switch’s LEDs.<br />
• Air flow around the unit and through its vents on the side and rear<br />
should not be restricted so that the switch can maintain adequate<br />
cooling.<br />
• Do not place objects on top of the switch.<br />
• Do not expose the switch to moisture or water.<br />
• Ensure that the site is a dust-free environment.<br />
• You should use dedicated power circuits or power conditioners to<br />
supply reliable electrical power to the network devices.<br />
32
<strong>AT</strong>-<strong>GS950</strong>/10PS, <strong>AT</strong>-<strong>GS950</strong>/16PS, and <strong>AT</strong>-<strong>GS950</strong>/48PS Switches <strong>Installation</strong> <strong>Guide</strong><br />
Cable Specifications<br />
Table 9 contains the cable specifications for the twisted pair ports.<br />
Table 9. Twisted Pair Cabling and Distances<br />
Speed<br />
Type of Cable<br />
Maximum<br />
Operating<br />
Distance<br />
10 Mbps Standard TIA/EIA 568-B-compliant<br />
Category 3 or better shielded or<br />
unshielded cabling with 100 ohm<br />
impedance and a frequency of 16<br />
MHz.<br />
100 Mbps Standard TIA/EIA 568-A-compliant<br />
Category 5 or TIA/EIA 568-Bcompliant<br />
Enhanced Category 5<br />
(Cat 5e) shielded or unshielded<br />
cabling with 100 ohm impedance<br />
and a frequency of 100 MHz.<br />
1000 Mbps Standard TIA/EIA 568-A-compliant<br />
Category 5 or TIA/EIA 568-Bcompliant<br />
Enhanced Category 5<br />
(Cat 5e) shielded or unshielded<br />
cabling with 100 ohm impedance<br />
and a frequency of 100 MHz.<br />
100 m (328 ft)<br />
100 m (328 ft)<br />
100 m (328 ft)<br />
Note<br />
The twisted pair ports on the switch feature auto-MDI when<br />
operating at 10, 100, or 1000 Mbps. A port is configured as MDI or<br />
MDI-X when it is connected to an end node. Consequently, you can<br />
use a straight-through twisted pair cable when connecting any type<br />
of network device to a port on the switch.<br />
33
Chapter 2: <strong>Installation</strong><br />
Unpacking the Switch<br />
To unpack the switch, perform the following procedure:<br />
1. Remove all of the components from the shipping package.<br />
Note<br />
Store the packaging material in a safe location. You must use the<br />
original shipping material if you need to return the unit to <strong>Allied</strong><br />
<strong>Telesis</strong>.<br />
2. Place the switch on a level, secure surface.<br />
3. In addition to an <strong>AT</strong>-<strong>GS950</strong>/10PS, <strong>AT</strong>-<strong>GS950</strong>/16PS, or <strong>AT</strong>-<strong>GS950</strong>/<br />
48PS switch, verify that the shipping container includes the following<br />
items shown in Figure 18 on page 35.<br />
34
<strong>AT</strong>-<strong>GS950</strong>/10PS, <strong>AT</strong>-<strong>GS950</strong>/16PS, and <strong>AT</strong>-<strong>GS950</strong>/48PS Switches <strong>Installation</strong> <strong>Guide</strong><br />
Two equipment rack or<br />
wall brackets<br />
Eight bracket screws<br />
Four wall anchors<br />
Four wall screws<br />
Four rubber feet (for<br />
desktop installation)<br />
One regional AC<br />
power cord<br />
Figure 18. Shipping Package Contents<br />
Two or four SFP slot<br />
dust covers (preinstalled).<br />
35
Chapter 2: <strong>Installation</strong><br />
Installing the Switch on a Desktop<br />
You may install the switches on a desktop, in a standard 19-inch<br />
equipment rack, or on a wall. To install the switch in a rack, see “Installing<br />
the Switch in an Equipment Rack” on page 37. To install the switch on a<br />
wall, see “Installing the Switch on a Wall” on page 39.<br />
To place the switch on a desktop, perform the following procedure:<br />
1. Remove all equipment from the package and store the packaging<br />
material in a safe place.<br />
2. Turn the switch over and place it on a table.<br />
3. Attach the four rubber feet to the bottom of the switch as shown in<br />
Figure 19.<br />
Figure 19. Attaching the Rubber Feet<br />
4. Turn the switch over again and place it on a flat, secure surface (such<br />
as a desk or table) leaving ample space around the unit for ventilation.<br />
5. Go to “Installing Optional SFP Transceivers” on page 42 or “Cabling<br />
the Switch” on page 45.<br />
36
<strong>AT</strong>-<strong>GS950</strong>/10PS, <strong>AT</strong>-<strong>GS950</strong>/16PS, and <strong>AT</strong>-<strong>GS950</strong>/48PS Switches <strong>Installation</strong> <strong>Guide</strong><br />
Installing the Switch in an Equipment Rack<br />
To install the switch in a standard 19-inch equipment rack, perform the<br />
following procedure:<br />
1. If the rubber feet are attached to the bottom of the switch, remove<br />
them using a flat-head screwdriver.<br />
2. Attach the two rack mount brackets to the sides of the switch using the<br />
eight bracket screws that come with the unit. There are four possible<br />
positions in which the brackets may be installed.<br />
Figure 20. Attaching the Rack-Mount Brackets to the Switch<br />
37
Chapter 2: <strong>Installation</strong><br />
Figure 21. Attaching the Rack-Mount Brackets to the Switch (Continued)<br />
3. Mount the switch in a standard 19-inch equipment rack using four<br />
equipment rack screws (not provided with the switch).<br />
Figure 22. Mounting the Switch in an Equipment Rack<br />
4. Go to “Installing Optional SFP Transceivers” on page 42 or “Cabling<br />
the Switch” on page 45.<br />
38
<strong>AT</strong>-<strong>GS950</strong>/10PS, <strong>AT</strong>-<strong>GS950</strong>/16PS, and <strong>AT</strong>-<strong>GS950</strong>/48PS Switches <strong>Installation</strong> <strong>Guide</strong><br />
Installing the Switch on a Wall<br />
Only the <strong>AT</strong>-<strong>GS950</strong>/10PS and <strong>AT</strong>-<strong>GS950</strong>/16PS switches can be installed<br />
on a wall.<br />
Caution<br />
The <strong>AT</strong>-<strong>GS950</strong>/48PS is too heavy to be safely installed on a wall.<br />
To <strong>AT</strong>-<strong>GS950</strong>/10PS or <strong>AT</strong>-<strong>GS950</strong>/16PSinstall the switch on a wall,<br />
perform the following procedure:<br />
1. Turn the switch over and place it on a table.<br />
2. If the rubber feet are attached to the bottom of the switch, remove<br />
them using a flat-head screwdriver.<br />
3. Orient the brackets against the sides of the switch as shown in Figure<br />
23, and secure them to the unit with the eight brackets screws included<br />
with the switch.<br />
Figure 23. Attaching the Brackets to Install the Switch on a Wall<br />
39
Chapter 2: <strong>Installation</strong><br />
4. Have another person hold the switch at the wall location where the<br />
switch is to be installed, while you use a pencil or pen to mark the wall<br />
with the locations of the four holes in the brackets. The switch should<br />
be oriented such that its front faceplate is facing up and is level to the<br />
floor. See Figure 24 on page 40.<br />
Figure 24. Marking the Screw Hole Locations<br />
5. Install the four plastic anchors included with the switch into the wall, at<br />
the locations marked in the previous step. The anchors require 0.635<br />
mm (0.25 in.) holes.<br />
40
<strong>AT</strong>-<strong>GS950</strong>/10PS, <strong>AT</strong>-<strong>GS950</strong>/16PS, and <strong>AT</strong>-<strong>GS950</strong>/48PS Switches <strong>Installation</strong> <strong>Guide</strong><br />
6. While another person holds the switch at the wall location, secure it to<br />
the wall using the four wall mounting screws. See Figure 25.<br />
Figure 25. Securing the Switch to the Wall<br />
7. Go to “Installing Optional SFP Transceivers” on page 42 or “Cabling<br />
the Switch” on page 45.<br />
41
Chapter 2: <strong>Installation</strong><br />
Installing Optional SFP Transceivers<br />
To install an SFP transceiver, perform the following procedure:<br />
Note<br />
The transceiver can be hot-swapped; you do not need to power off<br />
the switch to install a transceiver. However, always remove the<br />
cables before removing the transceiver.<br />
Note<br />
You should always install the transceiver before connecting the fiber<br />
optic cables to it.<br />
1. Remove the transceiver from its shipping container and store the<br />
packaging material in a safe location.<br />
Warning<br />
An SFP transceiver can be damaged by static electricity. Be sure to<br />
observe all standard electrostatic discharge (ESD) precautions,<br />
such as wearing an antistatic wrist strap, to avoid damaging the<br />
transceiver.<br />
2. Remove the dust plug from an SFP slot. See Figure 26.<br />
Figure 26. Removing the Dust Plug from an SFP Slot<br />
3. Position the SFP transceiver with the label facing up.<br />
42
<strong>AT</strong>-<strong>GS950</strong>/10PS, <strong>AT</strong>-<strong>GS950</strong>/16PS, and <strong>AT</strong>-<strong>GS950</strong>/48PS Switches <strong>Installation</strong> <strong>Guide</strong><br />
4. Slide the transceiver into the SFP slot until it clicks into place. See<br />
Figure 27<br />
Figure 27. Inserting the SFP<br />
5. Verify that the handle on the transceiver is in the upright position, as<br />
shown in Figure 28. This secures the transceiver and prevents it from<br />
being dislodged from the slot.<br />
SFP Transceiver<br />
Handle<br />
Figure 28. Positioning the SFP Handle in the Upright Position<br />
6. Repeat steps 2 through 5 to install additional SFP transceivers.<br />
Note<br />
SFP transceivers are dust sensitive. Always keep the plug in the<br />
optical bores when a fiber optic cable is not installed, or when storing<br />
the SFP. When you do remove the plug, keep it for future use.<br />
Note<br />
Unnecessary removal and insertion of an SFP can lead to premature<br />
failure.<br />
43
Chapter 2: <strong>Installation</strong><br />
For information on the cable specifications of the SFP, consult the<br />
documentation shipped with the SFP.<br />
7. Go to “Cabling the Switch” on page 45.<br />
44
<strong>AT</strong>-<strong>GS950</strong>/10PS, <strong>AT</strong>-<strong>GS950</strong>/16PS, and <strong>AT</strong>-<strong>GS950</strong>/48PS Switches <strong>Installation</strong> <strong>Guide</strong><br />
Cabling the Switch<br />
Observe the following guidelines when connecting twisted pair and fiber<br />
optic cables to the ports on the switch:<br />
• The connector on the cable should fit snugly into the port on the<br />
switch. The tab on the connector should lock the connector into<br />
place.<br />
• Because the twisted pair ports have auto-MDI/MDI-X, you may use<br />
straight-through twisted pair cable to connect any type of network<br />
device to the switch.<br />
• If your network topology contains a loop where two or more<br />
network devices can communicate with each other over more than<br />
one network path, do not connect the network cables that form the<br />
loop until after you activate a spanning tree protocol on the switch.<br />
Data loops can adversely affect network performance.<br />
• If you are creating a port trunk, do not connect the cables of the<br />
trunk to the switch until after you have created the trunk in the<br />
switch’s management software. Otherwise, a network loop will<br />
result which can adversely affect network performance.<br />
45
Chapter 2: <strong>Installation</strong><br />
Powering On the Switch<br />
To power on the switch, perform the following procedure:<br />
1. Plug the power cord into the AC power connector on the back of the<br />
switch, as shown in Figure 29.<br />
Figure 29. Plugging in the AC Power Cord<br />
2. Plug the other end of the power cord into a wall outlet.<br />
Warning<br />
Power cord is used as a disconnection device. To de-energize<br />
equipment, disconnect the power cord. E3<br />
Pluggable Equipment. The socket outlet shall be installed near the<br />
equipment and shall be easily accessible. E5<br />
3. Verify that the POWER LED is green. If the LED is OFF, see Chapter<br />
3, “Troubleshooting” on page 47.<br />
The switch is now powered on and ready for network operations. For<br />
information on how to manage the switch, see one of the following<br />
manuals:<br />
• <strong>AT</strong>-S110 Management Software Web User’s <strong>Guide</strong> for the<br />
<strong>AT</strong>-<strong>GS950</strong>/10PS Switch<br />
• <strong>AT</strong>-S111 Management Software Web User’s <strong>Guide</strong> for the<br />
<strong>AT</strong>-<strong>GS950</strong>/48PS Switch<br />
• <strong>AT</strong>-S112 Management Software Web User’s <strong>Guide</strong> for the<br />
<strong>AT</strong>-<strong>GS950</strong>/16PS Switch<br />
46
<strong>AT</strong>-<strong>GS950</strong>/10PS, <strong>AT</strong>-<strong>GS950</strong>/16PS, and <strong>AT</strong>-<strong>GS950</strong>/48PS Switches <strong>Installation</strong> <strong>Guide</strong><br />
Chapter 3<br />
Troubleshooting<br />
This chapter contains information on how to troubleshoot the switch if a<br />
problem occurs.<br />
Note<br />
For further assistance, please contact <strong>Allied</strong> <strong>Telesis</strong> Technical<br />
Support at www.alliedtelesis.com/support.<br />
Problem 1: The POWER LED on the front of the switch is off.<br />
Solutions: The unit is not receiving power. Try the following:<br />
• Verify that the power cord is securely connected to the power<br />
source and to the AC connector on the back panel of the switch.<br />
• Verify that the power outlet has power by connecting another<br />
device to it.<br />
• Try connecting the unit to another power source.<br />
• Try a different power cord.<br />
• Verify that the voltage from the power source is within the required<br />
levels for your region.<br />
Problem 2: All of the port LEDs are off even though the ports are<br />
connected to active network devices.<br />
Solution: The switch is probably operating in low power mode. To toggle<br />
on the LEDs, press the eco-friendly button on the front panel between to 4<br />
seconds.<br />
Caution<br />
Pressing the eco-friendly button for more than 4 seconds causes the<br />
switch to reboot. The switch does not forward network traffic during<br />
the reboot process. Some network traffic may be lost. Pressing the<br />
eco-friendly button for more than 10 seconds causes the switch to<br />
reset to factory defaults.<br />
Problem 3: A twisted pair port on the switch is connected to a network<br />
device but the port’s LINK/ACT LED is off.<br />
Solutions: The port is unable to establish a link to a network device. Try<br />
the following:<br />
• Verify that the network device connected to the twisted pair port is<br />
47
Chapter 3: Troubleshooting<br />
powered on and is operating properly.<br />
• Verify that the twisted pair cable is securely connected to the port<br />
on the media converter channel and to the port on the remote<br />
network device.<br />
• Verify that the port is connected to the correct twisted pair cable.<br />
This is to eliminate the possibility that the port is connected to the<br />
wrong network device, such as a powered off device.<br />
• Try connecting another network device to the twisted pair port with<br />
a different cable. If the twisted pair port is able to establish a link,<br />
then the problem is with the cable or the other network device.<br />
• Verify that the twisted pair cable does not exceed 100 meters (328<br />
feet).<br />
• Verify that you are using the appropriate category of twisted pair<br />
cable: Category 3 or better for 10 Mbps operation and Category 5<br />
and Category 5E for 100 and 1000 Mbps operation.<br />
Note<br />
A 1000Base connection may require five to ten seconds to establish<br />
a link.<br />
Problem 4: The LINK/ACT LED for an SFP transceiver is off.<br />
Solutions: The fiber optic port on the transceiver is unable to establish a<br />
link to a network device. Try the following:<br />
• Verify that the network device connected to the fiber optic port is<br />
operating properly.<br />
• Verify that the fiber optic cable is securely connected to the port on<br />
the media converter channel and to the port on the remote network<br />
device.<br />
• Check that the SFP module is fully inserted in the slot.<br />
• Verify that the operating specifications of the fiber optic ports on<br />
the SFP transceiver and the remote network device are<br />
compatible.<br />
• Verify that the correct type of fiber optic cabling is being used.<br />
• Verify that the port is connected to the correct fiber optic cable.<br />
This is to eliminate the possibility that the port is connected to the<br />
wrong remote network device, such as a powered off device.<br />
• Try connecting another network device to the fiber optic port using<br />
a different cable. If the port is able to establish a link, then the<br />
problem is with the cable or with the other network device.<br />
• Use the switch’s management software to verify that the port is<br />
enabled.<br />
• If the remote network device is a management device, use its<br />
48
<strong>AT</strong>-<strong>GS950</strong>/10PS, <strong>AT</strong>-<strong>GS950</strong>/16PS, and <strong>AT</strong>-<strong>GS950</strong>/48PS Switches <strong>Installation</strong> <strong>Guide</strong><br />
management firmware to determine whether its port is enabled.<br />
• Test the attenuation on the fiber optic cable with a fiber optic tester<br />
to determine whether the optical signal is too weak (sensitivity) or<br />
too strong (maximum input power).<br />
Problem 5: Network performance between a twisted pair port on the<br />
switch and a network device is slow.<br />
Solution: There might be a duplex mode mismatch between the port and<br />
the network device. This occurs when a twisted pair port using Auto-<br />
Negotiation is connected to a device with a fixed duplex mode of full<br />
duplex. If this is the cause of the problem, adjust the duplex mode of the<br />
port on the network device or on the switch so that both ports are using the<br />
same duplex mode.<br />
Problem 6: A port’s LINK/ACT LED is blinking.<br />
Solutions: The link between the port and the network device is<br />
intermittent. Try the following:<br />
• Connect another network device with a different cable to the port. If<br />
the Link LED remains steady on, then the problem is with the<br />
original cable or the network device.<br />
• If the problem is with an SFP transceiver, check that the<br />
transceiver is fully inserted in the slot.<br />
49
Chapter 3: Troubleshooting<br />
50
<strong>AT</strong>-<strong>GS950</strong>/10PS, <strong>AT</strong>-<strong>GS950</strong>/16PS, and <strong>AT</strong>-<strong>GS950</strong>/48PS Switches <strong>Installation</strong> <strong>Guide</strong><br />
Appendix A<br />
Technical Specifications<br />
Physical Specifications<br />
Dimensions<br />
Table 10. Chassis Dimensions<br />
Model<br />
<strong>AT</strong>-<strong>GS950</strong>/10PS<br />
<strong>AT</strong>-<strong>GS950</strong>/16PS<br />
<strong>AT</strong>-<strong>GS950</strong>/48PS<br />
W x D x H mm (in)<br />
330 mm x 200 mm x 44 mm<br />
(13.0 in x 7.9 in x 1.7 in)<br />
430 mm x 250 mm x 44 mm<br />
(17.0 in x 9.4 in x 1.7 in)<br />
440 mm x 430 mm x 44 mm<br />
(17.32 in x 17.0 in x 1.7 in)<br />
Weight<br />
Table 11. Chassis Weight<br />
Model<br />
<strong>AT</strong>-<strong>GS950</strong>/10PS<br />
<strong>AT</strong>-<strong>GS950</strong>/16PS<br />
<strong>AT</strong>-<strong>GS950</strong>/48PS<br />
W x D x H mm (in)<br />
1.90 kg (4.20 lbs)<br />
3.56 kg (7.85 lbs)<br />
6.62 kg (14.60 lbs)<br />
Environmental Specifications<br />
Table 12. Environmental Specifications<br />
Operating Temperature 0° C to 45° C (32° F to 113° F)<br />
Storage Temperature -25° C to 70° C (-13° F to 158° F)<br />
Operating Humidity<br />
Storage Humidity<br />
Operating Altitude Range<br />
5% to 90% non-condensing<br />
5% to 95% non-condensing<br />
Up to 3,000 m (9,843 ft)<br />
51
Appendix A: Technical Specifications<br />
Power Specifications<br />
Input Supply Voltage - 100-240 VAC, 50 - 60 Hz<br />
Table 13. Power Specifications<br />
<strong>AT</strong>-<strong>GS950</strong>/10PS<br />
<strong>AT</strong>-<strong>GS950</strong>/16PS<br />
<strong>AT</strong>-<strong>GS950</strong>/48PS<br />
92.7 W<br />
228.5 W<br />
446.0 W<br />
<strong>PoE</strong> Specifications<br />
The maximum number of ports that the <strong>AT</strong>-<strong>GS950</strong>xx/PS switches will<br />
support when only one class of service is required from the powered<br />
devices connected to the <strong>PoE</strong> ports is shown in Table 14.<br />
Table 14. Max Ports Supported per <strong>PoE</strong> Class<br />
Switch<br />
<strong>PoE</strong> Ports<br />
Max <strong>PoE</strong><br />
Power<br />
Available<br />
Class 2<br />
IEEE 802.3af<br />
(7W per Port)<br />
Class 3<br />
IEEE 802.3af<br />
(15.4W per Port)<br />
Class 4<br />
IEEE 802.3at<br />
(30W per Port)<br />
<strong>AT</strong>-<strong>GS950</strong>/10PS Ports 1 - 8 75 W 8 Ports 4 Ports 2 Ports<br />
<strong>AT</strong>-<strong>GS950</strong>/16PS Ports 1 - 16 150W 16 Ports 12 Ports 6 ports<br />
<strong>AT</strong>-<strong>GS950</strong>/48PS Ports 1 - 24 370W 24 Ports 24 Ports 12 ports<br />
Safety and Electromagnetic Emissions Certifications<br />
Table 15. Safety and Electromagnetic Emissions Certifications<br />
RFI Emissions<br />
Immunity<br />
Electrical Safety<br />
FCC Part 15 Class A<br />
CISPR Class A<br />
EN55022:2006/A:2007 Class A<br />
EN55024<br />
EN60950 (TUV) T-Mark, UL<br />
60950 ( C UL US ), C-TICK, CE<br />
52
<strong>AT</strong>-<strong>GS950</strong>/10PS, <strong>AT</strong>-<strong>GS950</strong>/16PS, and <strong>AT</strong>-<strong>GS950</strong>/48PS Switches <strong>Installation</strong> <strong>Guide</strong><br />
Table 15. Safety and Electromagnetic Emissions Certifications<br />
Environmental Compliance<br />
EU-RoHS compliant, WEEE<br />
China RoHS compliant<br />
Connectors and Port Pinouts<br />
This section lists the connectors and connector pinouts.<br />
Figure 30 illustrates the pin layout for an RJ-45 connector and port.<br />
Figure 30. RJ-45 Connector and Port Pin Layout<br />
Table 16 lists the RJ-45 pin signals when a twisted pair port is operating in<br />
the MDI configuration.<br />
Table 16. MDI Pin Signals (10Base-T or 100Base-TX)<br />
Pin<br />
Signal<br />
1 TX+<br />
2 TX-<br />
3 RX+<br />
6 RX-<br />
Table 17 lists the RJ-45 port pin signals when a twisted pair port is<br />
operating in the MDI-X configuration.<br />
Table 17. MDI-X Pin Signals (10Base-T or 100Base-TX)<br />
Pin<br />
Signal<br />
1 RX+<br />
2 RX-<br />
3 TX+<br />
6 TX-<br />
Table 18 lists the RJ-45 connector pins and their signals when a<br />
1000Base-T port is operating at 1000 Mbps.<br />
53
Appendix A: Technical Specifications<br />
Table 18. RJ-45 1000Base-T Connector Pinouts<br />
Pin Pair Signal<br />
1 1 TX and RX+<br />
2 1 TX and RX-<br />
3 2 TX and RX+<br />
4 3 TX and RX+<br />
5 3 TX and RX-<br />
6 2 TX and RX-<br />
7 4 TX and RX+<br />
8 4 TX and RX-<br />
54

![AT-8100L/8POE-E [Rev B] - Allied Telesis](https://img.yumpu.com/25714603/1/190x245/at-8100l-8poe-e-rev-b-allied-telesis.jpg?quality=85)


