Engine Cooling Upgrade Kit PART# - RY10040-ECUK-I - RIVA Racing
Engine Cooling Upgrade Kit PART# - RY10040-ECUK-I - RIVA Racing
Engine Cooling Upgrade Kit PART# - RY10040-ECUK-I - RIVA Racing

Create successful ePaper yourself
Turn your PDF publications into a flip-book with our unique Google optimized e-Paper software.
<strong>Engine</strong> <strong>Cooling</strong> <strong>Upgrade</strong> <strong>Kit</strong><br />
<strong>PART#</strong> - <strong>RY10040</strong>-<strong>ECUK</strong>-I<br />
We strongly recommend the use of a service manual to familiarize yourself with the various components and procedures<br />
involved with this installation. Please note that some of the original clamps, lines and hardware removed in the<br />
disassembly process will be used in the installation process. These instructions have been written in point form and refer<br />
to illustrations. Please follow these step-by-step instructions and illustrations carefully.<br />
APPLICATION(S): Yamaha 2008~10 FX-SHO & 2009~10 FZ using <strong>RIVA</strong> OEM Intercooler <strong>Upgrade</strong> <strong>Kit</strong> (part#<br />
RY17040-ICUK)<br />
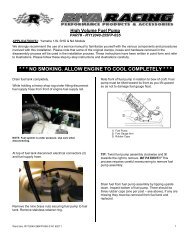
ALLOW ENGINE TO COOL COMPLETELY BEFORE PERFORMING INSTALLATION <br />
NOTE: <strong>Kit</strong> is designed to work with <strong>RIVA</strong> OEM Intercooler <strong>Upgrade</strong> <strong>Kit</strong> (RY17040-ICUK). For<br />
<strong>RIVA</strong> Power Cooler <strong>Kit</strong> you must use <strong>RY10040</strong>-<strong>ECUK</strong>-PC.<br />
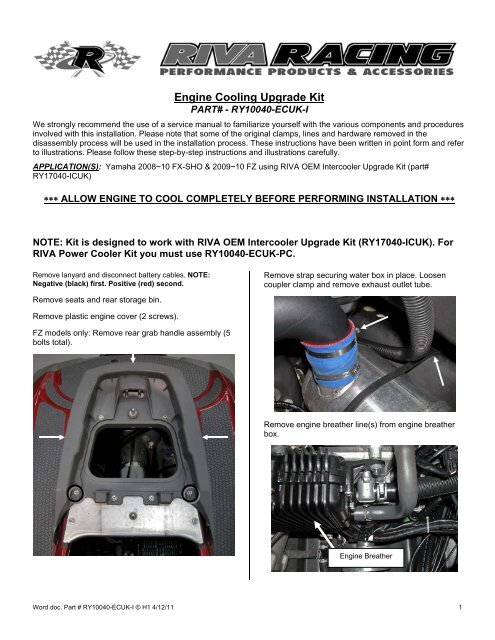
Remove lanyard and disconnect battery cables. NOTE:<br />
Negative (black) first. Positive (red) second.<br />
Remove seats and rear storage bin.<br />
Remove strap securing water box in place. Loosen<br />
coupler clamp and remove exhaust outlet tube.<br />
Remove plastic engine cover (2 screws).<br />
FZ models only: Remove rear grab handle assembly (5<br />
bolts total).<br />
Remove engine breather line(s) from engine breather<br />
box.<br />
<strong>Engine</strong> Breather<br />
Word doc. Part # <strong>RY10040</strong>-<strong>ECUK</strong>-I © H1 4/12/11 1
Remove engine breather box (3 bolts) and set aside.<br />
Remove cooling lines (3) from rectifier regulator.<br />
Remove bolts (2) securing rec/reg to engine and<br />
relocate rec/reg to left side of engine compartment.<br />
Remove exhaust pipe assembly by rotating towards<br />
hull, lifting up at front and then forward while lifting.<br />
On exhaust side of engine locate ‘Y’ fitting with cooling<br />
lines that feed the oil cooler and exhaust manifold.<br />
Remove bolt securing end of exhaust pipe to motor.<br />
Disconnect exhaust pipe overheat sensor connector<br />
(green). Disconnect cooling line from underside of end<br />
of exhaust pipe. Loosen clamp securing coupler to end<br />
of exhaust pipe.<br />
Disconnect lines attached to both ends of ‘Y’ fiting (1<br />
incoming / 2 out to oil cooler). Disconnect cooling line<br />
attached to engine water inlet fitting.<br />
Slide waterbox towards rear of craft as far as it will go.<br />
Remove bolts (11 total) securing exhaust pipe assembly<br />
to motor.<br />
Word doc. Part # <strong>RY10040</strong>-<strong>ECUK</strong>-I © H1 4/12/11 2
Remove ‘Y’ fitting with line for engine water inlet and<br />
discard.<br />
To <strong>Engine</strong><br />
Water Inlet<br />
Remove cooling line for end of exhaust pipe from plastic<br />
‘T’ and install onto supplied billet ‘T’ fitting in same<br />
configuration. Secure with stock spring clamp. Install<br />
supplied 3/8” cooling line onto 3/8” barb of ‘T’ fitting and<br />
secure with supplied 3/4” hose clamp.<br />
<strong>RIVA</strong> OEM Intercooler <strong>Upgrade</strong> <strong>Kit</strong> Update:<br />
To Oil<br />
Cooler<br />
Inlet<br />
Inside your craft (area closest to the pump) locate the<br />
incoming cooling line previously installed to feed<br />
additional water your <strong>RIVA</strong> Intercooler <strong>Upgrade</strong> <strong>Kit</strong>.<br />
Disconnect water line from Billet Thru-hull Fitting<br />
At the pump remove the 3/8” waterline between the<br />
Billet Pump Strainer and Billet Thru-hull Fitting.<br />
Remove 3/8” Billet Thru-hull Fitting and replace with<br />
supplied 1/2” Billet Thru-hull Fitting. NOTE: Apply<br />
below water line silicone sealant to fitting. Allow to<br />
dry for 24 hours.<br />
At Billet Pump Strainer remove 3/8” 90-degree fitting<br />
and replace with supplied 1/2” 90-degree fitting. NOTE:<br />
Apply pipe thread sealant to threads. Do not over<br />
tighten fitting.<br />
At rear of same side of engine disconnect the line<br />
feeding plastic ‘T’ fitting.<br />
Install 24” long piece of supplied 1/2” water line between<br />
Billet Pump Strainer and Billet Thru-hull Fitting. Secure<br />
using supplied 3/4” hose clamps. NOTE: Do not over<br />
tighten clamps.<br />
Inside craft install an 8” long piece of supplied 1/2”<br />
waterline onto Billet Thru-hull Fitting. Secure using<br />
supplied 3/4” hose clamp.<br />
Install supplied 1/2”x3/8”x1/2” plastic ‘T’ fitting into open<br />
end of 1/2” water line. Secure using supplied 3/4” hose<br />
clamp.<br />
Install remaining supplied 1/2” waterline onto ‘T’-fitting,<br />
route under driveline tube, thru bulkhead at water box<br />
and up towards exhaust. Secure using supplied 3/4”<br />
hose clamp.<br />
Remove ‘T’ fitting with lines (2) attached.<br />
To End of<br />
Exhaust Pipe<br />
To Oil Cooler &<br />
<strong>Engine</strong> Water Inlet<br />
Inlet<br />
Word doc. Part # <strong>RY10040</strong>-<strong>ECUK</strong>-I © H1 4/12/11 3
Attach 3/8” water line that supplies Intercooler <strong>Upgrade</strong><br />
<strong>Kit</strong> to ‘T’ fitting. Secure using supplied 1/2” hose clamp.<br />
Route 3/8” line forward under engine and up towards<br />
exhaust manifold. Attach open end to fitting on engine<br />
water inlet. Secure using supplied 1/2” hose clamp.<br />
Install supplied billet ‘Y’ fitting into open end of 1/2”<br />
waterline under exhaust. Secure using supplied 3/4”<br />
hose clamp. Route under motor towards oil cooler along<br />
inside of motor mount.<br />
Attach oil cooler lines (2) to open ends of billet ‘Y’ fitting.<br />
Secure using stock spring clamps.<br />
Secure cooling lines together using supplied zip tie.<br />
Replace exhaust assembly. NOTE: If exhaust gasket<br />
is damaged, warped or corroded do not reuse.<br />
Apply blue Loc-tite to bolts. Torque bolts in<br />
sequence:<br />
Install supplied billet ‘T’ fitting into stock cooling line<br />
from pump and secure with stock spring clamp.<br />
Install supplied 3/8” line onto T-fitting. Secure with<br />
supplied 1/2” hose clamp.<br />
First: 14 lbf•in / 20 N•m<br />
Second: 25 lbf•in / 35 N•m<br />
3/8” <strong>Cooling</strong> Hose to<br />
<strong>Engine</strong> Water Inlet<br />
Replace cooling line at underside of end of exhaust<br />
pipe. Secure using stock spring clamp.<br />
Stock <strong>Cooling</strong><br />
Line from Pump<br />
Word doc. Part # <strong>RY10040</strong>-<strong>ECUK</strong>-I © H1 4/12/11 4
Replace bolt securing end of exhaust pipe to motor.<br />
NOTE: Apply blue Loc-tite to bolt. Torque First to<br />
16 lbf•in / 22 N•m and then 31 lbf•in / 42 N•m.<br />
Reconnect exhaust pipe overheat sensor connector<br />
(green).<br />
Replace rectifier regulator. NOTE: Make sure rubber<br />
grommets and metal collars are in place. Apply blue<br />
Loc-tite to bolts. Torque to 19 lbf•in / 26 N•m.<br />
Reconnect rectifier regulator cooling lines. Secure using<br />
stock spring clamps.<br />
Replace engine breather box. NOTE: Make sure<br />
rubber grommets and metal collars are in place.<br />
Apply blue Loc-tite to bolts. Torque to 6 lbf•in / 8<br />
N•m.<br />
Reconnect exhaust outlet tube to waterbox outlet<br />
coupler. Once aligned tighten coupler clamps (inlet and<br />
outlet). NOTE: Do not over tighten clamps.<br />
Replace rubber strap securing waterbox in place.<br />
Replace grab handle assembly. NOTE: Apply blue<br />
Loc-tite to bolts. Do not over tighten bolts.<br />
Reconnect battery cables. NOTE: Positive (red) first.<br />
Negative (black) second.<br />
Check bilge for tools, rags, etc. Run craft on a flush kit<br />
to check for proper operation.<br />
Reconnect breather line(s) making sure small drain line<br />
at bottom is connected and secure to fitting on engine<br />
case.<br />
Remember, the water belongs to everyone.<br />
Please ride responsibly and respect the environment!<br />
Technical Support<br />
For answers to questions regarding installation or trouble shooting <strong>RIVA</strong> Performance Products contact:<br />
<strong>RIVA</strong> Technical Support directly at (954) 247-0705 or by e-mail at tech_support@rivamotorsports.com.<br />
Limited Warranty<br />
<strong>RIVA</strong> <strong>Engine</strong> <strong>Cooling</strong> <strong>Upgrade</strong> <strong>Kit</strong>s carry a 90-day limited warranty to the original purchaser. They are warranted to be free of defects in materials and workmanship under<br />
normal use and service. Customer modified components will be void of warranty. This warranty is limited to defects in the primary components only. Finish and/or wear<br />
marks in or on primary components are not covered under this warranty.<br />
<strong>RIVA</strong> <strong>Racing</strong>’s liability is expressly limited to the repair or replacement of the components contained within or associated with this kit. <strong>RIVA</strong> <strong>Racing</strong> agrees to repair or at<br />
<strong>RIVA</strong>’s option, replace any defective unit without charge, if product is returned to <strong>RIVA</strong> <strong>Racing</strong> freight prepaid within the warranty period. Any equipment returned which, in<br />
<strong>RIVA</strong>’s opinion, has been subjected to misuse, abuse, overheating or accident shall not be covered by this warranty.<br />
<strong>RIVA</strong> <strong>Racing</strong> shall have no liability for special, incidental or consequential damages or injury to persons or property from any cause arising from the sale, installation or use<br />
of this product.<br />
No other warranty, express or implied, including, but not limited to the implied warranties of merchantability and fitness for a particular purpose, applies. Various states do<br />
not allow for the limitation of incidental or consequential damages and therefore the above exclusion or limitation may not apply to you.<br />
Warranty does not include the expenses related to freight or transportation of parts or compensation for any inconvenience or loss of use while being repaired. A copy of<br />
the original invoice and a Return Authorization Number (RA#) must accompany all warranty claims.<br />
Warranted replacement parts will be returned freight collect.<br />
Word doc. Part # <strong>RY10040</strong>-<strong>ECUK</strong>-I © H1 4/12/11 5