RK11100-SCOM - RIVA Racing
RK11100-SCOM - RIVA Racing
RK11100-SCOM - RIVA Racing

You also want an ePaper? Increase the reach of your titles
YUMPU automatically turns print PDFs into web optimized ePapers that Google loves.
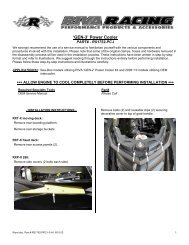
PPLICATION(S):<br />
Kawasaki Ultra 300X<br />
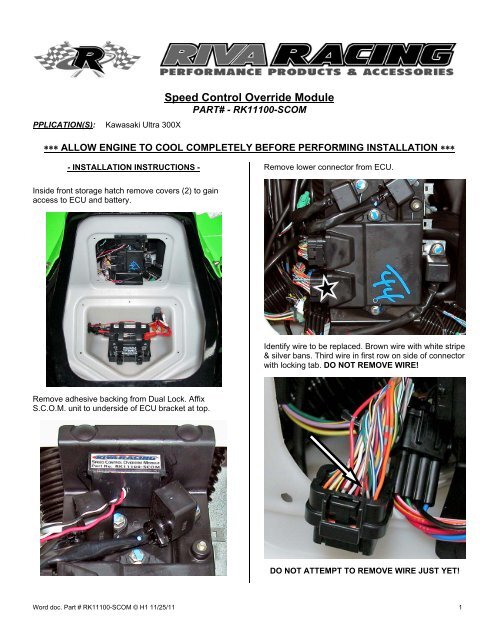
Speed Control Override Module<br />
PART# - <strong>RK11100</strong>-<strong>SCOM</strong><br />
ALLOW ENGINE TO COOL COMPLETELY BEFORE PERFORMING INSTALLATION <br />
- INSTALLATION INSTRUCTIONS -<br />
Remove lower connector from ECU.<br />
Inside front storage hatch remove covers (2) to gain<br />
access to ECU and battery.<br />
Identify wire to be replaced. Brown wire with white stripe<br />
& silver bans. Third wire in first row on side of connector<br />
with locking tab. DO NOT REMOVE WIRE!<br />
Remove adhesive backing from Dual Lock. Affix<br />
S.C.O.M. unit to underside of ECU bracket at top.<br />
DO NOT ATTEMPT TO REMOVE WIRE JUST YET!<br />
Word doc. Part # <strong>RK11100</strong>-<strong>SCOM</strong> © H1 11/25/11 1
Flip connector over and depress connector pin lock.<br />
Place supplied heat shrink over end of wire removed so<br />
end is centered inside sleeve.<br />
Remove brown wire with white stripe & silver bans.<br />
NOTE: Be careful not to dislodge other wires.<br />
Insert white S.C.O.M. wire into ECU connector<br />
completely.<br />
Using a heat gun warm heat shrink until it contracts<br />
around end of wire.<br />
Secure wires by depressing white tabs (2) below<br />
connector locking tab.<br />
Using a small pair of pliers crimp end of heat shrink,<br />
while warm, together to seal. NOTE: Do not crush!<br />
Plug connector into stock ECU.<br />
Remove ECU bracket by pulling forward evenly at push<br />
pins (4)<br />
NOTE: Tabs must be pressed in evenly. Ensure all<br />
wires are installed in connector properly.<br />
Word doc. Part # <strong>RK11100</strong>-<strong>SCOM</strong> © H1 11/25/11 2
Route black wire from S.C.O.M. unit behind bulkhead<br />
and down towards pass through for battery cables.<br />
Carefully feed black wire through rubber grommet.<br />
Slide sheathing away from terminal and isolate red wire<br />
with white stripe and double blue bands.<br />
Cut wire 3 inches from end of terminal. Remove 1/4” of<br />
insulation from each side of cut wire.<br />
Place bare end of wire from buzzer into one side of<br />
supplied heat seal connector and crimp. Place ends of<br />
both cut terminal wire and S.C.O.M. unit red wire into<br />
opposite side and crimp to secure.<br />
TIP: Glass cleaner or WD-40 may be used to ease<br />
passage.<br />
Carefully insert eyelet into black battery cable boot.<br />
Secure eyelet between ground cable and battery post.<br />
NOTE: Do not over tighten bolt. Apply di-electric<br />
grease to all cable ends. Do not over tighten bolts<br />
Slide battery cable boot over battery post.<br />
At upper inspection cover opening locate buzzer<br />
connector (blue connector with 2 wires). Disconnect.<br />
Remove terminals from buzzer wire connector.<br />
Push lock away from<br />
terminal end to release.<br />
TIP: Use a small sharp pick or scribe to release terminal<br />
lock. NOTE: Pull on wires carefully. When released<br />
terminals slide out of connector easily.<br />
Word doc. Part # <strong>RK11100</strong>-<strong>SCOM</strong> © H1 11/25/11 3
Using a heat gun carefully warm up connector until it<br />
collapses around wires. NOTE: Do not use high heat<br />
or hold in one place. Move heat gun around<br />
continuously.<br />
Replace ECU and battery covers.<br />
IMPORTANT OPERATION NOTE:<br />
S.C.O.M. unit will not work when ‘Fuel Economy<br />
Assistance Mode’ is activated. Activating the fuel<br />
economy assistance mode decreases horsepower as<br />
outlined in your owner’s manual (see pages 62 & 63 –<br />
GENERAL INFORMATION section).<br />
Replace terminals in connector (Listen for a click!).<br />
NOTE: Flat side of terminal faces side of connector<br />
with opening (see below). Ensure wires are oriented<br />
correctly to match wires from buzzer.<br />
Remember, the water belongs to everyone.<br />
Please ride responsibly and<br />
respect the environment!<br />
Technical Support<br />
For answers to questions regarding installation or<br />
trouble shooting <strong>RIVA</strong> Performance Products contact:<br />
<strong>RIVA</strong> Technical Support directly at (954) 247-0705 or by<br />
e-mail at tech_support@rivamotorsports.com.<br />
Reconnect buzzer.<br />
Limited Warranty<br />
<strong>RIVA</strong> Speed Control Override Modules carry a 30-day limited warranty<br />
to the original purchaser. They are warranted to be free of defects in<br />
materials and workmanship under normal use and service. Customer<br />
modified components will be void of warranty. This warranty is limited<br />
to defects in the primary components only. Finish and/or wear marks<br />
in or on primary components are not covered under this warranty.<br />
<strong>RIVA</strong> <strong>Racing</strong>’s liability is expressly limited to the repair or replacement<br />
of the components contained within or associated with this kit. <strong>RIVA</strong><br />
<strong>Racing</strong> agrees to repair or at <strong>RIVA</strong>’s option, replace any defective unit<br />
without charge, if product is returned to <strong>RIVA</strong> <strong>Racing</strong> freight prepaid<br />
within the warranty period. Any equipment returned which, in <strong>RIVA</strong>’s<br />
opinion, has been subjected to misuse, abuse, overheating or<br />
accident shall not be covered by this warranty.<br />
<strong>RIVA</strong> <strong>Racing</strong> shall have no liability for special, incidental or<br />
consequential damages or injury to persons or property from any<br />
cause arising from the sale, installation or use of this product.<br />
No other warranty, express or implied, including, but not limited to the<br />
implied warranties of merchantability and fitness for a particular<br />
purpose, applies. Various states do not allow for the limitation of<br />
incidental or consequential damages and therefore the above<br />
exclusion or limitation may not apply to you.<br />
Warranty does not include the expenses related to freight or<br />
transportation of parts or compensation for any inconvenience or loss<br />
of use while being repaired. A copy of the original invoice and a<br />
Return Authorization Number (RA#) must accompany all warranty<br />
claims.<br />
Replace ECU bracket (4 push pins).<br />
Warranted replacement parts will be returned freight collect.<br />
Word doc. Part # <strong>RK11100</strong>-<strong>SCOM</strong> © H1 11/25/11 4