Textease Quick Guide - RM.com
Textease Quick Guide - RM.com
Textease Quick Guide - RM.com

You also want an ePaper? Increase the reach of your titles
YUMPU automatically turns print PDFs into web optimized ePapers that Google loves.
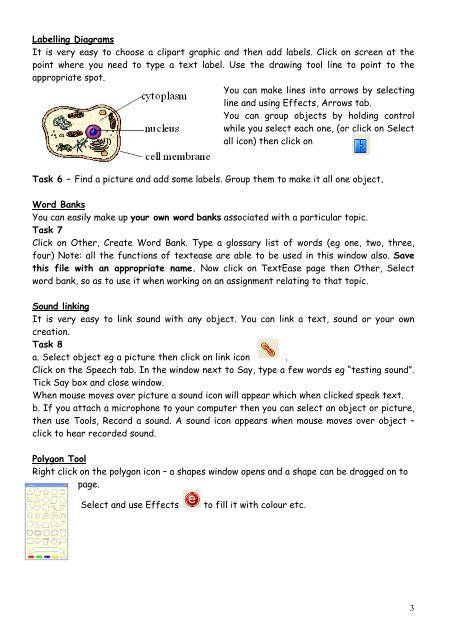
Labelling Diagrams<br />
It is very easy to choose a clipart graphic and then add labels. Click on screen at the<br />
point where you need to type a text label. Use the drawing tool line to point to the<br />
appropriate spot.<br />
You can make lines into arrows by selecting<br />
line and using Effects, Arrows tab.<br />
You can group objects by holding control<br />
while you select each one, (or click on Select<br />
all icon) then click on<br />
Task 6 – Find a picture and add some labels. Group them to make it all one object.<br />
Word Banks<br />
You can easily make up your own word banks associated with a particular topic.<br />
Task 7<br />
Click on Other, Create Word Bank. Type a glossary list of words (eg one, two, three,<br />
four) Note: all the functions of textease are able to be used in this window also. Save<br />
this file with an appropriate name. Now click on TextEase page then Other, Select<br />
word bank, so as to use it when working on an assignment relating to that topic.<br />
Sound linking<br />
It is very easy to link sound with any object. You can link a text, sound or your own<br />
creation.<br />
Task 8<br />
a. Select object eg a picture then click on link icon .<br />
Click on the Speech tab. In the window next to Say, type a few words eg “testing sound”.<br />
Tick Say box and close window.<br />
When mouse moves over picture a sound icon will appear which when clicked speak text.<br />
b. If you attach a microphone to your <strong>com</strong>puter then you can select an object or picture,<br />
then use Tools, Record a sound. A sound icon appears when mouse moves over object –<br />
click to hear recorded sound.<br />
Polygon Tool<br />
Right click on the polygon icon – a shapes window opens and a shape can be dragged on to<br />
page.<br />
Select and use Effects<br />
to fill it with colour etc.<br />
3