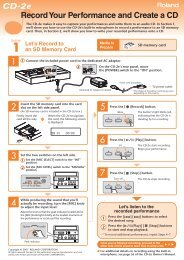
MVWS11âWorking with External MIDI Instruments - Roland UK
MVWS11âWorking with External MIDI Instruments - Roland UK
MVWS11âWorking with External MIDI Instruments - Roland UK

You also want an ePaper? Increase the reach of your titles
YUMPU automatically turns print PDFs into web optimized ePapers that Google loves.
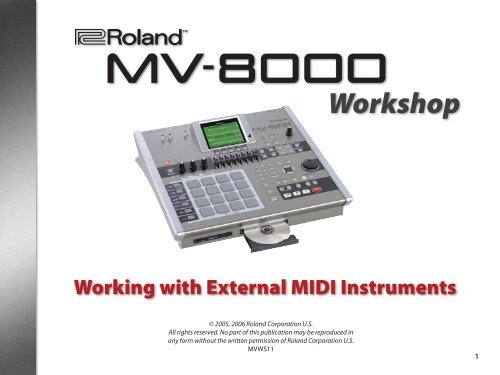
®ÂØÒňΠ<br />
MV-8000<br />
Workshop<br />
Working <strong>with</strong> <strong>External</strong> <strong>MIDI</strong> <strong>Instruments</strong><br />
© 2005, 2006 <strong>Roland</strong> Corporation U.S.<br />
All rights reserved. No part of this publication may be reproduced in<br />
any form <strong>with</strong>out the written permission of <strong>Roland</strong> Corporation U.S.<br />
MVWS11
About the MV-8000 Workshop Series<br />
<strong>Roland</strong>’s MV-8000 Production Studio is packed <strong>with</strong> features for<br />
making music. It’s a heavy-duty sampler that can do all sorts<br />
of things <strong>with</strong> sounds you sample or import. Its sequencer has<br />
136 tracks for <strong>MIDI</strong> sequencing and playing back audio, and its<br />
set of editing tools is deep. It’s a great box for performing—<br />
using its pads or an attached <strong>MIDI</strong> keyboard—and, of course,<br />
it can even burn a CD of your final master mix.<br />
If you’re not, don’t worry, because the VGA windows and LCD<br />
screens are essentially the same. There are clickable VGA icons<br />
for all of the MV-8000’s buttons. You can also press an onscreen<br />
button by clicking your mouse or by pressing an F button on<br />
the MV-8000. The main difference has to do <strong>with</strong> how you deal<br />
<strong>with</strong> settings—or “parameters”—and how you select objects.<br />
If you’re using a mouse:<br />
If you’re using the MV-8000’s buttons:<br />
Each MV-8000 Workshop Series booklet focuses on one<br />
MV-8000 topic, and is intended as a companion to your<br />
MV-8000 Owner’s Manuals.<br />
This booklet requires MV-8000 O.S. Version 3.5 or higher. You<br />
can download the latest O.S. from www.<strong>Roland</strong>US.com.<br />
Left click<br />
Scroll<br />
wheel<br />
Right click<br />
About This Booklet<br />
The MV-8000 can act as the command center of a <strong>MIDI</strong> studio.<br />
This booklet explains how to play <strong>MIDI</strong> instruments—including<br />
computer-based soft synths—from the MV-8000’s pads, as well<br />
as how to use <strong>MIDI</strong> sounds in your MV-8000 sequences.<br />
The Buttons, the LCD, or a VGA?<br />
On the MV-8000, you can work on the built-in LCD or on an<br />
optional color VGA monitor. You can use the MV-8000’s frontpanel<br />
controls, or a mouse on your VGA screen. No matter how<br />
you like to work, there’s an easy way to get things done.<br />
Probably the best idea is to work primarily <strong>with</strong> a mouse on a<br />
VGA, using the MV-8000’s buttons to quickly get in and out of<br />
MV-8000 screens. The procedures in this booklet typically<br />
assume you’ll be working this way.<br />
You select parameters and objects <strong>with</strong><br />
a left click. You change the selected<br />
parameter’s value by turning the scroll<br />
wheel. You can display an object’s<br />
menu by right-clicking the object.<br />
You select parameters and objects<br />
<strong>with</strong> the 3, 4, 5, and 6<br />
CURSOR buttons. Change a selected<br />
parameter’s value by turning the<br />
VALUE dial or by pressing DEC and INC.<br />
Understanding the Symbols in This Booklet<br />
Throughout this booklet, you’ll come across information that<br />
deserves special attention—that’s the reason it’s labeled <strong>with</strong><br />
one of the following symbols.<br />
A note is something that adds information about the topic at hand.<br />
A tip offers suggestions for using the feature being discussed.<br />
Warnings contain important information that can help you avoid possible<br />
damage to your equipment, your data, or yourself.
The Heart of Your <strong>MIDI</strong> Studio<br />
If you have other <strong>MIDI</strong> instruments—<br />
hardware synths, samplers, or soft<br />
synths running on a computer—you<br />
can play their sounds from your<br />
MV-8000, using them alongside<br />
MV-8000 patches and audio phrases<br />
in your MV-8000 songs.<br />
While this booklet explains making <strong>MIDI</strong> connections and the MV-8000’s<br />
<strong>MIDI</strong> settings, it assumes you have a basic understanding of <strong>MIDI</strong>.<br />
Throughout this booklet, we’ll refer to all external <strong>MIDI</strong> devices as simply<br />
“<strong>MIDI</strong> instruments” to make things easier to read.<br />
To learn how to operate an external <strong>MIDI</strong> instrument or a computer/soft<br />
synth setup, see its documentation.<br />
Listening to Your <strong>MIDI</strong> <strong>Instruments</strong><br />
You’ll need a way to hear both the MV-8000 and your <strong>MIDI</strong><br />
instruments when you want to use them together. There are<br />
basically two ways to do this. You can:<br />
• listen through a mixer—by connecting the MV-8000 and<br />
the <strong>MIDI</strong> instruments to the mixer and listening to the<br />
mixer’s output. (To learn how to set up a mixer, see its<br />
documentation.)<br />
• listen through the MV-8000—if you’re using the MV-8000<br />
<strong>with</strong> a single <strong>MIDI</strong> instrument, or if you’ve connected<br />
multiple <strong>MIDI</strong> instruments to a mixer. We’ll explain this<br />
option in detail in “Listening Through the MV-8000,” next.<br />
Listening Through the MV-8000<br />
Making a Direct Audio Connection<br />
You can listen to a <strong>MIDI</strong> instrument—or a mixer—in stereo<br />
through the MV-8000 by connecting its:<br />
• analog stereo outputs—to the MV-8000’s L and R MIC/LINE<br />
jacks.<br />
When you’re not<br />
using the PHONO<br />
jacks, keep the<br />
included shorting pin<br />
inserted in them.<br />
• digital output—to a digital input on an optional<br />
MV8-OP1 Audio I/O Expansion board (purchased<br />
separately) installed in your MV-8000.<br />
In addition to simplicity, there’s another advantage to listening directly<br />
through the MV-8000: If you decide to sample your <strong>MIDI</strong> instrument(s),<br />
you’re already set up to do so.<br />
Selecting the MV-8000 Input(s) You’re Using<br />
1. Press the MV-8000’s SYSTEM button.<br />
2. Select Global from the SYSTEM menu to display<br />
the GLOBAL window.<br />
Whenever you want to select a numbered menu item—such as the<br />
Global menu item—you can select it by pressing its number on the<br />
MV-8000’s numeric keypad and hitting ENTER.<br />
To find out how to get the best sound from a <strong>MIDI</strong> instrument, see its<br />
documentation.
If you’ve installed an<br />
optional MV8-OP1<br />
expansion board,<br />
you’ll see its digital<br />
connectors here.<br />
3. If you’re using the analog inputs, listen to your <strong>MIDI</strong><br />
instrument and adjust the SENS knob for each input so<br />
that the level shown in the IN (A) level meter onscreen is<br />
as loud as possible <strong>with</strong>out lighting its red Clip indicators.<br />
Clip indicators<br />
Input Select is always set to Analog unless you’ve installed an MV8-OP1. If<br />
you have, you can also select the Coaxial, Optical, or R-BUS digital input.<br />
3. Set the Input Type parameter to Stereo.<br />
Setting The <strong>MIDI</strong> Instrument’s Listening Level<br />
1. Press the MV-8000 MIXER button to display<br />
the MIXER (AUX/FX/AUDIO PHRASE/INPUT)<br />
window.<br />
Typically, you’ll set the L and R SENS knobs to the same position.<br />
Once they light, the Clip indicators stay lit to make sure you see your<br />
volume’s too high. To unlight them, click the Reset Peak button.<br />
Connecting the MV-8000 to Other <strong>MIDI</strong> Devices<br />
About the MV-8000’s Two <strong>MIDI</strong> OUT Jacks<br />
The MV-8000 has two <strong>MIDI</strong> OUT jacks on its rear panel: <strong>MIDI</strong><br />
OUT A and <strong>MIDI</strong> OUT B.<br />
IN (A) level<br />
If the AUX/Phrs/In pane isn’t visible—as shown here—click its tab at the<br />
top of the window to bring it forward.<br />
2. Set the IN (A) fader’s level to 100, as shown above.<br />
Each <strong>MIDI</strong> OUT jack can transmit <strong>MIDI</strong> data on 16 <strong>MIDI</strong><br />
channels, allowing you to play 16 individual <strong>MIDI</strong> sounds.<br />
Since each jack has its own set of 16 <strong>MIDI</strong> channels, together<br />
they allow you to play and control up to 32 individual <strong>MIDI</strong><br />
instrument sounds.<br />
Add a third <strong>MIDI</strong> OUT, as well as a second <strong>MIDI</strong> IN jack, by connecting a<br />
<strong>Roland</strong> DIF-AT24—purchased separately—to an installed MV8-0P1.
<strong>MIDI</strong> Connection Options<br />
To make <strong>MIDI</strong> connections, you’ll need a <strong>MIDI</strong> cable—purchased<br />
separately—for each <strong>MIDI</strong> instrument you plan to use.<br />
• You can connect the MV-8000 directly to one or two <strong>MIDI</strong><br />
instruments—Connect one of the MV-8000 <strong>MIDI</strong> OUT jacks<br />
to the <strong>MIDI</strong> IN jack on each <strong>MIDI</strong> instrument.<br />
<strong>MIDI</strong> IN<br />
<strong>MIDI</strong> OUT A<br />
<strong>MIDI</strong> OUT B<br />
<strong>MIDI</strong> IN<br />
Using <strong>MIDI</strong> <strong>Instruments</strong> in a Sequence<br />
Pads, Plus<br />
For recording sequencer tracks, you can use the MV-8000’s<br />
pads and/or a <strong>MIDI</strong> controller—such as a <strong>MIDI</strong> keyboard <strong>with</strong><br />
or <strong>with</strong>out its own sounds—connected to the MV-8000’s <strong>MIDI</strong><br />
IN jack.<br />
Preparing the MV-8000 for <strong>MIDI</strong> Sequencing<br />
1. Press the SYSTEM button to display the SYSTEM menu.<br />
2. Select <strong>MIDI</strong> to open the <strong>MIDI</strong> window.<br />
You can use either MV-8000 <strong>MIDI</strong> OUT jack for a single <strong>MIDI</strong> instrument. If<br />
you’re using two, either <strong>MIDI</strong> OUT jack is fine for either <strong>MIDI</strong> instrument.<br />
If your <strong>MIDI</strong> instrument has a keyboard, you can use it for sequencing on the<br />
MV-8000 by connecting its <strong>MIDI</strong> OUT jack to the MV-8000’s <strong>MIDI</strong> IN jack.<br />
• You can “daisy-chain” <strong>MIDI</strong> instruments—If a <strong>MIDI</strong> instrument<br />
has a <strong>MIDI</strong> THRU jack, it can pass the <strong>MIDI</strong> data it receives<br />
from the MV-8000 to the <strong>MIDI</strong> IN jack of another <strong>MIDI</strong><br />
instrument. This lets you connect several <strong>MIDI</strong> instruments,<br />
one-after-another, to either MV-8000 <strong>MIDI</strong> OUT jack.<br />
<strong>MIDI</strong> OUT A or B<br />
<strong>MIDI</strong> IN<br />
<strong>MIDI</strong> THRU<br />
Each instrument in a <strong>MIDI</strong> daisy-chain gets its data a little later than the<br />
instrument before it. Keep your <strong>MIDI</strong> rhythm sounds tight by placing their<br />
instruments as close as possible to the beginning of the daisy-chain.<br />
<strong>MIDI</strong> IN<br />
3. Make sure Multi Timbre Sampler Mode is set to Off as<br />
shown above. This accomplishes two things:<br />
• The MV-8000 pads and a <strong>MIDI</strong> keyboard connected<br />
to the MV-8000’s <strong>MIDI</strong> IN jack play the <strong>MIDI</strong> sound<br />
controlled by the currently selected sequencer track.<br />
• As you play a <strong>MIDI</strong> instrument from the MV-8000 pads<br />
or a connected <strong>MIDI</strong> keyboard, you can also record<br />
your playing into the MV-8000’s sequencer.
Setting Up the <strong>MIDI</strong> Instrument<br />
On each <strong>MIDI</strong> instrument you’ll be using, you’ll need to select<br />
the desired sound, or sounds. If you’re using a:<br />
• single-sound <strong>MIDI</strong> instrument—choose the sound you want<br />
the MV-8000 to play.<br />
• drum machine—select the drum or percussion kit you<br />
want the MV-8000 to play.<br />
• multitimbral <strong>MIDI</strong> instrument—set up the instrument’s<br />
parts so that they play the desired sounds, and so that<br />
each part receives <strong>MIDI</strong> data on the correct <strong>MIDI</strong> channel.<br />
A multitimbral <strong>MIDI</strong> instrument can play multiple sounds on separate <strong>MIDI</strong><br />
channels. The instrument is typically divided into “parts,” <strong>with</strong> each playing<br />
its own sound on its own <strong>MIDI</strong> channel.<br />
The MV-8000 can select sounds in a <strong>MIDI</strong> instrument automatically as the<br />
sequencer plays using <strong>MIDI</strong> Program Change messages. To learn more, see<br />
“EVENT LIST EDIT screen” on Page 214 of the MV-8000 Owner’s Manual.<br />
If Your <strong>MIDI</strong> Instrument Has a Keyboard<br />
To use a keyboard <strong>with</strong> its own sounds for MV-8000 sequencing,<br />
only the MV-8000 should actually play those sounds. Check<br />
the keyboard’s manual to learn how to temporarily disable<br />
the playing of its sounds directly from the keyboard. (In the<br />
<strong>Roland</strong> Juno-D shown above, for example, you’d turn off the<br />
Local Control parameter.)<br />
Choosing <strong>MIDI</strong> Instrument <strong>MIDI</strong> Channels<br />
Here are some things to keep in mind as you set up your <strong>MIDI</strong><br />
instrument(s):<br />
• If you’re using both of the MV-8000’s <strong>MIDI</strong> OUT jacks,<br />
you’ve really got 32 completely separate <strong>MIDI</strong> channels to<br />
choose from. Get used to thinking of these as A 1-16 and<br />
B 1-16 when you assign <strong>MIDI</strong> channels to the sounds you<br />
want to play.<br />
• In order for an MV-8000 sequencer track to play a <strong>MIDI</strong><br />
sound, its track has to be set up to send out <strong>MIDI</strong> data<br />
on the sound’s <strong>MIDI</strong> channel. When you set up your <strong>MIDI</strong><br />
instrument(s), keep track of each sound’s <strong>MIDI</strong> channel<br />
since you’ll need this information later when you set up its<br />
track.<br />
• Normally, each <strong>MIDI</strong> channel controls a single sound or<br />
drum/percussion kit in a <strong>MIDI</strong> instrument. Therefore, set<br />
each sound—whether it’s the only sound played by a <strong>MIDI</strong><br />
instrument, or a part in a multitimbral <strong>MIDI</strong> instrument—<br />
to its own unique <strong>MIDI</strong> channel.<br />
If you want to layer two or more <strong>MIDI</strong> sounds so that they play exactly the<br />
same thing, you can play them from the same MV-8000 sequencer track by<br />
setting them to respond to the same <strong>MIDI</strong> channel.<br />
Preparing to Record a <strong>MIDI</strong> Instrument Track<br />
The MV-8000 sequencer has two types of tracks:<br />
• audio tracks—play onboard audio phrases.<br />
• <strong>MIDI</strong> tracks—play MV-8000 patches and/or sounds in <strong>MIDI</strong><br />
instruments.<br />
When you want to sequence a <strong>MIDI</strong> instrument’s<br />
sound, use a <strong>MIDI</strong> track. You can identify a <strong>MIDI</strong> track in<br />
a song by the note icon to the left of its name.
A <strong>MIDI</strong> track can play an internal MV-8000 patch and a <strong>MIDI</strong> instrument<br />
sound at the same time. You’ll see how to do this in “Setting up a <strong>MIDI</strong><br />
Instrument Track” below.<br />
When you create a new project using the default settings,<br />
the song the MV-8000 automatically loads contains four <strong>MIDI</strong><br />
tracks. Likewise, when you create a new song using the default<br />
settings, the song has four <strong>MIDI</strong> tracks.<br />
When you’re creating a new <strong>MIDI</strong> track:<br />
1. If you’re not already on the SEQUENCE screen, press<br />
SEQUENCE.<br />
2. Press the MENU button.<br />
3. Select Add New <strong>MIDI</strong> Track... to open the ADD <strong>MIDI</strong><br />
TRACK window where you’ll see the two parameters we’re<br />
concerned <strong>with</strong>.<br />
If your song has no <strong>MIDI</strong> tracks, or if you’ve used all the <strong>MIDI</strong><br />
tracks it has, you can easily create new ones, as we’ll see.<br />
Creating a <strong>MIDI</strong> Instrument Track<br />
Whether you want to work <strong>with</strong> a <strong>MIDI</strong> track that already<br />
exists, or you want to add a new <strong>MIDI</strong> track, you’ll use the same<br />
two settings to set up the track for playing a <strong>MIDI</strong> instrument.<br />
These are the Output Assign and <strong>MIDI</strong> parameters.<br />
To set up a <strong>MIDI</strong> track that already exists:<br />
1. If you’re not already on the SEQUENCE screen, press<br />
SEQUENCE.<br />
2. Select the <strong>MIDI</strong> track you want to use by pressing the 6 or<br />
5 buttons to highlight it. (If you’re using a VGA, you can<br />
also select it by clicking its name.)<br />
3. Click Track Param to open the TRACK PARAMETER window<br />
where you’ll find the two parameters.<br />
Tell the MV-8000 how many new <strong>MIDI</strong> tracks you want to add by setting<br />
the Number of Tracks parameter.<br />
The Output Assign Parameter<br />
The setting of the Output Assign parameter decides whether<br />
or not the track’s notes get sent to an MV-8000 part in order<br />
to play its patch.<br />
To learn about parts and patches, see “About Patch Loading” on Page 3 in<br />
the MV-8000 Loading Patches Workshop booklet.<br />
You can set Output Assign to Off, or set it to the part whose<br />
patch you want the <strong>MIDI</strong> track to play.<br />
When you want the track to play only a <strong>MIDI</strong> instrument, set Output Assign<br />
to Off.
The <strong>MIDI</strong> Parameter<br />
The <strong>MIDI</strong> parameter selects the <strong>MIDI</strong> channel that carries the<br />
track’s data to its <strong>MIDI</strong> sound. Set it to the <strong>MIDI</strong> channel you<br />
selected for the sound when you set up its <strong>MIDI</strong> instrument.<br />
You can set <strong>MIDI</strong> to:<br />
• Off—so that the track sends out no <strong>MIDI</strong> data.<br />
• A-1 through A-16—so that the track’s data is sent on one of<br />
the 16 <strong>MIDI</strong> channels coming out of the <strong>MIDI</strong> OUT A jack.<br />
• B-1 through B-16—so that the track’s data is sent on one of<br />
the 16 <strong>MIDI</strong> channels coming out of the <strong>MIDI</strong> OUT B jack.<br />
Once you’ve set the <strong>MIDI</strong> parameter, we recommend naming your track to<br />
avoid confusing it <strong>with</strong> other tracks. Click Name to open the EDIT TRACK<br />
NAME window where you can name the track.<br />
Automatic <strong>MIDI</strong> Instrument Patch Selection<br />
A <strong>MIDI</strong> instrument’s track can automatically select the desired<br />
sound when you start playback of an MV-8000 song or pattern<br />
from the top. It does this by sending the <strong>MIDI</strong> instrument the<br />
required Program Change and Bank Select <strong>MIDI</strong> messages.<br />
Here’s how to set this up.<br />
Before proceeding, see the <strong>MIDI</strong> instrument’s documentation to learn the<br />
Program Change and Bank Select messages for the sound you want to<br />
select from the MV-8000.<br />
1. If you’re not already on the SEQUENCE screen, press<br />
SEQUENCE.<br />
2. Select the desired <strong>MIDI</strong> track by pressing the 6 or 5<br />
buttons to highlight it. (If you’re using a VGA, you can also<br />
select it by clicking its name.)<br />
3. Click Track Param to open the TRACK PARAMETER<br />
window.<br />
You select an<br />
external patch<br />
<strong>with</strong> the Prog and<br />
Bank. H and L<br />
parameters.<br />
4. Set:<br />
• Prog—to the desired sound’s Program Change value.<br />
• Bank. H—the the desired sound’s MSB value.<br />
• Bank. L—the the desired sound’s LSB value.<br />
You can set up other tracks the same way by selecting them using the Track<br />
parameter, and then setting their parameters as desired.<br />
5. When you’re done, click Close.<br />
Ready to Go<br />
That’s it. At this point you can record your <strong>MIDI</strong> instrument<br />
track the same way you’d record a track that plays an MV-8000<br />
patch. To learn about sequencing on the MV-8000, see the<br />
MV-8000 Owner’s Manual.<br />
The End<br />
We hope you’ve found this workshop helpful. Keep an eye<br />
out for other MV-8000 Workshop booklets, all available for<br />
downloading at www.<strong>Roland</strong>US.com.<br />
For the latest MV-8000 updates and support tools, visit the <strong>Roland</strong> U.S.<br />
Web site at www.<strong>Roland</strong>US.com. If you need personal assistance, call our<br />
amazing Product Support team at 323-890-3745.