XP-60 Basic Sequencing (PDF) - Roland UK
XP-60 Basic Sequencing (PDF) - Roland UK
XP-60 Basic Sequencing (PDF) - Roland UK

Create successful ePaper yourself
Turn your PDF publications into a flip-book with our unique Google optimized e-Paper software.
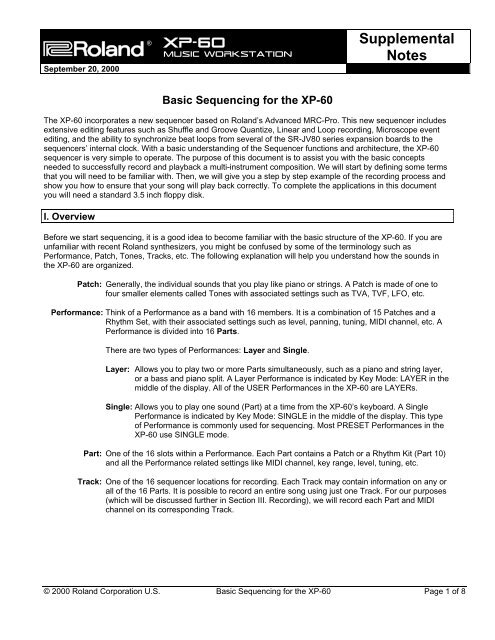
® <strong>XP</strong>-<strong>60</strong><br />
®ÂØÒňΠMUSIC WORKSTATION<br />
September 20, 2000<br />
Supplemental<br />
Notes<br />
<strong>Basic</strong> <strong>Sequencing</strong> for the <strong>XP</strong>-<strong>60</strong><br />
The <strong>XP</strong>-<strong>60</strong> incorporates a new sequencer based on <strong>Roland</strong>’s Advanced MRC-Pro. This new sequencer includes<br />
extensive editing features such as Shuffle and Groove Quantize, Linear and Loop recording, Microscope event<br />
editing, and the ability to synchronize beat loops from several of the SR-JV80 series expansion boards to the<br />
sequencers’ internal clock. With a basic understanding of the Sequencer functions and architecture, the <strong>XP</strong>-<strong>60</strong><br />
sequencer is very simple to operate. The purpose of this document is to assist you with the basic concepts<br />
needed to successfully record and playback a multi-instrument composition. We will start by defining some terms<br />
that you will need to be familiar with. Then, we will give you a step by step example of the recording process and<br />
show you how to ensure that your song will play back correctly. To complete the applications in this document<br />
you will need a standard 3.5 inch floppy disk.<br />
I. Overview<br />
Before we start sequencing, it is a good idea to become familiar with the basic structure of the <strong>XP</strong>-<strong>60</strong>. If you are<br />
unfamiliar with recent <strong>Roland</strong> synthesizers, you might be confused by some of the terminology such as<br />
Performance, Patch, Tones, Tracks, etc. The following explanation will help you understand how the sounds in<br />
the <strong>XP</strong>-<strong>60</strong> are organized.<br />
Patch: Generally, the individual sounds that you play like piano or strings. A Patch is made of one to<br />
four smaller elements called Tones with associated settings such as TVA, TVF, LFO, etc.<br />
Performance: Think of a Performance as a band with 16 members. It is a combination of 15 Patches and a<br />
Rhythm Set, with their associated settings such as level, panning, tuning, MIDI channel, etc. A<br />
Performance is divided into 16 Parts.<br />
There are two types of Performances: Layer and Single.<br />
Layer: Allows you to play two or more Parts simultaneously, such as a piano and string layer,<br />
or a bass and piano split. A Layer Performance is indicated by Key Mode: LAYER in the<br />
middle of the display. All of the USER Performances in the <strong>XP</strong>-<strong>60</strong> are LAYERs.<br />
Single: Allows you to play one sound (Part) at a time from the <strong>XP</strong>-<strong>60</strong>’s keyboard. A Single<br />
Performance is indicated by Key Mode: SINGLE in the middle of the display. This type<br />
of Performance is commonly used for sequencing. Most PRESET Performances in the<br />
<strong>XP</strong>-<strong>60</strong> use SINGLE mode.<br />
Part: One of the 16 slots within a Performance. Each Part contains a Patch or a Rhythm Kit (Part 10)<br />
and all the Performance related settings like MIDI channel, key range, level, tuning, etc.<br />
Track: One of the 16 sequencer locations for recording. Each Track may contain information on any or<br />
all of the 16 Parts. It is possible to record an entire song using just one Track. For our purposes<br />
(which will be discussed further in Section III. Recording), we will record each Part and MIDI<br />
channel on its corresponding Track.<br />
© 2000 <strong>Roland</strong> Corporation U.S. <strong>Basic</strong> <strong>Sequencing</strong> for the <strong>XP</strong>-<strong>60</strong> Page 1 of 8
®ÂØÒňÎ<br />
<strong>XP</strong>-<strong>60</strong> Supplemental Notes<br />
II. Setup for <strong>Sequencing</strong><br />
Selecting a Performance<br />
The <strong>XP</strong>-<strong>60</strong> contains 96 different Performances. When you are getting ready to sequence, one of the first<br />
decisions to make is which Performance to use. The ideal setup for sequencing is a Performance that uses<br />
separate MIDI channels for each of the 16 Parts or a Single Mode Performance. This is to ensure that all Parts<br />
do not play-back when you are trying to record just one. Layer Performances may have multiple Parts assigned to<br />
the same MIDI channel and can be difficult to use for sequencing. An ideal Single Mode Performance is Preset A-<br />
12, POP SET 1. Use the following procedure to select this Performance.<br />
1) Press PERFORM.<br />
2) From the numeric keypad on the right-hand side hold SHIFT and press #1 to select the Preset A Bank.<br />
3) Turn the VALUE DIAL to PR-A: 12 POP SET 1.<br />
III. Recording<br />
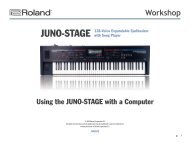
Sequencer Play Screen Layout<br />
The main sequencer display contains several menus which will greatly assist you when sequencing a song.<br />
Access to these helpful menus can be achieved by pressing the Function buttons F1-F6. Listed below are the<br />
functions of each. Press SEQUENCER to access the following display:<br />
Song # : Name - Select 0:Internal Song to record or edit a song<br />
Measure (M=) determines<br />
the current playback or<br />
record measure.<br />
<br />
Tempo ( =120) the speed of the<br />
recording. The <strong>XP</strong>-<strong>60</strong> defaults to<br />
120 BPM (beats per minute).<br />
Tracks - o indicates that there is data on a track.<br />
_ indicates no data on a track.<br />
Current Part - Indicates which<br />
of the 16 Parts you will record.<br />
Group: Patch - Current Group<br />
and Patch for this Part<br />
Time Signature (B = 4/4)<br />
determines how many beats in<br />
a measure and what type of<br />
note equals each beat.<br />
Loop determines the loop to use for recording and playback. Loop can be set to the following modes:<br />
OFF:<br />
Recording will take place in a linear fashion, from beginning to end.<br />
POINT: The loop positions specified for playback (Playback Loop) will also be used for recording.<br />
1-2-4-8-16: The number of measures to be looped starting from the current measure.<br />
ALL:<br />
The entire Track is looped. This operation cannot be applied to the first recording.<br />
In addition, the following information is available by using the F buttons under the display:<br />
F1 Setup - Metronome settings, Internal/External Sync, MTC, and MMC settings<br />
F2 Quantize - Grid, Shuffle or Groove Quantize, Load/Save User Grooves<br />
F3 Track Edit - Track Edit Functions including Erase, Delete, Copy, Transpose, Change Velocity etc...<br />
F4 Microscope - Individual Event Editing, Step Recording and Inserting Patterns into songs<br />
F5 Loop - Set the Loop points<br />
F6 List - Listing of the songs on the disk<br />
© 2000 <strong>Roland</strong> Corporation U.S. <strong>Basic</strong> <strong>Sequencing</strong> for the <strong>XP</strong>-<strong>60</strong> Page 2 of 8
®ÂØÒňÎ<br />
<strong>XP</strong>-<strong>60</strong> Supplemental Notes<br />
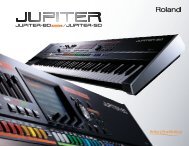
Real-time Record Stand-by Parameters<br />
In addition to the above mentioned parameters, there are several that appear in the Real-time Record Stand-by<br />
screen. From the sequencer display, press REC to display the following screen:<br />
Mode determines how the <strong>XP</strong>-<strong>60</strong> records what you play. The <strong>XP</strong>-<strong>60</strong><br />
contains the following modes:<br />
REPLACE:<br />
MIX:<br />
A.PUNCH:<br />
What you play is recorded over any existing data.<br />
What you play is added to any existing data.<br />
Data between the punch in and out points is automatically<br />
replaced with the new material you play<br />
Count In determines when the recording will start.<br />
The <strong>XP</strong>-<strong>60</strong> has the following Count In options:<br />
0: Recording begins immediately<br />
when you press play.<br />
1 or 2: Recording will begin after the<br />
selected number of Count In<br />
measure(s).<br />
WAIT NOTE: Recording begins when you press<br />
a key on the keyboard.<br />
Input Quantize determines how the information is adjusted when it is recorded (See Section IV. Editing; Quantize<br />
for further explanation). The <strong>XP</strong>-<strong>60</strong> has three modes of input quantize:<br />
OFF:<br />
GRID:<br />
SHUFFLE:<br />
The input notes will be recorded as played.<br />
The input notes will be placed to the nearest selected division of the beat. Ex. 1/16th or 1/8th note.<br />
A triplet feel will be applied to notes recorded with the emphasis on the selected division of the beat.<br />
Note: If you are interested in creating Tempo or Time Signature changes within your song, see Section IV Editing<br />
.<br />
In addition, the following information is available by using the F buttons under the display:<br />
F1 Part - Sound, pan, level and effects settings for your Performance.<br />
F2 Info - A monitor that displays MIDI messages such as polyphony, volume, modulation, etc.<br />
F3 Rec Sel - Allows you to choose specific MIDI messages to filter out while recording.<br />
F4 Quantiz - This display allows you to adjust the type and resolution of quantize to be applied to your recording.<br />
F5 A. Punch - This display allows you to make changes to the punch-in and punch-out settings.<br />
F6 List - Listing of the songs on the disk<br />
Press EXIT to leave the Record Standby Display.<br />
Recording Parts<br />
Using the previously selected Performance PR-A: POP SET 1, we will construct a piano, bass and drums<br />
ensemble sequence. Use the following steps from the sequencer display:<br />
1) Cursor to TRK and press the TRACK 1 button (located under the display) to select TRACK and PART 1.<br />
2) Cursor to the current Bank and Patch and turn the VALUE DIAL to select PR-A:004 Nice Piano.<br />
3) Press REC to access the Record Standby Display.<br />
<br />
4) Cursor to =120 and use the Value-Dial to select the desired tempo.<br />
5) Press F4 to view the QUANTIZE parameters. Use the CURSOR buttons and VALUE DIAL to choose GRID or<br />
SHUFFLE Type of Quantize. Use the same method to choose the desired Quantize Resolution and Strength.<br />
Press EXIT to leave this screen.<br />
6) Cursor to LOOP and choose the desired amount of bars. For the purposes of this example, set LOOP to 4.<br />
7) Cursor right and set MODE to MIX.<br />
8) Cursor to COUNT IN and use the VALUE DIAL to select the desired number of measure(s).<br />
9) Press PLAY and after the COUNT IN, begin loop recording the 4 measure piano part.<br />
© 2000 <strong>Roland</strong> Corporation U.S. <strong>Basic</strong> <strong>Sequencing</strong> for the <strong>XP</strong>-<strong>60</strong> Page 3 of 8
®ÂØÒňÎ<br />
<strong>XP</strong>-<strong>60</strong> Supplemental Notes<br />
As the piano part is looping, we will assign a bass to Part 2 and record it on TRK 2.<br />
1) Press F6 to enter Rehearsal Mode. This allows you to play or change sounds with out recording in the<br />
sequence.<br />
2) Cursor to TRK and press the TRACK/PART 2 button.<br />
3) Cursor to the bottom right corner and use the VALUE DIAL to select PR-B: 017 Frtls Dry and practice your<br />
part.<br />
4) Press F6 again to leave the Rehearsal Mode.<br />
5) Record the bass part.<br />
As the piano and bass part are looping, we can record a drum part:<br />
1) Press F6 to enter Rehearsal Mode.<br />
2) Cursor to TRK and press the TRACK/PART button 10.<br />
3) Cursor to the bottom right corner.<br />
4) Use the VALUE DIAL to select USER:002 Jazz Drum Set1.<br />
5) Press F6 again to leave the Rehearsal Mode.<br />
6) Play the drum part.<br />
7) Press STOP when finished.<br />
Note: To quickly rewind to the beginning of the sequence, hold SHIFT and press BWD.<br />
If you are satisfied with your recording, proceed to the next section. If you would like to erase this song, press<br />
UTILITY and cursor to SONG INIT. Press Enter. Press F6 EXECUTE to clear the internal song. Try the recording<br />
process again and then proceed to the next section.<br />
IV. Editing<br />
Quantize<br />
Quantize is a procedure that rhythmically adjusts notes after they have been played into a sequencer. Quantizing<br />
is an effective way to “correct” notes that may have been played off time. The <strong>XP</strong>-<strong>60</strong> has three types of quantize:<br />
GRID:<br />
SHUFFLE:<br />
GROOVE:<br />
16<br />
The timing of the notes will be adjusted to the closest sub-division of a beat or by a<br />
selected percentage (i.e. move all selected notes 87% to the closest eighth note).<br />
A triplet “feel” will be applied to the timing of the notes. The amount of shuffle is also determined<br />
by a percentage.<br />
Dynamic and timing changes will be applied to the individual notes by using the selected<br />
GROOVE TEMPLATE. There are 71 PRESET Templates covering various styles of music and<br />
USER Templates for original applications.<br />
Use the following procedure to quantize something that has already been recorded:<br />
1) From the sequencer display, press F2 QUANTIZE.<br />
2) Select the desired method of Quantizing (Grid, Shuffle or Groove) by pressing the appropriate function<br />
button.<br />
3) Use the CURSOR buttons and VALUE DIAL to set the parameters as desired.<br />
4) Cursor to Measure and set the starting measure to quantize. For this example choose 1.<br />
5) Cursor to for and select the number of measures to quantize. For this example choose ALL.<br />
6) Cursor to Channel and select which channel(s) to quantize. For this example choose ALL.<br />
7) Cursor to Note Range to set a range of keys on the keyboard to quantize.<br />
8) Cursor to TRACK and use the DEC/INC buttons to enable (0) or disable (_) the desired tracks to be<br />
quantized.<br />
9) Hold SHIFT and press BWD to return to the beginning of your song.<br />
10) Before executing the quantize, press PLAY to preview the adjustments.<br />
© 2000 <strong>Roland</strong> Corporation U.S. <strong>Basic</strong> <strong>Sequencing</strong> for the <strong>XP</strong>-<strong>60</strong> Page 4 of 8
®ÂØÒňÎ<br />
<strong>XP</strong>-<strong>60</strong> Supplemental Notes<br />
11) Press F6 EXECUTE to complete the quantize operation. Press EXIT to leave this display.<br />
Copying Measures<br />
We now have four measures recorded. Now, let’s use the Copy function to extend the length of this song to 16<br />
bars. Use the following procedure to copy these four measures to create sixteen:<br />
1) Press F3 TRACK EDIT.<br />
2) Cursor to 03:COPY and then press ENTER.<br />
3) Cursor to and use the VALUE DIAL to select TRK ALL. This indicates the source track to copy.<br />
4) Cursor to and use the VALUE DIAL to select TRK ALL. This indicates the track the information will<br />
be copied to.<br />
5) Cursor down to MEASURE and use the VALUE DIAL to select 1 For 4. This indicates that the measures to be<br />
copied will start on measure 1. This also indicates that we will be copying 4 measures.<br />
6) Cursor right to MEASURE (directly beneath ) and use the VALUE DIAL to select 5 or END. This<br />
indicates were we want to place our copies.<br />
7) Cursor to MODE and use the VALUE DIAL to select REPLACE. This mode will write over any existing data<br />
on the destination track.<br />
8) Cursor to TIMES and use the VALUE DIAL to select 3. This indicates that we will copy these 4 measures 3<br />
times for a total of 16 measures.<br />
9) Press F6 EXECUTE to complete the copy.<br />
10) Press EXIT twice to return to the Sequencer Play screen.<br />
Hold SHIFT and press BWD followed by PLAY. Make sure to turn off the LOOP button on the <strong>XP</strong>-<strong>60</strong> to play the<br />
complete 16 measures.<br />
Creating a Tempo change<br />
If you do not want the same tempo for your entire song, you may insert Tempo Changes at the desired measure.<br />
Use the following procedure to change the tempo within a song:<br />
1) From the sequencer display, press F4 MICRO.<br />
2) Press the TEMPO/BEAT TRACK button (second row of buttons under the display) until Tempo Change<br />
appears in the display. The TEMPO /BEAT TRACK is specifically designed for storage of tempo and meter<br />
changes.<br />
3) Cursor to 1-01-000 to enter the desired Measure, Beat and Clock for your change.<br />
4) Press F1 CREATE to insert a tempo change event.<br />
5) Cursor to Tempo Change Value=120 and use the VALUE DIAL to select the desired tempo.<br />
6) Press EXIT to return to the sequencer display.<br />
Note: It is also possible to record tempo changes in real-time, which is useful for creating effects such as<br />
accelerandos and ritards. From the Sequencer display, press REC followed by TEMPO/BEAT to select the<br />
Tempo Track for recording. When you start recording, use the VALUE DIAL to speed up or slow down the tempo.<br />
The changes you make will be recorded on the Tempo Track.<br />
Creating a Meter change<br />
You can create a Time Signature at any measure in the song. Use the following procedure to change the meter<br />
within a song:<br />
1) From the sequencer display, press F4 MICRO.<br />
2) Press the TEMPO/BEAT TRACK button (second row of buttons under the display) until Beat Change appears<br />
in the display.<br />
3) Cursor to 1-01-000 and use the FWD and BWD buttons to select the desired Measure.<br />
4) Press F1 CREATE to insert a Beat Change event.<br />
5) Cursor to Beat=4/4 and use the VALUE DIAL to select the appropriate meter.<br />
6) Press EXIT to return to the sequencer display.<br />
V. <strong>Sequencing</strong> Specials<br />
© 2000 <strong>Roland</strong> Corporation U.S. <strong>Basic</strong> <strong>Sequencing</strong> for the <strong>XP</strong>-<strong>60</strong> Page 5 of 8
®ÂØÒňÎ<br />
<strong>XP</strong>-<strong>60</strong> Supplemental Notes<br />
Real-time Erase<br />
If you have played an incorrect note and would like to erase it without erasing the rest of your recording, you can<br />
use the <strong>XP</strong>-<strong>60</strong>’s Real-time Erase function. This is especially useful when recording drum parts.<br />
Use the following procedure to Real-time Erase:<br />
1) While loop recording, press F5 ERASE.<br />
2) Hold down the key that you would like to erase. The note will be erased for as long as you hold down the key.<br />
3) If you hold down two keys, all the notes in between the keys will be erased. If you hold F6, all data on the<br />
selected track will be erased for as long as you hold that button down.<br />
4) Press EXIT to return to recording.<br />
Syncing Beatloops<br />
The <strong>XP</strong>-<strong>60</strong> has the unique ability to sync beatloops from several of the SR-JV80 series expansion boards to the<br />
sequencers’ clock. These drum loops can be synced in either Patch or Performance Mode. You must have a SR-<br />
JV80 series expansion board with beatloops installed in one of the 4 expansion slots of the <strong>XP</strong>-<strong>60</strong>. For example,<br />
we will assume that the SR-JV80-12 Hip Hop expansion board is installed in expansion slot A.<br />
Selecting a Beatloop Patch to Sync<br />
1) From the sequencer display, CURSOR to select the desired Expansion Board Drum Loop.<br />
2) While holding PERFORM, press PATCH to enter PART mode.<br />
3) Press F2 WG.<br />
4) Press F1 WG PRM.<br />
5) Use the TONE SELECT 1-4 buttons under the display to choose the Tone(s) that contains the beatloop.<br />
Cursor to TONE DELAY MODE and use the VALUE DIAL to select TEMPO-SYNC.<br />
Note: Save this Patch to a User location to keep for future use.<br />
Setting the Performance to Sync<br />
1) Press PERFORM.<br />
2) Press F1 COMMON.<br />
3) Cursor to CLOCK SOURCE and use the VALUE DIAL to select SEQUENCER.<br />
4) Press SEQUENCER and play the beatloop on the keyboard.<br />
5) While holding the key down, cursor to Tempo and turn the VALUE DIAL. The beatloop is now synced to the<br />
internal clock of the <strong>XP</strong>-<strong>60</strong>.<br />
VI. Saving and Playing Back from a Disk<br />
Saving your Song to a Disk<br />
Use the following procedure to save your song to disk:<br />
1) Insert a disk into the drive and press DISK. If you have already used this disk with the <strong>XP</strong>-<strong>60</strong>, skip to step #5.<br />
Note: Formatting the disk will erase any information that is currently on that disk.<br />
2) Cursor to FORMAT and press ENTER. A Disk Format display will appear that allows you to set the Volume<br />
name for the disk. Press F6 EXECUTE followed by F5 to format the disk.<br />
3) When formatting is complete, press EXIT.<br />
4) Press F2 SAVE.<br />
5) Cursor to FILE TYPE and select SONG, then cursor to SAVE MODE and select SONG+SOUND. *<br />
6) Use your CURSOR buttons and VALUE DIAL to select the Song name and press F6 EXECUTE.<br />
7) Press SEQ to return to the SEQUENCER SONG PLAY Screen.<br />
Note: It is very important to save the sound settings with the songs. This procedure saves the correct sounds<br />
with the selected song.<br />
Playing your Song direct from Disk<br />
Once all of the settings have been saved to the disk, the sequencer can play the songs directly from the floppy.<br />
1) Press SEQUENCER.<br />
© 2000 <strong>Roland</strong> Corporation U.S. <strong>Basic</strong> <strong>Sequencing</strong> for the <strong>XP</strong>-<strong>60</strong> Page 6 of 8
®ÂØÒňÎ<br />
<strong>XP</strong>-<strong>60</strong> Supplemental Notes<br />
2) Cursor to the top left corner and use the VALUE DIAL to select the song. Ex. 1: MY SONG. Press ENTER.<br />
3) Press PLAY.<br />
VII. Effects<br />
Performance Effects Routing<br />
The <strong>XP</strong>-<strong>60</strong> has three extremely powerful effects processors. These three effects processors are as follows:<br />
EFX: This is also known as the ‘insert effects’ processor. This processor includes forty different effects<br />
including Rotary Speaker, Distortion, Compressor, Reverb, Triple Tap Delay and others. In addition<br />
to single effects, this processor includes multiple effects configured in series or parallel. Parallel<br />
effects allow you to get a different effect depending on the pan position of your patch.<br />
Reverb: This processor contains primarily reverb and delay effects.<br />
Chorus: This processor contains primarily chorus effects. It can also be used to create a short delay effect.<br />
The effects parameters for each of these three processors can be chosen per Performance. Each of the 16 Parts<br />
in a Performance can be routed through these three processors if desired. There are four options for the routing<br />
of each part to the EFX (Insert) effects processor:<br />
MIX:<br />
EFX:<br />
DIR:<br />
PAT:<br />
Routes the sound to the MIX L&R Outputs without the EFX (Insert) Effects processor.<br />
Routes the sound to the MIX L&R Outputs with the EFX (Insert) Effects processor.<br />
Routes the sound to the DIRECT L&R Outputs without the EFX (Insert) Effects processor.<br />
Uses the Patch’s Output determine the above mentioned routing. This allows for individual routing<br />
per tone.<br />
Use the following procedure to set the routing for the Insert Effects processor in Performance mode.<br />
1) Press PERFORM to display the Performance Play Page.<br />
2) Press F5 to select the Effects page.<br />
3) Press F1 to select the Effects routing page.<br />
4) Use the TRACK/PART buttons (under the display) to select the desired Part.<br />
5) Cursor to Output and turn the VALUE DIAL to select MIX, EFX, DIR or PAT.<br />
6) Press the RIGHT CURSOR button and turn the VALUE DIAL to select the desired send level for this part.<br />
To route the sound through the Reverb and Chorus processors, you can simply adjust the Reverb and Chorus<br />
Send Levels on this same page. Use the following procedure to set the effect send levels for Parts in a<br />
Performance.<br />
1) From the previous display, press the CURSOR UP button twice and turn the VALUE DIAL to adjust the<br />
Reverb Send Level.<br />
2) Press the CURSOR DOWN button and turn the VALUE DIAL to adjust the Chorus Send Level.<br />
Note: While in this screen, you may cursor to set the parameters as desired. The name of the selected parameter<br />
will appear in the lower right corner of the display. Use the Function buttons F2-F5 to view and change specific<br />
settings for each processor.<br />
Copying Effects from a Patch<br />
It is possible to copy all Reverb, Chorus and EFX settings of a Patch and use them in a Performance. This will<br />
allow you to route your Parts through the processors and obtain a similar sound to Patch mode. Use the following<br />
procedure to copy the effects settings to the current Performance:<br />
1) Press UTILITY<br />
2) Press F2 COPY.<br />
3) Press F2 EFFECTS.<br />
4) Cursor left to Source and select Patch.<br />
5) Press the CURSOR RIGHT button and use the VALUE DIAL to choose the Patch to copy the effects from.<br />
6) Press F6 EXECUTE.<br />
7) Set the effects routing to the three processors as previously described<br />
© 2000 <strong>Roland</strong> Corporation U.S. <strong>Basic</strong> <strong>Sequencing</strong> for the <strong>XP</strong>-<strong>60</strong> Page 7 of 8
®ÂØÒňÎ<br />
<strong>XP</strong>-<strong>60</strong> Supplemental Notes<br />
* Note: This method can not be used on an expansion board patch. Copy the Expansion Board patch to a USER<br />
location and then execute this function.<br />
VIII. Other Features<br />
Arpeggiator<br />
The arpeggiator is a very useful feature for creating rhythmic textures. There are 33 rhythmic styles ranging from<br />
Rhythm Guitar to Harp Rolls. Each of these cyclic styles can be varied by adjusting parameters such as Accent<br />
Rate, Shuffle Rate, Octave Range, Key Velocity, and Tempo. For the purposes of this example, we will select two<br />
separate Patches and listen to some arpeggiator styles.<br />
Rhythm Guitar<br />
1) Press PATCH<br />
2) Press the SOUND LIST button and use F2 and F3 to select the USER Bank.<br />
3) Use the VALUE DIAL to select USER 007 CLEAR GUITAR.<br />
4) Press ARPEGGIO.<br />
5) Press F6 (Arpeg).<br />
6) Use the VALUE DIAL to select the Arpeggio Style RHYTHM GTR. B.<br />
7) Press F5 (Detail) and set the arpeggio details as desired.<br />
8) Play the keyboard to hear the effect of the Arpeggiator.<br />
Synth Bass<br />
1) Press PATCH.<br />
2) Press the SOUND LIST button and use F2 and F3 to select the USER Bank.<br />
3) Use the VALUE DIAL to select USER 011 RESOSAW BASS.<br />
4) Press ARPEGGIO and use the VALUE DIAL to select the Arpeggio Style SLAP BASS A.<br />
5) Press F5 DETAIL and set the arpeggio details as desired.<br />
Using the Sound Palette<br />
The <strong>XP</strong>-<strong>60</strong> also allows you to change the characteristics of a sound in real-time. We will use the above Synth<br />
Bass arpeggio pattern for this example.<br />
1) Play the Synth Bass arpeggio pattern.<br />
2) Press FILTER ENV in the SOUND PALETTE so the button is lit.<br />
3) Move the Sliders marked CUTOFF and RESONANCE and listen to the changes.<br />
* Useful Tip: Since all of the patterns (and their variations) in the Arpeggio and the slider movements from the<br />
Sound Palette can be recorded to the sequencer, the arpeggiator can be a main source for musical ideas in your<br />
song. Try recording separate Parts using different Arpeggio styles.<br />
As you can see, the <strong>XP</strong>-<strong>60</strong> is a very powerful instrument. You can create music in a number of different ways to<br />
suit your style and preferences. In this document, we have just started looking at the ways to use the sequencer.<br />
For more information, you should check out “Advanced <strong>Sequencing</strong> on the <strong>XP</strong>-<strong>60</strong> and <strong>XP</strong>-80” as well as the<br />
“<strong>XP</strong>-<strong>60</strong>/80 Frequently Asked Questions” supplemental notes.<br />
© 2000 <strong>Roland</strong> Corporation U.S. <strong>Basic</strong> <strong>Sequencing</strong> for the <strong>XP</strong>-<strong>60</strong> Page 8 of 8