Drafting patterns for raglan sleeves - Leena's.com
Drafting patterns for raglan sleeves - Leena's.com
Drafting patterns for raglan sleeves - Leena's.com

You also want an ePaper? Increase the reach of your titles
YUMPU automatically turns print PDFs into web optimized ePapers that Google loves.
Home<br />
page<br />
Svensk<br />
manual<br />
Suomeksi<br />
PatternMaker dealers<br />
Counter started<br />
2000-01-01<br />
Site Map<br />
December 5th, 2001<br />
PatternMaker®<br />
Pattern <strong>Drafting</strong> Sofware<br />
<strong>for</strong> PC<br />
Versions & prices<br />
Download & buy<br />
Demo version<br />
Macro collections<br />
Services<br />
Contact in<strong>for</strong>mation<br />
Learning<br />
Center<br />
Tutorials<br />
Measuring<br />
Sewing<br />
instructions<br />
Sewing projects<br />
Pattern drafting<br />
PDF-version of this page<br />
Get AcrobatReader<br />
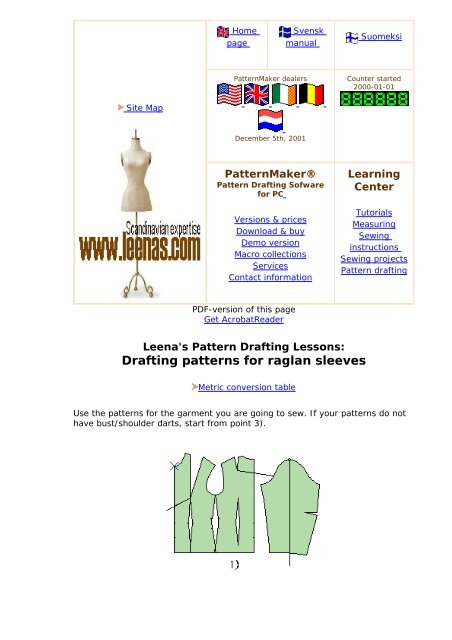
<strong>Leena's</strong> Pattern <strong>Drafting</strong> Lessons:<br />
<strong>Drafting</strong> <strong>patterns</strong> <strong>for</strong> <strong>raglan</strong> <strong>sleeves</strong><br />
Metric conversion table<br />
Use the <strong>patterns</strong> <strong>for</strong> the garment you are going to sew. If your <strong>patterns</strong> do not<br />
have bust/shoulder darts, start from point 3).
1) Cut center front piece from bust/shoulder dart apex to center front line and<br />
back piece from shoulder dart apex to back center line as well as the sleeve<br />
along its center line.<br />
2) pivot pieces so that the darts are temporarily moved to center front and<br />
back.<br />
3) Place the sleeve halves according to the picture above: distance A-B should<br />
equal to B-C and distance D-E to E-F. Sleeve cap lines of the original sleeve go<br />
through shoulder points.
4) Draw the <strong>patterns</strong> <strong>for</strong> the <strong>raglan</strong> <strong>sleeves</strong> as illustrated above. It is up to you<br />
how you shape the sleeve from the armscye to the neck opening. Draw the<br />
shoulder points with a smooth curve. Measure that the upper seams of the front<br />
and the back sleeve match. If not, change the shapes of them correspondingly.<br />
5) Draw <strong>patterns</strong> <strong>for</strong> front and back pieces as illustrated above in green.
6) After having pivoted the front and back center pieces so that the temporary<br />
darts close, your <strong>patterns</strong> should look something like this. .<br />
Sewing instructions are also included in this web-site. To view them click here.