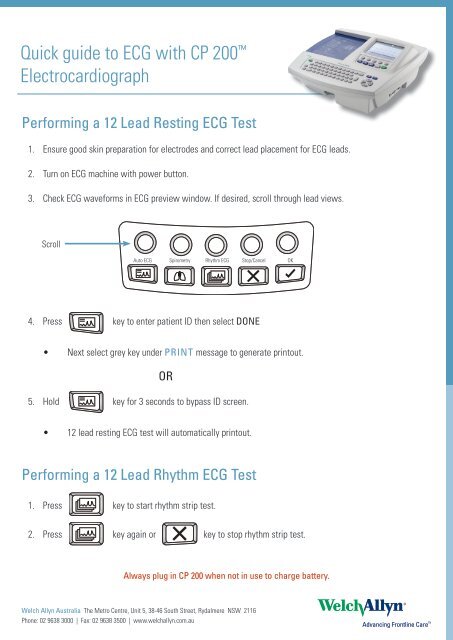
Quick guide to ECG with CP 200⢠Electrocardiograph
Quick guide to ECG with CP 200⢠Electrocardiograph
Quick guide to ECG with CP 200⢠Electrocardiograph

Create successful ePaper yourself
Turn your PDF publications into a flip-book with our unique Google optimized e-Paper software.
<strong>Quick</strong> <strong>guide</strong> <strong>to</strong> <strong>ECG</strong> <strong>with</strong> <strong>CP</strong> 200 <br />
<strong>Electrocardiograph</strong><br />
Performing a 12 Lead Resting <strong>ECG</strong> Test<br />
1. Ensure good skin preparation for electrodes and correct lead placement for <strong>ECG</strong> leads.<br />
2. Turn on <strong>ECG</strong> machine <strong>with</strong> power but<strong>to</strong>n.<br />
3. Check <strong>ECG</strong> waveforms in <strong>ECG</strong> preview window. If desired, scroll through lead views.<br />
Scroll<br />
Au<strong>to</strong> <strong>ECG</strong> Spirometry Rhythm <strong>ECG</strong> S<strong>to</strong>p/Cancel OK<br />
Au<strong>to</strong> <strong>ECG</strong> Spirometry Rhythm <strong>ECG</strong> S<strong>to</strong>p/Cancel OK<br />
4. Press Au<strong>to</strong> <strong>ECG</strong> key Spirometry <strong>to</strong> enter Rhythm patient <strong>ECG</strong>ID then S<strong>to</strong>p/Cancel select DONE OK<br />
• Next select grey key under PRINT message <strong>to</strong> generate prin<strong>to</strong>ut.<br />
Au<strong>to</strong> <strong>ECG</strong> Spirometry Rhythm <strong>ECG</strong> S<strong>to</strong>p/Cancel OK<br />
OR<br />
5. Hold key for 3 seconds <strong>to</strong> bypass ID screen.<br />
Au<strong>to</strong> <strong>ECG</strong> Au<strong>to</strong> <strong>ECG</strong> Spirometry SpirometryRhythm Rhythm <strong>ECG</strong> <strong>ECG</strong>S<strong>to</strong>p/Cancel S<strong>to</strong>p/Cancel OK OK<br />
• 12 lead resting <strong>ECG</strong> test will au<strong>to</strong>matically prin<strong>to</strong>ut.<br />
Performing a 12 Lead Rhythm <strong>ECG</strong> Test<br />
1. Press key <strong>to</strong> start rhythm strip test.<br />
2. Press key again or key <strong>to</strong> s<strong>to</strong>p rhythm strip test.<br />
Always plug in <strong>CP</strong> 200 when not in use <strong>to</strong> charge battery.<br />
Welch Allyn Australia The Metro Centre, Unit 5, 38-46 South Street, Rydalmere NSW 2116<br />
Phone: 02 9638 3000 | Fax: 02 9638 3500 | www.welchallyn.com.au
EASY GUIDE<br />
To The<br />
<strong>CP</strong> 200
Section 1: Know Your Way Around The <strong>CP</strong>200<br />
A. Back of the machine<br />
• AC power inlet<br />
• AC fuses<br />
• Equipotential stud<br />
B. Right side of machine<br />
• Com port B (for USB cable)<br />
• SD memory card slot<br />
• Spirometry port<br />
C. Left side of machine<br />
• Paper tray latch<br />
D. Front side of machine<br />
• Com port A ( for patient cable)<br />
E<br />
Turning the machine off and on.<br />
To turn the <strong>Electrocardiograph</strong> on press<br />
To turn the <strong>Electrocardiograph</strong> off press<br />
If the Power-Save is enabled, the electrocardiograph turns off au<strong>to</strong>matically after several idle<br />
minutes.<br />
To Keep the Battery Charged<br />
Whenever possible, leave the <strong>ECG</strong> machine connected <strong>to</strong> AC power. Battery charge status is<br />
indicated on the screen by the battery icon . When the battery gets low, the icon flashes.<br />
When the charge gets <strong>to</strong>o low <strong>to</strong> operate, a warning message appears and the <strong>ECG</strong> machine<br />
beeps every 15 seconds for 1 minute, then it tuns off.<br />
On full battery power, you can print up <strong>to</strong> 100 <strong>ECG</strong>’s continuously before needing <strong>to</strong> recharge.<br />
Clinical Support November 06 Propaq Information
F The keyboard<br />
A. On/Off<br />
B. Backspace<br />
C. Menu<br />
D. Help<br />
E. Navigation arrows: - To move through the menus<br />
F. Enter<br />
G. Space<br />
H. Shift: - Capitalises letters<br />
I. Tab: - Moves through the data-entry fields<br />
J. Green LED: - Lights up when <strong>ECG</strong> is connected <strong>to</strong> AC power<br />
Clinical Support November 06 Propaq Information
G. Soft keys and function Keys<br />
Soft key But<strong>to</strong>ns<br />
These but<strong>to</strong>ns activate the functions<br />
Displayed on the screen above them.<br />
FUNCTION KEYS<br />
Au<strong>to</strong> <strong>ECG</strong>: Begins an au<strong>to</strong> <strong>ECG</strong><br />
Spirometry: Begins spirometry tests<br />
Rhythm <strong>ECG</strong>: Begins rhythm <strong>ECG</strong><br />
S<strong>to</strong>p/Cancel: S<strong>to</strong>ps any current activity<br />
OK: Accepts data that you have entered or chooses a highlighted<br />
item.<br />
H Recording a Normal Au<strong>to</strong> <strong>ECG</strong><br />
1. Press the Au<strong>to</strong> <strong>ECG</strong> key quickly.<br />
2. Enter or search for patient data.<br />
• If searching for a patient, go <strong>to</strong> Scheduled Patients List screen and choose a patient from<br />
the scheduled patients list.<br />
Clinical Support November 06 Propaq Information
• If you are entering a new patient then fill in all the fields and press the Done on the soft<br />
key.<br />
3. Verify the quality of the <strong>ECG</strong> on the screen. Press the soft keys under the screen menu options <strong>to</strong><br />
adjust the waveforms.<br />
4. Press Print <strong>ECG</strong><br />
I. Recording a Stat Au<strong>to</strong> <strong>ECG</strong>.<br />
A stat au<strong>to</strong> <strong>ECG</strong> is an immediate prin<strong>to</strong>ut that does not require you <strong>to</strong> enter a patient’s data.<br />
A temporary ID number is assigned <strong>to</strong> the patient <strong>to</strong> identify stat tests .This number is found on the <strong>to</strong>p<br />
left hand side of the prin<strong>to</strong>ut. After printing, you may enter the patient data by editing the test.<br />
1. Press and HOLD the Au<strong>to</strong> <strong>ECG</strong> key<br />
2. Press the soft keys <strong>to</strong> adjust the waveforms<br />
The electrocardiograph begins requiring <strong>ECG</strong> data. After it has acquired 10 seconds of quality data, it<br />
prints a report.<br />
J. Recording a rhythm <strong>ECG</strong>.<br />
A rhythm <strong>ECG</strong> is a continuous, real-time prin<strong>to</strong>ut of a rhythm strip.<br />
Rhythm <strong>ECG</strong>s are prin<strong>to</strong>uts only. They cannot be saved or sent electronically.<br />
1. Press the Rhythm <strong>ECG</strong> key<br />
2. Printing will begin<br />
The screen displays 3 leads at a time from the leads currently printing: This can be set in the menus <strong>to</strong> 3,<br />
6 or 12 simultaneous waveforms.<br />
3. Press the soft keys <strong>to</strong> adjust the waveforms<br />
4. Press or <strong>to</strong> s<strong>to</strong>p printing.<br />
Clinical Support November 06 Propaq Information
K. Moving Through the Menus<br />
The main menu appears when you press the Menu key<br />
To move up and down a list use or on the navigation wheel.<br />
To open a standard menu use<br />
To perform an action<br />
To accept patient data use<br />
To move back through the menus use<br />
or zero key<br />
To mo ve through data-entry fields use<br />
To return <strong>to</strong> the <strong>ECG</strong> Previewscreen from a standard menu press<br />
Reviewing the device Configuration Settings (To change date and time)<br />
1. Press the Menu key<br />
2. Choose System Settings>Device Configuration.<br />
3. The Device Configuration Screen will appear<br />
Clinical Support November 06 Propaq Information
Scrolling through this menu allows you <strong>to</strong> change any of the desired settings.<br />
Whenever you want <strong>to</strong> get back <strong>to</strong> the main screen or are lost, press<br />
Getting Help<br />
The Help key<br />
can be pressed from the <strong>ECG</strong> previewscreen or Lead Off screen<br />
This but<strong>to</strong>ns allows you <strong>to</strong> print off information including:<br />
1. Au<strong>to</strong> <strong>ECG</strong> testing<br />
2. Rhythm <strong>ECG</strong> testing<br />
3. Troubleshooting<br />
4. Accessories<br />
5. What is an <strong>ECG</strong>?<br />
6. Menu Navigation<br />
7. Spirometry<br />
Scheduled Patient List<br />
The scheduled patient list identifies up <strong>to</strong> 40 patients whose data has been entered in<strong>to</strong> the <strong>ECG</strong>’s<br />
memory for an <strong>ECG</strong> test that day. At midnight every night, the list is au<strong>to</strong>matically cleared.<br />
When performing Au<strong>to</strong> <strong>ECG</strong> tests, you may select patients from this list rather than manually entering<br />
their data at the time of the test.<br />
To view, edit or add <strong>to</strong> the scheduled patient list 1. Press the Menu Key<br />
2. Choose Scheduled Patients<br />
Clinical Support November 06 Propaq Information
3. Press the desired soft keys: Add, Delete, Exit.<br />
Loading Thermal Chart Paper<br />
• Squeeze the latch, pull the paper door <strong>to</strong> the left<br />
• Remove the outer packaging, including the cardboard bot<strong>to</strong>m, from a new pack of paper.<br />
• Pull the <strong>to</strong>p sheet back so that the paper’s grid side faces up and the Welch Allyn name is on<br />
the bot<strong>to</strong>m of the paper.<br />
• Slide the paper in<strong>to</strong> the tray.<br />
• Lay the <strong>to</strong>p sheet cover over the paper door. Push the door <strong>to</strong> the right until it clicks.<br />
• The first page will be ejected. When an <strong>ECG</strong> has been performed the paper will move <strong>to</strong> the<br />
next perforation.<br />
Cleaning the <strong>CP</strong> 200<br />
• To prevent the spread of infection, the <strong>ECG</strong> and patient cable must be kept clean.<br />
• Do not let soap or water come in<strong>to</strong> contact <strong>with</strong> the <strong>ECG</strong> internal printer, connec<strong>to</strong>rs or jacks.<br />
• Do not use alcohol directly on the equipment or soak any components in alcohol.<br />
• Wipe the exterior of the patient cable and <strong>ECG</strong> <strong>with</strong> a damp cloth using a mild detergent diluted<br />
in water.<br />
• Use 70% isopropyl alcohol <strong>to</strong> disinfect patient cable, lead wires and equipment.<br />
• Dry all components <strong>with</strong> a clean, soft cloth or paper <strong>to</strong>wel.<br />
• Wait at least 10 minutes <strong>to</strong> allow all traces of alcohol <strong>to</strong> evaporate before turning the <strong>ECG</strong><br />
machine back on.<br />
Clinical Support November 06 Propaq Information
Welch Allyn <strong>CP</strong> 200 <strong>Electrocardiograph</strong><br />
Information and Tips for TROUBLEFREE <strong>ECG</strong> Prin<strong>to</strong>uts<br />
1. Whenever possible, take the time <strong>to</strong> prep the skin before applying gel electrodes.<br />
e.g. shave the area or use an alcohol wipe.<br />
2. All 12 lead diagnostic <strong>ECG</strong> machines require a minimum of 10 seconds <strong>to</strong> capture<br />
sufficient data.<br />
3. For a quality <strong>ECG</strong> prin<strong>to</strong>ut, wait 10 seconds AFTER attaching leads <strong>to</strong> the patient prior<br />
<strong>to</strong> holding down the <strong>ECG</strong> key. Any artifact caused by <strong>to</strong>uching the leads will then be<br />
eliminated from your acquired <strong>ECG</strong> prin<strong>to</strong>ut.<br />
4. What does the “waiting 10 seconds for quality data” message mean?<br />
This means that the machine has not yet had 10 seconds <strong>to</strong> acquire a full 12 lead <strong>ECG</strong>...<br />
simply wait a few more seconds and the machine will generate a prin<strong>to</strong>ut.<br />
If the quality message does not disappear <strong>with</strong>in 10 seconds…<br />
The machine is detecting that a lead is off or picking up excessive artifact. Check the<br />
contact between the leads and the patient. If you are unable <strong>to</strong> improve the quality due<br />
<strong>to</strong> clinical conditions, press the enter key <strong>to</strong> override the quality message and the <strong>ECG</strong><br />
will simply print out.<br />
5. Remember that holding down the <strong>ECG</strong> function key before all leads have been attached<br />
for 10 seconds may result in an incomplete or poor quality 12 lead <strong>ECG</strong> prin<strong>to</strong>ut.<br />
Welch Allyn Australia The Metro Centre, Unit 5, 38-46 South Street, Rydalmere NSW 2116<br />
Phone: 02 9638 3000 | Fax: 02 9638 3500 | www.welchallyn.com.au
AHA Diagnostic <strong>ECG</strong> Electrode Placement<br />
The quality of an <strong>ECG</strong> is dependent on the preparation and<br />
the resistance between the skin and the electrode. To ensure<br />
a good quality <strong>ECG</strong> and minimize the skin/electrode<br />
resistance, remember the following points:<br />
1.) Ensure that the patient is warm and relaxed<br />
2.) Shave electrode area before cleaning<br />
3.) Thoroughly clean the area <strong>with</strong> alcohol<br />
4.) Let dry prior <strong>to</strong> applying electrode<br />
Resting <strong>ECG</strong><br />
RA and LA electrodes should be placed on the wrists.<br />
RL and LL electrodes should be placed a few inches above the ankle.<br />
Lead<br />
V1<br />
V2<br />
V3<br />
V4<br />
V5<br />
V6<br />
Electrode Placement<br />
Fourth intercostal space at<br />
the right border of the sternum<br />
Fourth intercostal space at<br />
the left border of the sternum<br />
Midway between locations<br />
V2 and V4<br />
At the mid-clavicular line in<br />
the fifth intercostal space<br />
At the anterior axillary line on<br />
the same horizontal level as V4<br />
At the mid-axillary line on the<br />
same horizontal level as V4 and V5<br />
For service or technical support, please call<br />
(800) 535-6663. For supplies, please contact your<br />
authorized Welch Allyn distribu<strong>to</strong>r.<br />
Advancing Frontline Care <br />
71300-0000 Rev. A
<strong>CP</strong> 200 Spirometry Option<br />
<strong>Quick</strong> Reference<br />
Caution — consult accompanying documentation.<br />
To Record an FVC Test<br />
1. Connect spirometer <strong>to</strong> electrocardiograph.<br />
2. Press .<br />
3. Enter or search for patient data (age, height, gender, race).<br />
4. Select effort and curve types.<br />
5. Press Start. Perform effort. Press S<strong>to</strong>p.<br />
6. Accept or reject effort. Repeat from Step 4 until finished.<br />
7. Press Test Done.<br />
To Calibrate the Spirometer<br />
1. Connect spirometer <strong>to</strong> electrocardiograph.<br />
2. Press Menu key .<br />
3. Choose Spirometry Settings > Calibration Settings ><br />
Calibrate Spirometer.<br />
4. Enter transducer lot code and calibration code.<br />
5. Update ambient temperature, humidity, and barometric pressure.<br />
(See your local weather reports.)<br />
6. Follow prompts.<br />
To Configure the Spirometer<br />
1. Connect spirometer <strong>to</strong> electrocardiograph.<br />
2. Press Menu key .<br />
3. Choose Spirometry Settings.<br />
4. Change desired settings.<br />
800 535 6663, 315 685 4560 USA<br />
For worldwide Technical Support numbers, see spirometry manual.<br />
©2005 · Printed in USA · www.welchallyn.com · Mat: 703977 Rev: B
EASY GUIDE<br />
To SPIROMETRY<br />
With The<br />
<strong>CP</strong> 200
Clinical Support November 06 Propaq Information
CALIBRATION<br />
Calibration of the spirometer is recommended every day before testing. When opening a new package of<br />
flow transducer, verify the lot number on the package label .If this lot number differs from the lot number used<br />
during the most recent calibration, you must recalibrate the spirometer before resuming testing.<br />
1. Spirometer Calibration initial screen<br />
You can get <strong>to</strong> this screen in one of two ways.<br />
a) At a prompt<br />
Press<br />
when asked <strong>to</strong> Calibrate Now?<br />
This appears the first time you press the Spirometry key<br />
each day.<br />
b) Anytime<br />
Press the Menu key<br />
Spirometer.<br />
, then choose Spirometry Settings>Calibration Settings>Calibrate<br />
2. Fill in the relevant fields.<br />
• Transducer lot and “cal” codes appear on the transducer package<br />
• The syringe volume is always 3L<br />
• It is not necessary <strong>to</strong> update the temperature, humidity or pressure unless in extreme<br />
environmental conditions.<br />
Clinical Support November 06 Propaq Information
3. Press one of the desired soft keys<br />
• Verify Calibration<br />
To verify the accuracy of the system, however you must still simulate inhalation and exhalation <strong>with</strong> the<br />
calibration syringe.<br />
• Calibrate 1 Flow<br />
To calibrate the system using one inhale exhale cycle<br />
• Calibrate 3 Flows<br />
To calibrate the system using three inhale/exhale cycles at three different rates.<br />
The “attach flow transducer” prompt appears.<br />
4. Connect a new flow transducer <strong>to</strong> the pressure tubing<br />
5. Attach the flow transducer <strong>to</strong> the syringe’s port. Push the flow transducer all the way in for a tight seal.<br />
6. Pull the plunger all the way out.<br />
7. Press Continue<br />
8. Press Start<br />
9. When the blue bar begins <strong>to</strong> move, push the plunger all the way in, then pull it all the way out, carefully<br />
following the bar’s rate.<br />
Clinical Support November 06 Propaq Information
When no air has moved for three seconds, the following happens.<br />
For single flow calibrations: the results are displayed<br />
For multiple-flow calibrations: another simulated exhalation screen appears.<br />
It is recommended that poor calibration results are not accepted as spirometry tests may be inaccurate.<br />
Clinical Support November 06 Propaq Information
Performing a Spirometry Test<br />
1. Press .The first time this key is pressed each day, the prompt “Calibrate Now?”<br />
appears.<br />
2. “Enter New Patient” screen appears. Fill in all relevant data.(last name, patient ID h eight,<br />
gender, age and race are manda<strong>to</strong>ry and you will not be able <strong>to</strong> proceed if you have not<br />
entered data in these fields.)<br />
3. When finishing entering data, press the desired soft key:<br />
• Clear - deletes the patient data and returns <strong>to</strong> the Patient ID field.<br />
• Done- accepts the patient data and goes <strong>to</strong> the initial spirometry screen.<br />
4. Press Effort Type : Choices include-<br />
• FVC<br />
• FVC Post<br />
• SVC<br />
• SVC Post<br />
(FVC Post and SVC Post are available only if you have already accepted at least one pre-effort of the<br />
same type.)<br />
5. Press Curve as needed <strong>to</strong> select the curve type that you want <strong>to</strong> view whilst testing:<br />
• Flow/Volume<br />
• Volume/Time<br />
• Tidal Volume<br />
• Incentive<br />
6. When ready, press Start<br />
7. When finished, press S<strong>to</strong>p<br />
8. “Effort Complete Screen” will appear.<br />
Clinical Support November 06 Propaq Information
9. Review the data<br />
10. Press either:<br />
Accept Effort (pressing this key saves the effort)<br />
Reject Effort (pressing this key deletes the effort)<br />
11. If you want <strong>to</strong> perform another test, repeat steps 4-9<br />
12. If you are finished <strong>with</strong> this test, press Test Done.<br />
TO PRINT A TEST<br />
When you have completed the test and the Test Results screen appears, press the soft<br />
key Print Test.<br />
RECORDING A POST TEST<br />
• If there is no interruption between pre and post efforts the same screen continues <strong>to</strong><br />
display and you simply continue <strong>with</strong> the procedure.<br />
• If there is an interruption ( eg another patient has been tested or the machine has<br />
been turned off ) you need <strong>to</strong> recall the patient’s test-in-progress.<br />
• Pre and post tests must happen on the same day, <strong>with</strong> the same calibration. The next<br />
day or after calibration, tests become available for review only and you can not add<br />
efforts <strong>to</strong> them.<br />
TO RECALL A PATIENTS TEST<br />
When “Enter New Patient” appears press Search or Schedule on the soft keys and select<br />
a patient. Then press the desired soft keys.<br />
Clinical Support November 06 Propaq Information
Spirometry Effort Acceptability & Reproducibility<br />
An acceptable effort is defined as free from error and<br />
Inaccurate Results From Coughing<br />
Volume Time Curve Flow Volume Curve<br />
artifacts. A reproducible effort is defined as being<br />
<strong>with</strong>out excessive variability. Criteria for determining<br />
whether efforts are acceptable and reproducible are<br />
outlined below.<br />
Inaccurate Results From Glottis Closure<br />
Volume Time Curve<br />
Flow Volume Curve<br />
Normal Volume Time Curve<br />
Normal Flow Volume Curve<br />
Inaccurate Results From Early Termination<br />
Volume Time Curve<br />
Flow Volume Curve<br />
Flow volume curves exhibit a sharp initial peak flow close <strong>to</strong> the “Y” axis, then a<br />
relatively straight descent at 45° <strong>to</strong> the baseline. Volume time curves show an<br />
obvious plateau of at least 1 sec after 6 seconds of exhalation.<br />
Inaccurate Results From Leaks<br />
Volume Time Curve<br />
Flow Volume Curve<br />
Patient Preparation Patient Coaching<br />
We recommend that you practice the • Place the flow transducer in your<br />
procedure <strong>with</strong> the patient before<br />
mouth, on <strong>to</strong>p of your <strong>to</strong>ngue &<br />
starting the test, but first, you should<br />
between your teeth.<br />
prepare the patient for the procedure:<br />
Inaccurate Results From Variable Effort<br />
• Close lips and teeth around the flow<br />
• Patient may sit or stand.<br />
transducer <strong>to</strong> create a tight seal, like if<br />
Volume Time Curve<br />
Flow Volume Curve<br />
you were blowing in a musical<br />
• Patient should loosen tight clothing. instrument.<br />
• Patient should elevate chin and extend • Keep your chin slightly elevated and<br />
the neck slightly.<br />
make sure that your <strong>to</strong>ngue is out of<br />
the flow transducer.<br />
• Patient should use a nose clip or pinch<br />
his/her nostrils <strong>with</strong> fingers.<br />
• Take a good deep breath.<br />
Reproducibility Criteria<br />
• Now BLAST in<strong>to</strong> the flow transducer<br />
Inaccurate Results From Hesitation<br />
as hard, fast and completely as<br />
possible.<br />
Volume Time Curve<br />
Flow Volume Curve<br />
• Largest FVC should be <strong>with</strong>in 5%<br />
of the next largest FVC.<br />
• Keep blowing, squeeze all the air out.<br />
• Largest FEV1 should be <strong>with</strong>in 5% • S<strong>to</strong>p.<br />
of the next largest FEV1.<br />
• Must meet criteria for acceptability.<br />
Example of Non-Reproducible and Reproducible Spirometry Test<br />
Volume Time Curve<br />
Flow Volume Curve<br />
Volume Time Curve<br />
Flow Volume Curve<br />
Reproducible test<br />
This example shows a<br />
reproducible test <strong>with</strong> 3<br />
acceptable curves. The 3 FVC<br />
efforts are <strong>with</strong>in 5% of each<br />
other, which indicates that the<br />
patient inhaled completely<br />
before each expiration.<br />
Coughing<br />
Coughing during the first second<br />
may affect the FEV1. Both volume<br />
time and flow volume curves<br />
show dips instead of smoothly<br />
formed line.<br />
Glottis closure<br />
The flow of air is temporarily<br />
completely cut off. Both curves<br />
s<strong>to</strong>p abruptly. An artificial plateau<br />
is reached on volume time curves,<br />
<strong>with</strong> a bend where the effort<br />
s<strong>to</strong>pped.<br />
Early termination (< 6 sec)<br />
No obvious plateau is reached on<br />
volume time curves and the<br />
exhalation is less than 6 seconds.<br />
Flow volume curves show a low<br />
<strong>to</strong>tal volume <strong>with</strong> flow dropping<br />
sharply at the end of expiration.<br />
Air leak can happen around the<br />
flow transducer or from the nose.<br />
Volume time curves drop instead of<br />
reaching a plateau. Flow volume<br />
curves backtrack at the end.<br />
Variable effort<br />
The patient forced out the air at<br />
an inconsistent rate. Both curves<br />
show dips similar <strong>to</strong> those for a<br />
cough, making it difficult <strong>to</strong><br />
distinguish between the two<br />
conditions. Tracings are<br />
unacceptable if cough or variable<br />
effort occurred during the first<br />
second.<br />
Hesitation, False Start or<br />
Excessive Extrapolated Volume<br />
The patient did not exhale as<br />
forcefully as possible at the start<br />
of the effort. Volume time curves<br />
start slowly instead of climbing<br />
sharply. The peak of the flow<br />
volume curve is displaced <strong>to</strong> the<br />
right, away from the vertical axis.<br />
Non reproducible test<br />
This example shows a nonreproducible<br />
test <strong>with</strong> 3<br />
acceptable curves. Note the<br />
obvious variability in the FVC size<br />
of the curves, most likely due <strong>to</strong> an<br />
incomplete inhalation. Coach the<br />
subject <strong>to</strong> take a deeper breath in<br />
before performing the FVC<br />
maneuver.<br />
4341 State Street Road, P.O Box 220, Skaneateles Falls, New York 13153-0220 • www. welchallyn.com 703337 Rev. B
Spirometry Reference Chart<br />
START<br />
TERMINAL<br />
BRONCHIOLE<br />
CILIA<br />
GOOD FVC<br />
no<br />
REPEAT<br />
MANEUVER(S)<br />
LARYNX<br />
yes<br />
TRACHEA<br />
BEST OF 3?<br />
no<br />
yes<br />
RATIO<br />
ABNORMAL<br />
yes<br />
OBSTRUCTION<br />
no<br />
FVC NORMAL<br />
yes<br />
NORMAL<br />
SPIROMETRY<br />
no<br />
RESTRICTION<br />
LEFT MAIN<br />
BRONCHUS<br />
RIGHT MAIN<br />
BRONCHUS<br />
RIGHT<br />
UPPER LOBE<br />
LEFT UPPER LOBE<br />
FEV 1 ≥ 100%<br />
of Predicted?<br />
no<br />
yes<br />
May be a<br />
Physiological<br />
Variant<br />
Mild<br />
Restriction<br />
yes<br />
70% ≤ FVC < LLN<br />
of Predicted?<br />
no<br />
INTERLOBAR<br />
FISSURE<br />
RIGHT<br />
MIDDLE LOBE<br />
INTERLOBAR FISSURE<br />
LEFT LOWER LOBE<br />
70% ≤ FEV 1 < 100%<br />
of Predicted?<br />
no<br />
60% ≤ FEV 1 < 70%<br />
of Predicted?<br />
yes<br />
yes<br />
Mild<br />
Obstruction<br />
Moderate<br />
Obstruction<br />
Moderate<br />
Restriction<br />
Moderately<br />
Severe<br />
Restriction<br />
yes<br />
60% ≤ FVC < 70%<br />
of Predicted?<br />
no<br />
yes 50% ≤ FVC < 60%<br />
of Predicted?<br />
INTERLOBAR<br />
FISSURE<br />
RIGHT<br />
LOWER LOBE<br />
PULMONARY ARTERY<br />
no<br />
no<br />
50% ≤ FEV 1 < 60%<br />
of Predicted?<br />
yes<br />
Moderately<br />
Severe<br />
Obstruction<br />
Severe<br />
Restriction<br />
yes 34% ≤ FVC < 50%<br />
of Predicted?<br />
no<br />
no<br />
34% ≤ FEV 1 < 50%<br />
of Predicted?<br />
yes<br />
Severe<br />
Obstruction<br />
Very Severe<br />
Restriction<br />
yes<br />
FVC < 34%<br />
of Predicted?<br />
DIAPHRAGM<br />
no<br />
FEV 1 < 34%<br />
of Predicted?<br />
yes<br />
Very Severe<br />
Obstruction<br />
FVC Below 80% of predicted?<br />
yes<br />
PULMONARY VEIN<br />
ALVEOLAR DUCT<br />
TERMINAL<br />
BRONCHIOLE<br />
CAPILLARY<br />
And low vital capacity, cannot rule out superimposed restriction.<br />
ALVEOLUS<br />
This flowchart follows The American Thoracic Society Example For Interpretation.<br />
Typical Spirograms<br />
ranging from normal<br />
limits <strong>to</strong> severe<br />
restriction.<br />
Normal Spirometry<br />
Note the sharp initial peak flow, then<br />
relatively straight descent at about 45<br />
degrees <strong>to</strong> the baseline. All of the<br />
parameters are <strong>with</strong>in normal limits.<br />
Mild Obstruction<br />
The FEV1/FVC% predicted is abnormal<br />
(79%), indicating obstruction. The severity<br />
of the obstruction is mild as judged<br />
by the FEV1, which is 62% of the<br />
predicted. Mild obstruction occurs<br />
gradually over many years.<br />
Moderate Obstruction<br />
The FEV1/FVC% predicted is abnormal,<br />
indicating obstruction. The FEV1 %<br />
predictive is 63% indicating the<br />
obstruction is moderate in severity. Note<br />
the concave shape of the flow volume<br />
curve <strong>with</strong> low flows after the initial<br />
sharp peak flow.<br />
Severe Obstruction<br />
Severe obstruction <strong>with</strong> a low vital<br />
capacity. All of the parameters are<br />
abnormally low. The low FEV1/ FVC%<br />
indicates obstruction, and the FEV1 of<br />
only 28% of normals shows that the<br />
obstruction is severe. A superimposed<br />
restriction may also be present since the<br />
FVC is abnormally low (46%).<br />
Severe Restriction<br />
FEV1/FVC% prediction of 101% is normal,<br />
so obstruction does not exist. The FVC<br />
however is only 41% of normal, indicating<br />
severe restriction. FEV1 is also decreased<br />
44% but <strong>to</strong> a lesser degree than the FVC in<br />
restrictive disorders. Note the sharp peak<br />
and rapid, straight, and steep decline of<br />
the flow volume curve.<br />
Typical Spirogram curve for normal,<br />
obstruction and restriction patterns<br />
Flow (L/sec)<br />
12<br />
10<br />
8<br />
6<br />
4<br />
2<br />
Normal<br />
Obstruction<br />
Restriction<br />
0<br />
0 1 2 3 4 5 6<br />
Volume (L)<br />
For your protection, all of Welch Allyn<br />
Spirometers use disposable flow<br />
transducers that minimize the risk<br />
Pat-Name: LECKY-CATHERINE CARMEN A GASPERO MD<br />
Pat-Number: 0258974632 06-21-01 18:21<br />
Age: 67 year Height: 70 ins Ethnic: C<br />
Gender: F Weight: 131 lbs Smoker: N<br />
Normals: NHANES III<br />
Diagnosis: RESULTS APPEAR NORMAL ATS criteria met<br />
UNCONFIRMED REPORT<br />
PREDMEAS1%PRED MEAS1MEAS2 MEAS3<br />
FVC 1 3.69 2.94 80 2.94 2.89 2.78<br />
FEV1 1 2.80 2.22 80 2.22 2.23 2.19<br />
FEV1/FVC % 76.0 75.5 99 75.5 77.1 78.5<br />
FEV3/FVC % 90.6 96.1 106 96.1 97.8 98.1<br />
FEF.2-1.2 1/s 5.21 4.10 79 4.10 4.00 3.91<br />
FEF25-75% 1/s 2.54 1.76 69 1.76 1.86 1.89<br />
FEF75-85% 1/s 0.66 0.56 85 0.56 0.54 0.62<br />
PEF 1/min 375 313 83 313 307 310<br />
FEF25% 1/s 5.70 4.67 82 4.67 4.50 4.27<br />
FEF50% 1/s 3.44 2.31 67 2.31 2.24 2.21<br />
FEF75% 1/s 1.09 0.65 60 0.65 0.80 0.83<br />
FIVC 1 3.11 3.11 3.26 3.38<br />
FIV1 1 3.01 3.01 2.95 3.07<br />
FIV1/FIVC % 96.7 96.7 90.4 90.7<br />
PIF 1/s 4.78 4.78 5.01 4.82<br />
FIF50% 1/s 4.75 4.75 4.98 4.82<br />
Flow=f (V)<br />
Pat-Name:EVANGELISTA-NORMAN JAE C CHANG MD<br />
Pat-Number: 0258975912 06-05-01 21:57<br />
Age: 86 year Height: 71 ins Ethnic: C<br />
Gender: M Weight: 202 lbs Smoker: N<br />
Normals: NHANES III<br />
Diagnosis: MILD OBSTRUCTION<br />
ATS criteria met<br />
MILD RESTRICTION<br />
MAYBE POOR INITIAL EFFORT<br />
UNCONFIRMED REPORT<br />
PRED MEAS1 %PRED MEAS1 MEAS2 MEAS3<br />
FVC 1 3.77 2.48 66 2.48 2.34 2.34<br />
FEV1 1 2.85 1.49 62 1.49 1.55 1.37<br />
FEV1/FVC % 75.9 59.9 79 59.9 66.2 58.7<br />
FEV3/FVC % 88.3 90.1 102 90.1 89.1 89.7<br />
FEF.2-1.2 1/S 1.74 1.74 2.03 1.43<br />
FEF25-75% 1/S 3.59 0.96 27 0.96 0.89 0.89<br />
FEF75-85% 1/S 0.32 0.32 0.25 0.30<br />
PEF 1/min 477 128 27 128 217 117<br />
FEF25% 1/S 7.24 1.97 27 1.97 2.39 1.77<br />
FEF50% 1/S 5.76 1.03 18 1.03 1.23 0.99<br />
FEF75% 1/S 2.76 0.45 16 0.45 0.36 0.43<br />
FIVC 1 2.55 2.55 2.13 3.12<br />
FIV1 1 1.39 1.39 1.20 1.72<br />
FIV1/FIVC % 54.7 54.7 56.3 55.1<br />
PIF 1/S 1.61 1.61 1.42 1.95<br />
FIF50% 1/S 1.40 1.40 1.35 1.81<br />
Flow=f (V)<br />
Pat-Name: HEART-JULIETTE<br />
PETER J ALAU MD<br />
Pat-Number: 0258972445 03-15-01 16:12<br />
Age: 51 year Height: 60 ins Ethnic: C<br />
Gender: F Weight: 120 lbs Smoker: N<br />
Normals: NHANES III<br />
Diagnosis: MODERATE OBSTRUCTION ATS criteria not met<br />
MAYBE POOR INITIAL EFFORT<br />
UNCONFIRMED REPORT<br />
PRED MEAS1 %PRED MEAS1 MEAS2 MEAS3<br />
FVC 1 3.69 3.87 105 3.87 3.05 2.79<br />
FEV1 1 2.80 1.77 63 1.77 2.32 2.14<br />
FEV1/FVC % 76.0 45.6 60 46.6 75.9 76.7<br />
FEV3/FVC % 90.6 57.2 63 57.2 95.2 96.8<br />
FEF.2-1.2 1/S 5.21 2.85 55 2.85 4.44 3.51<br />
FEF25-75% 1/S 2.54 0.24 9 0.24 1.84 1.77<br />
FEF75-85% 1/S 0.66 1.40 211 1.40 0.48 0.53<br />
PEF 1/min 375 194 52 194 341 286<br />
FEF25% 1/S 5.70 2.67 47 2.67 4.70 3.82<br />
FEF50% 1/S 3.44 0.32 9 0.32 2.23 1.95<br />
FEF75% 1/S 1.09 1.86 170 1.86 0.72 0.78<br />
FIVC 1 3.85 3.17 3.35<br />
FIV1 1 3.40 3.05 3.00<br />
FIV1/FIVC % 88.3 96.1 89.8<br />
PIF 1/S 4.70 4.62 4.43<br />
FIF50% 1/S 4.47 4.45 4.42<br />
Flow=f (V)<br />
Pat-Name: O’BRIAN-DAVID<br />
JOHN P HEYWOOD MD<br />
Pat-Number: 0258974632 05-07-01 14:37<br />
Age: 56 year Height: 66 ins Ethnic: C<br />
Gender: M Weight: 149 lbs Smoker: N<br />
Normals: NHANES III<br />
Diagnosis: SEVERE OBSTRUCTION ATS criteria met (PRE)<br />
MAYBE AIR TRAPPING PRESENT ATS criteria met (POST)<br />
MAYBE POOR INITIAL EFFORT<br />
MARKED IMPROVED<br />
UNCONFIRMED REPORT<br />
PRE<br />
POST<br />
PRED MEAS1 %PRED MEAS1 %PRED %CH<br />
FVC 1 3.96 1.83 46 2.48 63 35<br />
FEV1 1 3.14 0.89 28 1.22 39 38<br />
FEV1/FVC % 81.9 48.4 59 49.3 60 2<br />
FEV3/FVC % 94.2 81.8 87 77.9 83 -5<br />
FEF.2-1.2 1/S 0.58 1.11 91<br />
FEF25-75% 1/S 4.10 0.42 10 0.51 12 20<br />
FEF75-85% 1/S 0.22 0.21 -5<br />
PEF 1/min 478 157 33 207 43 32<br />
FEF25% 1/S 7.35 0.89 12 1.39 19 56<br />
FEF50% 1/S 5.40 0.48 9 0.59 11 23<br />
FEF75% 1/S 2.62 0.26 10 0.26 10 0<br />
FIVC 1 2.11 2.69 28<br />
FIV1 1 2.10 2.51 19<br />
FIV1/FIVC % 99.5 93.2 -6<br />
PIF 1/S 3.65 3.70 1<br />
FIF50% 1/S 3.64 3.65 0<br />
Flow=f (V)<br />
Pat-Name: MEYRS-STEVEN DENISE R MADRICK MD<br />
Pat-Number: 0258970824 07-22-01 18:36<br />
Age: 81 year Height: 74 ins Ethnic: C<br />
Gender: M Weight: 201 lbs Smoker: N<br />
Normals: NHANES III<br />
Diagnosis: SEVERE RESTRICTION<br />
ATS criteria met<br />
PRED MEAS1 %PRED MEAS1 MEAS2 MEAS3<br />
FVC 1 4.89 2.01 41 2.01 1.81 1.65<br />
FEV1 1 3.62 1.58 44 1.58 1.53 1.44<br />
FEV1/FVC % 78.2 78.8 101 78.8 84.6 87.3<br />
FEV3/FVC % 88.6 99.0 112 99.0<br />
FEF.2-1.2 1/S 6.27 2.46 39 2.46 2.45 2.09<br />
FEF25-75% 1/S 3.43 1.53 45 1.53 1.68 1.74<br />
FEF75-85% 1/S 0.31 0.34 110 0.34 0.46 0.50<br />
PEF 1/min 531 171 32 171 285 256<br />
FEF25% 1/S 7.77 2.71 35 2.71 4.55 4.22<br />
FEF50% 1/S 4.48 2.43 54 2.43 2.08 2.02<br />
FEF75% 1/S 1.48 0.51 35 0.51 0.65 0.73<br />
FIVC 1 2.08 2.08 2.45 1.80<br />
FIV1 1 0.55 0.55 1.94 1.77<br />
FIV1/FIVC % 26.3 26.3 79.1 98.6<br />
PIF 1/S 1.89 1.89 2.85 2.82<br />
FIF50% 1/S 1.82 1.82 2.84 2.80<br />
Flow=f (V)<br />
of cross contamination.<br />
6<br />
6<br />
6<br />
6<br />
6<br />
4<br />
4<br />
4<br />
4<br />
4<br />
Welch Allyn<br />
2<br />
2<br />
2<br />
2<br />
2<br />
4341 State Street Road<br />
PO Box 220<br />
Skaneateles Falls, NY 13153-0220<br />
0<br />
-2<br />
1 2 3 4 5<br />
0<br />
-2<br />
1 2 3 4 5<br />
0<br />
-2<br />
1 2 3 4 5<br />
0<br />
-2<br />
1 2 3 4 5<br />
0<br />
-2<br />
1 2 3 4 5<br />
www.welchallyn.com<br />
-4<br />
-4<br />
-4<br />
-4<br />
-4<br />
-6<br />
-6<br />
-6<br />
-6<br />
-6<br />
Calib. : 03-15-01<br />
Welch Allyn<br />
Calib. : 03-15-01<br />
Welch Allyn<br />
Calib. : 03-15-01<br />
Welch Allyn<br />
Calib. : 03-15-01<br />
Welch Allyn<br />
Calib. : 03-15-01<br />
Welch Allyn<br />
Advancing Frontline Care <br />
71038-3000 Rev. B