Non Invasive Blood Pressure - Living on the EDge
Non Invasive Blood Pressure - Living on the EDge
Non Invasive Blood Pressure - Living on the EDge

Create successful ePaper yourself
Turn your PDF publications into a flip-book with our unique Google optimized e-Paper software.
A<br />
B<br />
C<br />
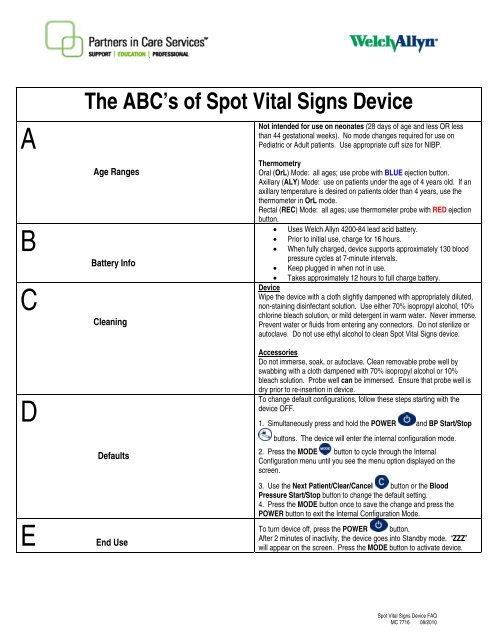
The ABC’s of Spot Vital Signs Device<br />
Age Ranges<br />
Battery Info<br />
Cleaning<br />
Not intended for use <strong>on</strong> ne<strong>on</strong>ates (28 days of age and less OR less<br />
than 44 gestati<strong>on</strong>al weeks). No mode changes required for use <strong>on</strong><br />
Pediatric or Adult patients. Use appropriate cuff size for NIBP.<br />
Thermometry<br />
Oral (OrL) Mode: all ages; use probe with BLUE ejecti<strong>on</strong> butt<strong>on</strong>.<br />
Axillary (ALY) Mode: use <strong>on</strong> patients under <strong>the</strong> age of 4 years old. If an<br />
axillary temperature is desired <strong>on</strong> patients older than 4 years, use <strong>the</strong><br />
<strong>the</strong>rmometer in OrL mode.<br />
Rectal (REC) Mode: all ages; use <strong>the</strong>rmometer probe with RED ejecti<strong>on</strong><br />
butt<strong>on</strong>.<br />
• Uses Welch Allyn 4200-84 lead acid battery.<br />
• Prior to initial use, charge for 16 hours.<br />
• When fully charged, device supports approximately 130 blood<br />
pressure cycles at 7-minute intervals.<br />
• Keep plugged in when not in use.<br />
• Takes approximately 12 hours to full charge battery.<br />
Device<br />
Wipe <strong>the</strong> device with a cloth slightly dampened with appropriately diluted,<br />
n<strong>on</strong>-staining disinfectant soluti<strong>on</strong>. Use ei<strong>the</strong>r 70% isopropyl alcohol, 10%<br />
chlorine bleach soluti<strong>on</strong>, or mild detergent in warm water. Never immerse.<br />
Prevent water or fluids from entering any c<strong>on</strong>nectors. Do not sterilize or<br />
autoclave. Do not use ethyl alcohol to clean Spot Vital Signs device.<br />
D<br />
E<br />
Defaults<br />
End Use<br />
Accessories<br />
Do not immerse, soak, or autoclave. Clean removable probe well by<br />
swabbing with a cloth dampened with 70% isopropyl alcohol or 10%<br />
bleach soluti<strong>on</strong>. Probe well can be immersed. Ensure that probe well is<br />
dry prior to re-inserti<strong>on</strong> in device.<br />
To change default c<strong>on</strong>figurati<strong>on</strong>s, follow <strong>the</strong>se steps starting with <strong>the</strong><br />
device OFF.<br />
1. Simultaneously press and hold <strong>the</strong> POWER and BP Start/Stop<br />
butt<strong>on</strong>s. The device will enter <strong>the</strong> internal c<strong>on</strong>figurati<strong>on</strong> mode.<br />
2. Press <strong>the</strong> MODE butt<strong>on</strong> to cycle through <strong>the</strong> Internal<br />
C<strong>on</strong>figurati<strong>on</strong> menu until you see <strong>the</strong> menu opti<strong>on</strong> displayed <strong>on</strong> <strong>the</strong><br />
screen.<br />
3. Use <strong>the</strong> Next Patient/Clear/Cancel butt<strong>on</strong> or <strong>the</strong> <str<strong>on</strong>g>Blood</str<strong>on</strong>g><br />
<str<strong>on</strong>g>Pressure</str<strong>on</strong>g> Start/Stop butt<strong>on</strong> to change <strong>the</strong> default setting.<br />
4. Press <strong>the</strong> MODE butt<strong>on</strong> <strong>on</strong>ce to save <strong>the</strong> change and press <strong>the</strong><br />
POWER butt<strong>on</strong> to exit <strong>the</strong> Internal C<strong>on</strong>figurati<strong>on</strong> Mode.<br />
To turn device off, press <strong>the</strong> POWER butt<strong>on</strong>.<br />
After 2 minutes of inactivity, <strong>the</strong> device goes into Standby mode. “ZZZ”<br />
will appear <strong>on</strong> <strong>the</strong> screen. Press <strong>the</strong> MODE butt<strong>on</strong> to activate device.<br />
Spot Vital Signs Device FAQ<br />
MC 7716 08/2010
Spot Vital Signs ® Train <strong>the</strong> Trainer Outline<br />
A. Light weight and durable<br />
1. Weighs approximately 4 lbs<br />
2. Made of heavy plastic<br />
3. Easy-carry rear handle makes portability simple<br />
B. Sealed Lead Acid Battery<br />
1. Initially up<strong>on</strong> receiving <strong>the</strong> device, charge <strong>the</strong> battery for 16 hrs or until <strong>the</strong> charging ic<strong>on</strong> no<br />
l<strong>on</strong>ger flashes<br />
2. Fully charged battery supports approximately 150 blood pressure cycles<br />
3. The Spot Vital Signs ® device should be charging when it is not in use<br />
4. It takes approximately 12 hours to fully charge <strong>the</strong> battery<br />
C. Spot Vital Signs Device Intended Use and C<strong>on</strong>figurati<strong>on</strong> Opti<strong>on</strong>s<br />
The Spot Vital Signs Device is intended to be used <strong>on</strong> patients 29 days and older, to obtain:<br />
1. NIBP (systolic & diastolic display)<br />
2. Pulse<br />
3. MAP<br />
4. SpO2 (opti<strong>on</strong>al)<br />
5. Temperature (opti<strong>on</strong>al)<br />
D. Fr<strong>on</strong>t Panel Butt<strong>on</strong>s and Functi<strong>on</strong>s<br />
1. Power: turns m<strong>on</strong>itor On or Off<br />
2. Start/Stop <str<strong>on</strong>g>Blood</str<strong>on</strong>g> <str<strong>on</strong>g>Pressure</str<strong>on</strong>g>: initiates or cancels a blood pressure cycle<br />
3. Next Patient/Clear:<br />
a. While <strong>the</strong> display is active, clears <strong>the</strong> screen<br />
b. While device is in Standby Mode, recalls <strong>the</strong> last patient informati<strong>on</strong><br />
4. mmHg: allows user to change initial NIBP inflati<strong>on</strong> pressure preset<br />
5. Mode:<br />
a. While device is active turns On/Off <strong>the</strong> backlight<br />
b. While device is in Standby Mode, recalls <strong>the</strong> last patient informati<strong>on</strong><br />
c. With temperature probe removed from probe holder, pressing Mode switches<br />
temperature from Oral to Axillary<br />
6. Print: (<strong>on</strong> older versi<strong>on</strong>s; no l<strong>on</strong>ger available for sale) initiates a printout<br />
E. Initial Startup<br />
1. To turn <strong>the</strong> device ON , press <strong>the</strong> power butt<strong>on</strong><br />
2. Standby Mode<br />
a. When <strong>the</strong> device is powered up but has not been used for 2 minutes, it will go into<br />
Standby Mode. “ZZZ” appears <strong>on</strong> <strong>the</strong> display with no backlight, which saves battery power<br />
b. To bring <strong>the</strong> device out of Standby Mode press Mode<br />
1<br />
Spot Outline<br />
SM2901 08/2010
3. Before taking a NIBP measurement, always perform <strong>the</strong> following:<br />
a. Select appropriate cuff. The cuff is <strong>the</strong> appropriate size when <strong>the</strong> artery index<br />
marker lies between <strong>the</strong> range markings <strong>on</strong> <strong>the</strong> NIBP cuff<br />
b. Positi<strong>on</strong> <strong>the</strong> cuff <strong>on</strong> a bare arm, midway between <strong>the</strong> shoulder and <strong>the</strong> elbow, with <strong>the</strong> artery<br />
index marker over <strong>the</strong> brachial artery. It should fit comfortably to allow <strong>on</strong>e to two finger<br />
spaces between <strong>the</strong> cuff and <strong>the</strong> arm. The cuffed upper arm should rest at heart level during<br />
<strong>the</strong> measurement and <strong>the</strong> patient should remain quiet and have no movement to <strong>the</strong> arm<br />
NOTE: If <strong>the</strong> cuff is not level with <strong>the</strong> heart, subtract 1.8 mmHg to <strong>the</strong> displayed reading for<br />
each inch of elevati<strong>on</strong> above <strong>the</strong> heart, or add 1.8 mmHg from <strong>the</strong> displayed<br />
reading for each inch arm is below <strong>the</strong> heart.<br />
F. To start a NIBP cycle<br />
1. Press Start/Stop butt<strong>on</strong> . The cuff inflates to 160 mmHg as a factory default.<br />
2. The blood pressure reading is displayed for 2 minutes, <strong>the</strong>n disappears. Press Mode to recall<br />
<strong>the</strong> last reading<br />
3. To change <strong>the</strong> NIBP pressure preset factory default settings, follow <strong>the</strong>se steps:<br />
a. Press mmHg for half sec<strong>on</strong>d<br />
b. Keep pressing mmHg to scroll <strong>the</strong> target NIBP inflati<strong>on</strong> pressure opti<strong>on</strong>s<br />
(160 mmHg, 140 mmHg, 120 mmHg, 200 mmHg, 180 mmHg)<br />
c. Once target inflati<strong>on</strong> pressure is displayed, press Start/Stop butt<strong>on</strong><br />
d. Target inflati<strong>on</strong> pressure returns to Internal C<strong>on</strong>figurati<strong>on</strong> setting (Factory default is 160<br />
mmHg) after blood pressure reading has been obtained or device is turned off<br />
G. Pulse<br />
1. Pulse rate readings are measured from SpO 2 . If SpO2 is not available pulse rate will be<br />
measured from <strong>the</strong> NIBP reading<br />
H. MAP<br />
1. MAP can be turned <strong>on</strong> or off by entering <strong>the</strong> internal c<strong>on</strong>figurati<strong>on</strong> mode<br />
a. Turn <strong>the</strong> Spot device Off<br />
b. Press both POWER and START/STOP simultaneously. The device will power <strong>on</strong><br />
in <strong>the</strong> internal c<strong>on</strong>figurati<strong>on</strong> mode<br />
c. Press Mode butt<strong>on</strong> to cycle through <strong>the</strong> menu to <strong>the</strong> MAP opti<strong>on</strong> screen<br />
d. Press START/ STOP or NEXT PATIENT/ CLEAR butt<strong>on</strong> to turn MAP On or Off<br />
e. When <strong>the</strong> desired functi<strong>on</strong>ality is displayed, turn <strong>the</strong> device off.<br />
I. Sp0 2 ( if applicable)<br />
1. Insert <strong>the</strong> patient’s index finger completely into <strong>the</strong> sensor. The thumb is not<br />
recommended for use with <strong>the</strong> finger clip sensor. NOTE: If blood pressure<br />
measurement is occurring simultaneously, ensure that <strong>the</strong> finger clip sensor is attached<br />
to <strong>the</strong> limb opposite <strong>the</strong> limb with <strong>the</strong> B/P cuff<br />
2. The pulse signal bar illuminates indicating <strong>the</strong> relative strength and quality of <strong>the</strong> patient’s<br />
pulses at <strong>the</strong> sensor site<br />
2<br />
Spot Outline<br />
SM2901 08/2010
1. The sensor takes approximately 10 sec<strong>on</strong>ds to determine initial SpO 2 value and updates <strong>the</strong><br />
reading every sec<strong>on</strong>d. The Spot Vital Signs device will display <strong>the</strong> SpO 2 c<strong>on</strong>tinuously for up to<br />
10 minutes. After 10 minutes <strong>the</strong> device displays an error code.<br />
J. Temperature (if applicable)<br />
1. The Spot Vital Signs device can be used to take oral temperatures in approximately 4 sec<strong>on</strong>ds,<br />
axillary temperatures in approximately15 sec<strong>on</strong>ds, and rectal temperatures in approximately 10<br />
sec<strong>on</strong>ds<br />
2. The Spot Vital Sign device can display temperature in degrees Fahrenheit (°F) or<br />
Celsius (°C). To determine <strong>the</strong> current temperature scale, remove <strong>the</strong> temperature probe from<br />
its holder and view °F or °C <strong>on</strong> <strong>the</strong> display<br />
3. To change <strong>the</strong> display from °F to °C you must enter <strong>the</strong> c<strong>on</strong>figurati<strong>on</strong> mode.<br />
a. Turn <strong>the</strong> Spot Vital Signs device Off<br />
b. Press <strong>the</strong> POWER and <strong>the</strong> START/STOP butt<strong>on</strong> simultaneously. The device will power <strong>on</strong><br />
in <strong>the</strong> internal c<strong>on</strong>figurati<strong>on</strong> mode<br />
c. Press Mode butt<strong>on</strong> to cycle through <strong>the</strong> menu to <strong>the</strong> Temperature opti<strong>on</strong> screen<br />
d. The first opti<strong>on</strong> illuminated <strong>on</strong> <strong>the</strong> temperature display is °F; press NEXT<br />
PATIENT/CLEAR butt<strong>on</strong> to illuminate<br />
e. When <strong>the</strong> desired temperature scale is selected, turn <strong>the</strong> device Off<br />
f. When <strong>the</strong> device is turned <strong>on</strong> again, <strong>the</strong> new temperature scale is <strong>the</strong> default<br />
1. Taking an Oral Temperature<br />
a. Ensure that <strong>the</strong> probe with <strong>the</strong> BLUE ejecti<strong>on</strong> butt<strong>on</strong> is c<strong>on</strong>nected to <strong>the</strong> device<br />
b. Remove <strong>the</strong> probe from <strong>the</strong> probe well. A short self test is initiated and <strong>the</strong> screen<br />
will display “OrL”<br />
c. Once <strong>the</strong> “OrL” is displayed load a probe cover <strong>on</strong>to <strong>the</strong> probe by holding <strong>the</strong> probe collar<br />
with <strong>the</strong> thumb and forefinger<br />
d. Place <strong>the</strong> probe deep into <strong>the</strong> patient’s sublingual pocket<br />
e. Hold <strong>the</strong> probe in place maintaining tissue c<strong>on</strong>tact until <strong>the</strong> temperature is complete.<br />
Instruct <strong>the</strong> patient not to talk or move during <strong>the</strong> temperature reading process<br />
f. When <strong>the</strong> final temperature is reached, a beep sounds and <strong>the</strong> temperature is<br />
displayed. It will remain <strong>on</strong> <strong>the</strong> screen for 2 minutes<br />
g. After <strong>the</strong> temperature measurement is complete, remove <strong>the</strong> probe from <strong>the</strong> patient’s<br />
mouth and remove <strong>the</strong> probe cover by firmly pressing <strong>on</strong> <strong>the</strong> ejecti<strong>on</strong> butt<strong>on</strong> <strong>on</strong> <strong>the</strong><br />
probe. NOTE: Do not re-use probe covers.<br />
3<br />
Spot Outline<br />
SM2901 08/2010
5. Taking an Axillary Temperature<br />
NOTE: Normal mode axillary temperatures are FDA approved for children under <strong>the</strong> age of 4<br />
years. If an axillary reading is desired for a patient 4 years and older, use <strong>the</strong> oral probe in<br />
M<strong>on</strong>itor mode.<br />
a. Ensure that <strong>the</strong> probe with <strong>the</strong> BLUE ejecti<strong>on</strong> butt<strong>on</strong> is c<strong>on</strong>nected to <strong>the</strong> unit.<br />
b. Remove <strong>the</strong> probe from <strong>the</strong> probe well. A short self test is initiated and <strong>the</strong> screen<br />
will display “OrL”<br />
c. Press MODE to change display from “OrL’ to “ALY” for an axillary temperature<br />
d. Load a probe cover <strong>on</strong>to <strong>the</strong> probe<br />
e. Avoid folds in <strong>the</strong> axilla and place probe tip vertically as high as you can as shown. TIP:<br />
Align <strong>the</strong> probe vertically with <strong>the</strong> spine<br />
f. Place <strong>the</strong> arm at <strong>the</strong> patient’s side. Hold in this positi<strong>on</strong> without movement of <strong>the</strong> arm or<br />
probe during <strong>the</strong> measurement cycle<br />
g. When <strong>the</strong> final temperature is reached, a beep sounds and <strong>the</strong> temperature is displayed. It<br />
will remain <strong>on</strong> <strong>the</strong> screen for 2 minutes<br />
h. To take an axillary temperature in m<strong>on</strong>itor mode, follow steps 5a through 5g plus:<br />
i. Leave <strong>the</strong> probe in place and press <strong>the</strong> Mode butt<strong>on</strong>. An “M” appears <strong>on</strong><br />
<strong>the</strong> temperature display to indicate M<strong>on</strong>itor mode<br />
ii. Maintain probe tissue c<strong>on</strong>tact for at least 5 minutes<br />
iii. Record <strong>the</strong> m<strong>on</strong>itor mode temperature before placing <strong>the</strong> probe back in<br />
<strong>the</strong> probe holder. The Spot Vital Signs device does not save <strong>the</strong><br />
M<strong>on</strong>itor mode temperature<br />
6. Taking a Rectal Temperature<br />
a. Ensure that <strong>the</strong> rectal probe with <strong>the</strong> RED ejecti<strong>on</strong> butt<strong>on</strong> is c<strong>on</strong>nected to <strong>the</strong> Spot Vital<br />
Signs device<br />
b. Remove <strong>the</strong> probe from <strong>the</strong> probe well. A short self test is initiated and <strong>the</strong> screen will<br />
display “Rec” indicating <strong>the</strong> rectal probe in use<br />
c. Once “Rec” is displayed, load <strong>the</strong> probe cover <strong>on</strong>to <strong>the</strong> probe by holding <strong>the</strong> probe collar<br />
with <strong>the</strong> thumb and forefinger. Apply lubricant if desired<br />
d. Separate <strong>the</strong> buttocks and gently insert <strong>the</strong> probe into <strong>the</strong> rectum ONLY 1.5 cm<br />
(5/8 of an inch for adults), and LESS for infants and children<br />
e. Hold <strong>the</strong> probe in place for <strong>the</strong> entire temperature. This should take approximately<br />
10 sec<strong>on</strong>ds for a reading<br />
f. After <strong>the</strong> temperature process is finished, eject <strong>the</strong> probe cover and dispose of properly<br />
4<br />
Spot Outline<br />
SM2901 08/2010
7. M<strong>on</strong>itor Mode Temperatures<br />
a. May be taken in Oral, Axillary, or Rectal routes by <strong>the</strong> following <strong>the</strong> steps discussed in<br />
Secti<strong>on</strong> J, 5h<br />
b. To obtain accurate M<strong>on</strong>itor mode temperatures, you must maintain probe c<strong>on</strong>tact with tissue<br />
at <strong>the</strong> various sites as listed:<br />
i. Oral: 3 minutes<br />
ii. Axillary: 5 minutes<br />
iii. Rectal: 3 minutes<br />
K. Error Codes<br />
1. Refer to <strong>the</strong> Directi<strong>on</strong>s for Use for a list of possible Error Codes which provides a descripti<strong>on</strong><br />
and probable cause of each.<br />
L. Cleaning<br />
1. Clean <strong>the</strong> Spot Vital Signs with a cloth slightly dampened with warm water and a mild detergent<br />
soluti<strong>on</strong>. Never immerse <strong>the</strong> device in any type of fluid. O<strong>the</strong>r soluti<strong>on</strong>s that can be used are:<br />
a. a diluted n<strong>on</strong>-staining disinfectant<br />
b. 70% isopropyl alcohol<br />
c. 10% chlorine bleach soluti<strong>on</strong><br />
d. mild detergent in water<br />
5<br />
Spot Outline<br />
SM2901 08/2010
A<br />
The ABC’s of Spot LXi Vital Signs Device<br />
NIBP not for use <strong>on</strong> ne<strong>on</strong>ates (less than 28 days of age or 44 weeks gestati<strong>on</strong>al age).<br />
Thermometry<br />
Oral Mode: all ages; use probe with BLUE ejecti<strong>on</strong> butt<strong>on</strong> and probe well<br />
Age Ranges<br />
Adult Axillary Mode: patients age 18 years and older; use probe with BLUE<br />
ejecti<strong>on</strong> butt<strong>on</strong> and probe well<br />
Pediatric Axillary Mode: patients age 17 years and younger; use probe with<br />
BLUE ejecti<strong>on</strong> butt<strong>on</strong> and probe well<br />
Rectal Mode: all ages; use probe with RED ejecti<strong>on</strong> butt<strong>on</strong> and probe well<br />
B<br />
C<br />
D<br />
Battery Info<br />
Cleaning<br />
Defaults<br />
Tympanic <strong>the</strong>rmometer (if applicable): appropriate for use <strong>on</strong> all ages<br />
Uses a sealed lead-acid battery.<br />
Battery must be c<strong>on</strong>nected up<strong>on</strong> initial receipt per instructi<strong>on</strong>s <strong>on</strong> battery door.<br />
Charge for 6 hours (+1 hour with Braun 4000 device) prior to initial use OR charging ic<strong>on</strong> <strong>on</strong> screen ceases to flash.<br />
Charge for 4 additi<strong>on</strong>al hours if device has a printer.<br />
Charge when not in use.<br />
Durati<strong>on</strong> of battery is model specific:<br />
• 45MTO = 14.5 hours<br />
• 45NTO = 13 hours<br />
• 45MEO = 13.5 hours<br />
• 45NEO = 12.5 hours<br />
Device<br />
Wipe <strong>the</strong> device with a cloth slightly dampened with appropriately diluted, n<strong>on</strong>-staining disinfectant soluti<strong>on</strong>. Use ei<strong>the</strong>r<br />
70% isopropyl alcohol, 10% chlorine bleach soluti<strong>on</strong>, mild detergent in warm water, or PDI Sani-System cloths. Never<br />
immerse. Prevent water or fluids from entering any c<strong>on</strong>nectors. Do not sterilize or autoclave <strong>the</strong> Spot LXi device.<br />
Accessories<br />
Do not immerse, soak or autoclave. Clean removable probe well by swabbing with a cloth dampened with 70%<br />
isopropyl alcohol or 10% bleach soluti<strong>on</strong>. Probe well can be immersed. Ensure probe well is dry before re-inserting into<br />
device.<br />
To enter <strong>the</strong> Internal C<strong>on</strong>figurati<strong>on</strong> menu, follow <strong>the</strong>se steps starting with <strong>the</strong> device powered OFF:<br />
1. Press and hold <strong>the</strong> POWER and SELECT butt<strong>on</strong>s simultaneously. The Internal C<strong>on</strong>figurati<strong>on</strong><br />
menu will display <strong>on</strong> <strong>the</strong> screen.<br />
2. Use <strong>the</strong> NAVIGATION butt<strong>on</strong>s to move through <strong>the</strong> menu opti<strong>on</strong>s.<br />
3. Use <strong>the</strong> SELECT butt<strong>on</strong> to access opti<strong>on</strong>s or accept a change.<br />
E<br />
End Use<br />
4. Press <strong>the</strong> POWER butt<strong>on</strong> to exit <strong>the</strong> Internal C<strong>on</strong>figurati<strong>on</strong> menu.<br />
Press <strong>the</strong> POWER butt<strong>on</strong> to turn device off. After 2 minutes of inactivity, <strong>the</strong> device goes into STANDBY<br />
mode. The screen will go blank; press any key to activate device. After 30 minutes of inactivity, <strong>the</strong> device powers itself<br />
off.<br />
Spot LXi FAQ<br />
MC 7715 08/2010
Spot Vital Signs® LXi Outline Train <strong>the</strong> Trainer<br />
A. Intended Use<br />
1. Depending up<strong>on</strong> <strong>the</strong> c<strong>on</strong>figurati<strong>on</strong> of your particular device, <strong>the</strong> Spot Vital Signs® LXi can measure:<br />
a. Systolic and diastolic blood pressure (<strong>on</strong> patients greater than 29 days ONLY)<br />
b. Pulse rate<br />
c. Temperature (oral, adult axillary, pediatric axillary, rectal, or ear)<br />
d. SpO2<br />
e. MAP<br />
f. The Spot LXi also allows <strong>the</strong> user to manually enter height, weight, respirati<strong>on</strong> rate, and pain level.<br />
The device will calculate <strong>the</strong> Body Mass Index (BMI) following height and weight entries.<br />
B. Battery<br />
1. The device c<strong>on</strong>tains a sealed Lead Acid battery.<br />
2. Initially up<strong>on</strong> receiving <strong>the</strong> Spot LXi device, c<strong>on</strong>nect <strong>the</strong> battery inside <strong>the</strong> device per <strong>the</strong> label <strong>on</strong> <strong>the</strong><br />
battery door.<br />
3. Prior to initial use, charge <strong>the</strong> battery for 6 hours or until <strong>the</strong> charging ic<strong>on</strong> <strong>on</strong> <strong>the</strong> fr<strong>on</strong>t panel of <strong>the</strong><br />
device no l<strong>on</strong>ger flashes. If your device includes a Braun Thermoscan PRO 4000 ear <strong>the</strong>rmometer,<br />
charge an additi<strong>on</strong>al hour. If <strong>the</strong>re is an external printer attached, you must charge <strong>the</strong> Spot LXi an<br />
additi<strong>on</strong>al 4 hours.<br />
4. The Spot LXi should be charging when not in use.<br />
C. Fr<strong>on</strong>t Panel Butt<strong>on</strong>s/C<strong>on</strong>trols<br />
Butt<strong>on</strong> Functi<strong>on</strong> Descripti<strong>on</strong><br />
Power<br />
Turns device On or Off<br />
<str<strong>on</strong>g>Blood</str<strong>on</strong>g> <str<strong>on</strong>g>Pressure</str<strong>on</strong>g> Start/Stop<br />
Initiates or cancels a blood pressure cycle<br />
Memory Butt<strong>on</strong><br />
Recalls up to 50 most recent readings<br />
Select Butt<strong>on</strong><br />
Navigati<strong>on</strong> Butt<strong>on</strong>s<br />
Accepts <strong>the</strong> current opti<strong>on</strong><br />
Move throughout <strong>the</strong> opti<strong>on</strong>s in <strong>the</strong> Navigati<strong>on</strong><br />
Window or to increase/ decrease parameter<br />
units<br />
1<br />
Spot LXi Trainer<br />
SM 2934 Rev. B 08/2010
D. Spot LXi Side and Rear Panels Related to C<strong>on</strong>necti<strong>on</strong>s<br />
1. C<strong>on</strong>nect <strong>the</strong> blood pressure hose, <strong>the</strong>rmometer probe and opti<strong>on</strong>al attachments of <strong>the</strong> appropriate<br />
ports depending up<strong>on</strong> c<strong>on</strong>figurati<strong>on</strong> of <strong>the</strong> device.<br />
E. Turn Spot LXi device ON<br />
1. Press <strong>the</strong> Power butt<strong>on</strong> .<br />
2. The display lights up, a beep sounds, and <strong>the</strong> device performs an internal self-check.<br />
3. Standby Mode:<br />
a. When <strong>the</strong> device is powered <strong>on</strong> and left unused for 2 minutes it will go into Standby Mode. This<br />
saves battery power and <strong>the</strong> display will turn blank.<br />
b. Press any butt<strong>on</strong> to bring <strong>the</strong> device out of Standby Mode.<br />
4. The device automatically powers off when not used for 30 minutes.<br />
F. Display Window<br />
1. Before using <strong>the</strong> Spot LXi <strong>the</strong> first time, you must program an initial c<strong>on</strong>figurati<strong>on</strong> screen.<br />
Once this is d<strong>on</strong>e, you will not see this screen again.<br />
2. Press <strong>the</strong> Power butt<strong>on</strong> .<br />
3. Press <strong>the</strong> Select butt<strong>on</strong> to access opti<strong>on</strong>s and accept entries. Use <strong>the</strong> Navigati<strong>on</strong> butt<strong>on</strong>s to<br />
move through <strong>the</strong> menu.<br />
4. The word “Exit” appears at <strong>the</strong> bottom of <strong>the</strong> list when you have programmed all items. You must<br />
program <strong>the</strong> settings before you can start to use <strong>the</strong> device.<br />
5. Scroll to Exit and press <strong>the</strong> Select butt<strong>on</strong> to save <strong>the</strong> entries.<br />
G. <str<strong>on</strong>g>Blood</str<strong>on</strong>g> <str<strong>on</strong>g>Pressure</str<strong>on</strong>g> (to be used <strong>on</strong> patients greater than 29 days of age ONLY)<br />
1. Before taking a BP measurement, always perform <strong>the</strong> steps described below:<br />
a. Select appropriate cuff. The cuff is <strong>the</strong> appropriate size when <strong>the</strong> artery index marker lies<br />
somewhere between <strong>the</strong> range markings <strong>on</strong> <strong>the</strong> BP cuff.<br />
b. Positi<strong>on</strong> <strong>the</strong> cuff. The cuff should always be positi<strong>on</strong>ed <strong>on</strong> a bare arm (or alternate site as<br />
necessary), preferably 1-2 cm above <strong>the</strong> elbow, with <strong>the</strong> artery index marker over <strong>the</strong> brachial<br />
artery. It should fit comfortably to allow no more than 1-2 fingers space between <strong>the</strong> cuff and <strong>the</strong><br />
arm. During <strong>the</strong> BP measurement cycle, <strong>the</strong> patient should have no movement to <strong>the</strong> extremity<br />
and should remain quiet.<br />
2. To initiate blood pressure measurements:<br />
a. Press <strong>the</strong> <str<strong>on</strong>g>Blood</str<strong>on</strong>g> <str<strong>on</strong>g>Pressure</str<strong>on</strong>g> Start/Stop butt<strong>on</strong> . Spot LXi inflates <strong>the</strong> cuff to <strong>the</strong> appropriate<br />
level, measuring <strong>the</strong> BP as <strong>the</strong> cuff is inflating. The display shows <strong>the</strong> inflati<strong>on</strong> pressure as <strong>the</strong> BP<br />
determinati<strong>on</strong> is in process. A reading will be obtained in about 15 sec<strong>on</strong>ds.<br />
b. If a reading cannot be obtained during inflati<strong>on</strong>, i.e., due to severe arrhythmias or patient movement,<br />
<strong>the</strong> device will attempt to obtain a reading during deflati<strong>on</strong>. A message will be displayed in <strong>the</strong><br />
Navigati<strong>on</strong> Window if this occurs.<br />
3. To cancel a reading while in progress, press <strong>the</strong> <str<strong>on</strong>g>Blood</str<strong>on</strong>g> <str<strong>on</strong>g>Pressure</str<strong>on</strong>g> Start/Stop butt<strong>on</strong> .<br />
H. Pulse Rate<br />
1. Pulse rate readings are measured from SpO 2 . If SpO 2 is not available, pulse rate will be measured from<br />
<strong>the</strong> blood pressure. NOTE: If <strong>the</strong>re is a HR displayed that was derived from SpO2, it will not be over-ridden by a HR<br />
from a blood pressure reading. The device defaults to <strong>the</strong> SPO2 HR since it senses for a reading over a l<strong>on</strong>ger period of<br />
time (approx. 8-10 sec<strong>on</strong>ds), versus a HR that is obtained in <strong>on</strong>e moment during a blood pressure reading.<br />
2<br />
Spot LXi Trainer<br />
SM 2934 Rev. B 08/2010
2. To remove last HR readings and clear <strong>the</strong> display screen: press Save after each reading, turn Off <strong>the</strong><br />
device or, after 30 minutes of not touching any butt<strong>on</strong>s <strong>the</strong> device will automatically shut down and<br />
clear <strong>the</strong> display screen.<br />
I. MAP<br />
1. MAP display can be turned <strong>on</strong> or off by entering <strong>the</strong> Internal C<strong>on</strong>figurati<strong>on</strong> Mode (refer to Secti<strong>on</strong> Q).<br />
Factory default will be set to off.<br />
2. If MAP is turned <strong>on</strong>, after a blood pressure measurement, <strong>the</strong> word “MAP” will appear in <strong>the</strong> Systolic<br />
window and <strong>the</strong> value will appear in <strong>the</strong> Diastolic window.<br />
J. Temperature Measurements<br />
SureTemp® Plus Thermometry (if applicable)<br />
1. Can be used to take an oral temperature in approximately 4-6 sec<strong>on</strong>ds, an adult axillary temperature<br />
(ages 18 years and older) in approximately 12-15 sec<strong>on</strong>ds, a pediatric axillary temperature (ages 17<br />
years and younger) in approximately 10-13 sec<strong>on</strong>ds, or a rectal temperature in 10-13 sec<strong>on</strong>ds.<br />
2. The temperature can be displayed in degrees Fahrenheit (°F) or Celsius (°C). To determine <strong>the</strong><br />
current temperature scale, remove <strong>the</strong> temperature probe from its holder and view °F or °C <strong>on</strong> <strong>the</strong><br />
device display. To change scales, refer to <strong>the</strong> Internal C<strong>on</strong>figurati<strong>on</strong> Mode secti<strong>on</strong>.<br />
3. Taking an Oral Temperature:<br />
a. Ensure that <strong>the</strong> probe with <strong>the</strong> BLUE ejecti<strong>on</strong> butt<strong>on</strong> and <strong>the</strong> BLUE probe well are c<strong>on</strong>nected to <strong>the</strong><br />
Spot LXi.<br />
b. Hold <strong>the</strong> probe handle with your thumb and two fingers <strong>on</strong> <strong>the</strong> indentati<strong>on</strong>s of <strong>the</strong> probe handle,<br />
<strong>the</strong>n withdraw <strong>the</strong> probe from <strong>the</strong> probe well.<br />
c. Verify <strong>the</strong> appropriate mode, Oral, is in <strong>the</strong> display window and <strong>the</strong> head ic<strong>on</strong> is flashing. To<br />
change modes, press <strong>the</strong> Navigati<strong>on</strong> butt<strong>on</strong>s until desired setting is displayed; <strong>the</strong>n press <strong>the</strong><br />
Select butt<strong>on</strong> .<br />
d. Insert <strong>the</strong> probe into a new probe cover and press down firmly until a new probe cover engages<br />
<strong>on</strong>to <strong>the</strong> probe.<br />
e. Instruct <strong>the</strong> patient not to talk or move during <strong>the</strong> temperature reading process.<br />
f. Place <strong>the</strong> probe into <strong>the</strong> patient’s posterior sublingual pocket.<br />
g. Have <strong>the</strong> nurse hold <strong>the</strong> probe in place maintaining tissue c<strong>on</strong>tact until <strong>the</strong> temperature is<br />
complete.<br />
h. When <strong>the</strong> final temperature is reached, three beeps sound and <strong>the</strong> reading is displayed in <strong>the</strong><br />
Temperature window in <strong>the</strong> pre-selected scale. Temporarily <strong>the</strong> reading will appear in both °F and<br />
°C in <strong>the</strong> Navigati<strong>on</strong> Window.<br />
i. The following may interfere with accurate readings for up to 20 minutes:<br />
• Ingesting hot or cold liquids<br />
• Brushing teeth<br />
• Eating<br />
• Chewing gum or mints<br />
• Smoking<br />
• Performing strenuous activity<br />
3<br />
Spot LXi Trainer<br />
SM 2934 Rev. B 08/2010
4. Taking an Axillary Temperature:<br />
a. Ensure that <strong>the</strong> probe with <strong>the</strong> BLUE ejecti<strong>on</strong> butt<strong>on</strong> and <strong>the</strong> BLUE probe well are c<strong>on</strong>nected to <strong>the</strong><br />
Spot LXi.<br />
b. Hold <strong>the</strong> probe handle with your thumb and two fingers <strong>on</strong> <strong>the</strong> indentati<strong>on</strong>s of <strong>the</strong> probe handle,<br />
<strong>the</strong>n withdraw <strong>the</strong> probe from <strong>the</strong> probe well.<br />
c. Ensure <strong>the</strong> appropriate mode, Adult Axillary (A.AXI) or Pediatric Axillary (P.AXI), appears in <strong>the</strong><br />
display window and <strong>the</strong> associated ic<strong>on</strong> is flashing. Adult Axillary will display a flashing shirt;<br />
Pediatric Axillary will display a small child crawling. To change <strong>the</strong> mode, press <strong>the</strong> Navigati<strong>on</strong><br />
butt<strong>on</strong>s until desired setting is displayed; <strong>the</strong>n press <strong>the</strong> Select butt<strong>on</strong> .<br />
d. Insert <strong>the</strong> probe into a new probe cover and press down firmly until a new probe cover engages<br />
<strong>on</strong>to <strong>the</strong> probe.<br />
e. Lift <strong>the</strong> patient’s arm to fully expose <strong>the</strong> axilla. Place <strong>the</strong> probe tip as high as possible in <strong>the</strong> axilla,<br />
against bare skin, aligning <strong>the</strong> probe vertically with <strong>the</strong> spine. Lower <strong>the</strong> patient’s arm, ensuring<br />
axillary tissue completely surrounds <strong>the</strong> probe tip. The patient should remain still, maintaining<br />
good tissue c<strong>on</strong>tact throughout <strong>the</strong> process.<br />
f. When <strong>the</strong> final temperature is reached, three beeps sound and <strong>the</strong> temperature is displayed in <strong>the</strong><br />
Temperature window in <strong>the</strong> pre-selected scale. Temporarily <strong>the</strong> reading will appear in both °F and<br />
°C in <strong>the</strong> Navigati<strong>on</strong> Window.<br />
5. Taking a Rectal Temperature:<br />
a. Ensure that <strong>the</strong> RECTAL PROBE with <strong>the</strong> RED ejecti<strong>on</strong> butt<strong>on</strong> and <strong>the</strong> RED probe well are<br />
c<strong>on</strong>nected to <strong>the</strong> Spot LXi device.<br />
b. Hold <strong>the</strong> probe handle with your thumb and two fingers <strong>on</strong> <strong>the</strong> indentati<strong>on</strong>s of <strong>the</strong> probe handle,<br />
<strong>the</strong>n withdraw <strong>the</strong> probe from <strong>the</strong> probe well.<br />
c. Ensure <strong>the</strong> appropriate mode, REC, appears in <strong>the</strong> display window and <strong>the</strong> lower body ic<strong>on</strong> is<br />
flashing.<br />
d. Insert <strong>the</strong> probe into a new probe cover and press down firmly until a new probe cover engages<br />
<strong>on</strong>to <strong>the</strong> probe. The use of lubricant is opti<strong>on</strong>al.<br />
e. Separate <strong>the</strong> buttocks with <strong>on</strong>e hand. Using <strong>the</strong> o<strong>the</strong>r hand, gently insert <strong>the</strong> probe inside <strong>the</strong><br />
rectum ONLY 1.5 cm (5/8 of an inch for adults) and LESS for infants and children.<br />
f. Tilt <strong>the</strong> probe so that <strong>the</strong> tip of <strong>the</strong> probe is in c<strong>on</strong>tact with tissue. Hold <strong>the</strong> probe in place<br />
throughout <strong>the</strong> measurement process. When <strong>the</strong> final temperature is reached, three beeps sound<br />
and <strong>the</strong> temperature is displayed in <strong>the</strong> Temperature window in <strong>the</strong> pre-selected scale. Temporarily<br />
<strong>the</strong> reading will appear in both °F and °C in <strong>the</strong> Navigati<strong>on</strong> Window.<br />
4<br />
Spot LXi Trainer<br />
SM 2934 Rev. B 08/2010
6. Taking a M<strong>on</strong>itor Mode Temperature:<br />
a. Take <strong>the</strong> patient’s temperature in <strong>the</strong> appropriate site, Oral, Axillary, or Rectal as outlined above.<br />
Leave <strong>the</strong> probe in place after <strong>the</strong> device beeps and <strong>the</strong> temperature is displayed. In<br />
approximately 30 sec<strong>on</strong>ds, a snail ic<strong>on</strong> will appear <strong>on</strong> <strong>the</strong> display, indicating <strong>the</strong> device is now in<br />
M<strong>on</strong>itor Mode.<br />
b. C<strong>on</strong>tinue to hold <strong>the</strong> probe in place for 3 minutes for oral or rectal temperatures, 5 minutes for<br />
axillary temperatures. The <strong>the</strong>rmometer will not beep to indicate a final temperature.<br />
c. Once <strong>the</strong> time limit is achieved, record <strong>the</strong> temperature before removing <strong>the</strong> probe from <strong>the</strong> site.<br />
M<strong>on</strong>itor Mode temperatures are not stored in memory.<br />
d. Return <strong>the</strong> probe to <strong>the</strong> probe well to reset <strong>the</strong> <strong>the</strong>rmometer to Normal Mode.<br />
NOTE: The <strong>the</strong>rmometer enters M<strong>on</strong>itor Mode automatically if <strong>the</strong> probe is removed from <strong>the</strong> well<br />
and not used for 60 sec<strong>on</strong>ds or if <strong>the</strong> patient’s temperature is too low to allow <strong>the</strong> device to predict<br />
a reading.<br />
K. Braun ThermoScan ® PRO 4000 Ear Thermometry (if applicable)<br />
1. Pull <strong>the</strong> <strong>the</strong>rmometer gently toward you and remove it from <strong>the</strong> housing.<br />
2. Locate <strong>the</strong> probe cover box inside <strong>the</strong> <strong>the</strong>rmometer housing. Firmly push <strong>the</strong> probe tip into <strong>the</strong> probe<br />
cover box. When <strong>the</strong> probe cover is in place, <strong>the</strong> <strong>the</strong>rmometer turns <strong>on</strong> automatically.<br />
3. Listen for <strong>the</strong> ready signal beep and three dashes to appear <strong>on</strong> <strong>the</strong> <strong>the</strong>rmometer.<br />
4. Fit <strong>the</strong> probe snugly into <strong>the</strong> ear canal. Correct probe placement is essential for accurate readings.<br />
Aim <strong>the</strong> probe tip in <strong>the</strong> directi<strong>on</strong> of <strong>the</strong> tympanic membrane.<br />
5. Press <strong>the</strong> Start butt<strong>on</strong>. If <strong>the</strong> probe is positi<strong>on</strong>ed correctly in <strong>the</strong> ear canal <strong>the</strong> “Exac Temp” light<br />
flashes. When <strong>the</strong> <strong>the</strong>rmometer detects an accurate measurement, <strong>the</strong> “Exac Temp” light is<br />
c<strong>on</strong>tinuously <strong>on</strong>, a l<strong>on</strong>g beep signals <strong>the</strong> end of <strong>the</strong> measurement, and <strong>the</strong> display shows <strong>the</strong> result.<br />
6. When finished, press <strong>the</strong> ejector butt<strong>on</strong> to eject <strong>the</strong> used probe cover.<br />
7. Return <strong>the</strong> <strong>the</strong>rmometer to its holder. Spot LXi displays <strong>the</strong> patient’s temperature and temperature<br />
scale in <strong>the</strong> Temperature window <strong>on</strong> <strong>the</strong> device.<br />
L. SpO 2 (if applicable)<br />
1. Insert <strong>the</strong> patient’s finger completely into <strong>the</strong> sensor. The thumb is not recommended for use with <strong>the</strong><br />
finger clip sensor. Do not attach <strong>the</strong> SpO2 sensor to <strong>the</strong> same limb as <strong>the</strong> blood pressure cuff.<br />
2. The pulse signal bar illuminates, indicating <strong>the</strong> relative strength and quality of <strong>the</strong> patient’s pulses at <strong>the</strong><br />
sensor site.<br />
3. Within approximately 10 sec<strong>on</strong>ds an initial SpO 2 value will be displayed and is updated every sec<strong>on</strong>d.<br />
The Spot LXi displays <strong>the</strong> SpO 2 for up to 10 minutes. You must remove <strong>the</strong> sensor to save <strong>the</strong><br />
reading in Memory.<br />
4. The following may interfere with accurate readings (for a comprehensive list, see <strong>the</strong> Spot LXi<br />
Directi<strong>on</strong>s for Use manual):<br />
• Bright light<br />
• Fingernail polish<br />
• Excessive patient movement<br />
• Poor perfusi<strong>on</strong><br />
• Sensor placement <strong>on</strong> extremities with blood pressure cuff, arterial ca<strong>the</strong>ter, or intravascular line<br />
5<br />
Spot LXi Trainer<br />
SM 2934 Rev. B 08/2010
M. Manual Entries<br />
1. Weight, Height, Respirati<strong>on</strong> Rate, and Pain Level can be manually entered in <strong>the</strong> Spot LXi.<br />
a. Press <strong>the</strong> Navigati<strong>on</strong> butt<strong>on</strong>s until <strong>the</strong> arrow is pointing to <strong>the</strong> chosen parameter in <strong>the</strong><br />
Navigati<strong>on</strong> Window.<br />
b. Press <strong>the</strong> Select butt<strong>on</strong> . The default parameter value appears and flashes above <strong>the</strong><br />
Navigati<strong>on</strong> butt<strong>on</strong>s.<br />
c. Press <strong>the</strong> Navigati<strong>on</strong> butt<strong>on</strong>s to increase or decrease <strong>the</strong> value.<br />
d. Press <strong>the</strong> Select butt<strong>on</strong> to accept <strong>the</strong> value.<br />
2. Body Mass Index (BMI) is calculated with weight and height entry.<br />
a. Once weight and height are entered, use <strong>the</strong> Navigati<strong>on</strong> butt<strong>on</strong>s to scroll to Save/Next<br />
Reading. Press <strong>the</strong> Select butt<strong>on</strong> to save <strong>the</strong> reading.<br />
b. Press <strong>the</strong> Memory butt<strong>on</strong> to view <strong>the</strong> BMI calculati<strong>on</strong>.<br />
N. Memory Recall<br />
1. Spot LXi retains up to 50 readings in memory. Press <strong>the</strong> Memory butt<strong>on</strong> to display <strong>the</strong> previous<br />
reading.<br />
2. Press <strong>the</strong> Navigati<strong>on</strong> butt<strong>on</strong>s to Scroll, Print, Erase, or Erase All readings.<br />
3. Press <strong>the</strong> Select butt<strong>on</strong> to choose <strong>the</strong> desired opti<strong>on</strong>. Follow instructi<strong>on</strong>s <strong>on</strong> <strong>the</strong> display.<br />
O. Error Codes<br />
1. If <strong>the</strong> Spot LXi detects an error, an error code will display in <strong>the</strong> parameter that has <strong>the</strong> error and a<br />
message will display in <strong>the</strong> Navigati<strong>on</strong> Window.<br />
P. Cleaning<br />
1. Never immerse <strong>the</strong> Spot LXi in any type of fluid. Clean <strong>the</strong> device with a cloth slightly dampened with<br />
<strong>on</strong>e of <strong>the</strong> following:<br />
a. 70% isopropyl alcohol<br />
b. 10% chlorine bleach soluti<strong>on</strong><br />
c. Mild detergent in water<br />
d. PDI Sani-System cloths<br />
Q. Internal C<strong>on</strong>figurati<strong>on</strong> Mode<br />
1. The Internal C<strong>on</strong>figurati<strong>on</strong> Mode allows <strong>the</strong> user to change operating parameters and adjust power-up<br />
default settings. This mode also allows you to see n<strong>on</strong>-changeable device c<strong>on</strong>figurati<strong>on</strong>s for technical<br />
service purposes. To enter <strong>the</strong> Internal C<strong>on</strong>figurati<strong>on</strong> Mode:<br />
a. Turn <strong>the</strong> Spot LXi off by pressing <strong>the</strong> Power butt<strong>on</strong> .<br />
b. Press and hold <strong>the</strong> Power and <strong>the</strong> Select butt<strong>on</strong>s for 5 sec<strong>on</strong>ds. The Internal<br />
C<strong>on</strong>figurati<strong>on</strong> Menu appears <strong>on</strong> <strong>the</strong> display. The C<strong>on</strong>figurati<strong>on</strong> Menu opti<strong>on</strong>s are: Versi<strong>on</strong><br />
Numbers, Battery, Locati<strong>on</strong> Identifier, Date/Time, <str<strong>on</strong>g>Blood</str<strong>on</strong>g> <str<strong>on</strong>g>Pressure</str<strong>on</strong>g>, Temperature, Manual<br />
Parameters, External Devices, Save Readings, Butt<strong>on</strong>s Lockout, Defaults, and Event Log.<br />
c. Use <strong>the</strong> Navigati<strong>on</strong> butt<strong>on</strong>s to move through <strong>the</strong> menu opti<strong>on</strong>s.<br />
d. Press <strong>the</strong> Select butt<strong>on</strong> to access opti<strong>on</strong>s or to accept a change.<br />
e. Press Power butt<strong>on</strong> to exit <strong>the</strong> Internal C<strong>on</strong>figurati<strong>on</strong> Mode.<br />
6<br />
Spot LXi Trainer<br />
SM 2934 Rev. B 08/2010
R. External Devices (Opti<strong>on</strong>al)<br />
The following external devices – Printer, Weight Scale, Barcode Scanner, and Wireless Radio – must be<br />
enabled in <strong>the</strong> Internal C<strong>on</strong>figurati<strong>on</strong> Mode before using and <strong>the</strong>n attached to <strong>the</strong> back of Spot LXi.<br />
1. Printer<br />
a. To print <strong>the</strong> most recent reading:<br />
• Press <strong>the</strong> Memory butt<strong>on</strong> to recall <strong>the</strong> last reading.<br />
• Use <strong>the</strong> Navigati<strong>on</strong> butt<strong>on</strong>s to scroll to “Print” and <strong>the</strong>n press <strong>the</strong> Select butt<strong>on</strong> .<br />
b. To print a previous reading:<br />
• Press <strong>the</strong> Memory butt<strong>on</strong> and <strong>the</strong> most recent reading is displayed.<br />
• Use <strong>the</strong> Navigati<strong>on</strong> butt<strong>on</strong>s to move to “Scroll.” Press <strong>the</strong> Select butt<strong>on</strong> .<br />
• Use <strong>the</strong> Navigati<strong>on</strong> butt<strong>on</strong>s to scroll to <strong>the</strong> appropriate reading; <strong>the</strong>n press <strong>the</strong> Select<br />
butt<strong>on</strong> .<br />
• Use <strong>the</strong> Navigati<strong>on</strong> butt<strong>on</strong>s to scroll to “Print.” Press <strong>the</strong> Select butt<strong>on</strong> .<br />
2. Weight Scale<br />
a. When <strong>the</strong> weight scale is enabled in <strong>the</strong> Internal C<strong>on</strong>figurati<strong>on</strong> Mode, you cannot manually enter a<br />
patient’s weight.<br />
b. Follow <strong>the</strong> weight scale’s instructi<strong>on</strong>s to zero out <strong>the</strong> weight scale.<br />
c. Instruct <strong>the</strong> patient to step <strong>on</strong> <strong>the</strong> scale and remain still until <strong>the</strong> weight levels off. The weight will<br />
be displayed <strong>on</strong> <strong>the</strong> Spot LXi.<br />
3. Barcode Scanner<br />
a. Supports linear or 2 D barcodes.<br />
b. When enabled in <strong>the</strong> Internal C<strong>on</strong>figurati<strong>on</strong> Mode, allows <strong>the</strong> scanning of patients’ and/or clinicians’<br />
barcodes for identificati<strong>on</strong> purposes.<br />
4. Wireless Radio<br />
a. Verify <strong>the</strong> Informati<strong>on</strong> System is enabled in <strong>the</strong> Internal C<strong>on</strong>figurati<strong>on</strong> Mode.<br />
b. Obtain patient vital signs. “Send/Next Reading” appears in <strong>the</strong> Navigati<strong>on</strong> Window. Verify patient’s<br />
barcode appears <strong>on</strong> <strong>the</strong> display.<br />
c. Use <strong>the</strong> Navigati<strong>on</strong> butt<strong>on</strong>s to go to “Send/Next Reading.” Press <strong>the</strong> Select .<br />
d. Spot LXi displays “Sending reading to informati<strong>on</strong> system” and successful ic<strong>on</strong> up<strong>on</strong> completi<strong>on</strong>.<br />
e. If reading was not sent, it is retained in memory and a failed send operati<strong>on</strong> ic<strong>on</strong> is displayed. Spot<br />
LXi will attempt to re-send with <strong>the</strong> next reading.<br />
7<br />
Spot LXi Trainer<br />
SM 2934 Rev. B 08/2010
The ABC’s of Vital Signs M<strong>on</strong>itor 300 Series<br />
A Age Ranges<br />
Ne<strong>on</strong>atal Pediatric Adult<br />
Ne<strong>on</strong>ate: Term birth (37 weeks) through 28 days, or up to 44 weeks gestati<strong>on</strong>al age.<br />
Pediatric: 29 days through 12 years of age.<br />
B<br />
C<br />
D<br />
Battery Info<br />
Cleaning<br />
Defaults<br />
Adult: 13 years and older.<br />
Uses a sealed lead-acid battery.<br />
Provides 8 hours of c<strong>on</strong>tinuous m<strong>on</strong>itoring of Adult NIBP (3 minute intervals/165 readings)<br />
with simultaneous temperature and c<strong>on</strong>tinuous SpO2.<br />
Charges to 90% of capacity in 12 hours.<br />
Should be charging when not in use.<br />
Patient data is erased if battery goes dead.<br />
If not plugged in, m<strong>on</strong>itor turns off 15 minutes after <strong>the</strong> battery discharge reaches “failure<br />
level.”<br />
Battery indicator is located <strong>on</strong> fr<strong>on</strong>t panel when <strong>the</strong> unit is turned <strong>on</strong>. When battery is LOW,<br />
a warning t<strong>on</strong>e sounds and <strong>the</strong> low battery indicator flashes. (To avoid shutdown, plug in and<br />
c<strong>on</strong>nect <strong>the</strong> AC power). When <strong>the</strong> low battery indicator appears, <strong>the</strong>re is enough charge<br />
remaining to perform at least ONE of <strong>the</strong> following functi<strong>on</strong>s over <strong>the</strong> next hour:<br />
• 20 NIPB cycles<br />
• 30 minutes of SpO2<br />
• 20 temperatures<br />
• a single printing of 99 stored data sets<br />
Device<br />
Wipe <strong>the</strong> m<strong>on</strong>itor with a cloth slightly dampened with warm water, a mild detergent or<br />
appropriately diluted, n<strong>on</strong>-staining disinfectant. Never wet or immerse <strong>the</strong> device.<br />
Accessories<br />
Do not immerse, soak, or autoclave. Wipe <strong>the</strong> NIBP hose and reusable cuffs with a damp<br />
cloth moistened in a mild detergent. Clean <strong>the</strong> SpO2 sensor with a cloth dampened with<br />
70% alcohol or 10% bleach soluti<strong>on</strong>. Wipe <strong>the</strong> temperature probe with a cloth dampened<br />
with alcohol, warm water, or an appropriately diluted, n<strong>on</strong>-staining disinfectant soluti<strong>on</strong>.<br />
Clean removable probe well by swabbing with a cloth dampened with 70% isopropyl alcohol<br />
or 10% bleach soluti<strong>on</strong>. Probe well can be immersed.<br />
To access <strong>the</strong> Internal C<strong>on</strong>figurati<strong>on</strong> menu, press and hold <strong>the</strong> MENU butt<strong>on</strong> for 3<br />
sec<strong>on</strong>ds. C<strong>on</strong>tinue to press <strong>the</strong> MENU butt<strong>on</strong> until you reach <strong>the</strong> setting of interest. Use <strong>the</strong><br />
UP and DOWN butt<strong>on</strong>s to change <strong>the</strong> values. Set <strong>the</strong> new value ei<strong>the</strong>r by doing<br />
nothing for 10 sec<strong>on</strong>ds or by pressing any butt<strong>on</strong> o<strong>the</strong>r than <strong>the</strong> UP and DOWN butt<strong>on</strong>s.<br />
If you press a functi<strong>on</strong> butt<strong>on</strong> such as <strong>the</strong> NIBP<br />
butt<strong>on</strong>, <strong>the</strong> m<strong>on</strong>itor returns to<br />
E<br />
End M<strong>on</strong>itoring<br />
normal operati<strong>on</strong> with that functi<strong>on</strong> activated. Powering OFF<br />
<strong>the</strong> values.<br />
Note: When Time/Date are changed, patient data is erased.<br />
To shut off <strong>the</strong> device, press<br />
or c<strong>on</strong>figurati<strong>on</strong>s.<br />
<strong>the</strong> device will save all<br />
. This will erase all stored patient data but not settings<br />
VSM 300 FAQ<br />
MC 7722 08/2010
Vital Signs M<strong>on</strong>itor 300 Series (VSM) Train <strong>the</strong><br />
Trainer Outline<br />
A. Light Weight and Durable<br />
1. Weighs approx 5 lbs<br />
2. Made of heavy plastic<br />
B. Battery<br />
1. Sealed lead acid battery 6 V<br />
2. Battery life provides approx 8 hours of c<strong>on</strong>tinuous m<strong>on</strong>itoring of B/P, Temperature and Sp02.<br />
3. The battery charges to 90% of capacity in 12 hours.<br />
4. The VSM should be charging, unless it is being used.<br />
C. Low Battery Warning<br />
1. Battery indicator is located <strong>on</strong> fr<strong>on</strong>t panel when <strong>the</strong> unit is turned <strong>on</strong>.<br />
2. When battery is LOW, a warning t<strong>on</strong>e sounds and <strong>the</strong> low battery indicator flashes. (To avoid<br />
shutdown, plug in and c<strong>on</strong>nect <strong>the</strong> AC power)<br />
3. When <strong>the</strong> low battery indicator appears, <strong>the</strong>re is enough charge remaining to perform at least<br />
ONE of <strong>the</strong> following functi<strong>on</strong>s over <strong>the</strong> next hour:<br />
a. 20 NIPB cycles<br />
b. 30 minutes of SpO2<br />
c. 20 temperatures<br />
d. a single printing of 99 stored data sets<br />
D. Transport Handle<br />
E. Start Up<br />
The VSM runs a self check up<strong>on</strong> power up (will see 888 in various parameter windows) and a short<br />
t<strong>on</strong>e sounds twice.<br />
Butt<strong>on</strong>s <strong>on</strong> <strong>the</strong> fr<strong>on</strong>t of <strong>the</strong> VSM 300 face plate:<br />
1. Turn <strong>the</strong> VSM <strong>on</strong> by pressing On/ Off<br />
2. Review<br />
3. Set NIBP interval<br />
4. Auto<br />
5. B/P start/ stop<br />
6. Limits<br />
7. Suspend<br />
8. Up/ Down arrows<br />
9. Menu<br />
10. Printer<br />
1<br />
VSM Trainer Outline<br />
SM 2818 Rev C 08/2010
F. Menu<br />
1. Each time you press <strong>the</strong> Menu butt<strong>on</strong>, it will scroll through a series of menus<br />
that you can select to change. These include:<br />
a. Patient Type<br />
b. Target Cuff Inflati<strong>on</strong> <str<strong>on</strong>g>Pressure</str<strong>on</strong>g><br />
c. Temperature Mode<br />
d. SpO2 / Pulse T<strong>on</strong>e Volume<br />
2. Patient Type<br />
ADULT (ages over 12 yrs)<br />
PEDIATRIC (ages 1 m<strong>on</strong>th - 12 yrs)<br />
NEONATE (ages < 29 days, 0-44 weeks gestati<strong>on</strong>al)<br />
a. Press <strong>the</strong> Up/ Down ARROWS until you reach <strong>the</strong> selected mode.<br />
NOTE: Patient Type ic<strong>on</strong> is <strong>on</strong> Left above ON/ OFF butt<strong>on</strong><br />
Ne<strong>on</strong>atal Pediatric Adult<br />
b. To set <strong>the</strong> displayed new values, do nothing for 10 sec<strong>on</strong>ds.<br />
3. Target Cuff Inflati<strong>on</strong> <str<strong>on</strong>g>Pressure</str<strong>on</strong>g><br />
Allows you to change <strong>the</strong> initial cuff inflati<strong>on</strong> pressure for each patient type. (This is<br />
<strong>the</strong> nominal starting point - if it is too low to take a measurement, <strong>the</strong> m<strong>on</strong>itor takes<br />
ano<strong>the</strong>r measurement using a higher initial pressure.)<br />
a. Press UP/DOWN arrow to make changes to <strong>the</strong> target pressure.<br />
b. To set <strong>the</strong> displayed new values, do nothing for 10 sec<strong>on</strong>ds.<br />
4. Temperature Mode (if applicable)<br />
If c<strong>on</strong>figured with <strong>the</strong> temperature opti<strong>on</strong>, <strong>the</strong> m<strong>on</strong>itor can obtain predictive or m<strong>on</strong>itored<br />
temperature measurements.<br />
Predictive measurement: a <strong>on</strong>e-time temperature reading which takes <strong>on</strong>ly a few<br />
sec<strong>on</strong>ds.<br />
M<strong>on</strong>itored measurement: c<strong>on</strong>tinuous temperature m<strong>on</strong>itoring used when <strong>the</strong> situati<strong>on</strong><br />
prevents an accurate predictive measurement.<br />
a. F Fahrenheit Predictive temperatures: approximately 4-6 sec<strong>on</strong>d Oral,<br />
approximately 10-13 sec<strong>on</strong>d pediatric Axillary, approximately 12-15 sec<strong>on</strong>d adult<br />
Axillary, and approximately 10-13 sec<strong>on</strong>d Rectal<br />
b. F M Fahrenheit M<strong>on</strong>itored temperatures: 3 minutes Oral, 5 minutes<br />
Axillary, and 3 minute Rectal<br />
c. C Celsius Predictive temperatures: approximately 4-6 sec<strong>on</strong>d Oral, approximately<br />
10-13 sec<strong>on</strong>d pediatric Axillary, approximately 12-15 sec<strong>on</strong>d adult Axillary, and<br />
approximately 10-13 sec<strong>on</strong>d Rectal<br />
d. C M Celsius M<strong>on</strong>itored temperatures: 3 minutes Oral, 5 minutes Axillary,<br />
and 3 minute Rectal<br />
e. Press <strong>the</strong> UP/DOWN arrow to choose <strong>the</strong> temperature mode you want.<br />
f. To set <strong>the</strong> displayed new values, do nothing for 10 sec<strong>on</strong>ds<br />
2<br />
VSM Trainer Outline<br />
SM 2818 Rev C 08/2010
5. SpO2/Pulse T<strong>on</strong>e Volume<br />
a. Press MENU repeatedly until VOLUME appears <strong>on</strong> <strong>the</strong> screen<br />
b. Press UP/ DOWN KEYS to raise or lower <strong>the</strong> volume<br />
c. The pulse t<strong>on</strong>e can be set from level 00 (volume Off) to 05 (volume On full)<br />
d. To set <strong>the</strong> displayed new values, do nothing for 10 sec<strong>on</strong>ds<br />
NOTE: Changing <strong>the</strong> volume of <strong>the</strong> pulse t<strong>on</strong>e has no effect <strong>on</strong> <strong>the</strong> volume of<br />
alarm t<strong>on</strong>es.<br />
G. C<strong>on</strong>figurati<strong>on</strong> Menu<br />
1. This menu allows you to make c<strong>on</strong>figurati<strong>on</strong> changes for:<br />
a. Time and Date:<br />
Hour (0-23 or 1-12)<br />
Minute<br />
Year<br />
M<strong>on</strong>th<br />
Day<br />
b. MAP Measurement (<strong>the</strong> value will be displayed in <strong>the</strong> message window):<br />
Enabled<br />
Disabled<br />
c. <str<strong>on</strong>g>Blood</str<strong>on</strong>g> <str<strong>on</strong>g>Pressure</str<strong>on</strong>g> Measurement units:<br />
mmHg<br />
kPa<br />
d. Print Mode(if applicable):<br />
Batch will print all data in memory up to 99 cycles<br />
Stream prints results as so<strong>on</strong> as each cycle is finished.<br />
2. To Change a C<strong>on</strong>figurati<strong>on</strong> Parameter:<br />
a. PRESS and HOLD <strong>the</strong> MENU butt<strong>on</strong> for 3 or more sec<strong>on</strong>ds.<br />
b. Then press MENU repeatedly until you reach <strong>the</strong> parameter you wish to change.<br />
c. Now press <strong>the</strong> UP/ DOWN until you reach <strong>the</strong> value you wish to change <strong>the</strong> parameter to.<br />
d. To set <strong>the</strong> displayed new values, do nothing for 10 sec<strong>on</strong>ds.<br />
H. Limits<br />
1. This feature allows you to make changes to <strong>the</strong> high and low alarm limits for <strong>the</strong><br />
following vital signs:<br />
a. Systolic HIGH and Systolic LOW<br />
b. Diastolic HIGH and Diastolic LOW<br />
c. Pulse Rate HIGH and Pulse Rate LOW<br />
d. SpO2 HIGH and SpO2 LOW<br />
e. (if applicable) MAP HIGH and MAP LOW<br />
2. To make changes to <strong>the</strong> limits:<br />
a. Press Limits butt<strong>on</strong><br />
b. For <strong>the</strong> selected vital sign, do <strong>on</strong>e of <strong>the</strong> following:<br />
1. Leave <strong>the</strong> limit unchanged or<br />
2. Press UP/ DOWN as needed to change <strong>the</strong> limit OR (--) to disable <strong>the</strong> alarm<br />
3<br />
VSM Trainer Outline<br />
SM 2818 Rev C 08/2010
c. The alarm parameter you are changing, such as HR HIGH, will be displayed in <strong>the</strong> message<br />
window.<br />
d. Press LIMITS butt<strong>on</strong> to accept alarm limit and advance to next vital sign.<br />
e. To return to normal operati<strong>on</strong>, do nothing for 10 sec<strong>on</strong>ds.<br />
3. Suspend Butt<strong>on</strong><br />
When an alarm sounds, pressing <strong>the</strong> suspend butt<strong>on</strong> will silence it for 90 sec<strong>on</strong>ds. NOTE:<br />
you will see a flashing display of <strong>the</strong> alarming parameter.<br />
I. NIBP<br />
1. Before starting <strong>the</strong> NIBP measurement, always perform <strong>the</strong> steps described below:<br />
a. Select appropriate cuff. The cuff is <strong>the</strong> appropriate size when <strong>the</strong> artery index<br />
marker lies somewhere between <strong>the</strong> range markings <strong>on</strong> <strong>the</strong> NIBP cuff.<br />
b. Positi<strong>on</strong> <strong>the</strong> cuff. The cuff should always be positi<strong>on</strong>ed <strong>on</strong> a bare arm, midway<br />
between <strong>the</strong> shoulder and <strong>the</strong> elbow, with <strong>the</strong> artery index marker over <strong>the</strong><br />
brachial artery. It should fit comfortably to allow no more than 1-2 fingers space<br />
between <strong>the</strong> cuff and <strong>the</strong> arm. During <strong>the</strong> NIBP measurement cycle, <strong>the</strong> patient should<br />
have no movement to <strong>the</strong> extremity and should remain quiet.<br />
NOTE: If <strong>the</strong> cuff is not level with <strong>the</strong> heart, subtract 1.8 mmHg to <strong>the</strong> displayed reading<br />
for each inch of elevati<strong>on</strong> above <strong>the</strong> heart, or add 1.8 mmHg from <strong>the</strong> displayed reading for<br />
each inch below <strong>the</strong> heart.<br />
2. Manual NIBP measurements<br />
a. Attach <strong>the</strong> appropriate cuff to <strong>the</strong> patients arm<br />
b. Press B/P<br />
c. When <strong>the</strong> B/P cycle is completed, a t<strong>on</strong>e sounds and <strong>the</strong> NIBP results are<br />
displayed in <strong>the</strong> SYS, DIA, and Pulse rate windows<br />
d. If MAP is enabled, <strong>the</strong> results are displayed in <strong>the</strong> message window<br />
e. The results are displayed for 2 minutes or until ano<strong>the</strong>r NIBP cycle is initiated.<br />
NOTE: If <strong>the</strong> SpO2 sensor is attached and generating valid pulse data, <strong>the</strong>n <strong>the</strong><br />
displayed Pulse Rate is derived from <strong>the</strong> SpO2 sensor reading.<br />
3. Automatic NIBP—Interval measurements<br />
a. Attach <strong>the</strong> appropriate cuff to <strong>the</strong> patients arm<br />
b. Press to set <strong>the</strong> measurement interval which includes: ST (Stat),1,3,4,5, 10,15, 30,<br />
45, 60, 90, 120, and 240 minutes. The two dashes ( -- ) in <strong>the</strong> message window<br />
indicate that <strong>the</strong> automatic mode for NIBP is turned OFF.<br />
c. Ten sec<strong>on</strong>ds after you select an interval, and assuming that safe venous return<br />
pressure has been maintained for at least 30 sec<strong>on</strong>ds, <strong>the</strong> m<strong>on</strong>itor starts <strong>the</strong> first<br />
automatic NIBP cycle.<br />
d. When <strong>the</strong> cycle ends, a t<strong>on</strong>e sounds and <strong>the</strong> m<strong>on</strong>itor displays <strong>the</strong> reading. The<br />
measurement will remain <strong>on</strong> <strong>the</strong> screen until <strong>the</strong> next measurement cycle begins, 2<br />
minutes pass, or <strong>the</strong> NIBP is pressed again.<br />
4<br />
VSM Trainer Outline<br />
SM 2818 Rev C 08/2010
4. ST/ STAT Measurement<br />
If <strong>the</strong> selected interval is STAT, <strong>the</strong> m<strong>on</strong>itor takes repeated NIBP measurements for 5<br />
minutes, starting a new cycle each time <strong>the</strong> cuff deflates below a safe venous return<br />
pressure (SVRP) for 2 sec<strong>on</strong>ds.<br />
5. MAP Measurement<br />
Is a calculated figure, available for adults, pediatric, and ne<strong>on</strong>atal patients. Factory<br />
default setting is enabled MAP display for ne<strong>on</strong>ates, and disabled for adult and pediatric<br />
patients. If MAP is enabled, <strong>the</strong> m<strong>on</strong>itor displays MAP readings in <strong>the</strong> message window at <strong>the</strong><br />
end of a NIBP reading.<br />
J. SpO2 M<strong>on</strong>itoring<br />
1. Verify that <strong>the</strong> SpO2 sensor is c<strong>on</strong>nected to <strong>the</strong> m<strong>on</strong>itor.<br />
2. Attach <strong>the</strong> SpO2 sensor to <strong>the</strong> patient’s index finger. Do not attach <strong>the</strong> SpO2 sensor to <strong>the</strong> same<br />
limb as B/P cuff.<br />
3. Within a few sec<strong>on</strong>ds, <strong>the</strong> pulse amplitude indicator reflects <strong>the</strong> rate and strength of <strong>the</strong> pulse.<br />
4. Within less than 20 sec<strong>on</strong>ds, <strong>the</strong> SpO2 window displays <strong>the</strong> SpO2 measurement and a numeric<br />
pulse rate value appears in <strong>the</strong> window.<br />
K. Temperature M<strong>on</strong>itoring<br />
1. Prep Thermometer Probe<br />
a. Hold <strong>the</strong> probe handle with your thumb and two fingers <strong>on</strong> <strong>the</strong> indentati<strong>on</strong>s of <strong>the</strong> probe<br />
handle, <strong>the</strong>n withdraw <strong>the</strong> probe from <strong>the</strong> probe well.<br />
b. Wait for <strong>the</strong> 188.8 and <strong>the</strong> ORL to appear in <strong>the</strong> temperature screen.<br />
c. Insert <strong>the</strong> probe into a new probe cover and press down firmly until a new probe cover<br />
engages <strong>on</strong>to <strong>the</strong> probe.<br />
2. Taking Oral Temperatures<br />
It is IMPORTANT while taking an Oral predictive temperature to:<br />
a. Instruct <strong>the</strong> patient not to talk or move during <strong>the</strong> temperature reading process.<br />
b. Place <strong>the</strong> probe deep into <strong>the</strong> patient’s posterior sublingual pocket.<br />
c. Have <strong>the</strong> nurse hold <strong>the</strong> probe in place maintaining tissue c<strong>on</strong>tact until <strong>the</strong> temperature is<br />
complete.<br />
d. The predictive temperature reading will be displayed for 1 minute in window.<br />
5<br />
VSM Trainer Outline<br />
SM 2818 Rev C 08/2010
e. Interferences with oral measurements for up to 20 minutes include:<br />
1. Ingesting hot or cold liquids<br />
2. Talking<br />
3. Eating food<br />
4. Chewing gum or mints<br />
5. Brushing teeth<br />
6. Mouth care<br />
7. Smoking<br />
8. Performing strenuous exercises<br />
3. Taking Axillary Temperatures<br />
a. Hold <strong>the</strong> probe handle with your thumb and two fingers <strong>on</strong> <strong>the</strong> indentati<strong>on</strong>s of <strong>the</strong><br />
probe handle, <strong>the</strong>n withdraw <strong>the</strong> probe from <strong>the</strong> probe well.<br />
b. Wait for <strong>the</strong> 188.8 and <strong>the</strong> ORL to appear in <strong>the</strong> temperature screen.<br />
c. Press <strong>the</strong> UP/ DOWN arrows to change <strong>the</strong> display to:<br />
AP( axillary pediatric 17 years and younger) or<br />
AA ( axillary adult 18 years and older)<br />
d. Insert <strong>the</strong> probe into a new probe cover, and press down firmly until a new probe cover<br />
engages <strong>on</strong>to <strong>the</strong> probe.<br />
e. Lift <strong>the</strong> patients arm to fully expose <strong>the</strong> axilla. Place <strong>the</strong> probe tip as high as possible in <strong>the</strong><br />
axilla, aligning <strong>the</strong> probe vertically with <strong>the</strong> spine. Next, lower <strong>the</strong> patients arm down to make<br />
maximum c<strong>on</strong>tact with <strong>the</strong> probe tip. The patient should always remain still, maintaining good<br />
tissue c<strong>on</strong>tact throughout <strong>the</strong> process.<br />
f. The predictive temperature reading will be displayed for 1 minute in message window.<br />
4. Taking Rectal Temperatures<br />
For rectal temperatures, use <strong>on</strong>ly <strong>the</strong> RECTAL PROBE with <strong>the</strong> RED ejecti<strong>on</strong> butt<strong>on</strong> and <strong>the</strong> RED<br />
probe well.<br />
a. Hold <strong>the</strong> probe handle with your thumb and two fingers <strong>on</strong> <strong>the</strong> indentati<strong>on</strong>s of <strong>the</strong> probe handle,<br />
<strong>the</strong>n withdraw <strong>the</strong> probe from <strong>the</strong> probe well.<br />
b. Wait for <strong>the</strong> 188.8 and <strong>the</strong> rEC to appear in <strong>the</strong> temperature window.<br />
c. Load <strong>the</strong> probe cover <strong>on</strong>to <strong>the</strong> probe.<br />
d. Apply a thin coat of water-based lubricant to <strong>the</strong> tip of <strong>the</strong> probe cover (opti<strong>on</strong>al).<br />
e. Insert <strong>the</strong> probe tip 5/8 of an inch for adults and approximately ½ inch for children, inside <strong>the</strong><br />
rectal sphincter<br />
f. Tilt <strong>the</strong> probe slightly to ensure good tissue c<strong>on</strong>tact.<br />
g. The predictive temperature reading will be displayed for 1 minute in message window.<br />
** WARNING**: Use extreme care to avoid risk of bowel perforati<strong>on</strong>.<br />
**NEVER reuse probe covers; reusing covers will give inaccurate temperature readings.<br />
6<br />
VSM Trainer Outline<br />
SM 2818 Rev C 08/2010
L. M<strong>on</strong>itored Mode Temperatures<br />
*Remember: Press MENU to select <strong>the</strong> correct Temperature Mode, F M (Fahrenheit<br />
M<strong>on</strong>itored), or C M (Celsius M<strong>on</strong>itored)<br />
1. C<strong>on</strong>tinuous m<strong>on</strong>itoring mode is not recommended for use over 5 minutes.<br />
2. Measurements are not stored in memory.<br />
3. 3-5 minute <strong>the</strong>rmometer reading is equivalent to using a glass <strong>the</strong>rmometer.<br />
4. Useful for double-checking fast predictive readings; i.e. an infant exposed to cool ambient<br />
temperatures, or hypo<strong>the</strong>rmic patient.<br />
5. To use m<strong>on</strong>itor mode:<br />
a. Select <strong>the</strong> correct probe/probe well.<br />
b. Load probe cover.<br />
c. Determine <strong>the</strong> site for <strong>the</strong> Temperature reading: Oral, Axillary, or Rectal.<br />
d. Take <strong>the</strong> patient’s reading in <strong>the</strong> appropriate site. C<strong>on</strong>tinue to hold <strong>the</strong> probe in positi<strong>on</strong> for<br />
<strong>the</strong> required durati<strong>on</strong>:<br />
Oral 3 minutes<br />
Axillary 5 minutes<br />
Rectal 3 minutes<br />
e. Record <strong>the</strong> temperature before removing <strong>the</strong> probe from <strong>the</strong> site. M<strong>on</strong>itor Mode temperatures<br />
are not stored in memory.<br />
f. Discard <strong>the</strong> probe cover. Up<strong>on</strong> returning <strong>the</strong> probe to <strong>the</strong> well, <strong>the</strong> <strong>the</strong>rmometer will stay in <strong>the</strong><br />
present mode used. Change as needed.<br />
NOTE: The <strong>the</strong>rmometer enters M<strong>on</strong>itor Mode automatically, if <strong>the</strong> probe is removed from <strong>the</strong> well and<br />
not used for 60 sec<strong>on</strong>ds, or if <strong>the</strong> patient’s temperature is too low to allow <strong>the</strong> device to predict a<br />
reading.<br />
M. Review Butt<strong>on</strong><br />
1. Press Review to display most recent set of vital signs.<br />
2. Press UP/ DOWN or to cycle through stored data. The m<strong>on</strong>itor stores 99 sets.<br />
3. The message window displays READING with data-set sequence number and time of displayed<br />
reading; <strong>the</strong> most recent is displayed first.<br />
N. Nurse Call (if applicable)<br />
When <strong>the</strong> cable is c<strong>on</strong>nected and operati<strong>on</strong>al, <strong>the</strong> m<strong>on</strong>itor immediately notifies <strong>the</strong> Nurse Call system<br />
when a patient alarm occurs.<br />
O. Error Codes<br />
1. The VSM 300 is equipped with <strong>the</strong> technology to detect an error when calculating a patient’s vital<br />
sign. The codes will display <strong>on</strong> <strong>the</strong> parameter that has <strong>the</strong> error.<br />
2. The error code references are located <strong>on</strong> <strong>the</strong> right side of <strong>the</strong> VSM 300 and also in <strong>the</strong> VSM 300<br />
Directi<strong>on</strong>s for Use.<br />
P. Erasing Data<br />
1. All patient vital sign data is erased when <strong>the</strong> m<strong>on</strong>itor is powered Off, or when you change <strong>the</strong> date<br />
and time settings.<br />
7<br />
VSM Trainer Outline<br />
SM 2818 Rev C 08/2010
a. To erase patient data during normal operati<strong>on</strong>, press and hold Review for 3 sec<strong>on</strong>ds.<br />
b. When <strong>the</strong> m<strong>on</strong>itor prompts for c<strong>on</strong>firmati<strong>on</strong>, press <strong>the</strong> Up to c<strong>on</strong>firm or <strong>the</strong> Down to<br />
cancel.<br />
2. You cannot change <strong>the</strong> date and time setting without also erasing all stored patient data.<br />
a. When asked to erase patient data, press Up for yes; <strong>the</strong> m<strong>on</strong>itor erases <strong>the</strong> data and<br />
enables <strong>the</strong> date and time adjusted.<br />
Q. Cleaning<br />
1. Wipe <strong>the</strong> M<strong>on</strong>itor with a damp cloth with <strong>on</strong>e of <strong>the</strong> following:<br />
a. Mild detergent and water<br />
b. Hospital disinfectant that is n<strong>on</strong>-staining<br />
2. Wipe <strong>the</strong> Temperature Probe with a damp cloth with <strong>on</strong>e of <strong>the</strong> following:<br />
a. Alcohol<br />
b. Warm water<br />
c. Hospital disinfectant that is n<strong>on</strong>-staining<br />
3. Wipe <strong>the</strong> SpO2 Sensor with a damp cloth with <strong>on</strong>e of <strong>the</strong> following<br />
a. 70% isopropyl Alcohol<br />
b. 10% or less Bleach Soluti<strong>on</strong><br />
R. Replacing Printer Paper (if applicable)<br />
1. Press Printer butt<strong>on</strong> to open <strong>the</strong> printer door.<br />
2. Insert new roll of paper; use <strong>on</strong>ly WA <strong>the</strong>rmal paper.<br />
3. Thread end of roll over <strong>the</strong> roller and through slot in printer door.<br />
4. Pull slightly <strong>on</strong> paper to take up any slack, <strong>the</strong>n close printer door.<br />
8<br />
VSM Trainer Outline<br />
SM 2818 Rev C 08/2010
A<br />
B<br />
C<br />
The ABC’s of CVSM 6000<br />
Age Ranges<br />
Battery Info<br />
Cleaning<br />
To change patient modes, from <strong>the</strong> screen, touch in bottom left hand<br />
corner. Touch Type <strong>on</strong> right side of screen. Choose between Adult, Pediatric, or Ne<strong>on</strong>ate. Touch<br />
to save and go back to Home screen. Age ranges are as follows:<br />
• Ne<strong>on</strong>ate: 28 days or less of age if born at term (37 weeks), o<strong>the</strong>rwise, up to 44 weeks<br />
gestati<strong>on</strong>al age<br />
• Pediatric: 29 days of age through 12 years of age<br />
• Adult: >13 years of age<br />
Approximate hours of use: 7 – 8 hours<br />
6 Cell 9 Cell<br />
Compositi<strong>on</strong> Lithium i<strong>on</strong> Lithium i<strong>on</strong><br />
Charge time to 80% 2 hr 7 min 2 hr 25 min<br />
Charge time to 100% 3 hr 4 hr<br />
Patient exams per charge 1 26 47<br />
Age to 70% capacity 2 300 300<br />
Device/Stand<br />
• Disc<strong>on</strong>nect from AC power before cleaning<br />
• Do not submerge or autoclave m<strong>on</strong>itor or accessories<br />
The following agents are compatible with <strong>the</strong> m<strong>on</strong>itor:<br />
• CaviWipes<br />
• Sani-Cloth® Plus<br />
• 70% isopropyl alcohol<br />
• 10% chlorine bleach<br />
Apply soluti<strong>on</strong> to cloth and wipe down m<strong>on</strong>itor; never spray soluti<strong>on</strong> directly <strong>on</strong> m<strong>on</strong>itor.<br />
Allow m<strong>on</strong>itor to dry 10 minutes before use.<br />
Rinse off bleach with a cloth dampened with water.<br />
Note: Disinfect according to your facility’s protocols and standards or local regulati<strong>on</strong>s.<br />
D<br />
E<br />
Defaults<br />
End M<strong>on</strong>itoring<br />
Accessories<br />
NIBP hose/reusable cuffs: wipe down with mild detergent soluti<strong>on</strong>.<br />
SpO2 Sensor:: wipe with cloth dampened with 70% isopropyl alcohol or 10% chlorine bleach soluti<strong>on</strong>.<br />
Temperature probe: wipe with cloth dampened with alcohol, warm water, or an appropriately diluted,<br />
n<strong>on</strong>-staining disinfectant soluti<strong>on</strong>.<br />
To change <strong>the</strong> default power <strong>on</strong> settings:<br />
1. Enter or adjust desired settings. (Note: The new settings appear as <strong>the</strong>y are completed but are<br />
temporary until <strong>the</strong>y are saved).<br />
2. Touch <strong>the</strong> Settings tab.<br />
3. Touch <strong>the</strong> Device tab.<br />
4. Enter or adjust desired settings you want to add or change. Touch SAVE AS DEFAULT.<br />
5. Touch OK to c<strong>on</strong>firm you want to overwrite your previous settings and replace <strong>the</strong>m with your<br />
current settings, or touch Cancel to retain <strong>the</strong> previous settings.<br />
Power Down: From <strong>the</strong> Home screen, touch <strong>the</strong> battery ic<strong>on</strong>.<br />
Touch Power Down.<br />
Power Save (Standby):<br />
Press <strong>the</strong> Power butt<strong>on</strong> <strong>on</strong>ce briefly and choose Power Save OR leave m<strong>on</strong>itor inactive.*<br />
*The time limit can be set by users by touching Settings, Advanced, Display, and <strong>the</strong>n Power<br />
Saver. Choose <strong>the</strong> time limit that <strong>the</strong> m<strong>on</strong>itor will wait before going into Standby mode.<br />
Reset: Press and hold <strong>the</strong> power butt<strong>on</strong><br />
for 6 sec<strong>on</strong>ds. NOTE: you will lose all<br />
patient data and c<strong>on</strong>figurati<strong>on</strong> settings that are not saved as defaults.<br />
1 A patient exam includes NIBP, Temperature, and SpO2 measurements at <strong>the</strong> rate of <strong>on</strong>e patient every 10 minutes with a 2 minute display time out setting and a new battery.<br />
2 After this many full charge and discharge cycles, <strong>the</strong> battery has aged to where its total capacity has been reduced to 70% of its rating.<br />
CVSM 6000 FAQ<br />
MC 7719 08/2010
C<strong>on</strong>nex Vital Signs M<strong>on</strong>itor 6000 Series (CVSM) Outline<br />
Train <strong>the</strong> Trainer<br />
A. Intended Use<br />
1. Depending up<strong>on</strong> <strong>the</strong> c<strong>on</strong>figurati<strong>on</strong> of your particular device, <strong>the</strong> VSM 6000 Series can<br />
measure:<br />
a. Systolic and diastolic blood pressure <strong>on</strong> Adult, Pediatric, and Ne<strong>on</strong>ate<br />
patients.<br />
b. Pulse rate<br />
c. Temperature (oral, adult axillary, pediatric axillary, or rectal)<br />
d. SpO 2<br />
e. Mean Arterial <str<strong>on</strong>g>Pressure</str<strong>on</strong>g><br />
f. The m<strong>on</strong>itor allows you to enter patient data manually, scan in a patient's<br />
name with a barcode scanner, or download a patient's name from an ADT.<br />
You can enter specific patient informati<strong>on</strong> such as patient demographics,<br />
modifiers, and manual parameters.<br />
B. Power<br />
1. The power butt<strong>on</strong> is located <strong>on</strong> <strong>the</strong> right side of <strong>the</strong> m<strong>on</strong>itor, and it turns <strong>the</strong> m<strong>on</strong>itor<br />
<strong>on</strong>, sets <strong>the</strong> m<strong>on</strong>itor to standby, and also indicates <strong>the</strong> charging status.<br />
Power ic<strong>on</strong>:<br />
a. Press <strong>the</strong> power butt<strong>on</strong> to turn <strong>the</strong> device <strong>on</strong>.<br />
b. If <strong>the</strong> device is <strong>on</strong>, pressing <strong>the</strong> power butt<strong>on</strong> again puts <strong>the</strong> device in Standby<br />
mode.<br />
c. Green LED in center of power plug symbol indicates AC power is present and<br />
that <strong>the</strong> battery is fully charged or has been removed.<br />
d. Amber LED indicates AC power is present and that <strong>the</strong> battery is charging.<br />
2. Display power saving mode c<strong>on</strong>serves battery power by turning off <strong>the</strong> backlight of <strong>the</strong><br />
m<strong>on</strong>itor display after two minutes of inactivity. (Touch anywhere in <strong>the</strong> Home tab to<br />
bring <strong>the</strong> m<strong>on</strong>itor out of this mode.)<br />
3. The Standby mode c<strong>on</strong>serves battery power by shutting down <strong>the</strong> m<strong>on</strong>itor if you do<br />
not touch any butt<strong>on</strong> for ten minutes.<br />
4. To properly power off <strong>the</strong> m<strong>on</strong>itor, touch <strong>the</strong> Battery ic<strong>on</strong> located <strong>on</strong> <strong>the</strong> upper right<br />
hand secti<strong>on</strong> of <strong>the</strong> touch screen and <strong>the</strong>n select/touch “Power Down”.<br />
Note: The settings for Display power-saving mode and Standby mode can be c<strong>on</strong>figured.<br />
C. Battery<br />
1. The battery status is represented by three ic<strong>on</strong>s in <strong>the</strong> Device status area (at <strong>the</strong> top of<br />
<strong>the</strong> screen).<br />
a. The m<strong>on</strong>itor is c<strong>on</strong>nected to an electrical receptacle and <strong>the</strong> battery is<br />
charging or is fully charged.<br />
C<strong>on</strong>nex Vital Signs M<strong>on</strong>itor 6000 Trainer Outline<br />
MC 7517 08/2010<br />
1
. The m<strong>on</strong>itor is not c<strong>on</strong>nected to an electrical receptacle and is running <strong>on</strong><br />
battery power. The estimated battery capacity is displayed in <strong>the</strong> hour(s):<br />
minute(s) format.<br />
c. The m<strong>on</strong>itor is c<strong>on</strong>nected to an electrical receptacle but <strong>the</strong> battery is not able<br />
to maintain a charge.<br />
d. If <strong>the</strong> battery is not being recharged and becomes low, an informati<strong>on</strong><br />
message displays in <strong>the</strong> Device status area. If this is dismissed, a low-battery<br />
alarm c<strong>on</strong>diti<strong>on</strong> will result, with an error message as power diminishes.<br />
D. Home Screen/Profiles<br />
1. The device utilizes touchscreen technology and all navigati<strong>on</strong> can take place from <strong>the</strong><br />
home screen with <strong>the</strong> touch of a finger.<br />
2. The home screen is divided into three secti<strong>on</strong>s:<br />
a. Device Status Area (<strong>the</strong> top secti<strong>on</strong> of <strong>the</strong> screen) provides informati<strong>on</strong><br />
such as Clinician identificati<strong>on</strong>, Device locati<strong>on</strong>, Time and Date, C<strong>on</strong>necti<strong>on</strong><br />
status (E<strong>the</strong>rnet, USB, Wireless), Alarms and Messages, etc.<br />
b. C<strong>on</strong>tent Area (<strong>the</strong> large middle secti<strong>on</strong> of <strong>the</strong> screen) displays vital-sign<br />
measurements frames, patient informati<strong>on</strong> frame, manual parameters frame,<br />
and shortcuts to several c<strong>on</strong>trols.<br />
c. Navigati<strong>on</strong> Area (<strong>the</strong> bottom secti<strong>on</strong> of <strong>the</strong> screen) provides tabs for o<strong>the</strong>r<br />
settings. Touching <strong>the</strong>se tabs opens ano<strong>the</strong>r screen and provides setting<br />
opti<strong>on</strong>s.<br />
3. Profiles: Profiles are variati<strong>on</strong>s of <strong>the</strong> Home tab. Each profile gives you access to a<br />
different set of features. Depending <strong>on</strong> <strong>the</strong> model number purchased, <strong>the</strong> m<strong>on</strong>itor may<br />
offer multiple profiles, including M<strong>on</strong>itor, Spot Check, and Triage.<br />
a. M<strong>on</strong>itor: Enables you to use alarms and timed intervals. It is designed for<br />
c<strong>on</strong>tinuous patient m<strong>on</strong>itoring.<br />
b. Spot Check: Profile is optimized for clinicians who take spot-check vital<br />
readings and do not need c<strong>on</strong>tinuous m<strong>on</strong>itoring or alarm features. Therefore,<br />
<strong>the</strong> Alarms tab and all features related to alarms and timed intervals are<br />
unavailable.<br />
c. Triage: Allows for vital-signs capture without alarms or access to <strong>the</strong> Patients<br />
tab.<br />
4. Selecting a Profile:<br />
a. Touch Settings.<br />
b. Touch Profiles.<br />
c. Touch <strong>the</strong> desired profile.<br />
C<strong>on</strong>nex Vital Signs M<strong>on</strong>itor 6000 Trainer Outline<br />
MC 7517 08/2010<br />
2
d. Touch Home (Profiles can’t be changed while acquiring data.)<br />
E. Keypad<br />
1. When navigating, some screens have an opti<strong>on</strong> to enter numeric informati<strong>on</strong> using <strong>the</strong><br />
Keypad, indicated by this symbol: To open <strong>the</strong> keypad, touch any field that<br />
includes this ic<strong>on</strong>.<br />
2. To use <strong>the</strong> keypad:<br />
a. With <strong>the</strong> keypad open, enter <strong>the</strong> new value by touching <strong>the</strong> number butt<strong>on</strong>s.<br />
The value must be within <strong>the</strong> range that displays below <strong>the</strong> data field.<br />
b. Touch OK.<br />
c. To close <strong>the</strong> keypad, touch OK to exit <strong>the</strong> keypad and insert <strong>the</strong> value, or<br />
Cancel to exit <strong>the</strong> keypad without saving data.<br />
F. Keyboard<br />
1. When navigating, some screens have an opti<strong>on</strong> to enter numeric informati<strong>on</strong> using <strong>the</strong><br />
Keyboard, indicated by this symbol. To open <strong>the</strong> keyboard, touch any field that<br />
includes this ic<strong>on</strong>.<br />
2. To use <strong>the</strong> keyboard:<br />
a. With <strong>the</strong> keyboard open, touch letters or numbers.<br />
b. Do <strong>on</strong>e of <strong>the</strong> following:<br />
i. Touch Next. This accepts <strong>the</strong> entry for <strong>the</strong> current field, <strong>the</strong>n clears<br />
<strong>the</strong> data field to allow data entry in <strong>the</strong> next field.<br />
ii. Touch OK. The keyboard disappears and <strong>the</strong> entered characters<br />
appear in <strong>the</strong> data field.<br />
iii. Touch Cancel. This exits <strong>the</strong> keyboard without saving <strong>the</strong> entered<br />
data.<br />
G. NIBP<br />
The m<strong>on</strong>itor enables you to take manual and interval NIBP measurements.<br />
1. Measurements can be taken from <strong>the</strong> NIBP frame.<br />
a. Systolic, Diastolic, and MAP can be seen. (Touching <strong>the</strong> frame toggles <strong>the</strong><br />
primary and sec<strong>on</strong>dary view between SYS/DIA and MAP.)<br />
b. The m<strong>on</strong>itor supports single- and dual-lumen hoses.<br />
2. Taking <strong>the</strong> NIBP measurement should include <strong>the</strong>se steps:<br />
a. Select <strong>the</strong> appropriate size cuff.<br />
i. Measure <strong>the</strong> circumference of <strong>the</strong> patient's bare upper arm, midway<br />
between <strong>the</strong> elbow and shoulder.<br />
ii. Wrap <strong>the</strong> cuff around <strong>the</strong> patient's limb and verify that <strong>the</strong> artery index<br />
marker lies somewhere between <strong>the</strong> two range markings <strong>on</strong> <strong>the</strong> cuff<br />
iii. Choose <strong>the</strong> appropriate cuff size based <strong>on</strong> <strong>the</strong> circumference<br />
measurement of <strong>the</strong> patient’s arm. Ensure that Artery Index Marker arrow<br />
falls in between <strong>the</strong> cuff range markers that are depicted in “cm”. If <strong>the</strong><br />
C<strong>on</strong>nex Vital Signs M<strong>on</strong>itor 6000 Trainer Outline<br />
MC 7517 08/2010<br />
3
circumference of <strong>the</strong> patient's limb falls between two cuff sizes, use <strong>the</strong><br />
larger cuff size.<br />
b. Attach <strong>the</strong> cuff.<br />
i. Positi<strong>on</strong> <strong>the</strong> cuff <strong>on</strong> <strong>the</strong> patient's bare upper arm midway between <strong>the</strong><br />
shoulder and <strong>the</strong> elbow.<br />
ii. Wrap <strong>the</strong> cuff snugly so that <strong>the</strong>re is room for no more than two<br />
fingers between <strong>the</strong> cuff and <strong>the</strong> patient's bare upper arm.<br />
iii. Positi<strong>on</strong> <strong>the</strong> Artery Index Marker <strong>on</strong> <strong>the</strong> cuff directly over <strong>the</strong> brachial<br />
artery.<br />
iv. Ensure that <strong>the</strong> blood pressure tubing has no kinks or twists.<br />
3. Manual BP<br />
a. For manual BP, press <strong>the</strong> BP start butt<strong>on</strong>. When a measurement is<br />
started, <strong>the</strong> m<strong>on</strong>itor inflates <strong>the</strong> cuff to <strong>the</strong> appropriate level. In <strong>the</strong> NIBP<br />
frame, <strong>the</strong> systolic display shows <strong>the</strong> cuff pressure while <strong>the</strong> blood pressure<br />
measurement is in progress.<br />
b. The m<strong>on</strong>itor measures blood pressure as <strong>the</strong> cuff is inflating. If patient<br />
movement, excessive noise, or an arrhythmia prevents <strong>the</strong> m<strong>on</strong>itor from<br />
determining <strong>the</strong> blood pressure while <strong>the</strong> cuff is inflating, <strong>the</strong> m<strong>on</strong>itor attempts<br />
to measure <strong>the</strong> blood pressure while <strong>the</strong> cuff is deflating.<br />
c. When <strong>the</strong> measurement is complete, <strong>the</strong> m<strong>on</strong>itor displays <strong>the</strong> final reading.<br />
The m<strong>on</strong>itor displays <strong>the</strong> measurement until you save it to <strong>the</strong> patient's record<br />
or you take ano<strong>the</strong>r blood pressure measurement.<br />
4. Interval BP<br />
a. The m<strong>on</strong>itor can take NIBP measurements automatically based <strong>on</strong> intervals<br />
you choose.<br />
b. The Intervals tab provides all interval features. From this tab, you can do <strong>the</strong><br />
following: C<strong>on</strong>figure intervals, Turn off intervals, or C<strong>on</strong>figure <strong>the</strong> m<strong>on</strong>itor to<br />
print automatic measurements as <strong>the</strong>y are completed.<br />
c. The butt<strong>on</strong> changes to a timer , which counts down to <strong>the</strong> next<br />
automatic measurement. Automatic measurements c<strong>on</strong>tinue until you turn<br />
off intervals.<br />
d. Types of intervals:<br />
i. Automatic Intervals: You can c<strong>on</strong>figure <strong>the</strong> m<strong>on</strong>itor to take<br />
automatic NIBP measurements at c<strong>on</strong>sistent intervals (e.g., every 60<br />
min.).<br />
ii. On <strong>the</strong> Home tab touch , select automatic, use <strong>the</strong> numeric<br />
keypad to enter <strong>the</strong> length of time between NIBP measurements, and<br />
touch start intervals.<br />
iii. Program Intervals: You can c<strong>on</strong>figure <strong>the</strong> m<strong>on</strong>itor to take automatic<br />
C<strong>on</strong>nex Vital Signs M<strong>on</strong>itor 6000 Trainer Outline<br />
MC 7517 08/2010<br />
4
NIBP measurements at variable intervals.<br />
(a) Customized programs can exist but <strong>the</strong>y are programmed by<br />
<strong>the</strong> end users’ discreti<strong>on</strong>.The numbers below <strong>the</strong> program<br />
name indicate <strong>the</strong> length of time between each interval in <strong>the</strong><br />
cycle.<br />
(b) When you start a program, <strong>the</strong> following occurs:<br />
(i.) The m<strong>on</strong>itor starts <strong>the</strong> first measurement<br />
(ii.)<br />
immediately.<br />
After <strong>the</strong> first measurement, <strong>the</strong> interval cycle begins.<br />
The sec<strong>on</strong>d measurement starts at <strong>the</strong> programselected<br />
time (e.g., 15 minutes) after <strong>the</strong> first<br />
measurement is complete. The third measurement<br />
starts (e.g., 30 minutes) after <strong>the</strong> sec<strong>on</strong>d<br />
measurement is complete, and so <strong>on</strong>.<br />
Note: You can use <strong>the</strong> programs as is, or you can edit <strong>the</strong>m.<br />
5. Stat Intervals: If you select <strong>the</strong> Stat opti<strong>on</strong> in <strong>the</strong> Intervals tab, <strong>the</strong> m<strong>on</strong>itor takes<br />
repeated NIBP measurements for five minutes, starting a new cycle each time <strong>the</strong> cuff<br />
deflates below safe venous return pressure (SVRP) for two sec<strong>on</strong>ds.<br />
6. Stop automatic measurements:<br />
a. On <strong>the</strong> Home tab, touch <strong>the</strong> interval timer butt<strong>on</strong>. The Intervals tab displays.<br />
b. Touch to select Stop Intervals.<br />
7. Cancel a measurement that is in progress:<br />
a. On <strong>the</strong> Home tab, touch .<br />
b. The m<strong>on</strong>itor rapidly deflates <strong>the</strong> cuff. The screen displays NIBP cancellati<strong>on</strong><br />
message and if intervals are turned <strong>on</strong>, <strong>the</strong><br />
butt<strong>on</strong> changes to a timer<br />
(for example, ), which counts down to <strong>the</strong> next automatic<br />
measurement.<br />
8. C<strong>on</strong>figure NIBP alarms steps:<br />
a. Verify that you are using <strong>the</strong> M<strong>on</strong>itor profile, which c<strong>on</strong>tains <strong>the</strong> Alarms tab.<br />
b. Touch Alarms. The Alarms tab displays.<br />
c. Touch <strong>the</strong> NIBP tab.<br />
d. Enter <strong>the</strong> desired upper and lower alarm limits for Systolic, Diastolic, and MAP<br />
readings using <strong>the</strong> up/down arrows or <strong>the</strong> keypad.<br />
e. Touch Home. The new alarm settings display in <strong>the</strong> alarm c<strong>on</strong>trol butt<strong>on</strong>.<br />
H. Temperature<br />
The device utilizes SureTemp ® Plus <strong>the</strong>rmometry (range 80°-110° Fahrenheit or 26.6°- 43.4°<br />
Celsius).<br />
1. Device is c<strong>on</strong>figurable to Celsius and Fahrenheit in all profiles.<br />
2. Remove your temperature probe from <strong>the</strong> probe well and <strong>the</strong>n within <strong>the</strong> <strong>the</strong>rmometry<br />
C<strong>on</strong>nex Vital Signs M<strong>on</strong>itor 6000 Trainer Outline<br />
MC 7517 08/2010<br />
5
frame touch Temperature site c<strong>on</strong>trol to toggle between modes. (Rectal will <strong>on</strong>ly be<br />
an opti<strong>on</strong> when red top probe is utilized)<br />
Rectal Oral Pediatric Axillary Adult Axillary<br />
3. Predictive Mode<br />
a. One-time measurement that takes <strong>on</strong>ly a few sec<strong>on</strong>ds.<br />
i. Oral—approx. 4 to 6 sec<strong>on</strong>ds.<br />
ii. Adult axillary (age 18 years and older)—approx. 12 to 15 sec<strong>on</strong>ds.<br />
iii. Pediatric axillary (age 17 years and younger)—approx. 10 to 13<br />
sec<strong>on</strong>ds.<br />
iv. Rectal—approx. 10 to 13 sec<strong>on</strong>ds.<br />
b. It results in a single temperature reading which is displayed at <strong>the</strong> end of <strong>the</strong><br />
brief measurement.<br />
c. The m<strong>on</strong>itor sounds a t<strong>on</strong>e to indicate <strong>the</strong> end of a predictive measurement.<br />
d. Steps to use Predictive Mode:<br />
i. Remove <strong>the</strong> temperature probe from <strong>the</strong> probe well.<br />
ii. Insert <strong>the</strong> probe into a new probe cover and press <strong>the</strong> probe handle<br />
down firmly.<br />
iii. Touch Temperature Site C<strong>on</strong>trol to choose from <strong>the</strong>se readings:<br />
oral, pediatric axillary, or adult axillary temperature.<br />
iv. Hold <strong>the</strong> <strong>the</strong>rmometer probe tip in place at <strong>the</strong> measurement site.<br />
(a) For oral temperatures, place <strong>the</strong> <strong>the</strong>rmometer probe tip under<br />
<strong>the</strong> patient’s t<strong>on</strong>gue <strong>on</strong> ei<strong>the</strong>r side of <strong>the</strong> mouth to reach <strong>the</strong><br />
sublingual pocket and ask <strong>the</strong> patient to close his/her lips.<br />
(b) For axillary temperatures, lift <strong>the</strong> patient’s arm so that <strong>the</strong><br />
entire axilla is easily seen and place <strong>the</strong> temperature probe<br />
tip as high as possible in <strong>the</strong> mid-axilla. Align <strong>the</strong> probe<br />
vertically with <strong>the</strong> spine. Next, lower <strong>the</strong> patient’s arm down to<br />
make maximum c<strong>on</strong>tact with <strong>the</strong> probe tip<br />
e. The m<strong>on</strong>itor beeps when <strong>the</strong> final temperature is reached. The Home tab<br />
C<strong>on</strong>nex Vital Signs M<strong>on</strong>itor 6000 Trainer Outline<br />
MC 7517 08/2010<br />
6
displays <strong>the</strong> patient temperature. The temperature c<strong>on</strong>tinues to display in<br />
degrees Fahrenheit and degrees Celsius even after <strong>the</strong> probe is returned to<br />
<strong>the</strong> probe well.<br />
f. Remove <strong>the</strong> probe after <strong>the</strong> temperature measurement is complete and firmly<br />
press <strong>the</strong> ejecti<strong>on</strong> butt<strong>on</strong> <strong>on</strong> <strong>the</strong> top of <strong>the</strong> probe to release <strong>the</strong> probe cover.<br />
g. Return <strong>the</strong> probe to <strong>the</strong> probe well.<br />
4. Direct Mode<br />
a. The m<strong>on</strong>itor changes to Direct mode:<br />
i. 60 sec<strong>on</strong>ds after <strong>the</strong> <strong>the</strong>rmometer probe is removed from <strong>the</strong> probe<br />
well and exposed to air.<br />
ii. After you complete a Predictive mode measurement, <strong>the</strong>n touch<br />
to switch from Predictive to Direct mode. The temperature<br />
frame (in <strong>the</strong> lower-left corner) changes to ”MODE: Direct..." as it<br />
switches to <strong>the</strong> Direct mode.<br />
iii. If you have a patient whose body temperature is below <strong>the</strong> normal<br />
temperature range and you follow predictive mode steps, <strong>the</strong> probe<br />
sensor identifies this c<strong>on</strong>diti<strong>on</strong> and turns off <strong>the</strong> probe preheater in<br />
order to accommodate <strong>the</strong> lower body temperature measurement.<br />
b. The m<strong>on</strong>itor does not retain Direct mode temperatures in memory for recall. A<br />
manual recording of <strong>the</strong> reading is required.<br />
c. The patient’s temperature will reach final equilibrium in approximately three<br />
minutes in <strong>the</strong> oral and rectal sites and five minutes in <strong>the</strong> axillary site.<br />
d. After 10 minutes of Direct mode use, a technical alarm c<strong>on</strong>diti<strong>on</strong> is generated<br />
and <strong>the</strong> reading is cleared.<br />
e. Steps to use Direct mode:<br />
i. Remove <strong>the</strong> temperature probe from <strong>the</strong> probe well.<br />
ii. Insert <strong>the</strong> probe into a new probe cover and press <strong>the</strong> probe handle<br />
down firmly.<br />
iii. Touch Temperature Site C<strong>on</strong>trol to choose from <strong>the</strong>se opti<strong>on</strong>s: oral,<br />
pediatric axillary, or adult axillary temperature.<br />
iv. Hold <strong>the</strong> <strong>the</strong>rmometer probe tip in place at <strong>the</strong> measurement site for a<br />
total of three minutes for oral and rectal mode or five minutes for<br />
axillary mode.<br />
v. While <strong>the</strong> measurement is taking place, <strong>the</strong> Home tab displays <strong>the</strong><br />
patient's c<strong>on</strong>tinuous temperature readings in degrees Fahrenheit and<br />
degrees Celsius.<br />
vi. Document <strong>the</strong> temperature <strong>on</strong> <strong>the</strong> patient record before removing <strong>the</strong><br />
probe tip from <strong>the</strong> measurement site.<br />
vii. Remove <strong>the</strong> probe after <strong>the</strong> temperature measurement is complete<br />
and firmly press <strong>the</strong> ejecti<strong>on</strong> butt<strong>on</strong> <strong>on</strong> <strong>the</strong> top of <strong>the</strong> probe to release<br />
<strong>the</strong> probe cover.<br />
viii. Return <strong>the</strong> probe to <strong>the</strong> probe well to reset <strong>the</strong> SureTemp Plus<br />
C<strong>on</strong>nex Vital Signs M<strong>on</strong>itor 6000 Trainer Outline<br />
MC 7517 08/2010<br />
7
module to predictive mode.<br />
5. Taking <strong>the</strong> temperature in Rectal mode: You must use <strong>the</strong> temperature probe with<br />
<strong>the</strong> red ejecti<strong>on</strong> butt<strong>on</strong> and red probe well. The SureTemp Plus module <strong>on</strong>ly operates<br />
in rectal mode if <strong>the</strong> red rectal probe is installed.<br />
a. Remove <strong>the</strong> rectal probe from <strong>the</strong> rectal probe well.<br />
b. Insert <strong>the</strong> rectal probe into a new probe cover and press <strong>the</strong> probe handle<br />
down firmly.<br />
c. The Temperature Site C<strong>on</strong>trol defaults to rectal mode.<br />
d. Separate <strong>the</strong> patient’s buttocks with <strong>on</strong>e hand. Use <strong>the</strong> o<strong>the</strong>r hand to gently<br />
insert <strong>the</strong> probe tip <strong>on</strong>ly 5/8 in. (1.5 cm) inside <strong>the</strong> rectum. The use of a<br />
lubricant is opti<strong>on</strong>al.<br />
e. Tilt <strong>the</strong> probe so that <strong>the</strong> tip is in c<strong>on</strong>tact with tissue. C<strong>on</strong>tinue to separate <strong>the</strong><br />
buttocks and hold <strong>the</strong> probe in place throughout <strong>the</strong> measurement process.<br />
f. The m<strong>on</strong>itor beeps when <strong>the</strong> final temperature is reached. The Home tab<br />
displays <strong>the</strong> patient temperature. The temperature c<strong>on</strong>tinues to display in<br />
degrees Fahrenheit and degrees Celsius even after <strong>the</strong> probe is returned to<br />
<strong>the</strong> probe well.<br />
g. Remove <strong>the</strong> probe after <strong>the</strong> temperature measurement is complete and firmly<br />
press <strong>the</strong> ejecti<strong>on</strong> butt<strong>on</strong> <strong>on</strong> <strong>the</strong> top of <strong>the</strong> probe to release <strong>the</strong> probe cover.<br />
h. Return <strong>the</strong> probe to <strong>the</strong> probe well.<br />
WARNING: Use extreme cauti<strong>on</strong> when taking rectal temperatures <strong>on</strong> children.<br />
Insert <strong>the</strong> probe tip <strong>on</strong>ly 3/8 in. (~1 cm) to avoid risk of bowel perforati<strong>on</strong>.<br />
NOTE: Do not reuse probe covers. Discard after each use.<br />
6. C<strong>on</strong>figure temperature alarms manually:<br />
a. Touch <strong>the</strong> Settings tab.<br />
b. Touch to select M<strong>on</strong>itor.<br />
c. Touch <strong>the</strong> Alarms tab.<br />
d. Touch Temp.<br />
e. To turn alarm <strong>on</strong> or off, use <strong>the</strong> up and down arrow keys or <strong>the</strong> numeric<br />
keypad to adjust upper and lower temperature alarm limits.<br />
f. Touch Home to save your settings, return to <strong>the</strong> Home tab, and take a<br />
temperature measurement.<br />
I. SpO 2 and Pulse Rate (if applicable)<br />
SpO 2 (Nellcor or Masimo) and pulse rate m<strong>on</strong>itoring c<strong>on</strong>tinuously measure saturati<strong>on</strong> level of<br />
oxygen in hemoglobin as well as <strong>the</strong> pulse in a patient through a pulse oximeter.<br />
1. Steps to Measuring SPO 2 /Pulse Rate:<br />
a. Verify <strong>the</strong> SpO 2 sensor cable is c<strong>on</strong>nected to <strong>the</strong> m<strong>on</strong>itor.<br />
b. Clean <strong>the</strong> applicati<strong>on</strong> site. Remove anything, such as nail polish, that could<br />
interfere with sensor operati<strong>on</strong>.<br />
c. Attach <strong>the</strong> SpO 2 sensor to <strong>the</strong> patient. Place <strong>the</strong> SpO 2 sensor and <strong>the</strong> NIBP<br />
cuff <strong>on</strong> different limbs.<br />
d. C<strong>on</strong>firm <strong>the</strong> m<strong>on</strong>itor displays SpO 2 and pulse rate data within 15 sec<strong>on</strong>ds of<br />
C<strong>on</strong>nex Vital Signs M<strong>on</strong>itor 6000 Trainer Outline<br />
MC 7517 08/2010<br />
8
eing c<strong>on</strong>nected to a patient.<br />
2. C<strong>on</strong>figure SpO 2 alarms: Pulse oximetry alarms can be manually set.<br />
a. Touch <strong>the</strong> Settings tab.<br />
b. Touch to select M<strong>on</strong>itor.<br />
c. Touch <strong>the</strong> Alarms tab.<br />
d. Touch SpO 2 .<br />
e. To turn alarm <strong>on</strong> or off, use <strong>the</strong> up and down arrow keys or <strong>the</strong> numeric<br />
keypad to adjust upper and lower SpO 2 alarm limits.<br />
f. Touch Home to save your settings, return to <strong>the</strong> Home tab, and take an SpO 2<br />
measurement.<br />
WARNING: Inspect <strong>the</strong> SpO 2 cable. Replace it if it shows any signs of wear,<br />
breakage or fraying. Failure to do so could harm <strong>the</strong> patient, harm <strong>the</strong> m<strong>on</strong>itor, or<br />
produce inaccurate readings.<br />
NOTE:<br />
• During an SpO 2 measurement, <strong>the</strong> displayed pulse rate is derived from <strong>the</strong><br />
SpO 2 sensor. If SpO 2 is not available, <strong>the</strong> pulse rate is derived from NIBP.<br />
• If SpO 2 is being measured c<strong>on</strong>tinuously <strong>on</strong> a patient for an extended period,<br />
change <strong>the</strong> sensor locati<strong>on</strong> at least every three hours or as indicated by <strong>the</strong><br />
sensor manufacturer's directi<strong>on</strong>s for use.<br />
3. SatSec<strong>on</strong>ds alarm management: The SatSec<strong>on</strong>ds feature is an SpO 2 alarm<br />
management system available <strong>on</strong>ly with Nellcor-equipped m<strong>on</strong>itors.<br />
a. The SatSec<strong>on</strong>ds feature has a built-in safety protocol that sounds an alarm<br />
whenever three SpO 2 violati<strong>on</strong>s of any amount or durati<strong>on</strong> occur within a <strong>on</strong>eminute<br />
period.<br />
b. The SatSec<strong>on</strong>ds feature delays alarms for a set amount of time when it is<br />
enabled. If a c<strong>on</strong>diti<strong>on</strong> or alarm resolves <strong>on</strong> its own within <strong>the</strong> preset time, <strong>the</strong><br />
alarm will automatically reset.<br />
c. The feature can be set to 0, 10, 25, 50, or 100 SatSec<strong>on</strong>ds. The SatSec<strong>on</strong>ds<br />
feature is <strong>the</strong> product of <strong>the</strong> time and magnitude that a patient exceeds SpO 2<br />
alarm limits. For example, three points below <strong>the</strong> alarm limit for 10 sec<strong>on</strong>ds<br />
equals 30 SatSec<strong>on</strong>ds. An alarm is triggered <strong>on</strong>ly when a desaturati<strong>on</strong> event<br />
reaches <strong>the</strong> SatSec<strong>on</strong>ds limit.<br />
d. When <strong>the</strong> feature is not enabled, <strong>the</strong> SatSec<strong>on</strong>ds graphic will not appear and<br />
SpO 2 alarm c<strong>on</strong>diti<strong>on</strong>s will not be delayed.<br />
e. To set SatSec<strong>on</strong>ds limits:<br />
i. Touch <strong>the</strong> Alarms limit c<strong>on</strong>trol of <strong>the</strong> SpO 2 frame.<br />
ii. Touch <strong>the</strong> Alarms tab.<br />
iii. Touch to select a SatSec<strong>on</strong>ds setting. Values are 10, 25, 50, or 100.<br />
iv. Touch Home to save your settings and return to <strong>the</strong> Home tab.<br />
4. Perfusi<strong>on</strong> index: Perfusi<strong>on</strong> index is an SpO 2 feature available <strong>on</strong>ly with Masimoequipped<br />
m<strong>on</strong>itors.<br />
a. Perfusi<strong>on</strong> Index (PI) is a relative reading of pulse strength at <strong>the</strong> m<strong>on</strong>itoring<br />
site and is a numerical value that indicates <strong>the</strong> strength of <strong>the</strong> IR (infrared)<br />
C<strong>on</strong>nex Vital Signs M<strong>on</strong>itor 6000 Trainer Outline<br />
MC 7517 08/2010<br />
9
signal returning from <strong>the</strong> m<strong>on</strong>itoring site.<br />
b. PI display ranges from .02% (very weak pulse strength) to 20% (very str<strong>on</strong>g<br />
pulse strength).<br />
c. During sensor placement, <strong>the</strong> PI can be used to evaluate <strong>the</strong> appropriateness<br />
of an applicati<strong>on</strong> site by looking for <strong>the</strong> site with <strong>the</strong> highest PI number.<br />
J. Manual Parameters<br />
You can manually enter parameters including height, weight, pain level, temperature, or<br />
respirati<strong>on</strong> rate.<br />
1. From <strong>the</strong> Home tab, ensure that <strong>the</strong> current patient informati<strong>on</strong> is correct.<br />
2. Touch anywhere within <strong>the</strong> manual parameters frame. The manual parameters of <strong>the</strong><br />
Patients tab displays.<br />
3. Use <strong>the</strong> up and down arrow keys or <strong>the</strong> numeric keypad to manually adjust height,<br />
weight, pain level, temperature, or respirati<strong>on</strong> levels.<br />
4. Touch OK.<br />
K. Alarms<br />
The m<strong>on</strong>itor presents physiological alarms and technical alarms. Physiological alarms occur<br />
when vital sign measurements fall outside of set alarm limits, but <strong>the</strong>y occur <strong>on</strong>ly in <strong>the</strong> M<strong>on</strong>itor<br />
profile. Technical alarms occur in all profiles<br />
1. The following occurs <strong>on</strong> <strong>the</strong> LED light bar <strong>on</strong> <strong>the</strong> device handle with alarms.<br />
a. Flashing red for high-priority alarms<br />
b. Flashing amber for medium-priority alarms<br />
c. C<strong>on</strong>stant amber for low-priority alarms<br />
2. Alarm Types<br />
3. Home Tab Notificati<strong>on</strong>s:<br />
a. Device Status area: The area changes color and displays a message with an<br />
accompanying status ic<strong>on</strong> or butt<strong>on</strong>. If <strong>the</strong> alarm t<strong>on</strong>e is in a pause interval, a<br />
timer countdown appears. If multiple alarms and informati<strong>on</strong> messages are<br />
active, <strong>the</strong> Device Status area shows <strong>the</strong> highest-priority alarm. If <strong>the</strong> alarms<br />
are equal in priority, <strong>the</strong> most recent alarm message appears. You can cycle<br />
through <strong>the</strong> messages for each active alarm.<br />
C<strong>on</strong>nex Vital Signs M<strong>on</strong>itor 6000 Trainer Outline<br />
MC 7517 08/2010<br />
10
. Parameter frame: The background color changes. Touch this area to pause or<br />
turn off an alarm audio t<strong>on</strong>e and nurse call notificati<strong>on</strong>.<br />
c. Alarm Limit c<strong>on</strong>trol: The ic<strong>on</strong> in this c<strong>on</strong>trol indicates <strong>the</strong> status of <strong>the</strong> alarms<br />
limit settings. Red and amber ic<strong>on</strong>s indicate measurements that have<br />
exceeded alarm limits. Touch this c<strong>on</strong>trol to navigate to a parameter-specific<br />
tab where you can modify <strong>the</strong> alarm limit setting<br />
4. Ic<strong>on</strong>s in parameter frames:<br />
a. The ic<strong>on</strong>s in <strong>the</strong> parameter frames indicate alarm notificati<strong>on</strong> settings. When<br />
alarm limits are <strong>on</strong>, <strong>the</strong> ic<strong>on</strong>s will be black and white until an alarm occurs.<br />
Then, <strong>the</strong> ic<strong>on</strong>s will change color to indicate <strong>the</strong> priority of <strong>the</strong> alarm.<br />
b. Ic<strong>on</strong>s that can be seen in parameter frames and <strong>the</strong>ir meanings:<br />
Alarm off and no visual or audio alarms or nurse call notificati<strong>on</strong> will<br />
occur for this parameter.<br />
Alarm and audio and visual notificati<strong>on</strong>s are enabled.<br />
Alarm audio off and <strong>on</strong>ly visual notificati<strong>on</strong>s will occur.<br />
Alarm audio paused and <strong>the</strong> audio t<strong>on</strong>e is paused for 60 sec<strong>on</strong>ds or<br />
l<strong>on</strong>ger. The ic<strong>on</strong> remains until <strong>the</strong> paused time counts down to 0.<br />
c. Ic<strong>on</strong>s in <strong>the</strong> device status area and <strong>the</strong>ir meanings:<br />
Alarm active. One or more alarms are active. Touch this ic<strong>on</strong> to<br />
pause or turn off <strong>the</strong> audio t<strong>on</strong>e.<br />
Alarm audio off and <strong>the</strong> audio signals are disabled, but alarm limits<br />
and visual alarm signals remain active.<br />
Multiple alarms. Touch this ic<strong>on</strong> to cycle through <strong>the</strong> messages for<br />
each active alarm.<br />
Alarm audio paused. The audio t<strong>on</strong>e is paused for 60 sec<strong>on</strong>ds or<br />
l<strong>on</strong>ger. The ic<strong>on</strong> remains until <strong>the</strong> paused time counts down to 0.<br />
Touch this ic<strong>on</strong> to reset <strong>the</strong> pause interval, which is determined by<br />
settings in <strong>the</strong> Advanced tab.<br />
5. Reset (pause or turn off) audio alarms:<br />
a. After you reset an audio alarm, some t<strong>on</strong>es do not return, but o<strong>the</strong>rs return<br />
after <strong>the</strong> pause interval if <strong>the</strong> c<strong>on</strong>diti<strong>on</strong> that caused <strong>the</strong> alarm persists. Settings<br />
in <strong>the</strong> Advanced tab determine <strong>the</strong> length of <strong>the</strong> pause interval.<br />
b. If a new alarm c<strong>on</strong>diti<strong>on</strong> occurs during a pause interval, a new audio t<strong>on</strong>e<br />
C<strong>on</strong>nex Vital Signs M<strong>on</strong>itor 6000 Trainer Outline<br />
MC 7517 08/2010<br />
11
occurs.<br />
c. If an audio alarm is not paused or turned off after a period of time, a buzzer<br />
accompanies <strong>the</strong> t<strong>on</strong>e.<br />
6. Pause or turn off an audio alarm:<br />
a. In <strong>the</strong> Device Status area, touch .<br />
b. Visual indicati<strong>on</strong>s remain in <strong>the</strong> parameter frame until <strong>the</strong> c<strong>on</strong>diti<strong>on</strong> is<br />
corrected or until <strong>the</strong> next measurement is taken.<br />
c. In <strong>the</strong> Device Status area, if <strong>the</strong> ic<strong>on</strong> changes to and <strong>the</strong> message<br />
remains, <strong>the</strong> timer counts down and <strong>the</strong> audio t<strong>on</strong>e returns after a pause<br />
interval. You can touch again to restart <strong>the</strong> timer.<br />
d. If you resp<strong>on</strong>ded to an NIBP alarm and multiple NIBP limits have been<br />
exceeded, <strong>the</strong> first audio t<strong>on</strong>e and message go away, but ano<strong>the</strong>r NIBP limit<br />
message shows with a countdown timer. A new NIBP audio t<strong>on</strong>e sounds after<br />
<strong>the</strong> countdown unless you touch to dismiss each remaining NIBP limit<br />
message.<br />
e. If audio t<strong>on</strong>es c<strong>on</strong>tinue, multiple alarms are active. A multiple alarm toggle will<br />
appear in <strong>the</strong> Device Status area. Resp<strong>on</strong>d to multiple alarms as follows:<br />
i. Touch in <strong>the</strong> Device Status area.<br />
ii. Read <strong>the</strong> alarm message for <strong>the</strong> sec<strong>on</strong>d alarm.<br />
iii. Touch .<br />
iv. C<strong>on</strong>tinue to touch multiple alarm toggle butt<strong>on</strong>s and to reset t<strong>on</strong>es<br />
until you have read all of <strong>the</strong> messages.<br />
7. Adjust vital sign alarm limits: You can adjust vital sign alarm limits or turn off alarm<br />
limit checking for individual parameters.<br />
a. On <strong>the</strong> Home tab, touch <strong>the</strong> alarm limits c<strong>on</strong>trol in <strong>the</strong> selected parameter<br />
frame. For example, to adjust <strong>the</strong> NIBP alarm limits, touch<br />
.<br />
b. Adjust vital sign alarm limits: Enter <strong>the</strong> desired upper and lower alarm limits<br />
using <strong>the</strong> up/down arrow keys or <strong>the</strong> keypad.<br />
c. To turn alarm limits off or <strong>on</strong> for <strong>the</strong> vital sign: Touch or . This<br />
butt<strong>on</strong> toggles to display <strong>the</strong> current alarm state.<br />
d. If you turn off alarm limit checking for a vital sign, no visual or audio alarm<br />
signals will occur for those limits. If alarm limit checking is off, <strong>the</strong> ic<strong>on</strong><br />
changes to <strong>on</strong> <strong>the</strong><br />
<strong>on</strong> <strong>the</strong> Home tab in <strong>the</strong> parameter frame.<br />
C<strong>on</strong>nex Vital Signs M<strong>on</strong>itor 6000 Trainer Outline<br />
MC 7517 08/2010<br />
12
Nurse call: If nurse call is operati<strong>on</strong>al, nurse call notificati<strong>on</strong> occurs for certain<br />
alarms, depending <strong>on</strong> <strong>the</strong> alarm priority. Nurse call notificati<strong>on</strong> settings are<br />
specified in <strong>the</strong> Advanced settings. Nurse call notificati<strong>on</strong> is paused when alarm<br />
t<strong>on</strong>es are paused, and it is turned off when alarm t<strong>on</strong>es are turned off.<br />
L. Patient Data Management<br />
1. Managed through <strong>the</strong> Home tab<br />
a. Can enter patient data manually.<br />
b. Scan in a patient's name with <strong>the</strong> barcode scanner.<br />
c. Can enter specific patient informati<strong>on</strong> such as patient demographics,<br />
modifiers, and manual parameters.<br />
d. Patient can be selected from a list<br />
2. Creating a patient:<br />
a. Touch <strong>the</strong> Patients tab.<br />
b. Touch Add.<br />
c. Enter <strong>the</strong> patient data using <strong>the</strong> keyboard c<strong>on</strong>trols.<br />
d. Touch OK to return to <strong>the</strong> Home tab. Any informati<strong>on</strong> entered is automatically<br />
saved.<br />
3. Load patient data with <strong>the</strong> barcode scanner:<br />
a. You can use a barcode scanner to query existing patient records and perform<br />
an ADT patient name match.<br />
i. Ensure that you are <strong>on</strong> <strong>the</strong> Home tab.<br />
ii. Scan <strong>the</strong> patient's barcode with <strong>the</strong> barcode scanner.<br />
iii. The Patient ID appears in <strong>the</strong> Patient frame.<br />
Note: If Welch Allyn C<strong>on</strong>nex ® VM software is installed <strong>on</strong> your network,<br />
<strong>the</strong> m<strong>on</strong>itor can automatically return a patient name associated with a<br />
scanned ID number.<br />
4. Save patient data: Patient data can be saved to <strong>the</strong> m<strong>on</strong>itor.<br />
a. After taking a patient reading, touch Save.<br />
b. A message will indicate that a save is in progress.<br />
Note: Depending <strong>on</strong> <strong>the</strong> profile and settings, readings may be saved<br />
automatically.<br />
5. Select a patient:<br />
a. Touch <strong>the</strong> Patients tab.<br />
b. From <strong>the</strong> patient list, touch <strong>the</strong> patient's identifier.<br />
c. Touch Select.<br />
Note: In <strong>the</strong> Spot Check and Triage profiles, previous patient data and readings<br />
will be overwritten by a new save. In <strong>the</strong> M<strong>on</strong>itor profile, selecting a new patient<br />
will clear <strong>the</strong> current patient data.<br />
6. Manage patient records: Patient records can be sent to <strong>the</strong> network, printed, or<br />
deleted.<br />
a. Touch <strong>the</strong> Review tab.<br />
C<strong>on</strong>nex Vital Signs M<strong>on</strong>itor 6000 Trainer Outline<br />
MC 7517 08/2010<br />
13
. Select patients by touching <strong>the</strong> check box next to <strong>the</strong>ir name.<br />
c. Touch Send to transmit <strong>the</strong> records to <strong>the</strong> network.<br />
d. Print to print <strong>the</strong> records.<br />
e. Delete to permanently remove <strong>the</strong> records as desired.<br />
Note: The ic<strong>on</strong> indicates <strong>the</strong> records have been sent to <strong>the</strong> network.<br />
Note: Depending <strong>on</strong> <strong>the</strong> profile and settings, readings may be automatically sent<br />
to <strong>the</strong> network.<br />
7. Delete a patient from <strong>the</strong> list:<br />
a. From <strong>the</strong> patient list, touch <strong>the</strong> patient's name you wish to delete.<br />
b. Touch Delete. (At <strong>the</strong> Delete C<strong>on</strong>firmati<strong>on</strong> window, touch Yes to permanently<br />
delete <strong>the</strong> name. Touch No to cancel <strong>the</strong> deleti<strong>on</strong>.)<br />
Note: Deleting a name from <strong>the</strong> patient list does not delete saved records. Touch<br />
Review to see or delete records.<br />
M. Accessories<br />
1. Barcode Scanner: The m<strong>on</strong>itor enables <strong>the</strong> scanning of patients’ and/or clinicians’<br />
barcodes to enter identificati<strong>on</strong> informati<strong>on</strong>. The barcode scanner supports linear and<br />
two-dimensi<strong>on</strong>al barcodes.<br />
a. Ensure that <strong>the</strong> barcode scanner is c<strong>on</strong>nected and properly c<strong>on</strong>figured.<br />
b. Remove <strong>the</strong> barcode scanner from its holder.<br />
c. Hold <strong>the</strong> scanner approximately 6 inches (15.4 cm) from <strong>the</strong> barcode and<br />
squeeze <strong>the</strong> trigger so that <strong>the</strong> light from <strong>the</strong> scanner appears <strong>on</strong> <strong>the</strong> barcode.<br />
d. The patient or clinician identificati<strong>on</strong> displays in <strong>the</strong> targeted area (Patient<br />
frame, data field, Device Status area).<br />
i. Scanning a patient's barcode while <strong>on</strong> <strong>the</strong> Home tab will place <strong>the</strong><br />
scanned ID into <strong>the</strong> Patient frame.<br />
ii. Scanning a patient's barcode while <strong>the</strong> Patients List tab is open<br />
requires <strong>the</strong> following additi<strong>on</strong>al steps:<br />
(a) Touch Add to add a new patient.<br />
(b) Touch <strong>the</strong> keyboard in <strong>the</strong> Patient ID field.<br />
(c) Scan <strong>the</strong> patient's barcode.<br />
(d) C<strong>on</strong>firm <strong>the</strong> patient informati<strong>on</strong> by touching OK.<br />
iii. Scanning a clinician ID while <strong>the</strong> Clinician ID pane is open will place<br />
<strong>the</strong> scanned ID into <strong>the</strong> Clinician ID secti<strong>on</strong> of <strong>the</strong> Device Status area.<br />
Touch Select to return to <strong>the</strong> Home tab and to begin taking patient<br />
measurements.<br />
iv. Use <strong>the</strong> Advanced settings Data Management tab to change <strong>the</strong><br />
appearance of <strong>the</strong> Clinician ID if you do not want your ID to appear in<br />
<strong>the</strong> Device Status area. (This requires <strong>the</strong> Advanced settings access<br />
code.) However, this informati<strong>on</strong> is still retained in <strong>the</strong> m<strong>on</strong>itor<br />
memory for recall, printing, or to send measurements electr<strong>on</strong>ically to<br />
<strong>the</strong> network.<br />
C<strong>on</strong>nex Vital Signs M<strong>on</strong>itor 6000 Trainer Outline<br />
MC 7517 08/2010<br />
14
N. Printer Opti<strong>on</strong>s<br />
1. Print opti<strong>on</strong>s include manual and automatic print commands.<br />
a. Manual opti<strong>on</strong><br />
i. Touch Review from <strong>the</strong> Home tab.<br />
ii. Touch next to <strong>the</strong> names of <strong>the</strong> patients whose data you want to<br />
print. Once selected, a check mark - will be added to <strong>the</strong> box.<br />
iii. Touch Print.<br />
iv. C<strong>on</strong>firm <strong>the</strong> number of records you wish to print and touch Yes.<br />
v. The data is sent to <strong>the</strong> printer.<br />
b. Automatic opti<strong>on</strong> (for interval printing)<br />
i. Touch <strong>the</strong> Settings tab.<br />
ii. Touch <strong>the</strong> Intervals tab.<br />
iii. Touch <strong>the</strong> box next to Automatic print <strong>on</strong> interval.<br />
O. Cleaning<br />
1. Clean <strong>on</strong> a routine basis according to your facility's protocols and standards.<br />
2. The following agents are compatible with <strong>the</strong> m<strong>on</strong>itor:<br />
a. Cavi-Wipes<br />
b. Sani-Cloth ® Plus<br />
i. Using Cavi-Wipes or Sani-Cloth Plus, wipe <strong>the</strong> surface of <strong>the</strong> m<strong>on</strong>itor<br />
to remove all gross debris.<br />
ii. Allow <strong>the</strong> m<strong>on</strong>itor surface to dry for a minimum of 10 minutes before<br />
using <strong>the</strong> m<strong>on</strong>itor.<br />
c. 70% isopropyl alcohol<br />
i. Wipe <strong>the</strong> m<strong>on</strong>itor with a clean cloth slightly dampened with 70%<br />
isopropyl alcohol.<br />
d. 10% chlorine bleach soluti<strong>on</strong><br />
i. Wipe <strong>the</strong> m<strong>on</strong>itor with a clean cloth slightly dampened with a 10%<br />
bleach and water soluti<strong>on</strong>. Follow <strong>the</strong> cleaning agent manufacturer's<br />
guidelines.<br />
ii. Rinse with a clean cloth slightly dampened with water that meets EP<br />
and USP quality standards.<br />
iii. Allow <strong>the</strong> m<strong>on</strong>itor surface to dry for a minimum of 10 minutes before<br />
using <strong>the</strong> m<strong>on</strong>itor.<br />
P. General Settings/Parameters<br />
1. General settings such as Language, Date/Time, General Alarms, Screen Display,<br />
Device Locati<strong>on</strong>, and Demo mode can be changed by selecting General tab and <strong>the</strong>n<br />
choosing <strong>the</strong> appropriate tab opti<strong>on</strong> for each.<br />
2. Parameter settings allows for specific changes in <strong>the</strong> parameters for each vital sign<br />
being m<strong>on</strong>itored. To change <strong>the</strong>se, select <strong>the</strong> Parameters tab and <strong>the</strong>n select <strong>the</strong><br />
C<strong>on</strong>nex Vital Signs M<strong>on</strong>itor 6000 Trainer Outline<br />
MC 7517 08/2010<br />
15
specific vital sign tab which is to be changed.<br />
C<strong>on</strong>nex Vital Signs M<strong>on</strong>itor 6000 Trainer Outline<br />
MC 7517 08/2010<br />
16
TIPS FOR TAKING AN<br />
ACCURATE BLOOD PRESSURE<br />
F R O M W E L C H A L L Y N<br />
(Use Range Indicator) (Roll Sleeve) (Align with Brachial Artery) (Just Two Fingers) (Do Not Move) (Shhhh) (Support Back—Legs Crossed) (Arm at Heart Level)<br />
Use <strong>the</strong> proper<br />
size cuff<br />
Place <strong>the</strong> cuff <strong>on</strong><br />
a bare arm<br />
Place <strong>the</strong> artery<br />
marker over <strong>the</strong><br />
brachial artery<br />
Apply <strong>the</strong> cuff<br />
snugly, allowing<br />
room for no more<br />
than two fingers<br />
Once <strong>the</strong> cuff is<br />
placed, allow <strong>the</strong><br />
patient to sit<br />
quietly for a<br />
few minutes<br />
Do not talk to <strong>the</strong><br />
patient while<br />
taking <strong>the</strong> BP<br />
Support <strong>the</strong><br />
patient’s back<br />
and feet during<br />
measurement;<br />
keep legs<br />
uncrossed<br />
Keep <strong>the</strong> upper<br />
arm at heart level<br />
and passively<br />
support <strong>the</strong> lower<br />
arm when<br />
measuring <strong>the</strong><br />
blood pressure<br />
Keep <strong>the</strong> arm<br />
still during <strong>the</strong><br />
measurement<br />
cycle<br />
(i.e., hand resting <strong>on</strong> lap)<br />
IF THE ACCURACY OF A BP MEASUREMENT IS IN QUESTION, VERIFY THE ACCURACY OF A DEVICE READING USING THE AUSCULTATORY METHOD<br />
© 2005 Welch Allyn MC 3021
<str<strong>on</strong>g>Blood</str<strong>on</strong>g> <str<strong>on</strong>g>Pressure</str<strong>on</strong>g> Accuracy &<br />
Variability Quick Reference<br />
Accurate <str<strong>on</strong>g>Blood</str<strong>on</strong>g> <str<strong>on</strong>g>Pressure</str<strong>on</strong>g> Tips<br />
• Use <strong>the</strong> proper size cuff; if two cuff sizes fit, use <strong>the</strong><br />
larger <strong>on</strong>e.<br />
• Place <strong>the</strong> cuff <strong>on</strong> a bare arm.<br />
• Place <strong>the</strong> artery marker over <strong>the</strong> brachial artery.<br />
• Apply <strong>the</strong> cuff snugly, allowing room for no more than<br />
two fingers underneath.<br />
• Have <strong>the</strong> patient sit quietly for a few minutes.<br />
• Do not talk to <strong>the</strong> patient while taking a blood<br />
pressure.<br />
• Support <strong>the</strong> patient’s back and feet; keep legs<br />
uncrossed.<br />
• Keep <strong>the</strong> upper arm at heart level with <strong>the</strong> lower arm<br />
passively supported, i.e. resting <strong>on</strong> lap.<br />
• Keep <strong>the</strong> arm still during <strong>the</strong> measurement cycle.<br />
<str<strong>on</strong>g>Blood</str<strong>on</strong>g> <str<strong>on</strong>g>Pressure</str<strong>on</strong>g> Variability<br />
The following activities affect a blood pressure reading.<br />
Activity<br />
Cuff too small 2,4,6,7,8,10,12,14,16,18,19<br />
Cuff over clothing 10,16,18<br />
Back/feet unsupported 3,18<br />
Legs crossed 1,5,9,16,17,18<br />
Not resting 3 to 5 minutes 2,10,16,18,19,20<br />
Patient talking 2,10,11,16,17,18<br />
Labored breathing 16,18<br />
Full bladder 13,16,18<br />
Pain 16<br />
Arm below heart level 2,10,13,16,17,18<br />
Arm above heart level 10,13,16,17,18<br />
Systolic (mmHg)<br />
10 to 40 ⇑<br />
10 to 40 ⇑ or ⇓<br />
5 to 15 ⇑<br />
5 to 8 ⇑<br />
10 to 20 ⇑<br />
10 to 15 ⇑<br />
5 to 8 ⇑<br />
10 to 15 ⇑<br />
10 to 30 ⇑<br />
1.8 /inch ⇑<br />
4.6 /cm ⇑<br />
1.8 /inch ⇓<br />
4.6 /cm ⇓<br />
For references, refer to <strong>the</strong> footnotes listed <strong>on</strong> this card.
References<br />
1. Adiyaman Ahmet, Tosun Nevin, Elving LammyD, Deinum Jaap, Lenders JacquesWM,<br />
Thien Theo. The effect of crossing legs <strong>on</strong> blood pressure. <str<strong>on</strong>g>Blood</str<strong>on</strong>g> Press M<strong>on</strong>it June<br />
2007; 12:3: 189-193.<br />
2. Campbell NormanRC, McKay D<strong>on</strong>aldW. Accurate blood pressure measurement: Why<br />
does it matter? CMAJ 1999; 161(3): 277-278.<br />
3. Cushman WilliamC, Cooper KarenM, Horne RichardA, Meydrech EdwardF. Effect of<br />
back support and stethoscope head <strong>on</strong> seated blood pressure determinati<strong>on</strong>s. Am J<br />
Hypertens 1990; 3: 240-241.<br />
4. F<strong>on</strong>seca-Reyes Salvador, Garcia de Alba-Garcia Javier, Parra-Carrillo JoseZ, Paczka-<br />
Zapata Jose Ant<strong>on</strong>io. Effect of standard cuff <strong>on</strong> blood pressure readings in patients<br />
with obese arms. How frequent are arms of a ‘large circumference’? <str<strong>on</strong>g>Blood</str<strong>on</strong>g> Press<br />
M<strong>on</strong>it 2003 8:3: 101-106.<br />
5. Foster-Fitzpatrick Lucille, Ortiz Anna, Sibilano Helena, Marcant<strong>on</strong>io Richard,<br />
Braun LynneT. The effects of crossed leg <strong>on</strong> blood pressure measurement. Nursing<br />
Research Mar/Apr 1999; 48:2: 105-108.<br />
6. Geddes LA, Whistler SJ. The error in indirect blood pressure measurement with <strong>the</strong><br />
incorrect size cuff. Amer Heart J July 1978; 96:1: 4-8.<br />
7. Gomez-Marin O, Prineas RJ, Rastam L. Cuff bladder width and blood pressure<br />
measurement in children adolescents. J of Hypertens Oct 1992; 10:10: 1235-1241.<br />
8. Iyriboz Y, Hear<strong>on</strong> CM, Edwards K. Agreement between large and small cuffs in<br />
sphygmomanometry: A quantitative assessment. J of Clin M<strong>on</strong>itoring Mar 1994; 10:2:<br />
127-133.<br />
9. Keele-Smith Rebecca, Price-Daniel CeCilia. Effects of crossing legs <strong>on</strong> blood pressure<br />
measurement (Research Data). Virginia Henders<strong>on</strong> Internat Nurs Lib Aug 2007.<br />
10. Lockwood Craig, C<strong>on</strong>roy-Hiller Tiffany, Page Tamara. Vital signs. JBI Reports 2004;<br />
2: 207-230.<br />
11. Lynch JamesJ, L<strong>on</strong>g JackM, Thomas SueAnn, Malinow KennethL, Katcher<br />
Aar<strong>on</strong>H<strong>on</strong>ori. The effects of talking <strong>on</strong> <strong>the</strong> blood pressure of hypertensive and<br />
normotensive individuals. Psychosomatic Medicine Feb 1981; 43:1: 25-33.<br />
12. Manning DennisM, Kuchirka Carolee, Kaminski Jill. Miscuffing: inappropriate blood<br />
pressure cuff applicati<strong>on</strong>. Diag Methods Hypertens 1983; 68:4: 763-766.<br />
13. Marx GertieF, Orkin LouisR. Overdistenti<strong>on</strong> of <strong>the</strong> urinary bladder during and after<br />
anaes<strong>the</strong>sia. Can Anaes Soc J Sep 1966; 13:5: 500-504.<br />
14. Netea RT, Lenders JWM, Smits P, Thien T. Arm positi<strong>on</strong> is important for blood<br />
pressure measurement. J Hum Hypertens Feb 1999; 13:2: 105-109.<br />
15. Nicholas WC, Wats<strong>on</strong> RL, Barnes TY, Goodinow C, Russel E. Does blood pressure<br />
cuff size make a difference in blood pressure readings? J Mississippi Med Assoc Feb<br />
1985; 26:2.<br />
16. O’Brien Eoin, Asmar Roland, Beilin Lawrie, Imai Yutaka, Malli<strong>on</strong> Jean-Michel,<br />
Mancia Giuseppe, Mengden Thomas, Myers Martin, Padfield Paul, Palatini Paolo,<br />
Parati Gianfranco, Pickering Thomas, Red<strong>on</strong> Josep, Staessen Jan, Stergiou George,<br />
Verdecchia Paolo. European Society of Hypertensi<strong>on</strong> recommendati<strong>on</strong>s for<br />
c<strong>on</strong>venti<strong>on</strong>al, ambulatory and home blood pressure measurement. J Hypertens 2003;<br />
21: 821-848.<br />
17. Peters GrantL, Binder SaraK, Campbell NormRC. The effect of crossing legs <strong>on</strong> blood<br />
pressure: a randomized single-blind cross-over study. <str<strong>on</strong>g>Blood</str<strong>on</strong>g> <str<strong>on</strong>g>Pressure</str<strong>on</strong>g> M<strong>on</strong>itoring<br />
1999; 4:2: 97-101.<br />
18. Pickering ThomasG, Hall JohnE, Appel LawrenceJ, Falkner B<strong>on</strong>itaE, Graves John,<br />
Hill MarthaN, J<strong>on</strong>es DanielW, Kurtz Theodore, Sheps Sheld<strong>on</strong>G, Roccella EdwardJ.<br />
Recommendati<strong>on</strong>s for blood pressure measurement in humans and experimental<br />
animals: Part 1:<str<strong>on</strong>g>Blood</str<strong>on</strong>g> pressure measurement in humans: A statement for professi<strong>on</strong>als<br />
from <strong>the</strong> Subcommittee of Professi<strong>on</strong>al and Public Educati<strong>on</strong> of <strong>the</strong> American Heart<br />
Associati<strong>on</strong> Council <strong>on</strong> High <str<strong>on</strong>g>Blood</str<strong>on</strong>g> <str<strong>on</strong>g>Pressure</str<strong>on</strong>g> Research . Hypertens 2005; 45: 142-161.<br />
19. Rastam I, Prineas RJ, Gomez-Marin O. Rati<strong>on</strong> of cuff width/arm circumference as a<br />
determinant of arterial blood pressure measurements in adults.<br />
20. Roubsanthisuk Weranuj, W<strong>on</strong>gsurin Unticha, Saravich Surachai, Buranakitjaroen<br />
Peera. <str<strong>on</strong>g>Blood</str<strong>on</strong>g> pressure determinati<strong>on</strong> by traditi<strong>on</strong>ally trained pers<strong>on</strong>nel is less<br />
reliable and tends to underestimate <strong>the</strong> severity of moderate to severe hypertensi<strong>on</strong>.<br />
<str<strong>on</strong>g>Blood</str<strong>on</strong>g> Press M<strong>on</strong>it 2007; 12: 61-68.<br />
1-800-289-2501 ©2010, Welch Allyn, Inc. All rights reserved. 08/2010 MC4978
HOW TO USE<br />
Welch Allyn Flexiport <str<strong>on</strong>g>Blood</str<strong>on</strong>g> <str<strong>on</strong>g>Pressure</str<strong>on</strong>g> Cuffs<br />
1 Positi<strong>on</strong> 2 Check 3 Attach 4 Rotate 5 Detach<br />
Positi<strong>on</strong> <strong>the</strong> Artery Index Marker<br />
over <strong>the</strong> Patient’s Brachial Artery<br />
and wrap <strong>the</strong> cuff around <strong>the</strong><br />
patient's arm.<br />
Ensure <strong>the</strong> Artery Index Marker<br />
falls within <strong>the</strong> range markings<br />
<strong>on</strong> <strong>the</strong> cuff.<br />
Snap <strong>the</strong> FlexiPort fitting, from<br />
<strong>the</strong> device directly into <strong>the</strong> cuff.<br />
Rotate <strong>the</strong> device tubing to a<br />
comfortable positi<strong>on</strong> for both<br />
patient and practiti<strong>on</strong>er.<br />
Squeeze <strong>the</strong> FlexiPort fitting and<br />
pull away to detach from <strong>the</strong> cuff.<br />
© 2008 Welch Allyn MC5102
(Irish Journal of Medical Sciences 1994; 4:112-3)<br />
The Microbial Flora of In-Use <str<strong>on</strong>g>Blood</str<strong>on</strong>g> <str<strong>on</strong>g>Pressure</str<strong>on</strong>g> Cuffs<br />
Authors: M.G.M. Cormican, D.L. Lowe, P. Flynn, D. O’Toole<br />
Objective<br />
This study was c<strong>on</strong>ducted to determine <strong>the</strong> extent of microbial<br />
c<strong>on</strong>taminati<strong>on</strong> <strong>on</strong> blood pressure cuffs used in <strong>the</strong> operating and<br />
recovery rooms of a teaching hospital. The authors suggest that <strong>the</strong><br />
blood pressure cuff is as yet an unrecognized source of bacterial<br />
c<strong>on</strong>taminati<strong>on</strong>, which may play a part in <strong>the</strong> hospital’s nosocomial<br />
infecti<strong>on</strong> rate.<br />
Settings & Patients<br />
As part of this study, new blood pressure cuffs were placed in six<br />
operating rooms, and <strong>on</strong>e recovery room. A defined area of <strong>the</strong> cuff in<br />
c<strong>on</strong>tact with <strong>the</strong> patient was sampled before issue and at <strong>the</strong> end of <strong>the</strong><br />
operating day for a period of five days. Swabs were plated, incubated<br />
and evaluated after 48 hours.<br />
Results<br />
Results indicated that 68 different microorganisms were isolated from<br />
<strong>the</strong> forty-two samples. Seventy-<strong>on</strong>e percent (n=61) were Staphylococci.<br />
One of <strong>the</strong> Staphylococcus aureus was found to be resistant to<br />
methicillin, gentamycin and erythromycin. The remaining 25 organisms<br />
were thought to be skin and envir<strong>on</strong>mental representatives, although<br />
<strong>the</strong>y may pose a risk to certain groups of patients.<br />
Summary<br />
It was c<strong>on</strong>cluded that <strong>the</strong> majority of microorganism isolates in this<br />
study posed little risk to healthy patients undergoing surgery. The<br />
<strong>on</strong>e case where <strong>the</strong> gentamycin-methicillin resistant pathogen was<br />
identified caused c<strong>on</strong>cern, since no patient known to have that pathogen<br />
had been in <strong>the</strong> operating room during <strong>the</strong> corresp<strong>on</strong>ding day of data<br />
collecti<strong>on</strong>. Therefore, <strong>the</strong> bacteria would have had to survive for some<br />
time <strong>on</strong> <strong>the</strong> cuff, implying that <strong>the</strong> cuff acts as a vehicle of infecti<strong>on</strong>. The<br />
authors noted that enforcing policies that prohibit <strong>the</strong> transfer of cuffs<br />
outside a room where isolati<strong>on</strong> precauti<strong>on</strong>s are in effect is very difficult.<br />
In additi<strong>on</strong>, general-use blood pressure cuffs are handled by many<br />
health care workers and patients. Because <strong>the</strong>re are often no visible<br />
signs of c<strong>on</strong>taminati<strong>on</strong>, no disinfecting procedures are employed <strong>on</strong> <strong>the</strong><br />
cuff. The potential for cross c<strong>on</strong>taminati<strong>on</strong> magnifies, as often patients,<br />
who are sources of antibiotic-resistant pathogens, are unknown to <strong>the</strong><br />
hospital staff. <str<strong>on</strong>g>Blood</str<strong>on</strong>g> pressure cuffs attached to resuscitati<strong>on</strong> equipment<br />
were identified as ano<strong>the</strong>r source of c<strong>on</strong>taminati<strong>on</strong>.<br />
C<strong>on</strong>clusi<strong>on</strong>s<br />
This study emphasizes <strong>the</strong> need for increased awareness of <strong>the</strong><br />
potential for cross c<strong>on</strong>taminati<strong>on</strong> of patients and health care workers<br />
from seemingly innocuous items of general-use hospital equipment,<br />
specifically blood pressure cuffs.<br />
25<br />
SM4002 ICT4ECR.indd 25<br />
3/30/09 3:19:33 PM
(Infecti<strong>on</strong> C<strong>on</strong>trol Today 5/2006)<br />
The Case of <strong>the</strong> <str<strong>on</strong>g>Blood</str<strong>on</strong>g>y Cuff<br />
By: Kelly M. Pyrek Editor in Chief kpyrek@vpico.com<br />
While last m<strong>on</strong>th’s cover story focused <strong>on</strong> keeping patients safe,<br />
we can’t ignore <strong>the</strong> everyday risks to healthcare workers (HCWs).<br />
You’ll find recounts of a number of hair-raising medical errors and<br />
near-misses reported to <strong>the</strong> Agency for Healthcare Research and<br />
Quality (AHRQ) <strong>on</strong> its Morbidity & Mortality Rounds <strong>on</strong> <strong>the</strong> Web<br />
(www.webmm.ahrq.gov). In what seems to be a page taken from<br />
a bad medical thriller, <strong>on</strong>e case study illustrates <strong>the</strong> ghastly things<br />
that can happen when complacency creeps in. A patient who had<br />
been in a car crash presented to an ER with massive injuries and<br />
profuse bleeding. A fabric-and-nyl<strong>on</strong> blood pressure (BP) cuff used<br />
<strong>on</strong> this patient was saturated with so much blood, it could be wrung<br />
out. The patient later died from his injuries. A sec<strong>on</strong>d patient, also<br />
in a collisi<strong>on</strong> and who had cuts all over her body, was placed in <strong>the</strong><br />
same trauma bay vacated by <strong>the</strong> first patient. The same bloody cuff<br />
was used <strong>on</strong> her, with no regard for standard precauti<strong>on</strong>s. A nurse<br />
noted that <strong>the</strong> cuff was used from patient to patient, an observati<strong>on</strong><br />
that was received by o<strong>the</strong>r staff members with a shoulder shrug.<br />
Several weeks later, <strong>the</strong> medical examiner revealed that <strong>the</strong> first<br />
patient was HIV and hepatitis B virus positive and that <strong>the</strong> collisi<strong>on</strong><br />
was a suicide.<br />
In an analysis of this case, Atul K. Madan, MD, of <strong>the</strong> department<br />
of surgery at <strong>the</strong> University of Tennessee, says, “The early days of<br />
<strong>the</strong> AIDS epidemic saw first resp<strong>on</strong>ders trying to literally guess<br />
which patients might be harboring a potentially lethal blood borne<br />
agent. In additi<strong>on</strong> to <strong>the</strong> obvious problems of profiling and stigma,<br />
<strong>the</strong>se ‘eyeball tests’ proved highly inaccurate, sometimes with<br />
serious c<strong>on</strong>sequences. Ultimately, <strong>the</strong> healthcare system embraced<br />
a strategy of universal precauti<strong>on</strong>s—in essence, assuming that<br />
any patient might be harboring a blood-borne infectious agent and<br />
acting accordingly. Unfortunately, as with many sensible infecti<strong>on</strong><br />
c<strong>on</strong>trol practices, universal precauti<strong>on</strong>s are sometimes neglected.”<br />
Madan says <strong>the</strong> prevalence of HIV infecti<strong>on</strong> in ER patient populati<strong>on</strong>s<br />
ranges from 0.15 percent to 7.8 percent. He adds that <strong>the</strong> presence<br />
of HIV is smaller than that of most o<strong>the</strong>r blood-borne pathogens,<br />
with <strong>the</strong> risk of hepatitis and o<strong>the</strong>r bacteria much greater. He<br />
points to several studies of ER and trauma patients that found<br />
almost 25 percent of patients exhibited seropositivity for at least <strong>on</strong>e<br />
transmissible, infectious agent.<br />
Madan says that while rates of nosocomial transmissi<strong>on</strong> from<br />
equipment to patients remain unknown, cases of such transmissi<strong>on</strong><br />
have been documented. He says hospitals should establish—and<br />
enforce—policies and processes for <strong>the</strong> proper cleaning or disposal<br />
of c<strong>on</strong>taminated equipment in <strong>the</strong> ER, and adds that at least <strong>on</strong>e<br />
study has shown implementati<strong>on</strong> of policies like <strong>the</strong>se can improve<br />
compliance with universal precauti<strong>on</strong>s.<br />
“This case raises <strong>the</strong> specific issue of whe<strong>the</strong>r disposable BP cuffs<br />
(or disposable covers) should be added to universal precauti<strong>on</strong>s, at<br />
least in settings such as trauma care. One study from <strong>the</strong> OR revealed<br />
blood c<strong>on</strong>taminati<strong>on</strong> of approximately 30 percent of surfaces tested.<br />
Cuffs are already known to be reservoirs of bacterial pathogens<br />
such as Clostridium difficile.<br />
“C<strong>on</strong>taminati<strong>on</strong> with blood and bloodborne viruses is likely a<br />
significant—albeit under-recognized-patient-safety problem. Until<br />
<strong>the</strong> cost-effectiveness of disposable BP cuffs has been established,<br />
we can at least recommend explicit attenti<strong>on</strong> to <strong>the</strong> cleaning and<br />
disinfecti<strong>on</strong> of cuffs between patients, even in hectic settings such<br />
as trauma resuscitati<strong>on</strong>s.”<br />
20<br />
SM4002 ICT4ECR.indd 20<br />
3/30/09 3:19:32 PM
Significant Bacterial Col<strong>on</strong>izati<strong>on</strong> <strong>on</strong> <strong>the</strong> Surface of <str<strong>on</strong>g>N<strong>on</strong></str<strong>on</strong>g>-Disposable<br />
Sphygmomanometer Cuffs and Re-Used Disposable Cuffs<br />
Authors: Andrew L. Stemicht, M.D. and Alan Van Poznek, M.D.<br />
Affiliati<strong>on</strong>: Department of Anes<strong>the</strong>siology, New York Hospital —Comet Medical Center, New York, NY 10021<br />
Introducti<strong>on</strong><br />
This study investigated <strong>the</strong> possibility that significant bacterial<br />
c<strong>on</strong>taminati<strong>on</strong> of re-usable, n<strong>on</strong>-disposable blood pressure cuffs<br />
might occur in <strong>the</strong> operating room, P.A.C.U., and I.C.U. settings.<br />
Such c<strong>on</strong>taminati<strong>on</strong> might be of clinical significance were <strong>the</strong><br />
BP cuff to be located in <strong>the</strong> regi<strong>on</strong> of <strong>the</strong> operative site during<br />
a surgical procedure, or near a wound in <strong>the</strong> post-operative<br />
period. Col<strong>on</strong>izati<strong>on</strong> might be of greater significance in <strong>the</strong><br />
case of immunosuppressed, obstetric and orthopedic patients<br />
undergoing total joint replacement because of <strong>the</strong> increased<br />
need for sterility. Previous studies had pointed out that blood<br />
pressure cuffs could indeed be a vector for <strong>the</strong> transmissi<strong>on</strong> of<br />
bacterial infecti<strong>on</strong>s in ward and I.C.U. settings 1,3 . A comparis<strong>on</strong><br />
of <strong>the</strong> relative col<strong>on</strong>izati<strong>on</strong> of re-used cuffs of both permanent<br />
and disposable types used with manometers and n<strong>on</strong>-invasive<br />
automatic blood pressure m<strong>on</strong>itors was made with clean,<br />
disposable cuffs.<br />
Methods<br />
<str<strong>on</strong>g>Blood</str<strong>on</strong>g> pressure cuffs for study were obtained from <strong>the</strong> operating<br />
rooms and I.C.U. settings at three instituti<strong>on</strong>s: a university<br />
hospital, an orthopedic hospital and a cancer-center hospital.<br />
Cuffs were cultured within <strong>the</strong>ir utilizati<strong>on</strong> site and were all<br />
‘clean’ and ready for patient use. Cultures were taken at different<br />
times of <strong>the</strong> day, so as to avoid a possible bias of cuffs being<br />
cleaned at <strong>the</strong> end of <strong>the</strong> day. Cuff cultures were coded so those<br />
microbiologic technicians were unaware of <strong>the</strong>ir source. Actual<br />
cultures were obtained using Rodak trypticase soy agar plates,<br />
which were directly applied to <strong>the</strong> surface of <strong>the</strong> cuffs <strong>on</strong> inner<br />
and outer surfaces, since both are potentially c<strong>on</strong>taminable and<br />
<strong>the</strong>reby potentially communicable.<br />
Results<br />
In a data collecti<strong>on</strong> group of 80 separate patient-related cultures,<br />
<strong>the</strong> col<strong>on</strong>izati<strong>on</strong> rate was 98.7% (p
Discussi<strong>on</strong>s<br />
The study showed that “significant” bacterial col<strong>on</strong>izati<strong>on</strong><br />
of blood pressure cuffs utilized in <strong>the</strong> O.R., I.C.U. and P.A.C.U.<br />
settings does occur. Cuff types surveyed included automatic and<br />
manometric types of <strong>the</strong> permanent and disposable types. Cuff<br />
materials were ei<strong>the</strong>r nyl<strong>on</strong> or plastic. Previous studies have<br />
shown that blood pressure cuffs can actually be a clinically<br />
important vector in <strong>the</strong> transmissi<strong>on</strong> of infecti<strong>on</strong> <strong>on</strong> an in-patient<br />
floor 1 , and in a ne<strong>on</strong>atal I.C.U. 3<br />
Attitudes of staff employing <strong>the</strong> cuffs, including anes<strong>the</strong>siologists<br />
and nursing professi<strong>on</strong>als were also informally surveyed and<br />
revealed that almost n<strong>on</strong>e routinely cleaned cuffs between<br />
patients and few regarded <strong>the</strong> cuff as a possible source for<br />
infecti<strong>on</strong>.<br />
It is thus recommended that efforts be made to reduce bacterial<br />
c<strong>on</strong>taminati<strong>on</strong> of blood pressure cuffs. Cuffs should be located <strong>on</strong><br />
<strong>the</strong> c<strong>on</strong>tralateral limb to <strong>the</strong> operative site when at all possible.<br />
Spraying cuffs with a topical disinfectant such as entornexidine<br />
can reduce <strong>the</strong>ir bacterial load by 75% 2,4 . Repeated use of<br />
a disposable cuff <strong>on</strong> different patients produces significant<br />
col<strong>on</strong>izati<strong>on</strong> <strong>on</strong> <strong>the</strong> cuffs and defeats <strong>the</strong>ir major advantage. Only<br />
clean, n<strong>on</strong>-used disposable cuffs had insignificant col<strong>on</strong>izati<strong>on</strong><br />
rates in this study. Ideally, it is recommended that where<br />
applicable, a cleansed cuff or an unused disposable cuff be<br />
dedicated to a patient up<strong>on</strong> arrival at <strong>the</strong> hospital, and that it<br />
follow <strong>the</strong> patient to <strong>the</strong> O.R., to <strong>the</strong> P.A.C.U. and to <strong>the</strong> floor. This<br />
can also be adopted in I.C.U. settings. Such a procedure has been<br />
associated with a threshold reducti<strong>on</strong> in nosocomial infecti<strong>on</strong><br />
rate in I.C.U. setting 3 . Fur<strong>the</strong>r studies are underway to quantify<br />
col<strong>on</strong>izati<strong>on</strong> rates <strong>on</strong> patient's skin directly, pre- and postoperatively<br />
following applicati<strong>on</strong> of a re-usable blood pressure<br />
cuff in <strong>the</strong> O.R. It is hoped that <strong>the</strong>se results and safeguards<br />
might fur<strong>the</strong>r reduce <strong>the</strong> risks and improve <strong>the</strong> care of patients in<br />
<strong>the</strong> operating room, P.A.C.U. and I.C.U. settings.<br />
References<br />
1. Med. Journ. Australia 56:758-763, 1969.<br />
2. Dors<strong>on</strong> and Dorsch: Understanding Anes<strong>the</strong>sia Equipment:<br />
438: Williams & Wilkin, 1984.<br />
3. Pediatrics 61 (1):42-45, 19783.<br />
4. Brit. Journ. Anesth., 36:471-473, 1964.<br />
22<br />
SM4002 ICT4ECR.indd 22<br />
3/30/09 3:19:32 PM
Preventi<strong>on</strong> of Cross Transmissi<strong>on</strong> of Microorganisms Is Essential to<br />
Preventing Outbreaks of Hospital-Acquired Infecti<strong>on</strong>s<br />
David Schwegman, MD., Assistant Professor of Medicine, Emory University<br />
Introducti<strong>on</strong><br />
Hospital-acquired infecti<strong>on</strong> outbreaks may be prevented by providing<br />
single-patient-use disposable blood pressure cuffs that<br />
will remain with that patient from admissi<strong>on</strong> until discharge from<br />
<strong>the</strong> hospital before being discarded. Single-patient-use disposables<br />
may prevent hospital-acquired infecti<strong>on</strong>s that result from<br />
use of devices by multiple patients.<br />
Background<br />
Hospital-acquired infecti<strong>on</strong>s (HAIs) are becoming increasingly<br />
comm<strong>on</strong> worldwide and occur during more than two<br />
milli<strong>on</strong> hospitalizati<strong>on</strong>s in <strong>the</strong> United States each year 1 . Due<br />
to an increase in invasive procedures and a growing resistance<br />
to antibiotics, HAIs have increased by 36% in <strong>the</strong> last<br />
20 years and are c<strong>on</strong>suming more health care dollars each year.<br />
The burdens <strong>the</strong>se infecti<strong>on</strong>s place <strong>on</strong> our health care system<br />
can be divided into three categories: <strong>the</strong> cost of quality, <strong>the</strong> cost<br />
of human lives and <strong>the</strong> financial impact. The human cost is over<br />
99,000 deaths per year in <strong>the</strong> United States, which represents<br />
a 5% death rate for HAIs. 2 Quality costs include increased ICU<br />
stays by 8 days, and increased average hospital stay between 7.4<br />
and 9.4 days. 3,4,5 Total dollar costs added to <strong>the</strong> health care system<br />
are between $4.5 and $5.7 billi<strong>on</strong> annually, with <strong>the</strong> average<br />
cost per infecti<strong>on</strong> of $13,973 and an increased cost to patients<br />
(who survived) of approximately $40,000. 6 Specifically, methicillin-resistant<br />
Staphylococcus aureus (MRSA) has become endemic,<br />
even epidemic in many U.S. hospitals and added 2.7 milli<strong>on</strong><br />
extra days in <strong>the</strong> hospital with an average cost of $35,367. 6<br />
Where do <strong>the</strong> funds come from to pay for HAIs? Do <strong>the</strong>y come<br />
from third-party payers, Medicare/Medicaid, hospitals, or patients?<br />
Haley et al analyzed 9423 nosocomial infecti<strong>on</strong>s and<br />
found that <strong>on</strong>ly 5-18% of nosocomial infecti<strong>on</strong>s would have<br />
caused <strong>the</strong> admissi<strong>on</strong> to be reclassified to a higher diagnosis<br />
related group (DRG). 7 Of those hospitalizati<strong>on</strong>s able to be reclassified<br />
to a higher DRG, <strong>the</strong> extra payment <strong>on</strong>ly funded 5% of <strong>the</strong><br />
total cost to treat <strong>the</strong> infecti<strong>on</strong>. 7 That leaves 95% of <strong>the</strong> financial<br />
burden of HAIs to hospitals and patients.<br />
Problem<br />
Comm<strong>on</strong> HAIs include pneum<strong>on</strong>ia, ca<strong>the</strong>ter-associated urinary<br />
tract infecti<strong>on</strong>s, intravascular device-related infecti<strong>on</strong>s, and<br />
surgical site infecti<strong>on</strong>s from various bacteria, viruses and fungi.<br />
The sources of infecti<strong>on</strong>, modes of transmissi<strong>on</strong>, and rates of<br />
transmissi<strong>on</strong> vary based <strong>on</strong> setting, immune status of patients,<br />
and adherence of staff to infecti<strong>on</strong> c<strong>on</strong>trol procedures. Because<br />
of <strong>the</strong> multifactorial nature of HAIs, tendency to affect immunosuppressed<br />
patients, and often multi-drug resistant organisms,<br />
<strong>the</strong> primary method to avoid morbidity/mortality and costs associated<br />
with <strong>the</strong>se infecti<strong>on</strong>s is through preventi<strong>on</strong>. Harbath<br />
et al found that at least 20% and as much as 70% of HAIs are<br />
preventable, depending <strong>on</strong> <strong>the</strong> setting and type of infecti<strong>on</strong>. 8 To<br />
prevent HAIs it is necessary to identify sources and modes of<br />
transmissi<strong>on</strong> of <strong>the</strong> infecti<strong>on</strong> and to implement preventi<strong>on</strong> guidelines<br />
and practices. The modes of transmissi<strong>on</strong> of HAIs include<br />
direct-c<strong>on</strong>tact transmissi<strong>on</strong> (direct c<strong>on</strong>tact between two people)<br />
and indirect-c<strong>on</strong>tact transmissi<strong>on</strong> (transfer of an infectious agent<br />
through a c<strong>on</strong>taminated intermediate object).<br />
HAIs are <strong>the</strong> result of a high prevalence of pathogens with susceptible<br />
hosts and efficient transmissi<strong>on</strong> mechanisms from patient<br />
to patient. Unfortunately, <strong>the</strong>se pathogens tend to become<br />
incorporated into <strong>the</strong> normal flora of hospital workers and are<br />
Total Health Care Cost<br />
from Hospital-Acquired Infecti<strong>on</strong>s<br />
• Over 99,000 deaths per year in <strong>the</strong> United States<br />
• Increased ICU stay 8 days<br />
• Increased average hospital stay between<br />
7.4 and 9.4 days<br />
• Total dollar cost between $4.5 and $5.7 billi<strong>on</strong><br />
• Average cost per infecti<strong>on</strong> of $13,973<br />
• Increased total cost per patient who survived<br />
approximately $40,000<br />
17<br />
SM4002 ICT4ECR.indd 17<br />
3/30/09 3:19:32 PM
eadily transmitted through direct-c<strong>on</strong>tact transmissi<strong>on</strong>. Although<br />
less comm<strong>on</strong>, medical devices such as sphygmomanometers,<br />
<strong>the</strong>rmometers, and stethoscopes have been implicated in <strong>the</strong><br />
spread of HAIs through indirect-c<strong>on</strong>tact transmissi<strong>on</strong>. In a study<br />
by Base-Smith, sphygmomanometer cuffs from various inpatient<br />
settings were found to have bacterial col<strong>on</strong>izati<strong>on</strong> rates of 81-<br />
100%. 9 Also, 45.7% of <strong>the</strong> “clean” cuffs were c<strong>on</strong>taminated with<br />
organic and/or inorganic substances. The patient c<strong>on</strong>tact sides of<br />
cuffs were c<strong>on</strong>taminated twice as often as <strong>the</strong> n<strong>on</strong>patient sides.<br />
Stemicht et al found similar col<strong>on</strong>izati<strong>on</strong> rates of re-used disposable<br />
blood pressure cuffs. 10 Myers et al identified a single blood<br />
pressure cuff as <strong>the</strong> comm<strong>on</strong> source of a nosocomial infecti<strong>on</strong><br />
outbreak in a ne<strong>on</strong>atal intensive care unit. 11<br />
Similarly, Livornese et al found an electr<strong>on</strong>ic <strong>the</strong>rmometer as <strong>the</strong><br />
vehicle which caused an outbreak of vancomycin-resistant Enterococcus<br />
faecium in a med-surg intensive care unit and ward of<br />
a university hospital. 12 Marinella et al found that 100% of stethoscopes<br />
were c<strong>on</strong>taminated with coagulase negative staphylococcus<br />
and 38% were c<strong>on</strong>taminated with Staphylococcus aureus. 13<br />
In general, physicians tended to have a higher bacterial load <strong>on</strong><br />
<strong>the</strong>ir stethoscopes than nurses.<br />
Soluti<strong>on</strong><br />
Numerous organizati<strong>on</strong>s worldwide including <strong>the</strong> World Health<br />
Organizati<strong>on</strong> (WHO) and <strong>the</strong> Infecti<strong>on</strong> C<strong>on</strong>trol Practices Advisory<br />
Committee at <strong>the</strong> Centers for Disease C<strong>on</strong>trol and Preventi<strong>on</strong><br />
(CDC) have developed recommendati<strong>on</strong>s <strong>on</strong> protecting patients<br />
and health care workers from HAIs. The foundati<strong>on</strong> of HAI preventi<strong>on</strong><br />
is proper hand-hygiene technique, and <strong>the</strong> CDC 2002<br />
guidelines explicitly cover indicati<strong>on</strong>s for handwashing and<br />
hand antisepsis, hand-hygiene technique, surgical hand antisepsis,<br />
and selecti<strong>on</strong> of hand-hygiene agents. 14 If health care<br />
workers achieved 100% compliance with proper hand-hygiene<br />
techniques it would significantly reduce <strong>the</strong> spread of HAIs. Unfortunately,<br />
studies have found hand-hygiene compliance rates<br />
to be c<strong>on</strong>sistently less than 50%. 15,16 Perceived barriers to hand<br />
hygiene include skin irritati<strong>on</strong>, inaccessible supplies, interference<br />
with worker-patient relati<strong>on</strong>, patient needs perceived as<br />
priority, wearing gloves, forgetfulness, ignorance of guidelines,<br />
insufficient time, high workload and understaffing, and lack of<br />
scientific informati<strong>on</strong> dem<strong>on</strong>strating impact of improved hand<br />
hygiene <strong>on</strong> hospital infecti<strong>on</strong> rates. Eliminating perceived barriers<br />
to hand hygiene is an important first step in improving handhygiene<br />
compliance rates and reducing HAIs. The CDC has also<br />
published clear guidelines for isolati<strong>on</strong> precauti<strong>on</strong>s, preventi<strong>on</strong><br />
of hospital-acquired pneum<strong>on</strong>ias, intravascular device-related<br />
infecti<strong>on</strong>s, surgical site infecti<strong>on</strong>s, and ca<strong>the</strong>ter-related urinary<br />
tract infecti<strong>on</strong>s, and <strong>the</strong>se guidelines must also be closely followed<br />
to achieve maximum patient safety.<br />
CDC recommendati<strong>on</strong>s regarding indirect transmissi<strong>on</strong> through<br />
patient care devices and envir<strong>on</strong>mental reservoirs are less specific<br />
than <strong>the</strong> recommendati<strong>on</strong>s listed and require some interpretati<strong>on</strong>.<br />
The recommendati<strong>on</strong>s include: 17<br />
1. Establish policies and procedures for c<strong>on</strong>taining, transporting,<br />
and handling patient-care equipment and instruments/devices<br />
that may be c<strong>on</strong>taminated with blood or body fluids.<br />
2. Remove organic material from critical and semi-critical instruments/devices,<br />
using recommended cleaning agents before<br />
high-level disinfecti<strong>on</strong> and sterilizati<strong>on</strong> to enable effective<br />
disinfecti<strong>on</strong> and sterilizati<strong>on</strong> processes.<br />
3. Wear pers<strong>on</strong>al protective equipment (PPE), such as, gloves<br />
and gowns, according to <strong>the</strong> level of anticipated c<strong>on</strong>taminati<strong>on</strong><br />
when handling patient-care equipment and instruments/<br />
devices that are visibly soiled or may have been in c<strong>on</strong>tact<br />
with blood or body fluids.<br />
Because it has been shown that patient care devices such as<br />
blood pressure cuffs and <strong>the</strong>rmometers are frequently col<strong>on</strong>ized<br />
with bacteria and have been implicated in various outbreaks<br />
of HAIs, it is necessary to reduce <strong>the</strong> possibility of cross c<strong>on</strong>taminati<strong>on</strong><br />
with <strong>the</strong>se devices. A simple soluti<strong>on</strong> would be to<br />
provide each patient with a new disposable blood pressure cuff<br />
that remains with <strong>the</strong> patient during his/her hospital stay and is<br />
disposed of when <strong>the</strong> patient is discharged from <strong>the</strong> hospital.<br />
By providing a single-patient-use disposable blood pressure cuff,<br />
<strong>the</strong> possibility of an outbreak from cross c<strong>on</strong>taminati<strong>on</strong> would be<br />
greatly reduced. This soluti<strong>on</strong> does not eliminate <strong>the</strong> possibility<br />
of a HAI from <strong>the</strong> cuff, because <strong>the</strong> cuff will become col<strong>on</strong>ized<br />
with <strong>the</strong> patient’s flora and be a potential source of a future HAI.<br />
It is necessary to maintain hospital recommendati<strong>on</strong>s for disinfecti<strong>on</strong><br />
and sterilizati<strong>on</strong> procedures for <strong>the</strong>se devices. However,<br />
this soluti<strong>on</strong> does eliminate <strong>the</strong> possibility of cross c<strong>on</strong>taminati<strong>on</strong><br />
from a blood pressure cuff from multiple patient c<strong>on</strong>tact and<br />
will possibly prevent HAI outbreaks from a col<strong>on</strong>ized blood pressure<br />
cuff.<br />
18<br />
SM4002 ICT4ECR.indd 18<br />
3/30/09 3:19:32 PM
C<strong>on</strong>clusi<strong>on</strong><br />
Hospital-acquired infecti<strong>on</strong>s represent an increasing financial<br />
burden and declining quality of health care in <strong>the</strong> United States.<br />
Approximately 95% of <strong>the</strong> estimated $5 billi<strong>on</strong> total health care<br />
cost from hospital-acquired infecti<strong>on</strong>s falls <strong>on</strong> <strong>the</strong> shoulders of<br />
<strong>the</strong> hospitals and patients. The need for strict preventi<strong>on</strong> guidelines<br />
is essential. One possible strategy for <strong>the</strong> preventi<strong>on</strong> of<br />
hospital-acquired infecti<strong>on</strong> outbreaks can be achieved by providing<br />
each patient with a disposable blood pressure cuff that will<br />
remain with <strong>the</strong>m during <strong>the</strong>ir hospital stay and be disposed of<br />
when <strong>the</strong> patient is discharged. Likewise, providing medical devices<br />
(<strong>the</strong>rmometers) in each patient room that are appropriately<br />
sanitized between patients can prevent outbreaks of HAIs. Strict<br />
adherence to CDC guidelines regarding handwashing, handhygiene,<br />
and use of standard precauti<strong>on</strong>s also remains critical to<br />
preventing future HAIs.<br />
References<br />
1. Haley RW, Culver DH, White JW, Morgan WM, Emori TG. The<br />
nati<strong>on</strong>wide nosocomial infecti<strong>on</strong> rate: a new need for vital<br />
statistics. Am J Epidemiol 1985; 121:159-67.<br />
2. Klevens RM, Edwards JR, Richards CL, Horan TC. Estimating<br />
Health Care-Associated Infecti<strong>on</strong>s and Deaths in U.S.<br />
Hospitals, 2002. Public Health Reports 2007; 122:160-166.<br />
3. Brachman PS, Dan BB, Haley RW, Hooten TM, Garner JS,<br />
Allen JR. Nosocomial surgical infecti<strong>on</strong>s: incidence and cost.<br />
Surg Clin North Am 1980; 60:15-25.<br />
4. Zhan C, Miller MR. Excess length of stay, charges,<br />
and mortality attributable to medical injuries during<br />
hospitalizati<strong>on</strong>. JAMA 2003 Oct; 290(14):1868-1874.<br />
5. Pittet D, Tarara D, Wenzel RP. Nosocomial bloodstream<br />
infecti<strong>on</strong> in critically ill patients. Excess length of stay,<br />
extra costs, and attributable mortality. JAMA 1994 May 25;<br />
271(20):1598-601.<br />
6. St<strong>on</strong>e PW, Lars<strong>on</strong> E, Kawar LN. A systematic audit of<br />
ec<strong>on</strong>omic evidence linking nosocomial infecti<strong>on</strong>s and<br />
infecti<strong>on</strong> c<strong>on</strong>trol interventi<strong>on</strong>s: 1990-2000. Am J Infect<br />
C<strong>on</strong>trol 2002; 30:145-52.<br />
7. Haley RW, White JW, Culver DH, Hughes JM. The financial<br />
incentive for hospitals to prevent nosocomial infecti<strong>on</strong>s under<br />
<strong>the</strong> prospective payment system. An empirical determinati<strong>on</strong><br />
from a nati<strong>on</strong>ally representative sample.<br />
8. Harbath S, Sax H, Gastmeier P. The preventable proporti<strong>on</strong><br />
of nosocomial infecti<strong>on</strong>s: an overview of published reports. J<br />
Hosp Infect 2003; 54:258-266.<br />
9. Base-Smith V. <str<strong>on</strong>g>N<strong>on</strong></str<strong>on</strong>g>disposable sphygmomanometer cuffs<br />
harbor frequent bacterial col<strong>on</strong>izati<strong>on</strong> and significant<br />
c<strong>on</strong>taminati<strong>on</strong> by organic and inorganic matter. AANA J. 1997<br />
Feb; 65(1):28.<br />
10. Stemicht AL. Significant bacterial col<strong>on</strong>izati<strong>on</strong> of <strong>the</strong> surface<br />
of n<strong>on</strong>-disposable sphygmomanometer cuffs and reused<br />
disposable cuffs. Comet Med. Ctr., New York, NY 10021.<br />
11. Myers MG. L<strong>on</strong>gitudinal evaluati<strong>on</strong> of ne<strong>on</strong>atal nosocomial<br />
infecti<strong>on</strong>s: associati<strong>on</strong> of infecti<strong>on</strong> with a blood pressure<br />
cuff. Pediatrics 1978; 61:42-45.<br />
12. Livornese LL, Levis<strong>on</strong> ME, Johns<strong>on</strong> CL. Electr<strong>on</strong>ic<br />
<strong>the</strong>rmometers and nosocomial infecti<strong>on</strong>s. An of Intern Med<br />
1993; 118(2):156-157.<br />
13. Marinella MA, Piers<strong>on</strong> C, Chenoweth C. The stethoscope. A<br />
potential source of nosocomial infecti<strong>on</strong>? Arch Intern Med<br />
1997; 157:786-790.<br />
14. Boyce JM, Pittet D. Guideline for Hand Hygiene in Healthcare<br />
Settings. Recommendati<strong>on</strong>s of <strong>the</strong> Healthcare Infecti<strong>on</strong><br />
C<strong>on</strong>trol Practices Advisory Committee and <strong>the</strong> HICPAC/<br />
SHEA/APIC/IDSA Hand Hygiene Task Force. October 25th,<br />
2002 www.cdc.gov/mmwr/preview/mmwrhtml/rr5116a1.<br />
htm.<br />
15. Albert RK, C<strong>on</strong>die F. Hand-washing patterns in medical<br />
intensive-care units. N Engl J Med 1981; 304:1465.<br />
16. Graham M. Frequency and durati<strong>on</strong> of handwashing in an<br />
intensive care unit. Am J Infect C<strong>on</strong>trol 1990; 18:77-81.<br />
17. Siegel JD, Rhinehart E, Jacks<strong>on</strong> M, Chiarello L. Guideline for<br />
isolati<strong>on</strong> precauti<strong>on</strong>s: preventing transmissi<strong>on</strong> of infectious<br />
agents in healthcare settings 2007. June 2007 www.cdc.<br />
gov/ncidod/dhqp/pdf/guidelines/Isolati<strong>on</strong>2007.pdf.<br />
19<br />
SM4002 ICT4ECR.indd 19<br />
3/30/09 3:19:32 PM