Vetroquick System - Seves glassblock
Vetroquick System - Seves glassblock
Vetroquick System - Seves glassblock

You also want an ePaper? Increase the reach of your titles
YUMPU automatically turns print PDFs into web optimized ePapers that Google loves.
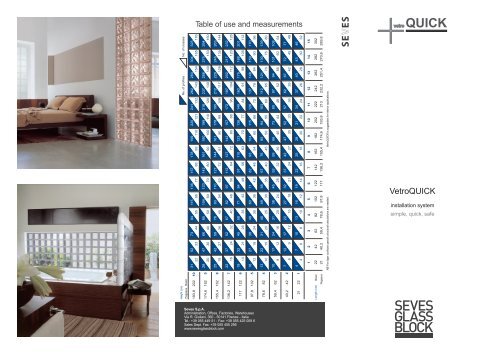
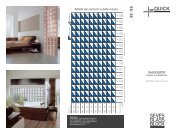
Table of use and measurements<br />
No. of profiles No. of crosses<br />
31 52 73 94 115 136 157 178 199 220 241 262 283 304 325<br />
22 33 44 55 66 77 88 99 110 121 132 143 154 165 176<br />
28 47 66 85 104 123 142 161 180 199 218 237 256 275 294<br />
20 30 40 50 60 70 80 90 100 110 120 130 140 150 160<br />
25 42 59 76 93 110 127 144 161 178 195 212 229 246 263<br />
18 27 36 45 54 63 72 81 90 99 108 117 126 135 144<br />
22 37 52 67 82 97 112 127 142 157 172 187 202 217 232<br />
16 24 32 40 48 56 64 72 80 88 96 104 112 120 128<br />
19 32 45 58 71 84 97 110 123 136 149 162 175 188 201<br />
14 21 28 35 42 49 56 63 70 77 84 91 98 105 112<br />
16 27 38 49 60 71 82 93 104 115 126 137 148 159 170<br />
12 18 24 30 36 42 48 54 60 66 72 78 84 90 96<br />
13 22 31 40 49 58 67 76 85 94 103 112 121 130 139<br />
10 15 20 25 30 35 40 45 50 55 60 65 70 75 80<br />
10 17 24 31 38 45 52 59 66 73 80 87 94 101 108<br />
8 12 16 20 24 28 32 36 40 44 48 52 56 60 64<br />
7 12 17 22 27 32 37 42 47 52 57 62 67 72 77<br />
6 9 12 15 18 21 24 27 30 33 36 39 42 45 48<br />
4 7 10 13 16 19 22 25 28 31 34 37 40 43 46<br />
4 6 8 10 12 14 16 18 20 22 24 26 28 30 32<br />
1 2 3 4 5 6 7 8 9 10 11 12 13 14 15<br />
22 42 62 82 102 122 142 162 182 202 222 242 262 282 302<br />
VetroQUICK<br />
installation system<br />
simple, quick, safe<br />
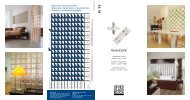
Height (cm)<br />
Pegasus Basic<br />
193,8<br />
202<br />
10<br />
174,6<br />
182<br />
9<br />
155,4<br />
162<br />
8<br />
136,2<br />
142<br />
7<br />
117<br />
122<br />
6<br />
97,8<br />
102<br />
5<br />
78,6<br />
82<br />
4<br />
59,4<br />
62<br />
3<br />
40,2<br />
42<br />
2<br />
21<br />
22<br />
1<br />
Length (cm) Basic<br />
21 40,2 59,4 78,6 97,8 117 136,2 155,4 174,6 193,8 213 232,2 251,4 270,6 289,8<br />
NB For lager surfaces specifc structural calculations are needed. VetroQUICK is suggested for interior applications.<br />
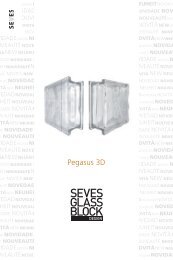
Pegasus<br />
<strong>Seves</strong> S.p.A.<br />
Administration, Offces, Factories, Warehouses<br />
Via R. Giuliani, 360 - 50141 Firenze - Italia<br />
Tel.: +39 055 449 51 - Fax: +39 055 425 009 6<br />
Sales Dept. Fax: +39 055 455 295<br />
www.seves<strong>glassblock</strong>.com
VetroQUICK is a dry installation system for creating glass block walls<br />
simply, quickly, safely<br />
and simplifies installation with the use of a few accessories:<br />
a profile and a cross.<br />
Accessories:<br />
prepare the cross to insert in different parts of the wall;<br />
L cross T cross + cross<br />
“L” cross: to be used at the corners of the wall<br />
“T” cross: to be used on the perimeter of the wall (accept the corners of the wall)<br />
“+” cross: to be used between the glass blocks (accept the perimeter and the corners)<br />
Installation:<br />
IMPORTANT: before starting the installation process:<br />
Mark with a pencil the dimensions of the glass block wall on the floor and wall, making sure<br />
that these lines are square and level. If the wall is created with a wooden profile or another<br />
type of material, make sure the profile is securely fastened to the floor and wall.<br />
Installation process<br />
Prepare the cross as “L” shape (for the starting angle) or “T” shape (for the first row of blocks)<br />
If creating cantilever walls (or using the end of a wall).<br />
Cut the profile in correspondence of the score line that marks the end block of the wall or<br />
rectangular block.<br />
Use the cross depending on the glass block choosen (Pegasus or Basic) Prepare the cross as<br />
“L” shape and, use the profiles to insert it into the appropriate slot until a right angle is formed.<br />
Draw the necessary points on the floor and wall next to the holes present on the profile. Drill<br />
the holes. Place the wedges and screw the structure to the square created beforehand with<br />
VetroQUICK.<br />
Prepare the cross as “T” shape and join it to the profiles. Continue to add profiles and crosses,<br />
repeating the drawing, drilling and screwing operations until reaching the desired width of the<br />
wall.<br />
Once all the horizontal profiles have been positioned, start inserting the vertical profiles by<br />
inserting them into the slits.<br />
make sure that the base laid<br />
perfectly flat, in case use the<br />
suitable shims<br />
(wooden edges or pieces).<br />
it is important that the wall is<br />
perfectly horizontal and vertical.<br />
Prepare the crosses and join<br />
them to the profiles. Continue to<br />
add profiles and crosses,<br />
repeating drawing, drilling and<br />
screwing operations until<br />
reaching the desired width of the<br />
wall<br />
Place the glass blocks in between the vertical profiles until the row is completed<br />
Insert a “T” shape cross into the top block leaning against the wall (laterally) in order to<br />
continue the installation process with VetroQUICK<br />
Place the glass blocks in<br />
between the vertical profiles.<br />
profile for corner<br />
DESIGN LINE<br />
Add more rows of VetroQUICK accessories and glass block rows until the whole wall is<br />
completed.<br />
profile<br />
profile for corner BASIC LINE<br />
Profile to use with to intersect 2 walls with a 90° angle<br />
Finishing process<br />
Finish off the joins with quick-setting mortar.<br />
Mix the special mortar (cement-based filler) with the suitable mixing spade on the driller, with<br />
adjustable speed,<br />
Apply it with the suitable spatula or gummy plastering trowels.<br />
Add more rows of vetroQUICK<br />
accessories and glass block<br />
rows until the whole wall is<br />
completed.<br />
“L” cross<br />
• Fill the joints with the special mortar of the desired colour.<br />
• Sponge the joint area after it has hardened.<br />
“T” cross<br />
“+” cross<br />
Clean with a wet cloth the surface of the glass when the mortar is dry but still not hardened,<br />
and refine your work with the suitable products.<br />
finish the joint with<br />
quick-setting mortar<br />
No. of crosses needed per m2:<br />
36 pcs.<br />
No. of profiles needed per m2:<br />
60 pcs.<br />
VetroQUICK is conceived and developed for indoor use.<br />
However it can be used in settings subject to high humidity or exposure to water (e.g. shower<br />
stalls) if totally impermeable finishing for joints is used, and if the finishing is done in a<br />
workman-like manner.<br />
To our knowledge, the information in this technical leaflet is accurate and reliable.<br />
For further information and the video of accessories and installation, please visit:<br />
www.vetroquick.com<br />
www.seves<strong>glassblock</strong>.com<br />
Since <strong>Seves</strong> SpA does not have any means of controlling installation and assembly<br />
conditions, of whether competent persons doe to work or the appropriate selection<br />
and correct use of the accessory materials, no guarantee can cover materials that<br />
prove defective after installation and/or assembly.<br />
For detailed information, please contact the technical dept.<br />
make cleaning of<br />
the wall


![SGB_Mendini 77x19.ps [ 1 ], page 1-2 @ Normalize ... - NBD-online](https://img.yumpu.com/26261560/1/190x190/sgb-mendini-77x19ps-1-page-1-2-normalize-nbd-online.jpg?quality=85)