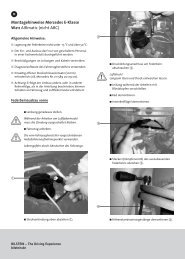
Installation Instructions - Bilstein
Installation Instructions - Bilstein
Installation Instructions - Bilstein

Create successful ePaper yourself
Turn your PDF publications into a flip-book with our unique Google optimized e-Paper software.
TOYOTA TUNDRA<br />
FRONT COIL-OVER SYSTEM<br />
<strong>Installation</strong> <strong>Instructions</strong><br />
Vehicles that have been modified for performance enhancement by either raising, lowering, and or the<br />
addition of larger or smaller tires will have very different handling characteristics. These modifications may<br />
dramatically change the vehicle’s driving and handling dynamics and may result in roll-over or loss of control.<br />
It is the operator’s obligation to operate the vehicle in a safe and responsible manner. Operating the vehicle in an<br />
unsafe manner or in unsafe conditions could cause serious bodily injury and or loss of life.<br />
If your state does not allow the legal modification of your vehicle’s suspension, STOP NOW, and do not install the<br />
system.<br />
Your vehicle’s warranty may be affected by the modification of your suspension. Please check with your vehicle<br />
manufacturer prior to installation.<br />
PLEASE READ ALL INSTRUCTIONS FIRST!<br />
In case of doubt please contact your local BILSTEIN dealer or our sales department before installation.<br />
When replacing other brands, BILSTEIN shock absorbers should always be installed as a set. <strong>Installation</strong> of shock<br />
absorbers, suspension springs, struts and cartridges requires special tools and expert knowledge. Accordingly,<br />
installation of all BILSTEIN products must be performed by a qualified suspension specialist.<br />
Always use a chassis hoist for the installation of BILSTEIN products, and make certain that the raised vehicle is<br />
securely attached to the hoist to prevent the vehicle from slipping, falling, or moving during the installation process.<br />
If you choose to install any BILSTEIN product without the necessary special tools, expertise or chassis hoist,<br />
you may subject yourself to the risk of serious bodily injury or death. If you elect not to use a chassis hoist, at<br />
least make sure the vehicle is on level ground, that all tires on the ground during installation are blocked to prevent<br />
movement, that at least two tires are on the ground at all times, and that adequately secured safety stands (jack<br />
stands) are used to support the chassis. NEVER get under the vehicle until you have checked to make sure all of<br />
these things are done.<br />
When replacing other brands, BILSTEIN shock absorbers should always be installed as a set. <strong>Installation</strong> of shock<br />
absorbers, struts and cartridges requires special tools and expert knowledge. Accordingly, installation of all BILSTEIN<br />
products must be performed by a qualified suspension specialist.<br />
All BILSTEIN product must only be used for the specific, intended application as indicated in the application guide.<br />
Any use of any BILSTEIN product other than for its intended use may result in serious bodily injury or death.<br />
BILSTEIN suspension products are gas-filled and are highly pressurized. Never place any BILSTEIN product in a vise<br />
or use a clamp on any BILSTEIN product; never apply heat near any BILSTEIN product, and never attempt to open or<br />
repair any BILSTEIN product, in order to prevent serious bodily injury or death. Any attempt to misuse, misapply,<br />
modify, or tamper with any BILSTEIN suspension product voids any warranty and may result in serious bodily injury<br />
or death.<br />
All mounting fasteners for struts must be securely tightened before tension is placed on the suspension system. Make<br />
sure that the bump stop and dust cover are correctly and properly fastened.<br />
Do not use impact tools for loosening or tightening fasteners, because this may destroy the screw threads.<br />
Self- locking nuts must only be used once!<br />
Suspension springs are PRELOADED! The suspension spring must be compressed with the assistance of an<br />
appropriate strut vise and spring compressor. The top mount must not be removed until the preload pressure is no<br />
longer present and the spring can be moved by hand, or serious bodily injury or death may result.<br />
Reuse original equipment components only if they are in good condition, otherwise replace them with new components.<br />
Never remove the slight film of oil on the piston rod and seal.<br />
196022-02 1
After installing any BILSTEIN product, the suspension caster and camber must be checked and/or adjusted to comply<br />
with the vehicle manufacturer’s specifications. Also, the (load dependent) brake compensator and the anti-lock brake<br />
system must be checked and/or reset to comply with the vehicle manufacturer’s specifications. Also the headlight aim<br />
must be checked and adjusted.<br />
Be sure to properly dispose of all old parts.<br />
BILL OF MATERIALS<br />
ITEM NO. QTY. PART NO. DESCRIPTION<br />
COIL OVER SHOCK ASSEMBLY<br />
1 2 BE5-6930-H5 Monotube shock absorber assembly<br />
2 2 199024 Coil spring<br />
3 2 193586 Spring hat<br />
UPPER SHOCK MOUNT ASSEMBLY<br />
4 2 197571 Upper mount<br />
5 2 197587 M14x1.5x90 mm hex head cap screw (HHCS)<br />
6 4 197581 14 mm heavy washer<br />
7 2 517900 M14x1.5 lock nut<br />
8 6 197582 M10 x 20 mm socket head cap screw (SHCS) – “Allen bolt”<br />
9 6 197586 10 mm heavy washer<br />
10 6 517790 M10 lock nut<br />
TOOLS<br />
11 1 191014 90 mm spanner wrench<br />
12 1 191015 75 mm spanner wrench<br />
Note: <strong>Installation</strong> of this kit and alignment of the vehicle should be performed by a qualified<br />
technician. Use of proper tools and observance of all safety precautions is required.<br />
1. Immediately inspect all parts and <strong>Instructions</strong> prior to installation of this kit! A Bill of Materials has<br />
been included with in this instruction sheet.<br />
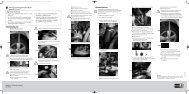
2. Following instructions in the manufacturer’s service manual, remove the original front shock assemblies from<br />
the vehicle. Only the original lower M14 hex bolts will be re-used for installation of the <strong>Bilstein</strong> components.<br />
Do not discard!<br />
3. The <strong>Bilstein</strong> threaded shocks have threaded spring seats and lock rings installed. Apply a suitable antiseize<br />
compound to the threads. The spring seat must be set to a specified location on the shock prior to<br />
installing the coil spring (see chart below). Do not exceed the upper and lower limits shown on the chart as<br />
this can lead to damage to the components and void the warranty.<br />
Specifications are based on a new vehicle in “stock” form and within the manufacturers specified vehicle<br />
weight. Measured heights may vary with additional/alternate aftermarket components.<br />
Measurement*<br />
Ride height change Ride height change<br />
(except 4x4 double cab) (4x4 double cab only)<br />
100mm (3.94”) 1.0” lift 0.25” lift<br />
110mm (4.33”) 1.5” lift 0.75” lift<br />
125mm (4.92”) 2.25” lift 1.50” lift<br />
* Measured dimensions are<br />
taken from the center of the<br />
lower shock bushing to the<br />
top of the spring seat<br />
surface.<br />
4. After setting the spring seat to the selected height, tighten the lock ring to the seat with the supplied spanner<br />
wrenches. Re-check the spring seat height after this step.<br />
196022-02 2
CAUTION!<br />
READ THIS BEFORE INSTALLING THE COIL SPRING: There will be a high pre-load force on the coil<br />
spring during installation. You must use a high-quality, one-piece, Macpherson-strut type spring<br />
compressor (wall- or floor-mount type recommended) and follow all instructions and safety<br />
precautions regarding the use of that spring compressor, or serious bodily injury or death may result.<br />
Do not use economy or hook-type spring compressors.<br />
5. Using a suitable, professional quality spring compressor, compress the coil spring (P/N 199024) so the<br />
spring hat (P/N 193456) can be positioned towards the top of the shock rod and seated under the upper eye<br />
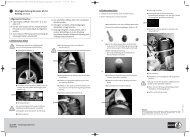
ring.<br />
6. After installing the upper spring hat with the <strong>Bilstein</strong> logo facing outward, slowly release the spring tension<br />
ensuring the upper hat seats on/in the coil spring and upper eye ring.<br />
7. Referring to the upper shock mount diagram (fig. 1), install one M10 socket head cap screw (SHCS- “allen<br />
bolt”) labeled A into the countersunk bolt hole, as shown, on the upper shock mount (P/N 197517).<br />
8. With the bolt labeled A in place, install the shock to the upper mount with the M14 hex head bolt [HHCS (P/N<br />
197584)] labeled B, lock nut (P/N 517900) and washer (P/N 197581). The hex head of the M14 bolt will<br />
prevent the M10 SHCS from dropping out of its location during installation. Thread the lock nut to the M14<br />
bolt but do not tighten at this time.<br />
9. Install the completed shock / spring / upper mount assembly to the vehicle body using the remaining M10<br />
SHCS’s, washers (P/N 197586) and M10 lock nuts (P/N 517790). For both left and right sides, the hex<br />
head of the M14 bolt “B” must be oriented towards the rear of the vehicle as shown in Fig.1. The innermost<br />
SHCS can be accessed by swinging the shock assembly outward, allowing more room for installation<br />
tools. Torque the M10 lock nuts to 20 ft/lbs (25Nm).<br />
10. Attach the shock assembly to the vehicle lower mount on the A-arm using the original M14 hex bolt. Torque<br />
the upper and lower M14 hex bolts to 60 ft/lbs (80Nm).<br />
11. Inspect all points of attachment and brake/ABS lines for clearance, and adjust if necessary.<br />
12. Align the vehicle to factory specifications before driving any substantial distance. Inspect and re-torque all<br />
hardware after the first 50 miles of driving.<br />
UPPER SHOCK MOUNT ASSEMBLY<br />
Fig. 1<br />
196022-02 3