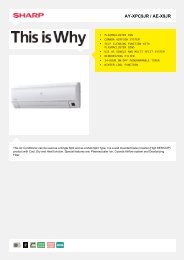
R-667-A Operation-Manual GB - Sharp
R-667-A Operation-Manual GB - Sharp
R-667-A Operation-Manual GB - Sharp

Create successful ePaper yourself
Turn your PDF publications into a flip-book with our unique Google optimized e-Paper software.
Important<br />
LOW FAT<br />
FOOD<br />
VEGETARIAN<br />
FOOD<br />
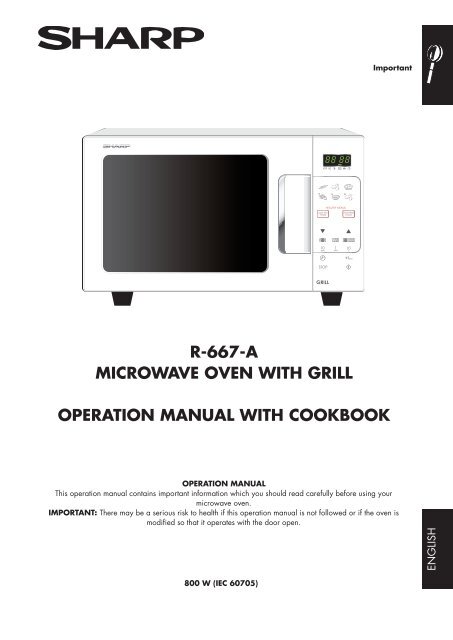
R-<strong>667</strong>-A<br />
MICROWAVE OVEN WITH GRILL<br />
OPERATION MANUAL WITH COOKBOOK<br />
OPERATION MANUAL<br />
This operation manual contains important information which you should read carefully before using your<br />
microwave oven.<br />
IMPORTANT: There may be a serious risk to health if this operation manual is not followed or if the oven is<br />
modified so that it operates with the door open.<br />
ENGLISH<br />
800 W (IEC 60705)<br />
A<br />
R-<strong>667</strong>_[Cover].indd A<br />
6/2/09 3:05:53 PM
Dear Customer,<br />
Congratulations on acquiring your new microwave oven with grill, which from now on will make your kitchen<br />
chores considerably easier.<br />
You will be pleasantly surprised by the kinds of things you can do with a microwave. Not only can you use it for<br />
rapid defrosting or heating up of food, you can also prepare whole meals.<br />
In our test kitchen our microwave team has gathered together a selection of the most delicious international recipes<br />
which are quick and simple to prepare.<br />
Be inspired by the recipes we have included and prepare your own favourite dishes in your microwave oven.<br />
There are so many advantages to having a microwave oven which we are sure you will find exciting:<br />
• Food can be prepared directly in the serving dishes, leaving less to wash up.<br />
• Shorter cooking times and the use of little water and fat ensure that many vitamins, minerals and<br />
characteristic flavours are preserved.<br />
We advise you to read the cookery book guide and operating instructions carefully.<br />
You will then easily understand how to use your oven.<br />
Enjoy using your microwave oven and trying out the delicious recipes.<br />
Your Microwave-Team<br />
ENGLISH<br />
1<br />
R-<strong>667</strong>_[Cover].indd Sec1:1<br />
6/2/09 3:05:54 PM
<strong>GB</strong><br />
A. Information on Disposal for Users<br />
(private households)<br />
1. In the European Union<br />
Attention:<br />
Your product is<br />
marked with this<br />
symbol.<br />
It means that used<br />
electrical and<br />
electronic products<br />
should not be<br />
mixed with general<br />
household waste.<br />
There is a separate<br />
collection system<br />
for these products.<br />
Attention: If you want to dispose of this equipment, please do not use the<br />
ordinary dust bin!<br />
Used electrical and electronic equipment must be treated separately and in<br />
accordance with legislation that requires proper treatment, recovery and<br />
recycling of used electrical and electronic equipment.<br />
Following the implementation by member states, private households within<br />
the EU states may return their used electrical and electronic equipment to<br />
designated collection facilities free of charge*.<br />
In some countries* your local retailer may also take back your old product<br />
free of charge if you purchase a similar new one.<br />
*) Please contact your local authority for further details.<br />
If your used electrical or electronic equipment has batteries or accumulators,<br />
please dispose of these separately beforehand according to local<br />
requirements.<br />
By disposing of this product correctly you will help ensure that the waste<br />
undergoes the necessary treatment, recovery and recycling and thus prevent<br />
potential negative effects on the environment and human health which could<br />
otherwise arise due to inappropriate waste handling.<br />
2. In other Countries outside the EU<br />
If you wish to discard this product, please contact your local authorities and<br />
ask for the correct method of disposal.<br />
For Switzerland: Used electrical or electronic equipment can be returned<br />
free of charge to the dealer, even if you don’t purchase a new product.<br />
Further collection facilities are listed on the homepage of www.swico.ch or<br />
www.sens.ch.<br />
B. Information on Disposal for Business Users<br />
1. In the European Union<br />
If the product is used for business purposes and you want to discard it:<br />
Please contact your SHARP dealer who will inform you about the take-back of<br />
the product. You might be charged for the costs arising from take-back and<br />
recycling. Small products (and small amounts) might be taken back by your<br />
local collection facilities.<br />
For Spain: Please contact the established collection system or your local<br />
authority for take-back of your used products.<br />
2. In other Countries outside the EU<br />
If you wish to discard of this product, please contact your local authorities and<br />
ask for the correct method of disposal.<br />
ENGLISH<br />
2<br />
R-<strong>667</strong>_[Cover].indd Sec1:2<br />
6/2/09 3:05:54 PM
CONTENTS<br />
<strong>Operation</strong> manual<br />
DEAR CUSTOMER . . . . . . . . . . . . . . . . . . . . . . . . . . . . . . . . . . . . . . . . . . . . . . . . . . . . . . 1<br />
RECYCLING INFORMATION. . . . . . . . . . . . . . . . . . . . . . . . . . . . . . . . . . . . . . . . . . . . . . . 2<br />
OVEN AND ACCESSORIES . . . . . . . . . . . . . . . . . . . . . . . . . . . . . . . . . . . . . . . . . . . . . . . 4<br />
CONTROL PANEL . . . . . . . . . . . . . . . . . . . . . . . . . . . . . . . . . . . . . . . . . . . . . . . . . . . . . . 5<br />
IMPORTANT SAFETY INSTRUCTIONS . . . . . . . . . . . . . . . . . . . . . . . . . . . . . . . . . . . . <strong>GB</strong>-1-3<br />
INSTALLATION . . . . . . . . . . . . . . . . . . . . . . . . . . . . . . . . . . . . . . . . . . . . . . . . . . . . . .<strong>GB</strong>-3<br />
BEFORE OPERATION . . . . . . . . . . . . . . . . . . . . . . . . . . . . . . . . . . . . . . . . . . . . . . . . . .<strong>GB</strong>-4<br />
MICROWAVE POWER LEVEL. . . . . . . . . . . . . . . . . . . . . . . . . . . . . . . . . . . . . . . . . . . . .<strong>GB</strong>-5<br />
MICROWAVE COOKING . . . . . . . . . . . . . . . . . . . . . . . . . . . . . . . . . . . . . . . . . . . . . . .<strong>GB</strong>-6<br />
GRILL COOKING/MIX GRILL COOKING . . . . . . . . . . . . . . . . . . . . . . . . . . . . . . . . . . . .<strong>GB</strong>-7<br />
OTHER CONVENIENT FUNCTIONS . . . . . . . . . . . . . . . . . . . . . . . . . . . . . . . . . . . . <strong>GB</strong>-8-9<br />
AUTOMATIC OPERATION . . . . . . . . . . . . . . . . . . . . . . . . . . . . . . . . . . . . . . . . . . <strong>GB</strong>-10-11<br />
EXPRESS COOK CHARTS . . . . . . . . . . . . . . . . . . . . . . . . . . . . . . . . . . . . . . . . . . . . . .<strong>GB</strong>-11<br />
EXPRESS DEFROST CHARTS . . . . . . . . . . . . . . . . . . . . . . . . . . . . . . . . . . . . . . . . . . . .<strong>GB</strong>-12<br />
RECIPES FOR EXPRESS COOK, GRATIN . . . . . . . . . . . . . . . . . . . . . . . . . . . . . . . . . . . .<strong>GB</strong>-12<br />
RECIPES FOR HEALTHY MENUS, LOW FAT FOOD . . . . . . . . . . . . . . . . . . . . . . . . . . . .<strong>GB</strong>-13<br />
RECIPES FOR HEALTHY MENUS, VEGETARIAN FOOD. . . . . . . . . . . . . . . . . . . . . . . . . .<strong>GB</strong>-14<br />
CARE AND CLEANING . . . . . . . . . . . . . . . . . . . . . . . . . . . . . . . . . . . . . . . . . . . . . . .<strong>GB</strong>-15<br />
SERVICE CALL CHECK . . . . . . . . . . . . . . . . . . . . . . . . . . . . . . . . . . . . . . . . . . . . . . . .<strong>GB</strong>-15<br />
Cookbook<br />
WHAT ARE MICROWAVES? . . . . . . . . . . . . . . . . . . . . . . . . . . . . . . . . . . . . . . . . . . . .<strong>GB</strong>-16<br />
SUITABLE OVENWARE, TIPS AND ADVICE. . . . . . . . . . . . . . . . . . . . . . . . . . . . . . . <strong>GB</strong>-16-17<br />
TIPS AND ADVICE . . . . . . . . . . . . . . . . . . . . . . . . . . . . . . . . . . . . . . . . . . . . . . . . . . .<strong>GB</strong>-18<br />
HEATING . . . . . . . . . . . . . . . . . . . . . . . . . . . . . . . . . . . . . . . . . . . . . . . . . . . . . . . . .<strong>GB</strong>-19<br />
DEFROSTING . . . . . . . . . . . . . . . . . . . . . . . . . . . . . . . . . . . . . . . . . . . . . . . . . . . . . .<strong>GB</strong>-19<br />
COOKING FRESH VEGETABLES . . . . . . . . . . . . . . . . . . . . . . . . . . . . . . . . . . . . . . . . .<strong>GB</strong>-20<br />
COOKING GRILLING AND BROWNING. . . . . . . . . . . . . . . . . . . . . . . . . . . . . . . . . . .<strong>GB</strong>-20<br />
DEFROSTING AND COOKING. . . . . . . . . . . . . . . . . . . . . . . . . . . . . . . . . . . . . . . . . .<strong>GB</strong>-20<br />
TABLES . . . . . . . . . . . . . . . . . . . . . . . . . . . . . . . . . . . . . . . . . . . . . . . . . . . . . . . . <strong>GB</strong>-21-24<br />
RECIPES . . . . . . . . . . . . . . . . . . . . . . . . . . . . . . . . . . . . . . . . . . . . . . . . . . . . . . . <strong>GB</strong>-25-35<br />
SERVICE ADDRESSES . . . . . . . . . . . . . . . . . . . . . . . . . . . . . . . . . . . . . . . . . . . . . . . . . . 6-12<br />
SPECIFICATIONS . . . . . . . . . . . . . . . . . . . . . . . . . . . . . . . . . . . . . . . . . . . . . . . . . . . . . . 13<br />
ENGLISH<br />
3<br />
R-<strong>667</strong>_[Cover].indd 3<br />
6/2/09 3:05:54 PM
OVEN AND ACCESSORIES<br />
1 Oven lamp<br />
2 Control panel<br />
3 Waveguide cover<br />
4 Coupling<br />
5 Oven cavity<br />
6 Door seals and sealing surfaces<br />
7 Door safety latches<br />
8 Door opening handle<br />
9 Grill heating element<br />
10 Power supply cord<br />
11 Ventilation openings<br />
12 Outer cover<br />
ACCESSORIES:<br />
Check to make sure the following accessories are<br />
provided:<br />
(13) Turntable (14) Roller stay<br />
(15) Rack (height: 8,5cm)<br />
Place the roller stay in the coupling on the floor of the<br />
cavity.<br />
Then place the turntable on the roller stay.<br />
To avoid turntable damage, ensure dishes or containers<br />
are lifted clear of the turntable rim when removing them<br />
from the oven.<br />
NOTE: When you order accessories, please mention<br />
two items: part name and model name to your dealer<br />
or SHARP authorised service agent.<br />
WARNING:<br />
The door, outer cabinet, oven cavity, accessories<br />
and dishes will become very hot during operation.<br />
To prevent burns, always use thick oven gloves.<br />
ENGLISH<br />
4<br />
R-<strong>667</strong>_[Cover].indd 4<br />
6/2/09 3:05:54 PM
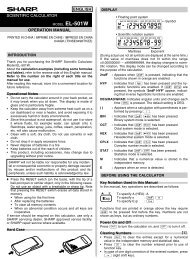
CONTROL PANEL<br />
CONTROL PANEL<br />
1<br />
1 Digital Display<br />
2 Indicators<br />
The appropriate indicator will flash or light up,<br />
just above each symbol according to the instruction.<br />
When an indicator is flashing, press the suitable key<br />
(having the same symbol) or do the necessary<br />
operation.<br />
LOW FAT<br />
FOOD<br />
VEGETARIAN<br />
FOOD<br />
2<br />
3<br />
4<br />
5<br />
6<br />
7<br />
8<br />
9<br />
Check<br />
Weight<br />
Power level<br />
Grill<br />
Microwave<br />
Cooking in progress<br />
3 EXPRESS COOK keys<br />
4 EXPRESS DEFROST keys<br />
5 LOW FAT FOOD key<br />
6 VEGETARIAN FOOD key<br />
7 LESS/PLUS keys<br />
8 MICROWAVE POWER LEVEL key<br />
Press to change the microwave power setting<br />
9 MIX GRILL key<br />
10 GRILL key<br />
11 TIME keys<br />
12 +1min key<br />
13 KITCHEN TIMER key<br />
14 START key<br />
15 STOP key<br />
10<br />
11<br />
12<br />
13<br />
14<br />
15<br />
ENGLISH<br />
5<br />
R-<strong>667</strong>_[Cover].indd Sec2:5<br />
6/2/09 3:05:55 PM
IMPORTANT SAFETY INSTRUCTIONS<br />
IMPORTANT SAFETY INSTRUCTIONS: READ CAREFULLY AND KEEP FOR FUTURE REFERENCE<br />
To avoid the danger of fire.<br />
The microwave oven should not be left<br />
unattended during operation. Power levels<br />
that are too high, or cooking times that are too<br />
long, may overheat foods resulting in a fire.<br />
This oven is designed to be used on a countertop only.<br />
It is not designed to be built into a kitchen unit. Do not<br />
place the oven in a cabinet. The electrical outlet must be<br />
readily accessible so that the unit can be unplugged<br />
easily in an emergency.<br />
The AC power supply must be 230V, 50Hz, with a<br />
minimum 10A distribution line fuse, or a minimum 10A<br />
distribution circuit breaker.<br />
A separate circuit serving only this appliance should be<br />
provided.<br />
Do not place the oven in areas where heat is<br />
generated. For example, close to a conventional oven.<br />
Do not install the oven in an area of high humidity or<br />
where moisture may collect.<br />
Do not store or use the oven outdoors.<br />
If smoke is observed, switch off or unplug the<br />
oven and keep the door closed in order to<br />
stifle any flames.<br />
Utensils should be checked to ensure that they<br />
are suitable for use in the oven. See Page <strong>GB</strong>-16-17.<br />
Use only microwave safe containers and<br />
utensils on microwave modes.<br />
When heating food in plastic or paper<br />
containers, keep an eye on the oven due to<br />
the possibility of ignition.<br />
Clean the waveguide cover, the oven cavity<br />
and the turntable after use. These must be dry<br />
and free from grease. Built-up grease may<br />
overheat and begin to smoke or catch fire.<br />
Do not place flammable materials near the oven or<br />
ventilation openings.<br />
Do not block the ventilation openings.<br />
Remove all metallic seals, wire twists, etc., from food<br />
and food packages. Arcing on metallic surfaces may<br />
cause a fire.<br />
Do not use the microwave oven to heat oil for deep<br />
frying. The temperature cannot be controlled and the<br />
oil may catch fire.<br />
To make popcorn, use only special microwave popcorn<br />
makers.<br />
Do not store food or any other items inside the oven.<br />
Check the settings after you start the oven to ensure the<br />
oven is operating as desired.<br />
To avoid overheating and fire, special care must be taken<br />
when cooking or reheating foods with a high sugar or fat<br />
content, for example, Sausage rolls, Pies or Christmas<br />
pudding.<br />
See the corresponding hints in operation manual and<br />
the cookery book section.<br />
<strong>GB</strong>-1<br />
To avoid the possibility of injury<br />
WARNING:<br />
Do not operate the oven if it is damaged or<br />
malfunctioning. Check the following before use:<br />
a) The door; make sure the door closes properly and<br />
ensure it is not misaligned or warped.<br />
b) The hinges and safety door latches; check to make<br />
sure they are not broken or loose.<br />
c) The door seals and sealing surfaces; ensure that<br />
they have not been damaged.<br />
d) Inside the oven cavity or on the door; make sure<br />
there are no dents.<br />
e) The power supply cord and plug; ensure that they<br />
are not damaged.<br />
If the door or door seals are damaged, the oven<br />
must not be operated until it has been repaired by a<br />
competent person.<br />
Never adjust, repair or modify the oven<br />
yourself. It is hazardous for anyone other<br />
than a competent person to carry out any<br />
service or repair operation which involves<br />
the removal of a cover which gives protection<br />
against exposure to microwave energy.<br />
Do not operate the oven with the door open or alter the<br />
door safety latches in any way.<br />
Do not operate the oven if there is an object between<br />
the door seals and sealing surfaces.<br />
Do not allow grease or dirt to build up on the<br />
door seals and adjacent parts. Clean the<br />
oven at regular intervals and remove any<br />
food deposits. Follow the instructions for<br />
“Care and Cleaning” on page <strong>GB</strong>-15.<br />
Failure to maintain the oven in a clean<br />
condition could lead to a deterioration<br />
of the surface that could adversely affect the<br />
life of the appliance and possibly result in a<br />
hazardous situation.<br />
Individuals with PACEMAKERS should check with<br />
their doctor or the manufacturer of the pacemaker<br />
for precautions regarding microwave ovens.<br />
To avoid the possibility of electric shock<br />
Under no circumstances should you remove the outer<br />
cabinet.<br />
Never spill or insert any objects into the door lock<br />
openings or ventilation openings. In the event of a spill,<br />
turn off and unplug the oven immediately, and call an<br />
authorised SHARP service agent.<br />
Do not immerse the power supply cord or plug in water<br />
or any other liquid.<br />
Do not let the power supply cord hang over the edge of<br />
a table or work surface.<br />
R-<strong>667</strong>_[EN].indd 1<br />
6/2/09 3:03:26 PM
IMPORTANT SAFETY INSTRUCTIONS<br />
Keep the power supply cord away from heated<br />
surfaces, including the rear of the oven.<br />
Do not attempt to replace the oven lamp yourself or<br />
allow anyone who is not an electrician authorised by<br />
SHARP to do so. If the oven lamp fails, please consult<br />
your dealer or an authorised SHARP service agent.<br />
If the power supply cord of this appliance is<br />
damaged, it must be replaced with a special cord.<br />
The exchange must be made by an authorised<br />
SHARP service agent.<br />
To avoid the possibility of explosion and<br />
sudden boiling:<br />
WARNING: Liquids and other foods must not<br />
be heated in sealed containers since they<br />
are liable to explode.<br />
Microwave heating of beverages can result<br />
in delayed eruptive boiling, therefore care<br />
must be taken when handling the container.<br />
Never use sealed containers. Remove seals and<br />
lids before use. Sealed containers can explode due<br />
to a build up of pressure even after the oven has been<br />
turned off.<br />
Take care when microwaving liquids. Use a widemouthed<br />
container to allow bubbles to escape.<br />
Never heat liquids in narrow necked<br />
containers such as baby bottles, as this may<br />
result in the contents erupting from the<br />
container when heated and cause burns.<br />
To prevent sudden eruption of boiling liquid and<br />
possible scalding:<br />
1. Do not use excessive amount of time (See page <strong>GB</strong>-21).<br />
2. Stir liquid prior to heating/reheating.<br />
3. It is advisable to insert a glass rod or similar utensil<br />
(not metal) into the liquid whilst reheating.<br />
4. Let liquid stand for at least 20 seconds in the oven<br />
at the end of cooking time to prevent delayed<br />
eruptive boiling.<br />
Do not cook eggs in their shells, and whole<br />
hard boiled eggs should not be heated in<br />
microwave ovens since they may explode<br />
even after microwave cooking has ended.<br />
To cook or reheat eggs which have not been<br />
scrambled or mixed, pierce the yolks and<br />
the whites, or the eggs may explode. Shell<br />
and slice hard boiled eggs before reheating<br />
them in the microwave oven.<br />
Pierce the skin of such foods as potatoes, sausages<br />
and fruit before cooking, or they may explode.<br />
To avoid the possibility of burns<br />
WARNING: The contents of feeding bottles<br />
and baby food jars must be stirred or<br />
shaken and the temperature checked before<br />
consumption, in order to avoid burns.<br />
Use pot holders or oven gloves when removing food<br />
from the oven to prevent burns.<br />
Always open containers, popcorn makers, oven<br />
cooking bags, etc., away from the face and hands to<br />
avoid steam burns and eruption of boiling.<br />
To avoid burns, always test food temperature<br />
and stir before serving and pay special<br />
attention to the temperature of food and<br />
drink given to babies, children or the elderly.<br />
Accessible parts may become hot during<br />
use. Young children should be kept away.<br />
Temperature of the container is not a true indication<br />
of the temperature of the food or drink; always<br />
check the food temperature.<br />
Always stand back from the oven door when opening it<br />
to avoid burns from escaping steam and heat.<br />
Slice stuffed baked foods after heating to release steam<br />
and avoid burns.<br />
This appliance is not intended to be operated by means<br />
of an external timer or separate remote-control system.<br />
To avoid misuse by children<br />
WARNING:<br />
Only allow children to use the oven without<br />
supervision when adequate instructions<br />
have been given so that the child is able to<br />
use the oven in a safe way and understands<br />
the hazards of improper use.<br />
When the appliance is operated in the GRILL,<br />
MIX GRILL and AUTOMATIC operation<br />
(except AUTO DEFROST), children should only<br />
use the oven under adult supervision due to<br />
the temperature generated.<br />
This appliance is not intended for use by<br />
persons (including children) with reduced<br />
physical, sensory or mental capabilities, or<br />
lack of experience and knowledge, unless<br />
they have been given supervision or<br />
instruction concerning use of the appliance<br />
by a person responsible for their safety.<br />
Children should be supervised to ensure that<br />
they do not play with the appliance.<br />
Do not lean or swing on the oven door. Do not play<br />
with the oven or use it as a toy.<br />
Children should be taught all important safety<br />
instructions: use of pot holders, careful removal of food<br />
coverings; paying special attention to packaging (e.g.<br />
self-heating materials) designed to make food crisp, as<br />
they may be extra hot.<br />
Other warnings<br />
Never modify the oven in any way.<br />
Do not move the oven while it is in operation.<br />
This oven is for home food preparation only and may<br />
only be used for cooking food. It is not suitable for<br />
commercial or laboratory use.<br />
ENGLISH<br />
<strong>GB</strong>-2<br />
R-<strong>667</strong>_[EN].indd 2<br />
6/2/09 3:03:27 PM
LOW FAT<br />
FOOD MENU<br />
VEGETARIAN<br />
FOOD<br />
IMPORTANT SAFETY INSTRUCTIONS<br />
To promote trouble-free use of your oven and<br />
avoid damage.<br />
Never operate the oven when it is empty except where<br />
recommended in the operation manual, see Page <strong>GB</strong>-7.<br />
Doing so may damage the oven.<br />
When using a browning dish or self-heating material,<br />
always place a heat-resistant insulator such as a<br />
porcelain plate under it to prevent damage to<br />
the turntable due to heat stress.<br />
The preheating time specified in the dish’s instructions<br />
must not be exceeded.<br />
Do not use metal utensils, which reflect microwaves<br />
and may cause electrical arcing. Do not put cans in the<br />
oven.<br />
Use only the turntable designed for this oven.<br />
Do not place anything on the outer cabinet during<br />
operation.<br />
Do not use plastic containers for microwaving if the<br />
oven is still hot from using the GRILL, MIX GRILL and<br />
AUTOMATIC operation (except AUTO DEFROST),<br />
because they may melt. Plastic containers must not<br />
be used during above modes unless the container<br />
manufacturer says they are suitable.<br />
NOTE:<br />
If you are unsure how to connect your oven, please<br />
consult an authorised, qualified electrician.<br />
Neither the manufacturer nor the dealer can accept<br />
any liability for damage to the oven or personal injury<br />
resulting from failure to observe the correct electrical<br />
connection procedure.<br />
Water vapour or drops may occasionally form on<br />
the oven walls or around the door seals and sealing<br />
surfaces. This is a normal occurrence and is not an<br />
indication of microwave leakage or a malfunction.<br />
This symbol means that the surfaces are<br />
liable to get hot during use.<br />
INSTALLATION<br />
1. Remove all packing materials from the inside of<br />
the oven cavity. Discard the loose polythene sheet<br />
from between the door and cavity. Remove the<br />
feature sticker, if attached, from the outside of the<br />
door.<br />
4. The oven door may become hot during<br />
cooking. Place or mount the oven so that<br />
the bottom of the oven is 85 cm or more<br />
above the floor. Keep children away<br />
from the door to prevent them burning<br />
themselves.<br />
5. Do not allow the power supply cord to<br />
run over any hot or sharp surfaces, such<br />
as the hot air vent area at the top rear of<br />
the oven.<br />
✓<br />
Remove<br />
this film<br />
2. Check the oven carefully for any signs of damage.<br />
3. Place the oven on a flat, level surface strong enough<br />
to support the oven’s weight plus the heaviest item<br />
likely to be cooked. The oven rear surface should<br />
be placed against the wall. Do not place the oven<br />
in a cabinet.<br />
6. Ensure there is a minimum of free space above<br />
the oven of 18 cm.<br />
18 cm<br />
7. Securely connect the plug of the oven to a<br />
standard earthed (grounded) household electrical<br />
outlet.<br />
<strong>GB</strong>-3<br />
R-<strong>667</strong>_[EN].indd 3<br />
6/2/09 3:03:27 PM
BEFORE OPERATION<br />
Your oven comes pre-set for Energy Save Mode.<br />
This facility saves electricity when the oven is not<br />
in use.<br />
When you first plug it in nothing will appear in the<br />
digital display.<br />
To operate the oven in Energy Save Mode:<br />
1. Plug in the oven. Nothing will appear in the display<br />
at this time.<br />
2. Open and close the door. The oven display will<br />
show " . 0 ".<br />
3. Heat the oven without food (See page <strong>GB</strong>-7,<br />
NOTE b).<br />
Using the STOP key<br />
Use the STOP key to:<br />
1. Erase a mistake during programming.<br />
2. Stop the oven temporarily during cooking.<br />
3. Cancel a programme during cooking, touch twice.<br />
In Energy Save Mode, if you do not operate the oven for 3 minutes or more (i.e. closing the door, pressing the<br />
STOP key, or at the end of cooking), you will not be able to operate the oven until you open and close the oven<br />
door.<br />
ENGLISH<br />
<strong>GB</strong>-4<br />
R-<strong>667</strong>_[EN].indd 4<br />
6/2/09 3:03:28 PM
MICROWAVE POWER LEVEL<br />
Your oven has 6 power levels. To choose the power<br />
level for cooking, follow the advice given in the recipe<br />
section. Generally the following recommendations<br />
apply:<br />
100 P (800 W) used for fast cooking or reheating<br />
e.g. soup, casseroles, canned food, hot beverages,<br />
vegetables, fish, etc.<br />
70 P (560 W) used for longer cooking of dense foods<br />
such as roast joints, meat loaf and plated meals, also<br />
for sensitive dishes such as cheese sauce and sponge<br />
cakes. At this reduced setting, the sauce will not boil<br />
over and food will cook evenly without over cooking at<br />
the sides.<br />
50 P (400 W) for dense foods which require a long<br />
cooking time when cooked conventionally, eg. beef<br />
dishes, it is advisable to use this power setting to ensure<br />
the meat will be tender.<br />
30 P (240 W Defrost setting) to defrost, select this<br />
power setting, to ensure that the dish defrosts evenly.<br />
This setting is also ideal for simmering rice, pasta,<br />
dumplings and cooking egg custard.<br />
10 P (80 W) For gentle defrosting, eg. cream gateaux<br />
or pastry.<br />
0 P (0 W)<br />
P = PERCENTAGE<br />
To set the microwave power level :<br />
Press the TIME keys to select cooking time.<br />
Press the MICROWAVE POWER LEVEL key once (100P).<br />
To change the microwave power level press the MICROWAVE POWER LEVEL key until the desired power level<br />
is reached.<br />
Press the START key.<br />
NOTE: If the power level is not selected, 100 P is automatically set.<br />
<strong>GB</strong>-5<br />
R-<strong>667</strong>_[EN].indd 5<br />
6/2/09 3:03:28 PM
MICROWAVE COOKING<br />
Your oven can be programmed for up to 99 minutes 90 seconds (99.90).<br />
Example:<br />
To cook 2 minutes and 30 seconds on 70 P microwave power.<br />
1. Enter desired cooking<br />
time by pressing TIME<br />
keys.<br />
2. Choose desired power<br />
by pressing MICROWAVE<br />
POWER LEVEL key twice.<br />
3. Press START key once<br />
to begin cooking.<br />
Check the display.<br />
1<br />
MIN<br />
10<br />
S<br />
x2<br />
x3<br />
x2<br />
x1<br />
NOTES:<br />
1. When the door is opened during the cooking process, the cooking time on the digital display stops<br />
automatically. The cooking time starts to count down again when the door is closed and the START key is<br />
pressed.<br />
2. If you wish to know the power level during cooking, press the MICROWAVE POWER LEVEL key. As long as<br />
your finger is touching the MICROWAVE POWER LEVEL key, the power level will be displayed.<br />
ENGLISH<br />
<strong>GB</strong>-6<br />
R-<strong>667</strong>_[EN].indd 6<br />
6/2/09 3:03:28 PM
GRILL COOKING/MIX GRILL COOKING<br />
This microwave oven has two GRILL cooking modes: 1. Grill only. 2. MIX Grill (Grill with microwave).<br />
1. GRILL ONLY COOKING<br />
This mode can be used to Grill/Brown food.<br />
Example : To cook for 4 minutes.<br />
1. Enter desired cooking<br />
time by pressing TIME<br />
keys.<br />
2. Press the GRILL<br />
key once.<br />
3. Press the START key<br />
once to begin cooking.<br />
Check the display.<br />
1<br />
MIN<br />
x4<br />
x1<br />
x1<br />
NOTES:<br />
a. The rack is recommended for grilling of flat pieces of food.<br />
b. HEATING WITHOUT FOOD:<br />
You may detect smoke or a burning smell when using the grill for the first time, this is normal and not a<br />
sign that the oven is out of order.<br />
To avoid this problem, when first using the oven, operate the grill without food for 20 minutes.<br />
2. MIX GRILL COOKING<br />
This mode uses a mix of Grill power and Microwave power (50P-30P-10P). Mix means to cook by Microwave<br />
power and Grill power alternately.<br />
Example:<br />
To cook for 7 minutes on MIX GRILL 50 P.<br />
1. Enter the desired cooking<br />
time by pressing TIME<br />
keys.<br />
2. Press the MIX<br />
GRILL key<br />
once.<br />
3. Change the microwave power<br />
level by pressing the MIX<br />
GRILL or MICROWAVE<br />
POWER LEVEL key twice.<br />
4. Press the START key<br />
once to begin<br />
cooking.<br />
1<br />
MIN<br />
x7<br />
x1<br />
x2<br />
or<br />
x2<br />
x1<br />
Check the display.<br />
WARNING:<br />
The door, outer cabinet, oven cavity, accessories and dishes will become very hot during operation.<br />
To prevent burns, always use thick oven gloves.<br />
<strong>GB</strong>-7<br />
R-<strong>667</strong>_[EN].indd 7<br />
6/2/09 3:03:29 PM
OTHER CONVENIENT FUNCTIONS<br />
1. MULTIPLE SEQUENCE COOKING<br />
A sequence of 3 stages (maximum) can be programmed using combinations of MICROWAVE, GRILL or MIX<br />
GRILL.<br />
Example:<br />
To cook : 2 minutes and 30 seconds on 70 P power (Stage 1)<br />
5 minutes Grill only (Stage 2)<br />
STAGE 1<br />
1. Enter the desired cooking time<br />
by pressing TIME keys.<br />
2. Enter the desired power level by pressing<br />
MICROWAVE POWER LEVEL key twice.<br />
1<br />
MIN<br />
x2<br />
10<br />
S<br />
x3<br />
x2<br />
STAGE 2<br />
3. Enter the desired<br />
time by pressing<br />
TIME keys.<br />
4. Select Grill by pressing<br />
the GRILL key once.<br />
5. Press the START key<br />
once to begin cooking.<br />
Check the display.<br />
1<br />
MIN<br />
x5<br />
x1<br />
x1<br />
(The oven will begin to cook for 2 minutes and 30 seconds at 70 P, and then for 5 minutes on Grill only).<br />
2. +1 MINUTE FUNCTION<br />
The +1MIN key allows you to operate the two following functions:<br />
a. Direct start<br />
You can directly start cooking on 100 P microwave power level for 1 minute by pressing the +1MIN key.<br />
NOTE:<br />
To avoid the misuse by children the +1MIN key can be used only within 3 minutes after preceding operation, i.e.,<br />
closing the door, pressing the STOP key or cooking completion.<br />
b. Extend the cooking time.<br />
You can extend the cooking time during manual cooking for multiples of 1 minute if the +1MIN key is pressed<br />
while the oven is in operation.<br />
ENGLISH<br />
<strong>GB</strong>-8<br />
R-<strong>667</strong>_[EN].indd 8<br />
6/2/09 3:03:29 PM
XXXXXXXXXXXXX<br />
OTHER CONVENIENT FUNCTIONS<br />
3. LESS / PLUS keys.<br />
The LESS ( ▼ ) and PLUS ( ▲ ) keys allow you to easily decrease or increase programmed setting times,<br />
(for a less well or more well cooked result), used in automatic operations or cooking time while in operation.<br />
a) Changing the pre-programmed time setting (for AUTOMATIC function).<br />
Example:<br />
Suppose you want to cook 0.6 kg Grill Skewers using the AUTOMATIC and PLUS ( ▲ ) keys.<br />
1. Choose the AUTOMATIC<br />
menu and quantity by pressing<br />
the GRILL SKEWERS key<br />
5 times.<br />
x5<br />
2. Choose the desired result<br />
(well cooked) by pressing<br />
the PLUS key once within<br />
2 seconds.<br />
x1<br />
After 2 seconds the<br />
oven will start to cook<br />
automatically.<br />
NOTE:<br />
When you choose PLUS, the display will show "PLUS".<br />
When you choose LESS, the display will show "LESS".<br />
To cancel LESS or PLUS, press the same key again.<br />
To change PLUS to LESS simply press the LESS ( ▼ ) key.<br />
To change LESS to PLUS simply press the PLUS ( ▲ ) key.<br />
b) Adjusting the heating time while oven is operating.<br />
During the manual cooking process, the cooking time can be decreased or increased in 1 minute steps each time the<br />
LESS ( ▼ ) and PLUS ( ▲ ) keys are pressed.<br />
NOTE:<br />
You can use this function for manual cooking only.<br />
4. TO CHECK SETTINGS WHILE THE OVEN IS OPERATING<br />
TO CHECK THE POWER LEVEL:<br />
To check the microwave power level during cooking<br />
press the MICROWAVE POWER LEVEL key.<br />
The oven continues to count down, although the display<br />
shows the power level.<br />
As long as your finger is<br />
pressing the key, the power<br />
level will be displayed.<br />
5. KITCHEN TIMER FUNCTION<br />
You can use the timer for timing where microwave cooking is not involved for example, to time boiled eggs<br />
cooked on a conventional hob.<br />
Example:<br />
To set the timer for 5 minutes.<br />
2. Enter desired time by<br />
pressing the 1 MIN<br />
key five times.<br />
(Ex: 5min)<br />
3. Press the KITCHEN<br />
TIMER key once.<br />
1. Open and Close the door<br />
to activate KITCHEN<br />
TIMER key.<br />
1<br />
MIN<br />
x5<br />
x1<br />
<strong>GB</strong>-9<br />
R-<strong>667</strong>_[EN].indd 9<br />
6/2/09 3:03:30 PM
XXXXXXXXXXXXXXXX<br />
AUTOMATIC OPERATION<br />
The AUTOMATIC function automatically works<br />
out the correct cooking mode and cooking time.<br />
You can choose from 3 EXPRESS COOK menus,<br />
3 EXPRESS DEFROST menus and 6 HEALTHY<br />
MENUS (3 each, LOW FAT FOOD and<br />
VEGETARIAN FOOD). What you need to know when<br />
using this automatic function:<br />
<br />
1. In order to prevent the accidental use of the<br />
oven, the EXPRESS COOK or EXPRESS<br />
DEFROST keys can only be input within<br />
3 minutes after cooking completion, closing the<br />
door or pressing the STOP key.<br />
2. The menu can be chosen by pressing the desired<br />
EXPRESS COOK or EXPRESS DEFROST keys.<br />
The weight of the food can be input by pressing<br />
the selected key until the desired weight is<br />
displayed.<br />
• Enter the weight of the food only. Do not include<br />
the weight of the container.<br />
• For food weighing more or less than weights given<br />
in the EXPRESS COOK or EXPRESS DEFROST<br />
charts, use manual programmes. For best results,<br />
follow the cooking charts in the cookbook section.<br />
3. The programmed cooking time is an average<br />
time. If you want to alter the cooking time, use<br />
the LESS ( ▼ ) or PLUS ( ▲ ) keys after pressing<br />
the EXPRESS COOK or EXPRESS DEFROST<br />
keys (see page <strong>GB</strong>-9).<br />
4. There is no need to press the START key as the<br />
oven will automatically start to cook after the weight<br />
has been input.<br />
5. The final temperature will vary according to the<br />
initial food temperature. Check food is piping hot<br />
after cooking. If necessary, you can extend the<br />
cooking manually.<br />
When action is required (e.g. to turn food over),<br />
the oven stops and the audible signals sound and<br />
the CHECK indicator will flash in the display.<br />
To continue cooking, press the START key.<br />
WARNING:<br />
The door, outer cabinet, oven cavity, accessories<br />
and dishes will become very hot during operation.<br />
To prevent burns, always use thick oven gloves.<br />
Example:<br />
To cook grill skewers weighing 0,3 kg.<br />
1. Select the menu and weight by<br />
pressing the GRILL SKEWERS<br />
key twice.<br />
After 2 seconds the oven will<br />
start to cook automatically.<br />
x2<br />
ENGLISH<br />
<strong>GB</strong>-10<br />
R-<strong>667</strong>_[EN].indd 10<br />
6/2/09 3:03:31 PM
XXXXXXXXXXXXX<br />
AUTOMATIC OPERATION<br />
<br />
1. The HEALTHY MENUS can be chosen by<br />
pressing the LOW FAT FOOD key or the<br />
VEGETARIAN FOOD key.<br />
• Press the selected key until the desired menu number<br />
is displayed (see page-13-14: recipes for HEALTHY<br />
MENUS).<br />
2. The programmed cooking time is an average time.<br />
If you want to alter the cooking time, use the<br />
LESS ( ▼ ) or PLUS ( ▲ ) keys after pressing<br />
the LOW FAT FOOD or VEGETARIAN FOOD<br />
keys (see page <strong>GB</strong>-9).<br />
3. Press the START key to start cooking.<br />
4. The final temperature will vary according to the<br />
initial food temperature. Check food is piping<br />
hot after cooking. If necessary, you can extend<br />
the cooking manually.<br />
When action is required (e.g. to turn food over),<br />
the oven stops and the audible signals sound and<br />
the CHECK indicator will flash in the display.<br />
To continue cooking, press the START key.<br />
WARNING:<br />
The door, outer cabinet, oven cavity, accessories<br />
and dishes will become very hot during operation.<br />
To prevent burns, always use thick oven gloves.<br />
Example:<br />
To cook Paella.<br />
1. Select the menu by pressing the<br />
LOW FAT FOOD key three<br />
times.The display will show "LF-3".<br />
2. Press the START key<br />
once to begin cooking.<br />
x3<br />
x1<br />
EXPRESS COOK CHARTS<br />
KEY<br />
EXPRESS<br />
COOK MENU<br />
Grill Skewers<br />
WEIGHT (Increasing<br />
Unit)/ UTENSILS<br />
0,2 - 0,6 kg (100 g)<br />
(initial temp 5°C)<br />
Rack<br />
PROCEDURE<br />
• Prepare the grill skewers referring to the recipe<br />
on page <strong>GB</strong>-30 of the Cookbook.<br />
• Place on the rack and cook.<br />
• When the audible signal sounds, turn over.<br />
• After cooking, remove and put on a plate for<br />
serving. (No standing time necessary).<br />
Chicken Legs<br />
0,2 - 0,6 kg (50 g)<br />
(initial temp 5°C)<br />
Rack<br />
Ingredients for 0,6 kg chicken legs:<br />
3 pieces, 1-2 tbsp oil, 1 /2 tsp salt,<br />
1 tsp sweet paprika, 1 tsp rosemary<br />
• Mix the ingredients and spread on the chicken<br />
legs.<br />
• Pierce the skin of the chicken legs.<br />
• Put the chicken legs on the rack, skin side down,<br />
with the thin ends towards the centre.<br />
• When audible signal sounds, turn over.<br />
• After cooking, remove and stand for approx. 3<br />
minutes.<br />
Gratin<br />
0,5 - 1,0 kg* (100 g)<br />
(initial temp 20° C)<br />
Gratin dish<br />
• See recipes for “Gratin” on page <strong>GB</strong>-12.<br />
* Total weight of all ingredients.<br />
<strong>GB</strong>-11<br />
R-<strong>667</strong>_[EN].indd 11<br />
6/2/09 3:03:31 PM
EXPRESS XXXXXXXXXXXXXXXX<br />
DEFROST CHARTS<br />
KEY<br />
EXPRESS<br />
DEFROST MENU<br />
WEIGHT (Increasing<br />
Unit)/ UTENSILS<br />
PROCEDURE<br />
Steak, Chops<br />
0.2 - 0.8 kg (100 g)<br />
(initial temp -18°C)<br />
(See NOTES below.)<br />
• Place the food in a flan dish in the centre of the turntable.<br />
• When the audible signal sounds, turn the food over,<br />
rearrange and separate. Shield thin parts and warm<br />
spots with small pieces of aluminium foil.<br />
• After defrosting, wrap in aluminium foil for<br />
10 - 15 minutes, until thoroughly defrosted.<br />
Minced Meat<br />
0.2 - 0.8 kg (100 g)<br />
(initial temp -18°C)<br />
(See NOTES below.)<br />
• Place the block of minced meat in a flan dish in the<br />
centre of the turntable.<br />
• When the audible signal sounds, turn the food<br />
over. Remove the defrosted parts if possible.<br />
• After defrosting, cover with aluminium foil and<br />
stand for 5 - 10 minutes, until thoroughly defrosted.<br />
Chicken legs<br />
0.2 - 1.0 kg<br />
(Initial temp -18°C)<br />
(See NOTES below.)<br />
• Place the chicken legs in a flan dish in the centre of the<br />
turntable.<br />
• When the oven stops, turn over, rearrange and<br />
shield thin parts and warm spots with small<br />
pieces of aluminium foil. Continue to defrost.<br />
• After defrosting, cover with aluminium foil and<br />
stand for 10 - 20 minutes until thoroughly defrosted.<br />
• Finally clean the chicken legs under running water.<br />
NOTES: Express Defrost<br />
1 Steaks and Chops should be frozen in one layer.<br />
2 Minced meat should be frozen in a thin shape.<br />
3 After turning over, shield the defrosted portions with small, flat pieces of aluminium foil.<br />
4 The chicken legs should be processed immediately after defrosting.<br />
RECIPES FOR XXXXXXXXXXXXXXXX<br />
EXPRESS COOK, GRATIN<br />
GRATIN (Express Cook)<br />
Spinach gratin<br />
Ingredients<br />
0.5 kg 1.0 kg<br />
150 g 300 g leaf spinach (defrosted,<br />
drained)<br />
15 g 30 g onion (finely chopped)<br />
salt, pepper, nutmeg<br />
150 g 300 g boiled potatoes (sliced)<br />
35 g 75 g cooked ham (diced)<br />
50 g 100 g crème fraîche<br />
1 2 eggs<br />
40 g 75 g grated cheese<br />
GRATIN (Express Cook)<br />
Potato-courgette-gratin<br />
Ingredients<br />
0.5 kg 1.0 kg<br />
200 g 400 g unboiled potatoes (sliced)<br />
115 g 230 g courgette (finely sliced)<br />
75 g 150 g crème fraîche<br />
1 2 eggs<br />
1/2 1 clove of garlic (crushed)<br />
salt, pepper<br />
40 g 75 g grated Gouda cheese<br />
sunflower kernel<br />
Preparation<br />
1. Mix together the leaf spinach with the onion and season<br />
with salt, pepper and nutmeg.<br />
2. Grease the gratin dish. Place alternate layers of potato<br />
slices, diced ham and spinach in the dish. The top layer<br />
should be spinach.<br />
3. Mix the eggs with crème fraîche, add salt and pepper and<br />
pour over the vegetables.<br />
4. Cover the gratin with the grated cheese.<br />
5. Place on the turntable and cook on Express Cook,<br />
“Gratin”.<br />
6. After cooking, let stand for 5-10 minutes.<br />
NOTES: These indications are for the minimum and maximum<br />
weight. If you want to cook other weights, you<br />
have to adjust the ingredients.<br />
Preparation<br />
1. Grease the gratin dish and place alternate layers of potato<br />
slices and courgette in the dish.<br />
2. Mix the eggs with crème fraîche, season with salt, pepper<br />
and garlic and pour over the vegetables.<br />
3. Cover the gratin dish with the grated Gouda cheese.<br />
4. Finally sprinkle the gratin with sunflower kernel.<br />
5. Place on the turntable and cook on Express Cook,<br />
“Gratin”.<br />
6. After cooking, let stand for 5-10 minutes.<br />
NOTES: These indications are for the minimum and maximum<br />
weight. If you want to cook other weights, you<br />
have to adjust the ingredients.<br />
<strong>GB</strong>-12<br />
ENGLISH<br />
R-<strong>667</strong>_[EN].indd 12<br />
6/2/09 3:03:32 PM
RECIPES FOR HEALTHY MENUS , LOW FAT FOOD<br />
LF-1 Chinese Style Beef<br />
Serves 2<br />
Ingredients:<br />
250 g Rump steak, tenderise and cut into strips<br />
1 clove garlic, crushed<br />
1 red chilli, de-seeded and sliced<br />
1 tbsp ginger, grated<br />
1 tsp sesame oil<br />
1 tbsp light soy sauce<br />
1 tbsp oyster sauce<br />
50 ml beef stock, cold<br />
1 tsp corn flour<br />
75 g carrots, sliced<br />
75 g red pepper, seeded and sliced<br />
60 g onions, sliced<br />
75 g snow peas, topped tailed and sliced in half<br />
75 g baby corn, cut in half<br />
Preparation:<br />
1. Combine the beef, garlic, chilli, ginger, sesame oil,<br />
soy sauce, oyster sauce, beef stock and corn flour<br />
in a 3 litre casserole dish.<br />
2. Add the carrots, red pepper and onions and mix<br />
well.<br />
3. Cover with lid and cook on LOW FAT FOOD LF-1,<br />
“Chinese Style Beef”.<br />
4. When the oven stops, the audible signals sound<br />
and the indicator “CHECK” is displayed, stir the<br />
food, re-cover and continue to cook.<br />
5. When the oven stops a second time, the audible<br />
signals sound and the indicator “CHECK” is<br />
displayed, add the snow peas and baby corn. Stir<br />
well, re-cover and continue to cook.<br />
Tip: Serve with rice or hokkien noodles.<br />
LF-2 Chicken Fricassee<br />
Serves 2<br />
Ingredients:<br />
120 g long-grain rice, par-boiled<br />
1/2 tsp turmeric<br />
50 g onions, sliced<br />
100 g red peppers, seeded and sliced<br />
100 g leeks, sliced<br />
300 g chicken breast, diced<br />
pepper, paprika powder<br />
10 g butter or margarine<br />
250 ml meat stock, cold<br />
Preparation:<br />
1. Place the rice and tumeric into a shallow ovenproof<br />
dish and mix well.<br />
2. Mix onions, red pepper, leek and chicken breast,<br />
season to taste. Place on top of the rice. Distribute<br />
butter in flakes on top.<br />
3. Pour the meat stock over and cover with microwave<br />
foil. Cook on LOW FAT FOOD LF-2, “Chicken<br />
Fricassee”.<br />
4. After cooking, leave to stand for 5 minutes before<br />
serving.<br />
LF-3 Paella<br />
Serves 2<br />
Ingredients:<br />
100 g white long-grain rice<br />
200 ml chicken stock, cold<br />
1/2 tsp turmeric<br />
100 g chicken breast, cubed<br />
50 g Chorizio, diced<br />
125 g tiger prawns<br />
60 g mussels<br />
125 g tomatoes, skinned and chopped<br />
100 g red pepper, seeded and sliced<br />
75 g onion, chopped<br />
50 g peas<br />
1 clove garlic, peeled and crushed<br />
1/2 tsp paprika powder<br />
Cayenne pepper<br />
Preparation:<br />
1. Place the rice into a shallow round dish. Add the<br />
chicken stock and turmeric and mix well.<br />
2. Cook on LOW FAT FOOD LF-3, “Paella”. Do not<br />
cover.<br />
3. When the oven stops, the audible signals sound<br />
and the indicator “CHECK” is displayed, stir in<br />
the chicken, Chorizio, prawns, mussels, peppers,<br />
tomatoes, onion, peas, garlic paprika and cayenne<br />
pepper. Continue to cook.<br />
4. When the oven stops a second time, the audible<br />
signals sound and the indicator “CHECK” is<br />
displayed, stir and continue to cook.<br />
5. After cooking, leave to stand for 2 minutes before<br />
serving.<br />
<strong>GB</strong>-13<br />
R-<strong>667</strong>_[EN].indd 13<br />
6/2/09 3:03:32 PM
RECIPES FOR HEALTHY MENUS, XXXXXXXXXXXXXXXX<br />
VEGETARIAN FOOD<br />
F-1 Vegetable Couscous<br />
Serves 2<br />
Ingredients:<br />
60 g red onion, sliced<br />
1 clove garlic, crushed<br />
100 g aubergine, cut into 1 cm cubes<br />
100 g courgettes, cut into 1 cm cubes<br />
100 g yellow pepper, cut into chunks<br />
100 g red pepper, cut into chunks<br />
100 g button mushrooms, cut into quarters<br />
1 tsp olive oil<br />
150 ml vegetable stock, cold<br />
125 g couscous<br />
seasoning to taste<br />
1 tbsp lemon juice<br />
Preparation:<br />
1. Place the vegetables, oil and vegetable stock into a<br />
casserole dish and mix well.<br />
Cover the dish with a lid and cook on VEGETARIAN<br />
FOOD F-1, “Vegetable Couscous”.<br />
2. When the oven stops, the audible signals sound<br />
and the indicator “CHECK” is displayed, add the<br />
couscous, mix until well combined and continue to<br />
cooking.<br />
3. After cooking stir in the lemon juice and season to<br />
taste.<br />
Tip: Serve with a yoghurt sauce.<br />
F-2 Spinach and Ricotta Cannelloni<br />
Serves 2<br />
Ingredients:<br />
100 g defrosted spinach, well drained<br />
175 reduced fat ricotta cheese<br />
salt, pepper and ground nutmeg to taste<br />
6 instant cannelloni tubes<br />
250 g ready made tomato basil pasta sauce<br />
15 g Parmesan cheese, grated<br />
Preparation:<br />
1. Mix together spinach and ricotta cheese. Season<br />
with salt, pepper and ground nutmeg.<br />
2. Fill the cannelloni tubes with the mixture. Place the<br />
tubes in a single layer into a square gratin dish.<br />
3. Pour the pasta sauce evenly over the cannelloni<br />
tubes. Please ensure that all sections of the tubes<br />
are covered with sauce.<br />
4. Sprinkle the cannelloni with the freshly grated<br />
Parmesan cheese and cook on VEGETARIAN<br />
FOOD F-2, “Spinach and Ricotta Cannelloni”. Do<br />
not cover.<br />
5. After cooking, leave to stand for 3 minutes before<br />
serving.<br />
F-3 Stuffed Peppers<br />
Serves 2<br />
Ingredients:<br />
2 red peppers ( approx. 450 g)<br />
1 egg<br />
10-15 g bread crumbs<br />
75 g Emmenthal cheese, grated<br />
60 g onion, diced<br />
100 g fresh mixed mushrooms, sliced<br />
1 tbsp lemon balm, finely chopped<br />
1 tbsp parsley, finely chopped<br />
salt, pepper and ground nutmeg<br />
10 g butter or margarine for greasing the pan<br />
For the sauce:<br />
150 g canned, pureed tomatoes<br />
50 g crème fraîche<br />
75 ml white wine<br />
herbs of the provence<br />
Preparation:<br />
1. Cut the red pepper lengthwise into half, remove the<br />
stalks and pins, wash and dry.<br />
2. In a bowl, beat the egg and add the cheese, bread<br />
crumbs, onions, mushrooms and herbs. Season with<br />
salt, pepper and nutmeg.<br />
3. Fill the red peppers with the mixture. Place the<br />
stuffed pepper in a greased shallow round gratin<br />
dish and cook on VEGETARIAN FOOD F-3,<br />
“Stuffed Peppers”. Do not cover.<br />
4. Meanwhile mix together the pureed tomatoes with<br />
crème fraîche, white wine and herbs.<br />
5. When the oven stops, the audible signals sound<br />
and the indicator “CHECK” is displayed, add the<br />
sauce and continue to cook.<br />
ENGLISH<br />
<strong>GB</strong>-14<br />
R-<strong>667</strong>_[EN].indd 14<br />
6/2/09 3:03:33 PM
CARE AND CLEANING<br />
CAUTION: DO NOT USE COMMERCIAL OVEN<br />
CLEANERS, STEAM CLEANERS, ABRASIVE,<br />
HARSH CLEANERS, ANY THAT CONTAIN<br />
SODIUM HYDROXIDE OR SCOURING PADS ON<br />
ANY PART OF YOUR MICROWAVE OVEN.<br />
Before cleaning, make sure the oven cavity,<br />
door, oven cabinet and accessories are<br />
completely cool.<br />
CLEAN THE OVEN AT REGULAR INTERVALS<br />
AND REMOVE ANY FOOD DEPOSITS - Keep the<br />
oven clean, or the oven could lead to a<br />
deterioration of the surface. This could<br />
adversely affect the life of the appliance and<br />
possibly result in a hazardous situation.<br />
Oven exterior<br />
The outside of your oven can be cleaned easily with<br />
mild soap and water. Make sure the soap is wiped off<br />
with a moist cloth, and dry the exterior with a soft<br />
towel.<br />
Oven controls<br />
Open the door before cleaning to de-activate the oven<br />
controls. Care should be taken when cleaning the oven<br />
control. Using a cloth dampened with water only,<br />
gently wipe the panel until it becomes clean. Avoid<br />
using excessive amounts of water. Do not use any sort<br />
of chemical or abrasive cleaner.<br />
Oven Interior<br />
1. For cleaning, wipe any splatters or spills with a soft<br />
damp cloth or sponge after each use while the oven is<br />
still warm. For heavier spills, use a mild soap and<br />
wipe several times with a damp cloth until all residues<br />
are removed. Built-up splashes may overheat and<br />
begin to smoke or catch fire, and cause arcing.<br />
Do not remove the waveguide cover.<br />
2. Make sure that mild soap or water does not penetrate<br />
the small vents in the walls which may cause damage<br />
to the oven. Do not use caustic cleaners (including alkali,<br />
acid thinner, benzin, alcohol or oven cleaner).<br />
3. Do not use spray type cleaners on the oven interior.<br />
4. Heat up your oven regularly by using the grill, refer to<br />
note b “Heating without food” on page <strong>GB</strong>-7. Remaining<br />
food or fat splashed can cause smoke or bad smell.<br />
Accessories<br />
The accessories should be washed in a mild washing<br />
up liquid solution and dried. They are dishwasher safe.<br />
Door<br />
To remove all trace of dirt, regularly clean both sides of<br />
the door, the door seals and adjacent parts with a soft,<br />
damp cloth. Do not use harsh abrasive cleaners or sharp<br />
metal scrapers to clean the oven door glass since they can<br />
scratch the surface, which may result in shattering of the glass.<br />
NOTE: Keep the waveguide cover and accessories<br />
clean at all times. If you leave grease or fat in the cavity<br />
or accessories, it may overheat, cause arcing, smoke<br />
or even catch fire when next using the oven.<br />
SERVICE CALL CHECK<br />
Please check the following before calling for service.<br />
1. Power Supply<br />
Check the power plug is properly connected to a suitable wall outlet.<br />
Check the line fuse/circuit breaker is functioning properly.<br />
2. When the door is opened, does the oven lamp light? YES NO<br />
3. Place a cup of water (approx. 150 ml) in the oven and close the door securely.<br />
Programme the oven for one minute on 100 P power and start the oven.<br />
Does the oven lamp come on? YES NO<br />
Does the turntable rotate? NOTE: The turntable turns in either direction. YES NO<br />
Does the ventilation work? (You will hear the fan sound.) YES NO<br />
After 1 minute does the signal sound? YES NO<br />
Does cooking in progress indicator go off? YES NO<br />
Is the cup with water warm after the above operation? YES NO<br />
4. Take the cup of water out of the oven and close the door.<br />
Programme the grill for three minutes and start the oven.<br />
After 3 minutes does the grill heating element become red? YES NO<br />
If “NO” is the answer to any of the above questions, call your dealer or an authorised SHARP Service Agent and<br />
report the results of your check.<br />
IMPORTANT: If the display shows nothing even if the power supply plug is properly connected, the energy save<br />
mode may be in operation. Open and close the oven door to operate the oven. See <strong>GB</strong>-4.<br />
NOTE: If you cook the food over the standard time<br />
with only the same cooking mode, the power of the<br />
oven will lower automatically to avoid overheating.<br />
(The microwave power level will be reduced or the<br />
grill heating element will begin to light on and off).<br />
<strong>GB</strong>-15<br />
Cooking Mode<br />
Microwave (100 P)<br />
Grill<br />
MIX Grill<br />
Standard time<br />
20 minutes<br />
10 minutes<br />
Grill - 10 minutes<br />
R-<strong>667</strong>_[EN].indd 15<br />
6/2/09 3:03:33 PM
WHAT ARE MICROWAVES?<br />
Microwaves are generated in the microwave oven by a magnetron and cause the water molecules in the food<br />
to oscillate. Heat is generated by the friction which is caused, with the result that the food is thawed, heated or<br />
cooked.<br />
SUITABLE OVENWARE, TIPS AND ADVICE<br />
GLASS AND CERAMIC GLASS<br />
Heat-resistant glass utensils are very<br />
suitable. The cooking process can be<br />
observed from all sides. They must not,<br />
however, contain any metal (e.g. lead<br />
crystal), nor have a metallic overlay<br />
(e.g. gold edge, cobalt blue finish).<br />
CERAMICS<br />
Generally very suitable. Ceramics must be glazed,<br />
since with unglazed ceramics moisture can get into<br />
the ceramic. Moisture causes the material to heat up<br />
and may make it shatter. If you are not certain whether<br />
your utensil is suitable for the microwave, carry out the<br />
utensil suitability test. (See page <strong>GB</strong>-17).<br />
PORCELAIN<br />
Very suitable. Ensure that the porcelain does not have a<br />
gold or silver overlay and that it does not contain any<br />
metal.<br />
PLASTIC AND PAPER CONTAINERS<br />
Plastic or paper containers which are<br />
designed for microwaves and which<br />
can withstand heat are suitable for<br />
defrosting, heating and cooking. Please<br />
follow manufacturers’ instructions.<br />
KITCHEN PAPER<br />
can be used to absorb any moisture which occurs in<br />
short heating methods, e.g. of bread or products in<br />
bread crumbs. Insert the paper between the food and<br />
the revolving plate. The surface of the food will stay<br />
crispy and dry. Covering greasy food with kitchen<br />
paper will catch splashes.<br />
MICROWAVE FOIL<br />
This, or heat-resistant foil, is very suitable for covering<br />
or wrapping. Please follow the manufacturer's<br />
recommendations.<br />
ROASTING BAGS<br />
Can be used in a microwave oven. Metal clips are<br />
not suitable for fastening them since the roasting bag<br />
foil might melt. Fasten the roasting bag with string<br />
and pierce it several times with a fork. Non heatresistant<br />
food wraps are not recommended for use in a<br />
microwave oven.<br />
BROWNING DISH<br />
A special microwave dish made from ceramic glass<br />
with a metal alloy base, which allows food to be<br />
browned. When using the browning dish a suitable<br />
insulator, e.g. a porcelain plate, must be placed<br />
between the turntable and the browning dish. Be<br />
careful to adhere exactly to the pre-heating time given<br />
in the manufacturer's instructions. Excessive pre-heating<br />
can damage the turntable and the turntable stand or<br />
can trigger the safety-device which will switch off the<br />
oven.<br />
METAL<br />
Generally speaking, metal should not be used,<br />
since microwaves do not pass through metal and<br />
therefore cannot reach the food. There are, however,<br />
exceptions: small strips of aluminium foil may be<br />
used to cover certain parts of the food, so that<br />
these do not thaw too quickly or begin to cook<br />
(e.g. chicken wings). Small metal<br />
skewers and aluminium containers<br />
(e.g. of readycooked meals) can<br />
be used. They must, however, be small<br />
in relation to the food, e.g. aluminium<br />
containers must be at least 2/ 3 to 3/ 4 filled with food.<br />
It is recommended that you transfer the food into<br />
a dish suitable for use in the microwave. When using<br />
aluminium containers or other metal utensils there<br />
must be a gap of approx. 2 cms<br />
between them and the walls of the<br />
cooking area, otherwise the walls could<br />
be damaged by possible arcing.<br />
ENGLISH<br />
<strong>GB</strong>-16<br />
R-<strong>667</strong>_[EN ckbk].indd <strong>GB</strong>-16<br />
6/2/09 3:01:58 PM
SUITABLE OVENWARE, TIPS AND ADVICE<br />
NO UTENSIL SHOULD HAVE A METAL<br />
overlay, or metal parts such as screws, bands or<br />
handles..<br />
UTENSIL SUITABILITY TEST<br />
If you are not sure whether your utensil<br />
is suitable for use in your microwave<br />
oven, carry out the following<br />
test: Place the utensil into the oven.<br />
Place a glass container filled with<br />
150 ml of water on or next to the utensil. Switch<br />
on the oven at 100 P power for 1 to 2 minutes. If<br />
the utensil stays cool or just warm to the touch, it<br />
is suitable. Do not use this test on a plastic utensil.<br />
It could melt.<br />
GRILL FUNCTION<br />
You can use any heat-resistant container for<br />
the roasting/grilling function which is suitable for<br />
conventional roasting methods, e.g. china, ceramic,<br />
glass and metal containers.<br />
In microwave cooking which requires the dish to<br />
be roasted or grilled, or when using the combined<br />
function, the containers must be suitable for<br />
microwaves and heat-resistant. Suitable containers<br />
are, for example, heat-resistant glass and ceramic<br />
containers.<br />
BEFORE YOU START...<br />
To make it as easy as possible to use the microwave<br />
oven we have put together a few hints and tips for<br />
you. Only switch on the oven when the food is already<br />
inside.<br />
SETTING THE COOKING TIME<br />
Defrosting, re-heating and cooking times are<br />
generally much shorter than in a conventional oven<br />
or hob. So you will need to consult this book for the<br />
recommended cooking times. It is better to set shorter<br />
rather than longer cooking times. Always test the food<br />
after the cooking time has elapsed. It is better then<br />
to continue cooking it for a little longer, than to have<br />
overcooked food.<br />
INITIAL TEMPERATURES<br />
Thawing, heating and cooking times are dependent<br />
upon the initial temperature of the food. Deep-frozen<br />
food and food stored in a refrigerator, for example,<br />
requires longer than food which has been stored at<br />
room temperature. For heating and cooking, normal<br />
storage temperatures are assumed (refrigerator<br />
temperature approx. 5°C, room temperature approx.<br />
20°C). For thawing the temperature of the deep freeze<br />
is assumed to be -18°C.<br />
COOKING TIMES<br />
All the times given in this cookery book are guidelines,<br />
which can be varied according to the initial<br />
temperature, weight and condition of the food (water<br />
or fat content etc.).<br />
USING A FOOD THERMOMETER TO DETERMINE<br />
COOKING TIME<br />
Once cooked, every drink and every foodstuff has<br />
a certain internal temperature at which the cooking<br />
process can be switched off and the food will be<br />
cooked. The internal temperature can be ascertained<br />
with a food thermometer. The most important<br />
temperatures are specified in the temperature table.<br />
Drink / Food Internal Internal temp.<br />
temperature after 10 - 15 mins<br />
once cooked standing time<br />
Heating drinks<br />
(Coffee, Water, Tea,<br />
etc.)<br />
Heating milk<br />
Heating soup<br />
Heating stew<br />
Poultry<br />
Lamb<br />
Pink<br />
Well done<br />
Roast beef<br />
Rare<br />
Medium<br />
Well done<br />
Pork, Veal<br />
65-75°C<br />
60-65°C<br />
75-80°C<br />
75-80°C<br />
80-85°C<br />
70°C<br />
75-80°C<br />
50-55°C<br />
60-65°C<br />
75-80°C<br />
80-85°C<br />
85-90°C<br />
70-75°C<br />
80-85°C<br />
55-60°C<br />
65-70°C<br />
80-85°C<br />
80-85°C<br />
ADDITION OF WATER<br />
Vegetables and other foods with a high water content<br />
an be cooked in their own juice or with the addition of<br />
a little water. This ensures that many vitamins and<br />
minerals are preserved.<br />
FOOD IN SKINS OR SHELLS<br />
Foods such as sausages, chickens, chicken legs,<br />
baked potatoes, tomatoes, apples, egg yolks or such<br />
like should be pricked or pierced with a fork or small<br />
wooden skewer. This will enable the steam which forms<br />
to dissipate without splitting the skin or shell.<br />
<strong>GB</strong>-17<br />
R-<strong>667</strong>_[EN ckbk].indd <strong>GB</strong>-17<br />
6/2/09 3:01:58 PM
TIPS AND ADVICE<br />
FATTY FOODS<br />
Fatty meat and layers of fat cook better than lean<br />
portions of meat. Before cooking, cover the fatty<br />
portions with a piece of aluminium foil or place the<br />
food with the fat side down.<br />
BLANCHING VEGETABLES<br />
Before freezing vegetables, they should be blanched.<br />
This preserves the quality and flavour at their best.<br />
Method: wash and chop the vegetables. Put 250<br />
g of vegetables in a dish with 275 ml water and<br />
cover. Heat for 3-5 minutes. After blanching, immerse<br />
immediately in cold water to prevent further cooking<br />
and then allow to drain. Pack vegetables in an airtight<br />
container and freeze.<br />
PRESERVING FRUIT AND VEGETABLES<br />
Using the microwave for preserving is quick and easy.<br />
There are preserving jars, rubber vacuum seals and<br />
suitable seals made of plastic available<br />
specially made for microwaves.<br />
The manufacturers will supply precise<br />
instructions for use.<br />
LARGE AND SMALL QUANTITIES<br />
Microwave times are directly dependent upon the<br />
amount of food which you would like to thaw, heat or<br />
cook. This means that small portions cook more quickly<br />
than larger ones. As a rule of thumb:<br />
TWICE THE AMOUNT = ALMOST TWICE THE TIME<br />
HALF THE AMOUNT = HALF THE TIME<br />
DEEP AND SHALLOW CONTAINERS<br />
Both containers have the same capacity,<br />
but the cooking time is longer for the<br />
deeper one. You should therefore<br />
choose as flat a container as possible<br />
with a large surface area. Only use<br />
deep containers for dishes where there is a danger of<br />
overcooking, e.g. for noodles, rice, milk etc..<br />
ROUND AND OVAL CONTAINERS<br />
Food cooks more evenly in round or oval containers<br />
than in containers with corners, since the microwave<br />
energy concentrates in the corners and the food in<br />
these areas could become overcooked.<br />
COVERING<br />
Covering the food retains the moisture within it and<br />
shortens the cooking time. Use a lid, microwave foil or<br />
a cover. Foods which are to be crispy, e.g. roasts or<br />
chickens, should not be covered. As a general<br />
rule, whatever would be covered in a conventional<br />
oven should also be covered in a microwave oven.<br />
Whatever would be uncovered in an ordinary oven<br />
can also be left uncovered in a microwave oven.<br />
IRREGULAR SHAPED FOOD<br />
Place the thicker, more compacted end of the food<br />
pointing towards the outside. Place vegetables (such as<br />
broccoli) with the stalks pointing outward.<br />
STIRRING<br />
Stirring the food is necessary, since<br />
the microwaves begin by heating the<br />
outer areas. The temperature is thereby<br />
equalised and the food heats up evenly.<br />
ARRANGEMENT OF FOOD<br />
Place a number of individual portions, such as small<br />
pudding moulds, cups or potatoes in their jackets,<br />
in a circle on the turntable. Keep the<br />
portions at a distance from each other<br />
so that the microwave energy can reach<br />
the food from all sides.<br />
TURNING<br />
Medium-sized items, such as hamburgers and steaks,<br />
should be turned over once during cooking, in order<br />
to shorten the cooking process. Large<br />
items, such as roasts and chickens, must<br />
be turned, since the upper side receives<br />
more microwave energy and could dry<br />
out if not turned.<br />
STANDING TIME<br />
Keeping to the standing time is one<br />
of the most important rules with<br />
microwaves. Almost all foods, which<br />
are thawed, heated or cooked in the<br />
microwave, require a certain amount of<br />
time to stand, during which temperature equalisation<br />
takes place and the moisture in the food is evenly<br />
distributed.<br />
ENGLISH<br />
<strong>GB</strong>-18<br />
R-<strong>667</strong>_[EN ckbk].indd <strong>GB</strong>-18<br />
6/2/09 3:01:59 PM
HEATING<br />
Details for this can be found in the table: Heating food<br />
and drink (see page <strong>GB</strong>-21).<br />
● Ready-prepared meals in aluminium containers<br />
should be removed from the aluminium container<br />
and heated on a plate or in a dish..<br />
● Remove the lids from firmly closed containers.<br />
● Food should be covered with microwave foil, a plate<br />
or cover (obtainable from stores), so that the surface<br />
does not dry out. Drinks need not be covered.<br />
● When boiling liquids such as water, coffee, tea or<br />
milk, place a glass stirrer in the container.<br />
● If possible, stir large quantities from time to time,<br />
to ensure that the temperature is evenly distributed.<br />
● The times are for food at a room temperature<br />
of 20°C. The heating time for food stored in a<br />
refrigerator should be increased slightly.<br />
● After heating allow the food to stand for 1-2<br />
minutes, so that the temperature inside the food can<br />
be evenly distributed (standing time).<br />
● The times given are guidelines which can be varied<br />
according to the initial temperature, weight, water<br />
content, fat content or the result which you wish to<br />
achieve.<br />
DEROSTING<br />
Details for this can be found in the table: Defrosting<br />
(see page <strong>GB</strong>-22). Your microwave is ideal for thawing.<br />
Thawing times are usually considerably shorter than in<br />
traditional methods. Here are a few tips. Take the<br />
frozen item out of its packaging and place on a plate<br />
for thawing.<br />
BOXES AND CONTAINERS<br />
Boxes and containers suitable for microwaves are<br />
particularly good for thawing and heating food, since<br />
they can withstand temperatures in a deep freeze<br />
(down to approx. -40°C) as well as being heat-resistant<br />
(up to approx. 220°C). You can therefore use the same<br />
container to freeze, thaw, heat and even cook the<br />
food, without having to transfer it.<br />
COVERING<br />
Cover thin parts with small strips of aluminium foil<br />
before thawing. Thawed or warm<br />
parts should likewise be covered with<br />
aluminium strips during thawing. This<br />
stops the thin parts becoming too hot<br />
while thicker parts are still frozen.<br />
CORRECT SETTING<br />
It is better to choose a setting which is too low rather<br />
than one which is too high. By so doing you will ensure<br />
that the food thaws evenly. If the microwave setting<br />
is too high, the surface of the food will already have<br />
begun to cook while the inside is still frozen.<br />
TURNING/STIRRING<br />
Almost all foods have to be turned or stirred from time<br />
to time. As early as possible, separate parts which are<br />
stuck together and rearrange them.<br />
SMALL AMOUNTS...<br />
thaw more quickly and evenly than larger ones. We<br />
recommend that you freeze portions<br />
which are as small as possible. By<br />
so doing you will be able to prepare<br />
whole menus quickly and easily.<br />
FOODS REQUIRING CAREFUL HANDLING,<br />
Foods such as gateaux, cream, cheese and bread<br />
should only be partially thawed and then left to thaw<br />
completely at room temperature. By so doing you<br />
will avoid the outer areas becoming too hot while the<br />
inside is still frozen.<br />
STANDING TIME<br />
This is particularly important after thawing food, as<br />
the thawing process continues during this period. In<br />
the thawing table you will find the standing times for<br />
various foods. Thick, dense foods require a longer<br />
standing time than thinner foods or food of a porous<br />
nature. If the food has not thawed sufficiently, you<br />
may continue thawing it in the microwave oven or<br />
lengthen the standing time accordingly. At the end of<br />
the standing time you should process the food as soon<br />
as possible and not re-freeze it.<br />
<strong>GB</strong>-19<br />
R-<strong>667</strong>_[EN ckbk].indd <strong>GB</strong>-19<br />
6/2/09 3:01:59 PM
COOKING FRESH VEGETABLES<br />
Details for this can be found in the table: Cooking fresh<br />
vegetables (see page <strong>GB</strong>-23).<br />
● When buying vegetables try to ensure that, as far as<br />
possible, they are of similar size. This is particularly<br />
important when you want to cook the vegetables<br />
whole (e.g. boiled potatoes).<br />
● Wash the vegetables before preparing them, clean<br />
them and only then weigh the required quantity for<br />
the recipe and chop them up.<br />
● Season them as you would normally, but as a rule<br />
only add salt after cooking.<br />
● Add about 5 tbsps of water for 500 g of vegetables.<br />
Vegetables which are high in fibre require a little<br />
more water. You will find information about this in<br />
the table (see page <strong>GB</strong>-23).<br />
● Vegetables are usually cooked in a dish with a lid.<br />
Those with a high moisture content, e.g. onions or<br />
boiled potatoes, can be cooked in microwave foil<br />
without adding water.<br />
● After half the cooking time has elapsed vegetables<br />
should be stirred or turned over.<br />
● After cooking allow the vegetables to stand for<br />
approx. 2 minutes, so that the temperature disperses<br />
evenly (standing time).<br />
● The cooking times given are guidelines and depend<br />
upon the weight, initial temperature and condition<br />
of the type of vegetable in question. The fresher the<br />
vegetables, the shorter the cooking times.<br />
COOKING GRILLING AND BROWNING<br />
Details for this can be found in the table: Cooking,<br />
grilling and browning (see page <strong>GB</strong>-24).<br />
● When buying food items, try to ensure that, as far<br />
as possible, they are of similar size. This will ensure<br />
that they are cooked properly.<br />
● Before preparation wash meat, fish and poultry<br />
thoroughly under cold running water and pat them<br />
dry with kitchen paper. Then continue as normal.<br />
● Beef should be well hung and have little gristle.<br />
● Even though the pieces may be of a similar size,<br />
cooking results may vary. This is due, amongst other<br />
things, to the kind of food, variations in the fat and<br />
moisture content as well as the temperature before<br />
cooking.<br />
● Turn large pieces of meat, fish or poultry half way<br />
through the cooking time, so that they are cooked<br />
evenly from all sides.<br />
● After cooking cover roasts with aluminium foil<br />
and allow them to stand for approx. 10 minutes<br />
(standing time). During this period the roast carries<br />
on cooking and the liquid is evenly distributed,<br />
so that when it is carved a minimum amount of juice<br />
is lost.<br />
DEFROSTING AND COOKING<br />
Deep-frozen dishes can be thawed and cooked at the<br />
same time in one process in your microwave. You will<br />
find some examples in the table (see page <strong>GB</strong>-21).<br />
Do take note, however, of the general advice given on<br />
"heating" and "thawing" food.<br />
Please refer to the manufacturer's instructions on the<br />
packaging when preparing deep- frozen dishes. These<br />
usually contain precise cooking times and offer advice<br />
on preparation.<br />
ENGLISH<br />
<strong>GB</strong>-20<br />
R-<strong>667</strong>_[EN ckbk].indd <strong>GB</strong>-20<br />
6/2/09 3:02:00 PM
TABLES<br />
Food/Drink<br />
TABLE : HEATING FOOD AND DRINK<br />
Coffee, 1 cup 150 100 P approx. 1 Do not cover<br />
Milk, 1 cup 150 100 P approx. 1 Do not cover<br />
Water, 1 cup 150 100 P 1 1/ 2 -2 Do not cover, bring to the boil<br />
6 cups 900 100 P 10-12 Do not cover, bring to the boil<br />
1 dish 1000 100 P 11 1/ 2-13 Cover, bring to the boil<br />
One-plate meal 400 100 P 3-6 Sprinkle sauce with water, cover, stir half<br />
(Vegetables, Meat<br />
way through cooking time<br />
and side dishes)<br />
Stew 200 100 P 1 1/ 2 -2 1/ 2 Cover, stir after heating<br />
Soup, clear 200 100 P 1 1/ 2-2 Cover, stir after heating<br />
Cream soup 200 100 P 1 1/ 2-2 1/ 2 Cover, stir after heating<br />
Vegetables 200 100 P 2-2 1/ 2 Add water if necessary, cover, stir half<br />
500 100 P 4-5 way through cooking time<br />
Side dishes 200 100 P 2-2 1/ 2 Sprinkle with a little water, cover, stir half<br />
500 100 P 4-4 1/ 2 way through cooking time<br />
Meat, 1 slice 1 200 100 P 3-4 Sprinkle with a little sauce, cover<br />
Fish fillet 200 100 P 2-3 Cover<br />
Sausages, 2 pieces 180 100 P approx. 2 Prick skin several times<br />
Cake, 1 slice 150 50 P 1/2- Place on a plate<br />
Baby food, 1 jar 190 50 P approx. 1 Remove lid, stir well after heating<br />
Check the temperature<br />
Melting Margarine 50 100 P approx. 1/ 2 Cover<br />
or Butter 1<br />
Melting chocolate 100 50 P 2-3 Stir during cooking<br />
Dissolving 6 sheets of 10 50 P 1/2 Soak in water, squeeze out well and put in<br />
gelatine<br />
soup bowl, stir during cooking<br />
Cake glaze for 1/ 4 l 10 50 P 5-6 Stir with sugar and 250ml liquid, cover and, liquid<br />
stir well during and after cooking<br />
1 from chilled<br />
Quantity<br />
-g-<br />
Setting<br />
Power<br />
-Level-<br />
Time<br />
-min-<br />
Method<br />
Food<br />
(Frozen)<br />
Quantity<br />
-g-<br />
Setting<br />
TABLE : COOKING AND DEFROSTING<br />
Power<br />
-Level-<br />
Time<br />
-min-<br />
Adding water<br />
-tbsp-<br />
Method<br />
Standing Time<br />
-min-<br />
Fish fillet 300 100 P 10-12 - Cover 1-2<br />
Trout, 1 piece 250 100 P 5-7 - Cover 1-2<br />
One-plate meal 400 100 P 9-11 - Cover, stir after 6 minutes 2<br />
Fresh spinach 300 100 P 6-8 - Cover, stir once or twice during cooking 2<br />
Broccoli 300 100 P 7-9 3-5 tbsp Cover, stir halfway through time 2<br />
Peas 300 100 P 7-9 3-5 tbsp Cover, stir halfway through time 2<br />
Kohlrabi 300 100 P 7-9 3-5 tbsp Cover, stir halfway through time 2<br />
Mixed veg. 500 100 P 11-13 3-5 tbsp Cover, stir halfway through time 2<br />
Brussel sprouts 300 100 P 7-9 3-5 tbsp Cover, stir halfway through time 2<br />
Red cabbage 450 100 P 10-12 3-5 tbsp Cover, stir halfway through time 2<br />
<strong>GB</strong>-21<br />
R-<strong>667</strong>_[EN ckbk].indd <strong>GB</strong>-21<br />
6/2/09 3:02:00 PM
TABLES<br />
Food<br />
Quantity<br />
-g-<br />
Setting<br />
TABLE : DEFROSTING<br />
Power<br />
-Level-<br />
Time<br />
-min-<br />
Method<br />
Standing time<br />
-min-<br />
Meat for roasting 1500 10 P 58-64 Place on an upturned plate, turn over 30-90<br />
(e.g. Pork, Beef, 1000 10 P 42-48 halfway through defrosting 30-90<br />
Lamb, Veal) 500 10 P 19-23 30-90<br />
Steaks, Cutlets, 200 30 P 4-5 Turn over halfway through defrosting 10-15<br />
Liver<br />
Goulash 500 30 P 8-12 Stir halfway through defrosting 15-30<br />
Sausages, 8 600 30 P 6-9 Place next to each other, turn over half 5-10<br />
4 300 30 P 4-5 way through defrosting 5-10<br />
Duck/Turkey 1500 10 P 48-52 Place on an upturned plate, turn over 30-90<br />
halfway through defrosting<br />
Chicken 1200 10 P 39-43 Place on an upturned plate, turn over 30-90<br />
halfway through defrosting<br />
1000 10 P 33-37 Place on an upturned plate, turn over 30-90<br />
halfway through defrosting<br />
Chicken legs 200 30 P 4-5 Turn over halfway through defrosting 10-15<br />
Fish in pieces 800 30 P 9-12 Turn over halfway through defrosting 10-15<br />
Fish fillet 400 30 P 7-10 Turn over halfway through defrosting 5-10<br />
Crab 300 30 P 6-8 Turn over halfway through defrosting 5<br />
and remove defrosted parts<br />
Bread rolls, 2 80 30 P approx. 1 Only begin to defrost -<br />
Coarse wholemeal bread 250 30 P 2-4 Place slices next to each other, 5<br />
in slices<br />
only begin to defrost<br />
Slices of Toast bread<br />
Mixed flour bread, whole loaf 500 30 P 6-8 Turn over halfway through defrosting 15<br />
White bread, whole loaf<br />
(centre will still be frozen)<br />
Cake, 1 slice 150 10 P 2-5 Place on a plate 5<br />
Cream cake, 1 slice 10 P 3-4 Place on a plate 10<br />
Whole cake, Ø 25 cm 10 P 18-20 Place on a plate. When half defrosted, 30-60<br />
cut in to slices and leave until cake is<br />
fully defrosted<br />
Cream 200 30 P 2+2 Remove lid. When half defrosted, put in 5-10<br />
a dish and allow to finish defrosting<br />
Butter 250 30 P 2-4 Only begin to defrost 15<br />
Fruit e.g. strawberries 250 30 P 4-5 Place next to each other, spread out evenly 5<br />
raspberries, cherries, plums<br />
Turn over halfway through defrosting<br />
The times shown in the table are guidelines which may vary according to freezing temperature, quality and weight<br />
of the foodstuffs.<br />
ABBREVIATIONS USED<br />
tbsp = tablespoon<br />
tsp = teaspoon<br />
Cup = cupful<br />
kg = kilogram<br />
g = gram<br />
l = litre<br />
ml = millilitre<br />
cm = centimetre<br />
DFC = dry fat content<br />
DF = deep frozen<br />
min = minutes<br />
sec = seconds<br />
dm = diameter<br />
app. = approximate<br />
sach. = sachet<br />
ENGLISH<br />
<strong>GB</strong>-22<br />
R-<strong>667</strong>_[EN ckbk].indd <strong>GB</strong>-22<br />
6/2/09 3:02:01 PM
TABLES<br />
TABLE : COOKING FRESH VEGETABLES<br />
Vegetable Weight Setting Power Time Hints Added Water<br />
-g- -Level- -Min- tbsps/ml-<br />
Artichokes 300 100 P 6-8 remove the stalk, cover 3-4 tbsp<br />
Leaf Spinach 300 100 P 5-7 wash, dry well, cover, stir once or twice during cooking -<br />
Cauliflower 800 100 P 15-17 1 whole head, cover, divide into florets 5-6 tbsp<br />
500 100 P 10-12 stir during cooking 4-5 tbsp<br />
Broccoli 500 100 P 9-11 divide into florets, cover, stir occasionally during cooking 4-5 tbsp<br />
Mushrooms 500 100 P 8-10 whole heads, cover, stir occasionally during cooking -<br />
Chinese leaves 300 100 P 9-11 cut into strips, cover, stir occasionally during cooking 4-5 tbsp<br />
Peas 500 100 P 9-11 cover, stir occasionally during cooking 4-5 tbsp<br />
Fennel 500 100 P 9-11 cut into quarters, cover, stir occasionally during cooking 4-5 tbsp<br />
Onions 250 100 P 5-7 whole, cook in microwave foil -<br />
Carrots 500 100 P 10-12 cut into rings, cover, stir occasionally during cooking 4-5 tbsp<br />
Green peppers 500 100 P 7-9 cut into strips, stir once or twice during cooking 4-5 tbsp<br />
Jacket potatoes 500 100 P 9-11 cover, stir occasionally during cooking 4-5 tbsp<br />
Leeks 500 100 P 9-11 cut into rings, cover, stir occasionally during cooking 4-5 tbsp<br />
Red cabbage 500 100 P 15-17 cut into strips, stir once or twice during cooking 50 ml<br />
Brussels sprouts 500 100 P 9-11 whole sprouts, cover, stir occasionally during cooking 50 ml<br />
Boiled potatoes 500 100 P 9-11 cut into large pieces of a similar size, add a little salt, 150 ml<br />
(salted)<br />
cover, stir occasionally during cooking<br />
Celery 500 100 P 9-11 dice finely, cover, stir occasionally during cooking 50 ml<br />
White cabbage 500 100 P 15-17 cut into strips, cover, stir occasionally during cooking 50 ml<br />
Courgettes 500 100 P 9-11 slice, cover, stir occasionally during cooking 4-5 tbsp<br />
<strong>GB</strong>-23<br />
R-<strong>667</strong>_[EN ckbk].indd <strong>GB</strong>-23<br />
6/2/09 3:02:02 PM
TABLES<br />
Food<br />
Roasts<br />
(Pork,Veal, Lamb)<br />
Roast beef<br />
(medium)<br />
Chicken<br />
Chicken legs<br />
500<br />
1000<br />
1500<br />
1000<br />
1500<br />
1200<br />
TABLE : COOKING, GRILLING AND BROWNING<br />
Quantity<br />
-g-<br />
200<br />
Setting<br />
Power<br />
-Level-<br />
100 P<br />
30 P<br />
70 P<br />
30 P<br />
100 P<br />
30 P<br />
70 P<br />
30 P<br />
100 P<br />
30 P<br />
70 P<br />
30 P<br />
70 P<br />
30 P<br />
70 P<br />
30 P<br />
70 P<br />
30 P<br />
70 P<br />
30 P<br />
100 P<br />
30 P<br />
100 P<br />
30 P<br />
30 P<br />
Time<br />
-min-<br />
6-8<br />
4-5*<br />
6-8<br />
3-5<br />
11-13<br />
8-10*<br />
11-13<br />
7-9<br />
19-22<br />
11-13*<br />
14-16<br />
7-9<br />
9-11<br />
9-10*<br />
5-7<br />
6-8<br />
11-13<br />
7-8*<br />
11-13<br />
4-6<br />
10-12<br />
7-9*<br />
10-12<br />
6-8<br />
7-8*<br />
7<br />
Method<br />
Season to taste, place in shallow dish, place on<br />
revolving plate, turn over after *<br />
Season to taste, place fatty side down in shallow<br />
dish, place on revolving plate, turn over after *<br />
Season to taste, place breast side down in shallow<br />
dish, place on revolving plate, turn over after *<br />
Season to taste, place skin downwards on grill, turn<br />
over after *<br />
Standing time<br />
-min-<br />
5-10<br />
10<br />
3<br />
3<br />
Steaks<br />
2 medium pieces<br />
To brown dishes<br />
etc.<br />
Croque monsieur,<br />
1 slice<br />
400<br />
10 P<br />
10 P<br />
11-13*<br />
10-14<br />
7-10<br />
5-7<br />
Place on rack, turn over after *, season after grilling<br />
Place dish on the rack<br />
Toast bread, spread with butter, lay 1 slice of cooked<br />
ham, 1 slice of pineapple and 1 slice of processed<br />
cheese on top and grill<br />
2<br />
10<br />
1<br />
ENGLISH<br />
<strong>GB</strong>-24<br />
R-<strong>667</strong>_[EN ckbk].indd <strong>GB</strong>-24<br />
6/2/09 3:02:03 PM
RECIPES<br />
ADAPTING RECIPES FOR THE MICROWAVE<br />
OVEN<br />
If you would like to adapt your favourite recipes for<br />
the microwave, you should take note of the following:<br />
Shorten cooking times by a third to a half. Follow<br />
the example of the recipes in this cookery book.<br />
Foods which have a high moisture content such as<br />
meat, fish, poultry, vegetables, fruit, stews and soups<br />
can be prepared in your microwave without any<br />
difficulty.<br />
Foods which have little moisture, such as platters<br />
of food, should have the surface moistened prior to<br />
heating or cooking.<br />
The amount of liquid to be added to raw foods,<br />
which are to be braised, should be reduced to about<br />
two thirds of the quantity in the original recipe.<br />
If necessary, add more liquid during cooking.<br />
The amount of fat to be added can be reduced<br />
considerably. A small amount of butter, margarine<br />
or oil is sufficient to flavour food. For this reason your<br />
microwave is excellent for preparing low-fat foods as<br />
part of a diet.<br />
HOW TO USE THE RECIPES<br />
● All the recipes in this cookery book are calculated<br />
on the basis of 4 servings - unless otherwise stated.<br />
● Recommendations relating to suitable utensils and<br />
the total cooking times are given at the beginning of<br />
every recipe.<br />
● As a rule the quantities shown are assumed to be<br />
wholly consumable, unless specifically indicated<br />
otherwise.<br />
● When eggs are given in the recipes they are<br />
assumed to have weight of approx. 55 g (medium).<br />
SOUPS AND STARTERS<br />
Spain<br />
CREAM OF AVOCADO SOUP<br />
Sopa de aguacates<br />
Total cooking time: approx. 10-12 minutes<br />
Utensils: Bowl with lid (2 Iitre capacity)<br />
Ingredients<br />
3 avocados (600 g of flesh)<br />
a little lemon juice<br />
700 ml meat stock<br />
70 ml cream<br />
salt<br />
pepper<br />
Procedure<br />
1. Peel the soft, ripe avocados, remove stone, cut into<br />
small pieces and puree with a mixer or a mixing<br />
attachment on a hand mixer. Reserve two thin slivers<br />
per portion for decoration and sprinkle with lemon<br />
juice.<br />
2. Put the meat stock, avocados and the cream in a<br />
dish, season with salt and pepper and cook with lid<br />
on. Stir once during cooking.<br />
10-12 min. 100 P<br />
3. Mix soup until creamy and decorate with the<br />
remaining avocado slivers. Allow to stand for 5<br />
minutes after cooking.<br />
<strong>GB</strong>-25<br />
R-<strong>667</strong>_[EN ckbk].indd <strong>GB</strong>-25<br />
6/2/09 3:02:05 PM
SOUPS AND STARTERS<br />
Switzerland<br />
BARLEY SOUP<br />
Bündner Gerstensuppe<br />
Total cooking time: approx. 35-40 minutes<br />
Utensils: Bowl with lid (2 Iitre capacity)<br />
Ingredients<br />
2 tbsp butter or margarine (20 g)<br />
1 onion (50 g), finely chopped<br />
1-2 carrots (130 g), sliced<br />
15 g celery, diced<br />
1 leek (130 g), in rings<br />
3 white cabbage leaves (100 g) in strips<br />
200 g veal bones<br />
50 g streaky bacon, in strips<br />
50 g barley grains<br />
700 ml meat stock<br />
pepper<br />
4 Wiener sausages (300 g)<br />
Procedure<br />
1. Put the butter and diced onion in the dish and steam<br />
with the lid on the dish.<br />
approx. 1-2 min. 100 P<br />
2. Add the vegetables to the dish. Then add the bones,<br />
the strips of bacon and the barley and fill with the<br />
meat stock. Season with pepper and cook with the<br />
lid on.<br />
1. 17-19 min. 100 P<br />
2. 17-19 min. 50 P<br />
3. Chop the sausages into small pieces and heat them<br />
for 5 minutes in the dish.<br />
4. After cooking, let the soup stand for 5 minutes. Take<br />
the bones out of the soup before serving.<br />
Netherlands<br />
MUSHROOM SOUP<br />
Champignonsoep<br />
Total cooking time: approx. 13-17 minutes<br />
Utensils: Bowl with lid (2 litre capacity)<br />
Ingredients<br />
200 g mushrooms, sliced<br />
1 onion (50 g), finely chopped<br />
300 ml meat stock<br />
300 ml cream<br />
2 1/ 2 tbsp plain flour (25 g)<br />
2 1/ 2 tbsp butter or margarine (25 g)<br />
salt and pepper<br />
1 egg yolk<br />
150 g crème fraiche<br />
Procedure<br />
1. Put the vegetables with the meat stock in the dish<br />
and cook with the lid on.<br />
8-9 min. 100 P<br />
2. Puree all the ingredients in a food processor. Add<br />
the cream.<br />
3. Rub the flour and butter into a dough and stir into the<br />
mushroom soup until smooth. Season with salt and<br />
pepper, cover and cook. Stir again after cooking.<br />
4-5 min. 100 P<br />
4. Mix the egg yolk with the crème fraiche, stir into the<br />
soup little by little. Heat the whole mixture again for<br />
a short time, but do not allow it to boil!<br />
approx. 1 min. 100 P<br />
Allow the soup to stand for approximately 5 minutes<br />
once cooked.<br />
Soup insert<br />
SOUP THICKENER with EGG<br />
for half a litre of soup<br />
Total cooking time: approx. 3-5 minutes<br />
Utensils: Coffee cup (150 ml capacity)<br />
Ingredients<br />
1 egg<br />
4 tbsp Milk or cream (50 ml)<br />
1 pinch salt<br />
1 pinch nutmeg<br />
Procedure<br />
1. Whisk all the ingredients, pour them into the cup<br />
and heat until they curdle.<br />
3-5 min. 30 P<br />
2. Turn out the egg thickening out and allow to cool.<br />
Cut into small cubes and add to the soup<br />
ENGLISH<br />
<strong>GB</strong>-26<br />
R-<strong>667</strong>_[EN ckbk].indd <strong>GB</strong>-26<br />
6/2/09 3:02:06 PM
SOUPS AND STARTERS<br />
Germany<br />
CAMEMBERT TOAST<br />
Camemberttoast<br />
Total cooking time: approx. 1 1/ 2 -2 1/ 2 minutes<br />
Utensils: Flat dish<br />
Ingredients<br />
4 slices of bread for toasting (80 g)<br />
2 tbsp butter or margarine (20 g)<br />
150 g Camembert<br />
4 tsp Cranberry jelly (40 g)<br />
Cayenne pepper<br />
Procedure<br />
1. Toast the bread and spread with butter.<br />
2. Cut the Camembert into slices and arrange on<br />
top of the toast. Put the Cranberry jelly in the<br />
middle of the cheese and sprinkle with Cayenne<br />
pepper.<br />
3. Place the toast on a plate and heat.<br />
approx 1 1/ 2 -2 1/ 2 min. 100 P<br />
Tip: You can vary this recipe according to your<br />
taste. For example, you can use fresh mushrooms<br />
and grated cheese or cooked ham, asparagus<br />
and Emmental cheese.<br />
MEAT, FISH AND POULTRY<br />
France<br />
FRESH TUNA WITH VEGETABLES<br />
Thon frais braisé aux tomates et aux poivrons<br />
Total cooking time: approx. 21-23 minutes<br />
Utensils: Shallow oval gratin dish with lid<br />
(approx. 26 cm diameter)<br />
Ingredients<br />
500 g fresh tuna, in slices<br />
2 tbsp lemon juice<br />
salt<br />
1 tsp vegetable oil to grease the dish<br />
1/2 green pepper (125 g), cut into strips<br />
2 onions (125 g), finely chopped<br />
1 carrot (50 g), sliced<br />
1-2 tomatoes (125 g), diced<br />
40 ml white wine<br />
1 clove of garlic<br />
Bouquet garni<br />
Salt and pepper<br />
Procedure<br />
1. Wash the tuna, pat dry and sprinkle with lemon<br />
juice. Allow the fish to stand for approximately 15<br />
minutes, then pat dry again and add salt.<br />
2. Spread oil on the bottom of the dish and lay the tuna<br />
in it. Arrange the vegetables on top of the fish. Add<br />
the white wine, the clove of garlic and the bouquet<br />
garni and season. Cover the dish and cook.<br />
21-23 min. 70 P<br />
Allow the fish to stand for approximately 2 minutes<br />
after cooking. Remove the bouquet garni and the<br />
clove of garlic before serving.<br />
Tip: A bouquet garni is made of: a sprig of parsley,<br />
a bunch of herbs and vegetables for making soup ,<br />
lovage, thyme and a few bay leaves<br />
<strong>GB</strong>-27<br />
R-<strong>667</strong>_[EN ckbk].indd <strong>GB</strong>-27<br />
6/2/09 3:02:07 PM
MEAT, FISH AND POULTRY<br />
Spain<br />
MUSHROOM WITH ROSEMARY<br />
Champinones rellenos al romero<br />
Total cooking time: approx. 15-21 minutes<br />
Utensils: Bowl with lid (1 Iitre capacity)<br />
Shallow round dish<br />
(approx. 22 cm diameter)<br />
Ingredients<br />
8 large mushrooms (approx. 225 g), whole<br />
2 tbsp butter or margarine (20 g)<br />
1 onion (50 g), finely chopped<br />
50 g bacon, finely diced<br />
black pepper, ground<br />
fresh rosemary, bruised<br />
125 ml dry white wine<br />
125 ml cream<br />
2 tbsp flour (20 g)<br />
Procedure<br />
1. Remove the stalks from the mushrooms and chop the<br />
stalks into small pieces.<br />
2. Spread the butter on the bottom of the dish. Add the<br />
onions, the diced bacon and the mushroom stalks.<br />
Season with pepper and rosemary, cover and cook.<br />
4-6 min. 100 P<br />
Leave to cool.<br />
3. Heat 100 ml of the wine and cream in the other<br />
dish with its lid on.<br />
2-3 min. 100 P<br />
4. Mix the remaining wine with the flour, stir into the<br />
hot liquid and cook with the lid on. Stir once during<br />
cooking.<br />
1-2 min. 100 P<br />
5. Fill the mushrooms with the bacon mixture, place in<br />
the sauce and cook on the rack.<br />
12 min. 50 P<br />
Allow the mushrooms to stand for approximately<br />
2 minutes once cooked.<br />
Germany<br />
COURGETTE AND MACARONI BAKE<br />
Zucchini-Nudel-Auflauf<br />
Total cooking time: approx. 41-49 minutes<br />
Utensils: Bowl with lid (2 Iitre capacity)<br />
Gratin dish (approx. 26cm diameter)<br />
Ingredients<br />
500 ml water<br />
1/2 tsp oil<br />
80 g macaroni<br />
400 g tinned tomatoes, chopped<br />
3 onions (150 g), finely chopped<br />
Basil, thyme, salt, pepper<br />
1 tbsp oil to grease the dish<br />
450 g courgettes, sliced<br />
150 g sour cream<br />
2 eggs<br />
100 g grated cheddar cheese<br />
Procedure<br />
1. Put the water, oil and salt in the dish and bring to<br />
the boil with the lid on.<br />
3-4 min. 100 P<br />
2. Break the macaroni into pieces, add to the dish, stir<br />
and allow to swell.<br />
8-10 min. 30 P<br />
Drain the macaroni and allow to cool.<br />
3. Mix the tomatoes with the onions and season well.<br />
Grease the gratin dish. Put the macaroni in it and<br />
pour the tomato sauce over it. Arrange the courgette<br />
slices on the top.<br />
4. Beat the sour cream with the eggs and pour over the<br />
mixture in the dish. Sprinkle the grated cheese over<br />
the top.<br />
17-20 min. 100 P<br />
8-10 min. 50 P<br />
Allow the dish to stand for 5-10 minutes after<br />
cooking.<br />
ENGLISH<br />
<strong>GB</strong>-28<br />
R-<strong>667</strong>_[EN ckbk].indd <strong>GB</strong>-28<br />
6/2/09 3:02:07 PM
MEAT, FISH AND POULTRY<br />
Austria<br />
STUFFED ROAST CHICKEN<br />
Gefülltes Brathähnchen<br />
Stuffed roast chicken for two servings<br />
Total cooking time: approx. 32-39 minutes<br />
Utensils: Quiche dish<br />
Thread<br />
Ingredients<br />
1 chicken (1000 g)<br />
Salt, bruised (fresh) rosemary, bruised<br />
marjoram<br />
1 stale bread roll (40 g)<br />
salt<br />
1 bunch parsley, finely chopped (10 g)<br />
1 pinch nutmeg<br />
2 tbsp butter or margarine (20 g)<br />
1 egg yolk<br />
3 tbsp butter or margarine (30 g)<br />
1 tsp paprika, mild<br />
salt<br />
1 tsp butter or margarine to grease the dish<br />
Procedure<br />
1. Wash the chicken, pat it dry and season the cavity<br />
with salt, rosemary and marjoram.<br />
2. To make the filling, soak the bread roll for<br />
approximately 10 minutes in cold water, and then<br />
squeeze out excess water. Mix butter and egg yolk<br />
with salt, parsley, nutmeg, and stuff the chicken<br />
with the mixture. Sew the opening with cotton or<br />
butcher’s thread.<br />
3. Heat the butter.<br />
approx. 1 min. 100 P<br />
Mix the paprika and salt with the butter and smear<br />
it on the chicken.<br />
4. Place the chicken breast side down in the greased<br />
quiche dish and cook (do not cover).<br />
1. 11-13 min. 100 P<br />
2. 6-8 min. 30 P<br />
Turn the chicken over<br />
3. 11-13 min. 100 P<br />
4. 5-7 min. 30 P<br />
Allow the stuffed chicken to stand for approximately<br />
3 minutes after cooking.<br />
Switzerland<br />
FISH FILLET WITH CHEESE SAUCE<br />
Fischfilet mit Käsesauce<br />
Total cooking time: approx. 22-26 minutes<br />
Utensils: Bowl with lid (1 Iitre capacity)<br />
Shallow round gratin dish<br />
(approx. 25 cm diameter)<br />
Ingredients<br />
3 fish fillets (approx. 600 g)<br />
2 tbsp lemon juice<br />
salt<br />
1 tbsp butter or margarine<br />
1 onion (50 g), finely chopped<br />
2 tbsp flour (20 g)<br />
100 ml white wine<br />
1 tsp vegetable oil to grease the dish<br />
100 g grated Emmental cheese<br />
2 tsp chopped parsley<br />
Procedure<br />
1. Wash the fish, pat dry and sprinkle with lemon<br />
juice. Leave to stand for 15 minutes, pat dry again<br />
and rub with salt.<br />
2. Smear the butter on the bottom of the dish. Add the<br />
diced onion, cover with the lid and steam.<br />
approx. 2 min. 100 P<br />
3. Sprinkle the flour over the onions and stir. Add the<br />
white wine and mix.<br />
4. Grease the gratin dish and place the fish in it. Pour<br />
the sauce over the fish and sprinkle with cheese.<br />
Place on the grill and cook.<br />
13-15 min. 70 P<br />
7-9 min. 30 P<br />
Allow fish to stand for approximately 2 minutes after<br />
cooking. Serve with a garnish of chopped parsley<br />
<strong>GB</strong>-29<br />
R-<strong>667</strong>_[EN ckbk].indd <strong>GB</strong>-29<br />
6/2/09 3:02:08 PM
MEAT, FISH AND POULTRY<br />
Germany<br />
COLOURED MEAT KEBABS<br />
Bunte Fleischspieße<br />
Total cooking time: approx. 14-17 minutes<br />
Utensils: Rack<br />
3 wooden skewers<br />
(approx. 20-25 cm long)<br />
Ingredients<br />
250-300 g pork cutlets<br />
60 g bacon<br />
1-2 onions (75 g), cut in quarters<br />
3 tomatoes (150 g), cut in quarters<br />
1/2 green pepper (75 g), cut into 8<br />
3 tbsp oil<br />
2 tsp paprika<br />
salt<br />
1 tsp cayenne pepper<br />
1 tsp Worcester sauce<br />
Procedure<br />
1. Cut the pork and the bacon into cubes approximately<br />
2-3cm in size.<br />
2. Skewer the meat the vegetables alternately on the<br />
wooden skewer.<br />
3. Mix the oil with the spices and place the skewers on<br />
the grill and cook on the rack.<br />
EXPRESS COOK or<br />
1. 7-9 min. 50 P<br />
4. Turn the skewers over.<br />
2. 7-9 min. 50 P<br />
Spain<br />
STUFFED HAM<br />
Jamón relleno<br />
Total cooking time: approx. 15-21 minutes<br />
Utensils: Bowl with lid (2 Iitre capacity)<br />
Shallow oval gratin dish with lid<br />
or microwave foil<br />
(approx. 26 cm long)<br />
Ingredients<br />
125 g fresh spinach, with stalks removed<br />
125 g quark (6% fat)<br />
40 g grated Emmental cheese<br />
Pepper<br />
Paprika, mild<br />
6 slices cooked ham (300 g)<br />
125 ml water<br />
125 ml cream<br />
2 tbsp flour (20 g)<br />
2 tbsp butter or margarine (20 g)<br />
1 tsp butter or margarine to grease the dish<br />
Procedure<br />
1. Cut the spinach finely, mix with the quark and the<br />
cheese and season to taste.<br />
2. Place a tablespoon of the filling on each slice of<br />
the cooked ham and roll up. Secure the ham with a<br />
wooden toothpick.<br />
3. Make a béchamel sauce. To do this, pour the liquid<br />
into the dish, cover and heat.<br />
3-4 min. 100 P<br />
Rub the butter into the flour, add to the liquid and<br />
beat with a balloon whisk, until it is smooth. Cover,<br />
bring to the boil until thickened.<br />
approx. 1 min. 100 P<br />
Stir and taste.<br />
4. Pour the sauce into the greased dish, place the ham<br />
rolls in the dish and cook with the lid on. To brown<br />
the top, remove the lid and place the dish on the<br />
rack.<br />
1. 6-9 min. 100 P<br />
2. 6-8 min. 30 P<br />
Allow the ham rolls to stand for approximately<br />
5 minutes after cooking.<br />
Tip: You can also use ready-made béchamel sauce for<br />
this recipe.<br />
ENGLISH<br />
<strong>GB</strong>-30<br />
R-<strong>667</strong>_[EN ckbk].indd <strong>GB</strong>-30<br />
6/2/09 3:02:08 PM
MEAT, FISH AND POULTRY<br />
Greece<br />
POT ROAST WITH GREEN BEANS<br />
Kréas mé fasólia<br />
Total cooking time: approx. 20-24 minutes<br />
Utensils: Bowl with lid (2 litre capacity)<br />
Ingredients<br />
1-2 tomatoes (100 g)<br />
400 g lamb without bones<br />
1 tsp butter or margarine to grease the dish<br />
1 onion (50 g), finely chopped<br />
1 clove of garlic, crushed<br />
salt and pepper<br />
sugar<br />
250 g tinned green beans<br />
Procedure<br />
1. Peel the tomatoes, cut out the stalks and purée in a<br />
food processor.<br />
2. Cut the lamb into large cubes. Grease the dish with<br />
butter. Add the meat, the diced onion and crushed<br />
garlic clove, season, cover dish and cook.<br />
9-11 min. 100 P<br />
3. Add the beans and the puréed tomatoes to the meat<br />
and continue to cook with the lid on.<br />
11-13 min. 70 P<br />
Allow the meat to stand for approximately 5 minutes<br />
after cooking.<br />
Tip: If you use fresh beans, these must be cooked in<br />
advance.<br />
Switzerland<br />
ZURICH VEAL STEW<br />
Züricher Geschnetzeltes<br />
Total cooking time: approx. 11-15 minutes<br />
Utensils: Bowl with lid (2 Iitre capacity)<br />
Ingredients<br />
600 g veal fillet<br />
1 tbsp butter or margarine<br />
1 onion (50 g), finely chopped<br />
100 ml white wine<br />
Gravy thickener to make approx. 1/ 2 litre<br />
300 ml cream<br />
salt and pepper<br />
1 tbsp parsley, chopped<br />
Procedure<br />
1. Slice the meat into finger-thick strips.<br />
2. Smear the butter evenly around the dish. Add the<br />
onion and the meat to the dish, cover and cook. Stir<br />
once during cooking.<br />
7-10 min. 100 P<br />
3. Add the white wine, the gravy powder and<br />
the cream, stir, cover and continue to cook.<br />
Stir once during cooking.<br />
4-5 min. 100 P<br />
4. Taste the stew, stir again and allow to stand for 5<br />
minutes. Serve with parsley garnish.<br />
France<br />
FILET OF SOLE<br />
Filets de sole or 2 Portions<br />
Total cooking time: approx. 13-16 minutes<br />
Utensils: Shallow oval gratin dish with lid<br />
(approx.26 cm)<br />
Ingredients<br />
400 g filet of sole<br />
1 lemon, untreated<br />
2 tomatoes (150 g)<br />
1 tsp butter or margarine to grease the dish<br />
1 tbsp vegetable oil<br />
1 tbsp parsley, chopped<br />
salt and pepper<br />
4 tbsp white wine (30 ml)<br />
2 tbsp butter or margarine (20 g)<br />
Procedure<br />
1. Wash the fish and pat dry. Remove any bones.<br />
2. Slice the lemon and the tomatoes finely.<br />
3. Grease the gratin dish with butter. Place the fish in it<br />
and drizzle with vegetable oil.<br />
4. Sprinkle the fish with parsley, lay the slices of tomato<br />
on top and season. Lay the slices of lemon on top of<br />
the tomato and pour the white wine over this.<br />
5. Dot the lemon with butter, cover and cook.<br />
13-16 min. 70 P<br />
Die Fischfilets nach dem Garen 2 min. stehen<br />
lassen.<br />
Tip: You can also use rosefish, halibut, mullet, plaice or<br />
cod in this recipe.<br />
<strong>GB</strong>-31<br />
R-<strong>667</strong>_[EN ckbk].indd <strong>GB</strong>-31<br />
6/2/09 3:02:09 PM
MEAT, FISH AND POULTRY<br />
China<br />
PRAWNS WITH CHILLI<br />
Total cooking time: approx. 5 - 7 minutes<br />
Utensils: Bowl with lid (1 litre capacity)<br />
Bowl with lid (2 litre capacity)<br />
Ingredients<br />
6 prawns (shelled 240 g)<br />
50 ml white wine<br />
2 small bunches of chives (200 g)<br />
1-2 chillies, hot<br />
20 g ginger (fresh)<br />
1 tbsp cornflour<br />
2 tbsp vegetable oil (20 g)<br />
1 1/ 2 tbsp soy sauce (20 ml)<br />
1 tbsp sugar<br />
1 tbsp vinegar<br />
Procedure<br />
1. Wash the prawns. Remove the shell and tail. Cut<br />
into the spine and remove gut. Cut each prawn into<br />
2 or 3 pieces and snip each piece so they do not<br />
curl when cooked. Put the prawns into a bowl and<br />
sprinkle with the wine. Cover and marinate.<br />
2. Wash chives and chillis and pat dry. Cut chives<br />
into 5cm lengths. Cut chillies in half lengthwise and<br />
remove seeds. Peel and slice ginger.<br />
3. Take the prawns out of the wine and coat them in<br />
cornflour.<br />
4. Put oil, chives, chillies and ginger slices into bowl<br />
and cover. Heat.<br />
approx. 2 min. 100 P<br />
5. Add prawns to the bowl. Season with soy sauce,<br />
sugar and vinegar. Stir and cook covered.<br />
3-5 min. 100 P<br />
Allow the prawns to stand for 1 - 2 minutes after<br />
cooking. Serve hot.<br />
Germany<br />
ROAST PORK WITH CRACKLING<br />
Schweinebraten mit Kruste<br />
Total cooking time: approx. 55-63 minutes<br />
Utensils: Bowl with lid (2 litre capacity)<br />
Bowl with lid (1 litre capacity)<br />
Ingredients<br />
1000 g boned shoulder of pork, with fat rind<br />
1 - 2 garlic cloves<br />
salt<br />
black pepper, freshly ground<br />
1 tsp caraway seeds<br />
2 carrots, sliced (125 g)<br />
60 g celeriac, finely diced<br />
60 g leeks, sliced in rings<br />
salt and pepper<br />
75 ml water<br />
75 ml beer<br />
Gravy thickener, dark, for 1/ 4- 1/ 2 litre gravy<br />
Procedure<br />
1. Wash the meat and pat dry. Cut a criss-cross pattern<br />
onto the fat rind.<br />
2. Crush garlic clove, mix with salt, pepper and<br />
caraway seeds, and use to season meat.<br />
3. Place the meat rind-down in bowl. Season<br />
vegetables and add them to bowl. Mix water and<br />
beer and pour into bowl. Cook covered, turning<br />
halfway through cooking.<br />
1. 6-7 min. 100 P<br />
2. 46-52 min. 70 P<br />
4. Remove meat, wrap in kitchen foil and leave to<br />
stand for 10 minutes. Strain the meat juices through<br />
a sieve into the small dish. Add water to make<br />
250 ml of liquid. Add the correct amount of gravy<br />
thickener to the juices, stir and heat covered, stirring<br />
occasionally.<br />
1-3 min. 100 P<br />
Season the sauce as required, pour over meat and<br />
serve.<br />
Tip: Vegetables and dumplings or boiled potatoes go<br />
well with this recipe<br />
ENGLISH<br />
<strong>GB</strong>-32<br />
R-<strong>667</strong>_[EN ckbk].indd <strong>GB</strong>-32<br />
6/2/09 3:02:13 PM
VEGETABLES AND NOODLES<br />
Italy<br />
LASAGNE<br />
Lasagne al forno<br />
Total cooking time: approx. 22-26 minutes<br />
Utensils: Bowl with lid (2 Iitre capacity)<br />
Shallow rectangular gratin dish with lid<br />
(approx. 20x20x6 cm)<br />
Ingredients<br />
300 g tomatoes, tinned<br />
50 g ham, finely diced<br />
1 onion (50 g), finely chopped<br />
1 garlic clove, crushed<br />
250 g minced beef<br />
2 tbsp tomato puree (30 g)<br />
salt and pepper<br />
oregano, thyme, basil<br />
150 ml creme fraiche<br />
100 ml milk<br />
50 g grated Parmesan cheese<br />
1 tsp chopped mixed herbs<br />
1 tsp olive oil<br />
salt, pepper and nutmeg<br />
1 tsp vegetable oil for greasing dish<br />
125 g green lasagne sheets<br />
1 tsp grated Parmesan cheese<br />
1 tsp butter or margarine<br />
Procedure<br />
1. Slice the tomatoes and mix with the diced onion and<br />
ham, garlic, minced beef and tomato puree. Season<br />
and steam with lid on.<br />
7-9 min. 100 P<br />
2. Mix together the cream, milk, Parmesan cheese,<br />
herbs and oil. Season.<br />
3. Grease the dish and cover the base with 1/ 3 of the<br />
pasta sheets. Spread half of the meat mixture on<br />
top of the pasta and cover with some of the cheese<br />
sauce. Lay another 1/ 3 of the pasta on top of this,<br />
followed by the meat mixture and some sauce. Finish<br />
with the last 1/ 3 of the pasta covered with a lot of<br />
sauce and top with grated Parmesan. Add butter<br />
slivers and cook with lid on.<br />
15-17 min. 70 P<br />
Leave the lasagne 5 to 10 minutes to stand after<br />
cooking.<br />
France<br />
VEGETABLE CASSEROLE<br />
Ratatouille spécial<br />
Total cooking time: approx. 19-21 minutes<br />
Utensils: Bowl with lid (2 litre capacity)<br />
Ingredients<br />
5 tbsp olive oil (50 ml)<br />
1 garlic clove, crushed<br />
1 onion (50 g), sliced<br />
1 small aubergine (250 g), roughly chopped<br />
1 courgette (200 g), roughly chopped<br />
1 pepper (200 g), roughly chopped<br />
1 small fennel bulb (75 g), roughly chopped<br />
pepper<br />
1 bouquet garni<br />
200 g tin artichoke hearts, quartered<br />
salt and pepper<br />
Procedure<br />
1. Put olive oil and garlic in dish. Add all the prepared<br />
vegetables except the artichoke hearts and season<br />
with pepper. Add the bouquet garni and cook<br />
covered. Stir once during cooking.<br />
19-21 min. 100 P<br />
Add the artichoke hearts to the bowl for the last<br />
5 minutes.<br />
2. Season the ratatouille to taste and take the bouquet<br />
garni out before serving. Once cooked, leave the<br />
ratatouille to stand for about 2 minutes.<br />
Tip: Serve this hot vegetable casserole with meat<br />
dishes. Served cold it makes a delicious starter.<br />
Bouquet garni consists of: a sprig each of parsley,<br />
lovage and thyme, plus some bay leaves.<br />
<strong>GB</strong>-33<br />
R-<strong>667</strong>_[EN ckbk].indd <strong>GB</strong>-33<br />
6/2/09 3:02:13 PM
VEGETABLES AND NOODLES<br />
Spain<br />
STUFFED POTATOES<br />
Patatas Rellenas<br />
Total cooking time: approx. 12 - 16 minutes<br />
Utensils: Bowl with lid (2 litre capacity)<br />
China plates<br />
Ingredients<br />
4 medium-sized potatoes (400 g)<br />
100 ml water<br />
60g ham, finely diced<br />
1/2 onion (25 g), finely chopped<br />
75-100 ml milk<br />
2 tbsp grated Parmesan cheese (20 g)<br />
salt<br />
pepper<br />
2 tbsp grated Emmental cheese<br />
Procedure<br />
1. Put the potatoes in the bowl, add the water, cover<br />
and cook. Turn once during cooking.<br />
8-10 min. 100 P<br />
Allow to cool.<br />
2. Halve the potatoes lengthways and carefully scoop<br />
out the flesh. Mix the potato with the ham, onion,<br />
milk and Parmesan until it is smooth. Season with<br />
salt and pepper.<br />
3. Fill the potato skins with the mixture, top with the<br />
grated Emmental, place on the plates and cook.<br />
4-6 min. 100 P<br />
Leave the potatoes to stand for about 2 minutes after<br />
cooking.<br />
DRINKS AND DESSERTS<br />
Denmark<br />
BERRY JELLY WITH VANILLA SAUCE<br />
Rødgrød med vanilie sovs<br />
Total cooking time: approx. 10-13 minutes<br />
Utensils: 2 dishes with lids (2 Iitre capacity)<br />
Ingredients<br />
150 g redcurrants, washed, stems and stalks<br />
removed<br />
150 g strawberries, washed, stalks removed<br />
150 g raspberries, washed and checked<br />
250 ml white wine<br />
100 g sugar<br />
50 ml lemon juice<br />
8 gelatine sheets<br />
300 ml milk<br />
Flavouring from 1/ 2 vanilla pod<br />
30 g sugar<br />
15 g cornflour<br />
Procedure<br />
1. Reserve some of the fruit for decoration. Puree the<br />
rest of the berries with the wine. Put into the bowl<br />
and cook cover.<br />
6-8 min. 100 P<br />
Add sugar and lemon juice.<br />
2. Leave gelatine in cold water for 10 minutes to<br />
soften. Remove and squeeze out water. Stir gelatine<br />
into the hot fruit until it dissolves. Put the jelly into the<br />
fridge to set.<br />
3. To make the vanilla sauce, put the milk in a bowl.<br />
Slice the vanilla pod open and scrape out the<br />
vanilla flavouring. Stir the flavouring, sugar and<br />
cornflour into the milk and cover before cooking.<br />
Stir occasionally during cooking and to finish.<br />
3-4 min. 100 P<br />
4. Tip the set jelly onto a plate and garnish with the<br />
whole berries. Serve with the vanilla sauce.<br />
Tip: You can also use frozen fruit once it is defrosted.<br />
ENGLISH<br />
<strong>GB</strong>-34<br />
R-<strong>667</strong>_[EN ckbk].indd <strong>GB</strong>-34<br />
6/2/09 3:02:13 PM
DRINKS AND DESSERTS<br />
France<br />
PEARS IN CHOCOLATE SAUCE<br />
Poires au chocolat<br />
Total cooking time: approx. 12-16 minutes<br />
Utensils: Bowl with lid (2 Iitre capacity)<br />
Bowl with lid (1 Iitre capacity)<br />
Ingredients<br />
4 pears (600 g)<br />
60 g sugar<br />
1 packet of vanilla sugar (10 g)<br />
1 tbsp pear liqueur, 30% proof<br />
150 ml water<br />
130 g plain chocolate, broken into pieces<br />
100 g crème fraiche<br />
Procedure<br />
1. Peel the pears, keeping them whole.<br />
2. Put sugar, vanilla sugar, liqueur and water into the<br />
bowl. Stir and heat.<br />
1-2 min. 100 P<br />
3. Place the pears in the juice, cover and cook.<br />
9-11 min. 100 P<br />
Take the pears out of the juice and allow to cool.<br />
4. Put 50 ml of the juice in the small bowl, add the<br />
cream and chocolate. Cover and heat.<br />
2-3 min. 100 P<br />
5. Stir the sauce well and pour over the pears to serve.<br />
Tip: You could also serve this with vanilla ice cream.<br />
Niederlande<br />
FIERY DRINK<br />
Vuurdrank for 10 Portions<br />
Total cooking time: approx. 9-11 minutes<br />
Utensils: Bowl with lid (2 Iitre capacity)<br />
Ingredients<br />
500 ml white wine<br />
500 ml red wine, dry<br />
500 ml rum, 54% proof<br />
1 whole orange, untreated<br />
3 cinnamon sticks<br />
75 g sugar<br />
10 tsp rock candy<br />
Procedure<br />
1. Pour the alcohol into the bowl. Peel the orange<br />
so that the peel is thin and put this in the alcohol<br />
together with the cinnamon and sugar. Cover and<br />
heat.<br />
9-11 min. 100 P<br />
Remove the peel and cinnamon. Put one teaspoon<br />
of the rock candy into each grog glass, top up with<br />
the fiery drink and serve.<br />
Österreich<br />
CHOCOLATE WITH CREAM<br />
Schokolade mit Schlagobers for 1 Portion<br />
Total cooking time: approx. 1-2 minutes<br />
Utensils: large cup (200 ml capacity)<br />
Ingredients<br />
150 ml milk<br />
30 g plain chocolate, grated<br />
30 ml cream<br />
chocolate vermicelli<br />
Procedure<br />
1. Pour the milk into the cup. Add the chocolate, stir<br />
and heat. Stir occasionally.<br />
approx. 1-2 min. 100 P<br />
2. Whip the cream until stiff and spoon this on top<br />
of the chocolate. Serve garnished with chocolate<br />
vermicelli.<br />
Deutschland<br />
HOT LEMON<br />
Heisse Zitrone for 1 Portion<br />
Total cooking time: approx. 1-2 minutes<br />
Utensils: Tea glass (150 ml capacity)<br />
Ingredients<br />
100 ml Water<br />
juice of 1 lemon<br />
2-3 tsp sugar<br />
Procedure<br />
1. Pour water and lemon juice into the glass and heat.<br />
approx. 1-2 min. 100 P<br />
Stir in sugar to taste.<br />
<strong>GB</strong>-35<br />
R-<strong>667</strong>_[EN ckbk].indd <strong>GB</strong>-35<br />
6/2/09 3:02:14 PM
• SEULEMENT VALIDE POUR L'ALLEMAGNE ET L’AUTRICHE • SLECHTS GELDIG VOOR DUITSLAND EN OOSTENRUK •<br />
• SOLTANTO VALIDO PER LA GERMANIA E L’AUSTRIA • SOLAMENTE VÁLIDO PARA ALEMANIA Y AUSTRIA •<br />
ONLY VALID FOR GERMANY AND AUSTRIA •<br />
Vorgehensweise bei Vorliegen eines Produktmangels:<br />
• Wurde Ihr Gerät durch einen Fachbetrieb mit einem von <strong>Sharp</strong> genehmigten Einbaurahmen oder<br />
rahmenlos ein-/untergebaut, können Sie die unter Ziffer 1. aufgeführten Garantieansprüche im<br />
Rahmen des Quick 48 Vor-Ort-Service geltend machen und sich direkt an den KUNDEN-SERVICE<br />
wenden oder Sachmängel gegenüber Ihrem Verkäufer geltend machen.<br />
• Für alle übrigen Geräte können Sie die unter Ziffer 2. aufgeführten Garantieansprüche ohne<br />
Quick 48 Stunden Vor-Ort-Service oder Sachmängel gegenüber Ihrem Verkäufer geltend<br />
machen.<br />
1. Garantie mit Quick 48 Stunden Vor-Ort-Service<br />
Gilt für Deutschland und Österreich<br />
Haushalts-Mikrowellengeräte im Quick 48 Stunden Vor-Ort-Service<br />
Sehr geehrter <strong>Sharp</strong> Kunde,<br />
alle ein-/ untergebauten Haushalts-Mikrowellengeräte, die durch einen Fachbetrieb fachgerecht mit einem von SHARP genehmigten<br />
Einbaurahmen oder rahmenlos ein-/ bzw. untergebaut worden sind, werden im Quick 48 Vor-Ort-Service abgewickelt. Die in dieser<br />
Garantie beschriebenen Ansprüche stehen Ihnen zusätzlich neben den gesetzlichen Sachmängelansprüchen gegen Ihren Verkäufer zu.<br />
Umfang der Garantie: Sollte Ihr Mikrowellengerät trotz sorgfältiger Herstellung und Endkontrolle einen Mangel aufweisen, können<br />
Sie innerhalb der Garantiezeit, Garantieleistungen gegen <strong>Sharp</strong> Electronics (Europe) GmbH in Anspruch nehmen. Diese stehen Ihnen zu,<br />
wenn ein herstellungsbedingter Material- und/oder Verarbeitungsmangel (nachfolgend „Mangel“) bei dem Mikrowellengerät oder Teilen<br />
davon - mit Ausnahme der Garraum-Glühlampe - innerhalb von 24 Monaten auftritt. Die Garantie umfasst nicht Mängel, die durch<br />
unsachgemäße Behandlung, Bedienungsfehler oder durch Fremdeinwirkung entstanden sind. Transportschäden bei Neugeräten müssen<br />
Sie bei Ihrem Verkäufer geltend machen. Die Garantiefrist von 24 Monaten beginnt mit dem Tag, an dem Sie das fabrikneue Gerät von<br />
einem Händler gekauft haben. Die Erbringung von Garantieleistungen verlängert nicht die Garantiezeit.<br />
Garantieleistungen: <strong>Sharp</strong> Electronics (Europe) GmbH erfüllt seine Garantieverpflichtungen für Mängel durch kostenlose Reparatur<br />
und einen Quick 48 Stunden Vor-Ort-Service. Etwa anfallende Transportkosten innerhalb Deutschlands und Österreich<br />
übernehmen wir.<br />
Im Quick 48 Stunden Vor-Ort-Service werden alle Reklamationen, die montags bis freitags zwischen 8:00 und18:00 Uhr beim Quick<br />
48 Deutschland, Tel.: 0180 / 5 23 46 74 *( 0,14 /Min. aus dem deutschen Festnetz, max. 0,42 /Min. aus dem deutschen<br />
Mobilfunknetz) und in Österreich Tel.: 0820 / 500 820 **( 0,145/Min) eingehen, ab dem darauffolgenden Werktag gerechnet,<br />
im Regelfall innerhalb 48 Stunden bei Ihnen im Vor-Ort-Service repariert.<br />
Geltendmachung der Garantie: Der Mangel des Gerätes muss innerhalb der Garantiefrist unter Angabe des Kaufdatums, der<br />
Modellbezeichnung und der Seriennummer des Gerätes unter den oben aufgeführten Telefonnummern geltend gemacht werden. Bei der<br />
Vor-Ort-Reparatur ist dann der Kaufbeleg, aus dem sich das Kaufdatum, die Modellbezeichnung und die Seriennummer des Gerätes<br />
ergibt, vorzulegen.<br />
Achtung:<br />
Wird dieser Service für von Ihnen selbst ein-/untergebaute Geräte in Anspruch genommen, sind für Aus-/und Einbau, Fahrzeit und Km<br />
die entstehenden Kosten von Ihnen zu tragen!<br />
Bitte erkundigen Sie sich vor Anforderung des Kundendienstes bei diesem über die anfallenden Kosten. Den für Sie nächstgelegenen<br />
Kundendienst nennt Ihnen gern unsere o.g. Hotline.<br />
Als Nachweis für Sachmängel-/ Garantiearbeiten dient Ihr Kaufbeleg / Rechnung.<br />
Selbstverständlich können Sie unseren QUICK 48 Vor-Ort-Service für Mikrowellengeräte auch nach Ablauf der Verjährungsfristen für<br />
Sachmängel-/Garantiefristen in Anspruch nehmen, dann jedoch gegen Aufwandsberechnung des jeweiligen Kundendienstes.<br />
Garantiegeber: SHARP Electronics (Europe) GmbH, Sonninstraße 3, 20097 Hamburg<br />
www.sharp.de<br />
6<br />
R-<strong>667</strong>_[EN Service+Back CV].indd 6<br />
2/26/10 7:29:38 PM
• SEULEMENT VALIDE POUR L'ALLEMAGNE ET L’AUTRICHE • SLECHTS GELDIG VOOR DUITSLAND EN OOSTENRUK •<br />
• SOLTANTO VALIDO PER LA GERMANIA E L’AUSTRIA • SOLAMENTE VÁLIDO PARA ALEMANIA Y AUSTRIA •<br />
ONLY VALID FOR GERMANY AND AUSTRIA •<br />
Vorgehensweise bei Vorliegen eines Produktmangels:<br />
• Wurde Ihr Gerät durch einen Fachbetrieb mit einem von <strong>Sharp</strong> genehmigten Einbaurahmen oder<br />
rahmenlos ein-/untergebaut, können Sie die unter Ziffer 1. aufgeführten Garantieansprüche im<br />
Rahmen des Quick 48 Vor-Ort-Service geltend machen und sich direkt an den KUNDEN-SERVICE<br />
wenden oder Sachmängel gegenüber Ihrem Verkäufer geltend machen.<br />
• Für alle übrigen Geräte können Sie die unter Ziffer 2. aufgeführten Garantieansprüche ohne<br />
Quick 48 Stunden Vor-Ort-Service oder Sachmängel gegenüber Ihrem Verkäufer geltend<br />
machen.<br />
2. Garantie ohne Quick 48 Stunden Vor-Ort-Service<br />
Gilt für Deutschland und Österreich<br />
Haushalts - Mikrowellengeräte<br />
Wichtiger Endkunden – Hinweis: Serviceabwicklung nur über den Verkäufer. Die in dieser Garantie beschriebenen<br />
Ansprüche stehen Ihnen zusätzlich neben den gesetzlichen Sachmängelansprüchen gegen Ihren Verkäufer zu.<br />
Sehr geehrter SHARP Kunde,<br />
SHARP- Geräte sind Markenartikel, die mit Präzision und Sorgfalt nach modernen Fertigungsmethoden hergestellt werden. Bei<br />
sachgemäßer Handhabung und unter Beachtung der Bedienungsanleitung wird Ihnen Ihr Gerät lange Zeit gute Dienste leisten.<br />
Das Auftreten von Fehlern ist aber nie auszuschließen. Sollte Ihr Gerät innerhalb der gesetzlichen oder mit Ihrem Verkäufer<br />
vereinbarten Verjährungsfristen für Sachmängel-/ Garantiefristen einen Mangel aufweisen und das Gerät wurde nicht von<br />
Ihrem Handelspartner ein-/untergebaut, so wenden Sie sich bitte an den Verkäufer, bei dem Sie das Gerät<br />
erworben haben und geben Sie das defekte Gerät dort ab, denn dieser ist Ihr Ansprechpartner für Sachmängel.<br />
Umfang der Garantie: Sollte Ihr Mikrowellengerät trotz sorgfältiger Herstellung und Endkontrolle einen Mangel<br />
aufweisen, können Sie innerhalb der Garantiezeit, Garantieleistungen gegen <strong>Sharp</strong> Electronics (Europe) GmbH in Anspruch<br />
nehmen. Diese stehen Ihnen zu, wenn ein herstellungsbedingter Material- und/oder Verarbeitungsmangel (nachfolgend<br />
„Mangel“) bei dem Mikrowellengerät oder Teilen davon - mit Ausnahme der Garraum-Glühlampe - innerhalb von 24<br />
Monaten auftritt. Die Garantie umfasst nicht Mängel, die durch unsachgemäße Behandlung, Bedienungsfehler oder durch<br />
Fremdeinwirkung entstanden sind. Transportschäden bei Neugeräten müssen Sie bei Ihrem Verkäufer geltend machen. Die<br />
Garantiefrist von 24 Monaten beginnt mit dem Tag, an dem Sie das fabrikneue Gerät von einem Händler gekauft haben.<br />
Die Erbringung von Garantieleistungen verlängert nicht die Garantiezeit.<br />
Garantieleistung:<br />
<strong>Sharp</strong> Electronics (Europe) GmbH erfüllt seine Garantieverpflichtung für Mängel nach seiner Wahl durch kostenlose<br />
Reparatur oder durch Austausch des mangelhaften Gerätes gegen ein mangelfreies. Etwa anfallende Transportkosten<br />
innerhalb Deutschlands und Österreich werden von uns übernommen.<br />
Geltendmachung der Garantie:<br />
Um die Garantie in Anspruch nehmen zu können, benötigen Sie den Kaufbeleg (Rechnung, Quittung) aus dem sich das<br />
Kaufdatum, die Modellbezeichnung und Seriennummer des Gerätes ergibt. Der Mangel des Gerätes muss innerhalb der<br />
Garantiefrist von Ihnen gegenüber einem <strong>Sharp</strong> Service-Partner oder einem autorisierten Händler von <strong>Sharp</strong> Electronics<br />
(Europe) GmbH geltend gemacht werden. Bei weiteren Fragen wenden Sie sich bitte von montags bis freitags zwischen<br />
8:00 und 18:00 Uhr an unsere Service-Hotline 01805-29 95 29 * ( 0,14 /Min. aus dem deutschen Festnetz,<br />
max. 0,42 /Min. aus dem deutschen Mobilfunknetz)<br />
Selbstverständlich können Sie unseren Kundendienst für <strong>Sharp</strong>-Mikrowellengeräte auch nach Ablauf der Verjährungsfristen<br />
für Sachmängel-/Garantiefristen in Anspruch nehmen, dann jedoch gegen Aufwandsberechnung des jeweiligen<br />
Kundendienstes.<br />
Garantiegeber: SHARP Electronics (Europe) GmbH, Sonninstraße 3, 20097 Hamburg<br />
www.sharp.de<br />
7<br />
R-<strong>667</strong>_[EN Service+Back CV].indd 7<br />
2/26/10 7:29:39 PM
• ADDRESSES D’ENTRETIEN • ONDERHOUDSADRESSEN • DIRECCIONES DE SERVICIO • INDIRIZZI DI SERVIZIO •<br />
BELGIUM - http://www.sharp.be<br />
En cas d´une réclamation concernant une four a micro-onde SHARP, nous vous prions de vous adresser à votre<br />
spècialiste ou à une adresse des SHARP Services suivantes.<br />
Indien uw magnetron problemen geeft kunt u zich wenden tot uw dealer of een van de onderstaande <strong>Sharp</strong><br />
service centra.<br />
SHARP ELECTRONICS, Phone: 0900-10158<br />
AVTC, Kleine Winkellaan 54,1853 Strombeek-Bever, 02/2674019 / ETS HENROTTE, Rue Du Campinaire 154, 6240 Farciennes,<br />
071/396290 / Nouvelle Central Radio (N.C.R), Rue des Joncs 15 L-1818 HOWALD, 00352404078 / Service Center<br />
Deinze, Kapellestraat, 95, 9800 DEINZE, 09-386.76.67<br />
NEDERLAND - http://www.sharp.nl<br />
Indien uw magnetron problemen geeft kunt u zich wenden tot uw dealer of naar onderstaand <strong>Sharp</strong> Service<br />
Centrum.<br />
SHARP ELECTRONICS BENELUX BV,- Helpdesk -,Postbus 900, 3990 DW Houten, 0900-7427723<br />
FRANCE - http://www.sharp.fr centralized hotline = 0820 856 333<br />
En cas de réclamation pour les fours micro-ondes SHARP, nous vous prions de vous adresser à votre spécialiste<br />
ou à l'une des stations techniques agréées SHARP suivantes:<br />
A.A.V.I. : Rue des Bourreliers – Parc des Pyramides – ZAC Moulin Lambin 2 - 59320 Hallennes Lez Haubourdin ; Tél : 0892 236 246 ;<br />
Fax : 03.20.86.20.60 / ATELIER ROUSSEL : 12, Bld Flandre Dunkerque - 56100 Lorient ; Tél : 02.97.83.07.41 ; Fax : 02.97.87.<br />
02.36 / MONSIEUR SAV : 8 Av Noel Franchini – 20090 AJACCIO ; Tel : 04.95.23.67.63 ; Fax 04.95.23.67.67 / ELECTRONIC<br />
SERVICE PLUS : 5, bd LOUIS XI - ZI le Menneton - 37000 Tours ; Tél : 02.47.77.90.90 ; Fax : 02.47.77.90.91 / ELECTRO<br />
SERVICE : 21, rue de Mulhouse - B.P 122 - 68313 Illzach ; Tél : 0820 20 10 15 ; Fax : 03.89.50.80.14 / ELECTRO TECH :<br />
26, Rue Cyrano - 69003 Lyon ; Tel: 0892 691 032 ; Fax: 04 72 33 18 90 / M.R.T. : 1-3, rue André CITROEN - 72000 Le Mans ;<br />
Tél : 02 22 66 50 20 ; Fax : 02 22 66 50 21 / SETELEC : 23, Rue de l'Argilière - 76420 Bihorel les Rouen ; Tél : 02.35.60.64.39 ;<br />
Fax : 02.35.59.93.48 / S.T.E. : 3, chemin de l'Industrie - 06110 Le Cannet Rocheville ; Tél : 04.93.46.05.00 ; Fax : 04.93.46.51.18 /<br />
TECH SERVICE : 15, rue du château de Ribaute - ZA Ribaute 2 - 31130 Quint Fonsegrives ; Tel: 05.62.57.63.90 ; Fax: 05.62.57.<br />
63.99 / TIMO VIDEO : 6, avenue des boutons d'or - Batiment A -Parc d'activité des petits carreaux - 94370 Sucy en Brie ;<br />
Tél : 01.43.39.08.18 ; Fax : 01.43.39.08.07<br />
ITALIA - http://www.sharp.it<br />
Nel caso si verificassero problemi alla vostra apparecchiatura potrete rivolgervi presso un nostro centro di<br />
assistenza autorizzato sharp<br />
BASILICATA: DBF ELETTRONICA DI DI BIASE FARINA EUTERIO, VIA CONSAGRO 33-35, 0881-331126 / LD SERVICE, via<br />
Viviani 2, 0971-472578<br />
CALABRIA: FAG SERVICE SRL, VIA MAGENTA, 7, 0983-91943 / MONTEMURRO SERVICE DI A. MONTEMURRO, VIA<br />
LEONARDO DA VINCI, 62, 0984-401979 0984-404562 / S.A.T.E di DODARO E GERVASI SNC, VIA DEGLI STADI, 28/F,<br />
0984- 482337 / SBF di BATTAGLIA SAVERIO e Figli sas, VIA C. COLOMBO, 85, 0961-33824 02-700594509 /<br />
EUROTRADING SAS DI AIELLO GAETANO, VIA TORINO, 121/123, 0962- 20889 0962-24254 / FAG SERVICE S.R.L. FILIALE,<br />
VIA T. CAMPANELLA, 32/34, 0983-91943 / ATER SNC DI DOMENICO & AURELIO CATALANO, Via Naz. Pentimele 159/a-b,<br />
0965-47051 0965-47855 / CIANO GIUSEPPE, VIA SECONDA TRAVERSA TOSCANINI, 16, 0966-643483 / PROFESSIONAL<br />
SERVICE CENTER SNC DEI F.LLI FORTUGNO, VICO PETRILLINA, 9/11, 0965-51967 0965-349401 / AUDIOVIDEO SNC DI<br />
VARRESE & COSTANTINI, VIA A. DE GASPERI, 4/E, 0963- 45571 0963- 45572<br />
CAMPANIA: AGS ELDOM SAS di D'ATTOMA GONDAR e C., VIA APPIA, 79, 0825-626418 0825-610352 / ELETTRONICA<br />
D`ARGENIO, VIA NAZION. TORRETTE,195, 0825-681590 / DRF ELETTRONICA di RICCIARDI CONCETTA & C. SAS, ZONA<br />
INDUSTRIALE PEZZAPIANA, 0824 43030 / CONGESTRI' SAS di IGNAZIO CONGESTRI' & C., Via Caudina, 331/3,<br />
0823-437704 0823-1760585 / ELETTRONICA NASTI DI BRUNO NASTI, VIA FERRARECCE PAL. ETA 173/175, 0823-443099<br />
0823-356006 / ELETTRONICA NASTI DI BRUNO NASTI FILIALE, VIA CILEA, 52, 081-8113163 / ELETTRONICA STARACE<br />
DI ANIELLO STARACE, VIALE EUROPA, 15, 081-8728280 / ERREDIESSE SERVICE SRL, VIA P. MASCAGNI, 74/76,<br />
081-5794825 081-5791899 / ERREDIESSE SERVICE SRL FILIALE, VIA SANNITICA N. 9 INT 13-14, 081-5794825 081-5791899 /<br />
S.A.RI.EL. SAS, VIA DIOCLEZIANO, 177, 081-7628155 / NETTI GIANFRANCO, Via Magna Grecia, 137/139, 0828-730071 /<br />
TECTRON ELECTRONICS SRL, Via dei Mille, 138, 089-330591 6233244764<br />
EMILIA ROMAGNA: MA.PI. SNC DI MAURIZI E CAMPAGNOLI, VIA T.AZZOLINI, 3, 051-6414115 051-406848 / VIDEO<br />
2000 SNC DI POLI MARCO & C., VIA DELL-INDUSTRIA, 26, 051-531581 051-6029266 / BARGELLINI ORAZIO, VIA LOCCHI,<br />
3/C, 0543- 701446 / ELECTRON SERVICE SNC, VIA F.LLI AVENTI, 59, 0532-903250 / ASSIST SRL, VIA CESARE COSTA, 37,<br />
059-331388 059-3365360 / P. & L. DI LELLI MAURO E C. SNC, VIA TOSCANA, 7, 059-530300 / CASALIGGI F.LLI SNC,<br />
VIA BOSELLI, 77, 0523-615740 0523-602014 / NUOVA CRT DI AUGUSTO BOERI, VIA MOLINARI, 40, 0523-592345 /<br />
REM SNC, VIA MANFREDI, 110/A, 0523-716361 / CERIT SNC, VIA BRUNO ESTASI, 2/A, 0521-481479 0521-494317 /<br />
TASS DI BROZZI ALESSANDRO, VIA GRUPPINI, 19/21, 0521-697140 / TERMOSERVICE SNC DI BARTOLETTI IMERIO & C.,<br />
VIA DISMANO, 114/N, 0544-472001 0544-67837 / TVA SERVICE SNC di Fulgente E. e Palladini M., Via F. Chiloni 29/B,<br />
0522-554400 0522-331582 / NOVATECNICA CLIMATIZZAZIONE di GUIDO DI FLAVIO, Via San Giovenale, 32/F,<br />
0541-736361 0541-1831497 / NUOVA TECNOCOOP, VIA ARMELLINI 28/30/32, 0541-370812 / EPS SNC DI TREVISAN &<br />
ZANGIROLAMI, V.LE GRAMSCI, 134, 0425-33221<br />
FRIULI VENEZIA GIULIA: A.V.R. SERVICE DI FOCHESATO IVAN MOSE', VIA COLONNA, 20/8, 0434-27669 0434-523661 /<br />
AUDIO VIDEO SERVICE SNC di COTALI S. & C., VIA A. FOSSATI, 9, 0434-571104 0434-572174<br />
8<br />
R-<strong>667</strong>_[EN Service+Back CV].indd 8<br />
2/26/10 7:29:39 PM
• ADDRESSES D’ENTRETIEN • ONDERHOUDSADRESSEN • DIRECCIONES DE SERVICIO • INDIRIZZI DI SERVIZIO •<br />
LAZIO: PALMIERI F., VIA TOMMASO LANDOLFI, 203, 0775-291485 / ELETTRONICA 81 SNC, VIA EZIO, 56/58, 0773-694608<br />
0773-1870410 / ITALREG SRL, SS FORMIA-CASSINO KM 30,200 LOC PENITRO, 0771-738011 0771-738061 / CENTRO<br />
E.L.VA. SNC, VIA ATTILIO MORI, 19/21, 06-2148641 06-2753048 / CTS centro tecnico specializzato di Rita De Renzi,<br />
Via Rialto, 38/42, 06-39729748 06-39733315 / PANASERVICE SRL, VIA BARBANA, 35, 06-5403384 06-5401221 /<br />
TELEINFORMATICA SRL, TRAVERSA MAREMMANA INFERIORE Km 0,400, 0774-530212 0774-532217 / FRITTELLI BRUNO,<br />
VIA MONTE BIANCO 99/101, 0761-340901<br />
LIGURIA: C.R.E. DI ARATELE FABRIZIO, VIA CAMOZZINI, 189R, 010-6121754 106100154 / VILL@ SNC DI R. VILLA E M.T.<br />
ADAMO, VIA S. CHIARA, 6 R, 010-5740318 010-8630203 / Michelis Sandro, Via Argine Destro, 79-81, 0183-275891 /<br />
Rien snc, Via Valle, 17/19, 0187-21925 / TOGNETTI SERVICE DI TOGNETTI MASSIMILIANO, VIA LUNIGIANA, 589, 0187-<br />
507656 / TELESERVICE DI SCLAVO N. & C. snc, VIA PONCHIELLI 27R, 019-810058 019-8403277<br />
LOMBARDIA: TECNOSERVICE SNC di Salmaso Giovanni e Frigeni Gianmario, VIA BELLINI, 45/59, 035-257066<br />
035-258871 / BACCINELLI MARZIO E C. SNC, VIA BRANZE, 22, 030-2006411 / EUROTECNICA di RONCHI, VIA MILANO,<br />
74/B, 030-317673 / C.A.T. PICONE ANTONIO - Affiliato 2M DIGITECH, VIA FOSCOLO 10 - LOC. CREVENNA, 031-645209 /<br />
S.T.A.R.T. VIDEO HI-FI, VIA ORTI ROMANI, 16/A, 0372-38731 / C.A.T. PICONE ANTONIO - Affiliato 2M DIGITECH, VIA<br />
FOSCOLO 10 - LOC. CREVENNA, 031-645209 / 4D SISTEMI INFORMATICI SRL, VIA KENNEDY 84, 0383-6443 0383-644399 /<br />
2M DIGITECH SRL, Viale Einaudi, 2, 0362-306557 0362-306148 / F.G.R. ELECTRONIC SAS, VIA R. PELLEGATTA, 34/A, 039-<br />
6082592 039-6085034 / MARKET RICAMBI SERVICE SNC, VIA W. TOBAGI 8, 02-48952866 02-4239820 / PAGANINI<br />
GRAZIANO, VIA TOLMEZZO, 6, 0331-566379 0331-566603 / Z BIT SRL, VIA CHIOGGIA 3, 02-26822804 02-26110301 /<br />
TECNOVIDEO SNC, P.ZZA DE GASPERI, 28, 0376-321554 / GRANDINI E TORCHIO SNC, VIA FASOLO, 4, 0382-471360 /<br />
4D SISTEMI INFORMATICI SRL, VIA KENNEDY 84, 0383-6443 0383-644399 / SA.MO di Sacchetto Teresio e c. snc,<br />
CORSO PAVIA 85/7, 0381-42353 0381-349015 / TELETECNICA 2000, VIA TORINO, 21, 0331-775519 / TELETECNICA 2000<br />
FIL. VARESE, VIALE VALGANNA, 178, 0332-499365<br />
MARCHE: MARCONI LANFRANCO, VIA M.BIANCO,10, 0735-659230 0375-751155 / SAT RADIO TV FIL. ASCOLI, VIA<br />
TEBALDINI, 10, 0733-231304 0733-230492 / S.A.T. RADIO TV, VIA D. ROSSI, 32-34, 0733-231304 0733-230492 / CAT SNC<br />
DI SCHIARATURA CARLO & C., VIA BORGHERIA 20, 0721-456245 0721-417602<br />
MOLISE: TELECOM AUDIO VIDEO SERVICE DI MANOCCHIO G., VIA V. EMANUELE, 67/69, 0874-716783 0874-716783/<br />
1861550 / TELECOM AUDIO VIDEO SERVICE DI MANOCCHIO G. FILIALE, VIA XXIV MAGGIO, 73, 0874-484440<br />
PIEMONTE: 4D SISTEMI INFORMATICI SRL, VIA KENNEDY 84, 0383-6443 0383-644399 / SIRAGUSA E ROAGNA SNC,<br />
C.SO MATTEOTTI,41, 0141-531131 / ARTE E TECNICA SNC, VIA FALLETTI, 22, 015-8496250 / M.V. ELETTRONICA di<br />
MIGLIORE, VIA CHIRI 7/A, 0171-412526 / GUIDA di GUIDA ALESSIO, VIA ROGGIOLO, 5, 0321-71608 0321-777003 /<br />
4D SISTEMI INFORMATICI SRL, VIA KENNEDY 84, 0383-6443 0383-644399 / ELTE SNC DI CONTESTABILE NICOLA, Via<br />
CASTELGOMBERTO 125 INT. 8, 011-6503786 / REAT DI FRISINA RITA, C.SO UNIONE SOVIETICA, 584, 011-3979817 /<br />
ELEKTRO di FIORE F., C.SO XXVI APRILE, 26, 0161-250071 0161-255843 / 4D SISTEMI INFORMATICI SRL, VIA KENNEDY<br />
84, 0383-6443 0383-644399<br />
PUGLIA: SAT DI PARTIPILO, VIA BORSELLINO E FALCONE, 17 BIS, 080-5022999 080-5022992 / SN ELETTRODOMESTICI<br />
DI SIMONE NICOLA, VIA TASSO, 69, 080-3113618 080-3114199 / TECNODIGIT SRL, Via Sabotino, 89/91, 080-5567413 /<br />
TAURISANO SERVICE SRL, VIA NUMA POMPILIO, 49/55, 0831-564069 0831-522021 / ASTROTEC Soc. Coop., VIA DEL<br />
FEUDO D'ASCOLI, 37, 0881-720921 0881-561894 / DBF ELETTRONICA DI DI BIASE FARINA EUTERIO, VIA CONSAGRO<br />
33-35, 0881-331126 / ARNESANO FAUSTINO, VIA M.MOSCARDINO, 10, 0832-318277 / Microkey srl, Via Giammatteo,<br />
22, 0832-399398 0832-399600 / MICROKEY SRL SUCCURSALE, Via de giuseppe, 73, 0836-424813 / MATERA ELETTRONICA<br />
SNC DI BUONO E. & C., VIA E. MAIORANA, 86/88, 0835-389310 / SN ELETTRODOMESTICI DI SIMONE NICOLA,<br />
VIA TASSO, 69, 080-3113618 080-3114199 / SANTORO ATTILIO, VIA MARCHE 24, 099-335884<br />
SARDEGNA: AS.TEC ELETTRONICA SNC, VIA RIVA VILLASANTA, 227, 070-524153 070-504109 / FLORIS SERGIO, VIA<br />
MAZZINI, 56, 0781-45436 0781-469198 / AUDIOEFFE DI FRANCESCHELLI FABRIZIO, VIA MANNIRONI, 16, 0784-235041 /<br />
TECNOSERVICE DI LUIGI MELONI, VIA NAZARIO SAURO, 116, 0784-810081 / LA VIDEO ELETTRONICA SNC DI FAEDDA,<br />
VIA SARDEGNA, 91, 0783-300026 0783-777599 / BRACCU GAVINO, VIA DE SIMONE, 9, 0789-50114 / VIDEOELETTRONICA<br />
SNC DI PEDOL E SABA, VIA TORINO, 18, 079- 276616 079-273239<br />
SICILIA: VIDEO SERVICE SNC DI DE FRANCISCI E NOLENTINI, Via P. Nenni, 1, 0922-595881 / GUASTELLA GIUSEPPE,<br />
VIA OLANDA, 11, 0933-933976 / TELEDIGIT di BELLANCA CARMELO & C. SAS, VIA DON MINZONI 209-211, 0934-599163 /<br />
A.V.S. Elettronica snc, VIA SASSARI, 2/C, 095-446696 095-434337 / MT SERVICE, Via Novara, 47, 095-445561 095-448628 /<br />
S.A.T.E.L. SERVICE SNC, CORSO SICILIA, 55 A-C, 0935-75085 / CUPPARI SERVICE SRL, VIA S. AGOSTINO ANG. VIA<br />
CAPERRINA, 6, 090-672064 090-672065 / CUPPARI SERVICE SRL FILIALE, VIA LIBERTA', 95, 0941-911785 0941-912552 /<br />
ELDOM ELETTRONICA SRL, VIA C. BATTISTI 351, 090-2932105 / ALAMIA SERVICE PICCOLA COOPERATIVA, C.SO PISANI,<br />
310/312, 091-6570502 091-6575761 / PG SERVICE di GIUSINO FRANCESCO, VIA SERRADIFALCO 12/12A/12B, 091-<br />
6828368 091-6820540 / A. V. SERVICE di ADAMO GIOVANNI, VIA G. FERRARIS, 18, 0932-624553 0932-627191 /<br />
ELETTROSERVICE DI COLOMBO PIERO & C. SNC, VIA VARIANTE SS 115 KM 338,400 N. 28, 0932-456169 / DI@<br />
ELECTRONICS di DARIO IGNACCOLO, VIA CARLENTINI, 40/A, 0931-758602 / TRISCARI BARBERI GIUSEPPE, Via<br />
Pindemonte, 97, 333 5848485 1782276341 / ARTE TV sas, VIA G.CENTORBI, 17, 0923- 908160 0923-670035 / S.T.E.T. di<br />
Spada Alfonso, VIA CONTE A. PEPOLI, 84, 0923-873939<br />
TOSCANA: TELESERVICE SRL, VIA FRATELLI LUMERE, 86/C, 0575-300986 0575-903825 / BARDAZZI PAOLO, via E. Forlanini<br />
8DR, 055-4376776 055-431956 / CATE SNC DI BALDI M. E BUONAMICI G. SEDE, Via Segantini, 2, 0571-80652 0571-<br />
944115 / HD ELECTRONICS SRL, VIA Dante Alighieri, 37/A - 37/B, 0587-422291 0587-422297 / S.A.T.E.L. Di MANNA<br />
MAURIZIO & c. snc, via delle Cento Stelle 1, 055-613307 055-81131142 / M2 ELETTRONICA DI MORELLI MASSIMO, VIA<br />
DANIMARCA, 3, 0564-454571 / CATE SNC DI BALDI M. E BUONAMICI G. FIL. CECINA, C.so Matteotti, 320/a-b, 0586-<br />
635071 / LAB.RIPARAZ. FALCHI M., VIA A. GARIBALDI, 35/37, 0565-49400 / TELESERVICE DI D'AMICIS E. & V. SNC, VIA<br />
P. PISANA, 71, 0586-400564 0586-409724 / DBS Elettronica snc di Aldovardi S. & c., Via Simon Musico, 2/c, 0585-489893<br />
178-2284599 / MGM SERVICE SNC DI MARTINELLI, Via Paolinelli, 26 - Marlia, 0583-30382 / DBS Elettronica snc di<br />
Aldovardi S. & c., Via Simon Musico, 2/c, 0585-489893 178-2284599 / HD ELECTRONICS SRL, VIA DANTE ALIGHIERI 37/A,<br />
37/B, 0587-422291 0587-422297 / BARDAZZI PAOLO, VIA FORLANINO 8 DR, 055-4376776 055-431956 / CATE SNC DI<br />
BALDI M. E BUONAMICI G. FIL. PRATO, Via Fiorentina, 76/a-b, 0574-632652 0574-4632690 / PARIELS SRL, Via B. Tolomei,<br />
8, 0577-51159 0577-589454 / VIDEO SERVICE DI GENUARDI, VIA BORGACCIO, 72, 0577-983181 0577-996382<br />
9<br />
R-<strong>667</strong>_[EN Service+Back CV].indd 9<br />
2/26/10 7:29:40 PM
• ADDRESSES D’ENTRETIEN • ONDERHOUDSADRESSEN • DIRECCIONES DE SERVICIO • INDIRIZZI DI SERVIZIO •<br />
TRENTINO ALTO ADIGE: TECNOSERVICE SRL, VIA SAN VIGILIO, 64/b-c-d, 0471-289062 0471-261559 / ASSISTENZA<br />
TECNICA MELONE SRL, VIA ZARA, 44, 0461-1820515 0461-1820516 / SIGHEL MAURO, VIA A. VOLTA, 92, 0461-935919<br />
UMBRIA: TECNOCONSULT ELETTRONICA SNC, VIA MAD.ALTA, 185, 075-5003089 / QUONDAM C. STEFANO, VIA DEL<br />
RIVO, 33, 0744-301512<br />
VALLE D'AOSTA: CAT DI D'ISANTO, VIA VOISON 22/A, 0165-364056 0165-235910<br />
VENETO: ASSISTENZA TECNICA DI MIRCO DE BONA, VIA MONDINI, 11, 0437-30240 0437-939916 / VIDEOSERVICE<br />
SNC DI SALVATORI & C., VIA VITRUVIO,11, 045-566299 045-573865 / PIEREZZA CARLO, VIA BARROCCIO DAL BORGO, 4,<br />
049-681592 049/8807726 / ASS.ELETTR.CAMPI SNC, VIA E.REGINATO, 87, 0422-436245 0422-435996 / FRANCHINO<br />
GIORGIO, VIA ZERMANESE 6B, 0422-321054 / ANDRIOLO SAS DI ANDRIOLO MONICA E NICOLA, VIA VOLONTARI DELLA<br />
LIBERTA', 39/A, 041-5675614 041-5675190 / VIDEO TV1732, Via San Marco, 1818, 041-5541675 / ZAFFALON URBANO,<br />
Via Santa Croce, 2040, 041-2750670 / DL SERVICE DI DAL LAGO LORENZO, Via Giaretta, 33, 0444 / 966239 / PIEREZZA<br />
CARLO, VIA BARROCCIO DAL BORGO, 4, 049-681592 049/8807726 / SPEEDY SERVICE DI CORRA' & GIARETTA, V.le<br />
Europa, 1, 0445-368235 0445-379028 / GLOBAL SERVICE IMPIANTI di Cerpelloni & c. snc, VIA DELLA CONSORTIA, 15,<br />
045-8342935 045-8350805 / VIDEOSERVICE SNC DI SALVATORI & C., VIA VITRUVIO,11, 045-566299 045-573865<br />
ESPANA - http://www.sharp.es customer service department telephone: 902 10 13 88<br />
En caso de una reclamación con vuestra SHARP Microwave, preguntan por favor la casa dónde han comprado<br />
su máquina o infórmanse en una de las SHARP Service casas siguientes.<br />
ANDALUCIA: JEREZ DE LA FRA.; ELECTR. Y CLIMAT. JEDA, Pintor Paco Toro, 5 Tel.: 956 33 64 99 / CADIZ; J. J.<br />
COLLADO NORIEGA, Pza. de los Porches, 6, L-G-1 Tel.: 856 17 21 75 / CORDOBA; CAYRO, Hermano Juan Fdez, 15 Tel.:<br />
957 26 35 06 / CORDOBA (PUENTE GENIL); GEISHA ELECTROCASH, S.L, Avda. poeta Manuel Reina, 86 Tel.: 987 60 57 23 /<br />
SERPRIEGO DE CORDOBA; SERPRIEGO, S. L., San Luis, 4 Bjo. lzda Tel.: 95 754 15 11 / GRANADA; FERMASA, Azorín, 7<br />
Tel.: 958 25 64 77 / GRANADA; SERVIGON, Hospital de la Virgen 22 Tel.: 958 20 52 81 / ALMUÑECAR; SERVICOSTA, S. L.,<br />
Pza. Dr. Alvarez Riosol, 1bj Tel.: 958 63 11 43 / HUELVA; AIRSEXT HUELVA, S. L., Paseo de la Glorieta, 6 Tel.: 959 22 88 13 /<br />
HUELVA; TELEJARA, Polig. Polirrosa, C/A, Nave 27 Tel.: 959 22 60 74 / JAEN; ELECTRO HIMEGA, S. A., Adarves Bajos, 4 C<br />
Tel.: 953 24 22 56 / LINARES; LORENZO MARTINEZ OSUNA, Don Luis, 10 Tel.: 953 69 52 03 / ALHAURIN DE LA TORRE;<br />
REMEDIOS CAMARGO ESPADA, C/ Junco, 5 Tel.: 952 41 33 93 / SEVILLA; LUIS RIVAS CALDAS, Res.I Los<br />
Milanos-3a fase, núm. 41 Tel.: 95 451 73 55 / SEVILLA; INTERSAT REPARACIONES., Beethoven, 5 Tel.: 95 443 02 26 /<br />
ECIJA; AGASOLAR, Merinos, 15A Tel.: 95 483 04 72 / MAIRENA DEL AJARAFE; VILLASANTE GARCIA JOAQUIN, Pablo<br />
Neruda, 5, (SEVILLA) Tel.: 95 417 06 24 / CANTILLANA; SERIVEN CANTILLANA, Juan XXIII, 60 Tel.: 95 573 11 69 / DOS<br />
HERMANAS; ELECTRO 93 S. L., Melliza, 1-3 Tel.: 95 566 48 56<br />
ARAGON: ZARAGOZA; RENALES SABATER JAVIER, Florentino Ballesteros, 17 Tel.: 976 59 01 28<br />
ASTURIAS: OVIEDO Y GIJON; PRINCIPADO CAMILO, Avda. Santander, 12 Bajos Tel.: 985 21 28 65<br />
BALEARES: PALMA; INSTALACIONES MAES, Son Nadal, 63B Tel.: 971 24 91 16<br />
CANTABRIA: SANTANDER; ELECTRONICA SEYMA, Camilo Alonso Vega, 48 Tel.: 942 32 50 60<br />
CASTILLA LA MANCHA: ALBACETE; PARREÑO S. T., Franciscanos, 40 Tel.: 967 23 96 68 / MOTA DEL CUERVO (CUENCA);<br />
SERVI-TRASGU, Alfareria, 12 Tel.: 967 18 10 50 / CIUDAD REAL; ELECTRONICA JOPAL, Zarza,2 Tel.: 926 25 68 10 /<br />
TOLEDO; ELECTRONICA JOPAL, Av. Purísima Concepción, 31 Tel.: 925 25 04 42 / FUENSALIDA; ELECTRO SERVICE, Calvo<br />
Sotento, 15 Tel.: 925 73 07 85 / TALAVERA DE LA REINA; SERVIELECTRO, Ntla. Sra. De la Piedad, 6 Tel.: 925 81 91 81<br />
CASTILLA Y LEON: AVILA; ANTONIO SAN SEGUNDO, Soria, 6 Tel.: 920 22 33 21 / LEON; TECNYSER ELECTRO, S. L.,<br />
Relojero Losada, 25 Tel.: 987 22 77 87 / LEON; PROSAT, Pza. Doce Martires, 5 Tel.: 987 20 34 10 / OLVEGA (SORIA); TECO<br />
ELECTRONICA, Reyes Catolicos, 1 Tel.: 976 64 58 54 / VALLADOLID; TEODORO NEGRO, Glorieta del Descubrimiento, 4<br />
Tel.: 983 39 17 81<br />
CATALUÑA: BARCELONA; 4 EN 1 REPARACIONES, Taquígrafo Martí, 19 Tel.: 93 430 97 26 / BARCELONA; DOMOTICA,<br />
Ada. Diagonal, 296 Tel.: 93 244 88 66 / TERRASSA; ASISTEL STORY, S. L, Pedrell, 9 Bjos Tel.: 93 789 96 47 / MALGRAT DE<br />
MAR; SERVEI TECNIC JOYMA, Avda. Virgen de Montserrat, 19 Tel.: 93 765 36 33 / MANRESA; ELDE, Bruc, 55 Tel.: 93 872<br />
85 42 / VILAFRANCA DEL PENEDES; FRED VILAFRANCA, Progrès 42 Tel.: 93 8904852 / VIC; SERVEIS ASS.T. JUVANTENY,<br />
Nou, 109-111 Tel.: 93 886 20 23 / IGUALADA; JACINTO SANCHEZ NARVAEZ, Clavells, 6 Tel.: 93 805 40 32 / TREMP;<br />
JORDI DURO FORT, Industria, 6-3 Tel.: 973 65 25 15 / TARRAGONA; SERTECS, S. C., Caputxins, 22 Tel.: 977 22 18<br />
51 / CALAFELL; MAÑE GRIFOLLS. S.C.P., Jesus, 21 Tel.: 977 69 18 01 / REUS; EURO TECNICS, Monasterio de Poblet, 4<br />
Tel.: 977 32 24 89 / TORTOSA; ELECTRO SERVEI, C. B., Passeig Moreira, 10 Tel.: 977 51 04 42 / GERONA; SUREDA I<br />
ASSOCIATS, Francesc Artau, 2 Tel.: 972 23 65 88 / PALAFRUGELL; NEW MARESA, SURERA BERTAN 23 Tel.: 972 30 44 54<br />
EXTREMADURA: ALMENDRALEJO; INDALECIO AMAYA, Carreras, 11 Tel.: 924 67 75 17 / PUEBLA SANCHO PEREZ;<br />
ELECTRONICA CENTENO, Avda. de Zafra, Bl. 1 Tel.: 924 55 27 03 / CACERES; TECNOSATV, Bellavista, 2 Bjo Tel.: 927 24 11 68<br />
GALICIA: CEE; RAMSAT, Avda. Finisterre, 117-B Tel.: 981 74 74 61 / SANTIAGO DE COMPOSTELA; VICTOR PEREZ<br />
QUINTELA, Entreríos, 35 Tel.: 981 58 43 92 / BURELA; S. T. PASFER, Avda. Arcadio Pardiñas, 77 bj Tel.: 696 17 86 45 /<br />
PONTEVEDRA; MONT. Y SERV. TECN. IMASON, Loureio crespo, 43 Tel.: 986 84 16 36 / VIGO; ALVIMO, S. A., Conde de<br />
Torrecederia, 92 Tel.: 986 29 93 01 / LUGO; PROSAT., Obispo Rouco Varela, 52-54, Bjo. Tel.: 982 51 22 35<br />
LA RIOJA: LOGROÑO; ROBERTO AGUADO GIL, C/. Velez de Guevara, 26 Bjo Tel.: 941 25 25 53<br />
ALCORCÓN; UGENASA, La Canaleja, 4 Tel.: 91 611 52 51<br />
MURCIA: MURCIA; ELECTROSERVICIOS SEBA, Isaac Albeniz, 4 bjos. Tel.: 968 29 85 93 / MURCIA; ELECT. SERV. PLAZA,<br />
Sierra de Peñarrubia, 7 Tel.: 968 27 40 14 / MURCIA; ANGEL LOPEZ ALCARAZ, Sierra del Espartal, 6 (Edif. Ana) Tel.: 968 29<br />
39 10 / CARTAGENA; R.E.G, C.B., Ramon y Cajal, 27 Tel.: 968 51 00 06 / LORCA; JOSE LUIS HARO CALVO, La Seda, 8<br />
Edif. Las Terrazas Tel.: 968 47 18 79<br />
10<br />
R-<strong>667</strong>_[EN Service+Back CV].indd 10<br />
2/26/10 7:29:40 PM
• ADDRESSES D’ENTRETIEN • ONDERHOUDSADRESSEN • DIRECCIONES DE SERVICIO • INDIRIZZI DI SERVIZIO •<br />
NAVARRA: PAMPLONA; ALEXSU TECNOTRADE, S.L., C/ Ciudad de Sueca, 10 (bajo) Tel.: 948 14 47 00<br />
PAIS VASCO: BILBAO; DANIEL NEGREDO, Padre Pernet, 8 Tel.: 94 411 22 82 / PORTUGALETE; ONOFRE COLLANTES,<br />
Ortuño Alango, 7 Tel.: 94 483 21 22 / ERANDIO; TELNOR, Plaza Juanene, 5 Tel.: 94 417 04 97<br />
COMUNIDAD DE VALENCIA: ALICANTE; JOAQUIN SAEZ, Escorpión, 6-8 Tel.: 96 528 73 33 / ALICANTE; LUIS SOLER<br />
REQUENA, Sto. Domingo, 16 Bjo Tel.: 965 92 02 95 / ALCOY; IMECLIMA, S,L, Cavaller Merita, 21 Tel.: 96 554 21 10 /<br />
ELCHE (ALICANTE); TRINITARIO GEA, C. B., Jaime Pomares Javaloyes, 47 Tel.: 96 545 56 25 /<br />
ORIHUELA; ELECTROSERV. PLAZA, Monseñor Espinosa, 3 Tel.: 96 674 18 67 / SAX; E. ELECTROSAX, S.L., Rio Turia, 1 Bjos.<br />
Tel.: 96 547 42 32 / ALTEA; MIQUEL REIG, Camí del Pontet, 6 Tel.: 965 84 08 34 / TORREVIEJA; MATEO BELDA, S.L,<br />
Concordia, 120 Tel.: 96 670 49 78 / CASTELLON; ASISTE, S. L., Avda. Valencia, s/n Pol. "Los Cipresses", Nave 19 Tel.: 964 21<br />
57 69 / GANDIA; TECNITOT REPARACIONES I MANTENIMENTS, S.L, C/ Primer de Maig, 51 Tel.: 96 286 04 69<br />
SWITZERLAND - http://www.sharp.ch<br />
<strong>Sharp</strong> Electronics (Schweiz) AG, Moosstrasse 2, CH-8803 Rüschlikon, +41 1 846 61 11<br />
SWEDEN - www.sharp.se Helpdesk 013 35 39 00<br />
Assist Workshop Linköping, Roxviksgatan 8, 582 73 Linköping, 013-35 62 50 / Tomi Elektronik, Svandammsplan 2, 126 47<br />
Hägersten, 08 18 61 70 / Tv Trim, St Pauligatan 37, 416 90 Göteborg, 031-84 72 00<br />
NORWAY - www.sharp.no Helpdesk +46 13 35 39 00<br />
Service Eksperten, Trondheimsvn 436B, N-0962 Oslo, 22 90 19 30<br />
ICELAND<br />
Ormsson, Sidumuli 9, 108 Reykjavik, 533 28 00<br />
DENMARK - www.sharp.dk Helpdesk +46 13 35 39 00<br />
Assist Workshop Linköping, Roxviksgatan 8, 582 73 Linköping, Sweden +46 13 35 62 50.<br />
SUOMI - www.sharp.fi Helpdesk 09 14 61 500<br />
Theho Video Oy, Niittyläntie 3, SF-0620 Helsinki, 09 14 61 500<br />
11<br />
R-<strong>667</strong>_[EN Service+Back CV].indd 11<br />
2/26/10 7:29:40 PM
NOTE<br />
12<br />
R-<strong>667</strong>_[EN Service+Back CV].indd 12<br />
2/26/10 7:29:41 PM
XXXXXXXXXXXXXXXX<br />
SPECIFICATIONS<br />
AC Line Voltage<br />
Distribution line fuse/circuit breaker<br />
AC Power required:<br />
Output power:<br />
Microwave Frequency:<br />
Outside Dimensions:<br />
Cavity Dimensions<br />
Oven Capacity<br />
Turntable<br />
Weight<br />
Oven lamp<br />
Microwave<br />
Grill<br />
Micro/Grill<br />
Off Mode (Energy Save Mode)<br />
Microwave<br />
Grill<br />
: 230 V, 50 Hz, single phase<br />
: Minimum 10 A<br />
: 1.25 kW<br />
: 1.05 kW<br />
: 1.25 kW<br />
: less than 0.5 W<br />
: 800 W (IEC 60705)<br />
: 1000 W<br />
: 2450 MHz (Group 2/Class B)*<br />
: 460 mm (W) x 275 mm (H) x 389 mm (D) **<br />
: 314 mm (W) x 187 mm (H) x 336 mm (D) ***<br />
: 20 litres ***<br />
: ø 272 mm, glass<br />
: approx. 12.2 kg<br />
: 25 W/240 - 250 V<br />
* This Product fulfils the requirement of the European standard EN55011.<br />
In conformity with this standard, this product is classified as group 2 class B equipment.<br />
Group 2 means that the equipment intentionally generates radio-frequency energy in the form of<br />
electromagnetic radiation for the heat treatment of food.<br />
Class B equipment means that the equipment is suitable to be used in domestic establishments.<br />
** The depth includes the door opening handle.<br />
*** Internal capacity is calculated by measuring maximum width, depth and height.<br />
Actual capacity for holding food is less.<br />
As part of a policy of continuous improvement, we reserve the right to alter design and<br />
specifications without notice.<br />
ENGLISH<br />
13<br />
R-<strong>667</strong>_[EN Service+Back CV].indd 13<br />
2/26/10 7:29:41 PM
SHARP ELECTRONICS (Europe) GmbH<br />
Sonninstraße 3, D-20097 Hamburg<br />
Germany<br />
TINS-A780WRRZ-H02<br />
Gedruckt in Thailand<br />
Imprimé au Thaïlande<br />
Gedrukt in Thailand<br />
Stampato in Tailandia<br />
Impreso en Tailandia<br />
Impresso em Tailândia<br />
14<br />
R-<strong>667</strong>_[EN Service+Back CV].indd 14<br />
2/26/10 7:29:41 PM