Automatic folder estefold 4211 HP - es-te.de
Automatic folder estefold 4211 HP - es-te.de
Automatic folder estefold 4211 HP - es-te.de

Create successful ePaper yourself
Turn your PDF publications into a flip-book with our unique Google optimized e-Paper software.
ES-TE<br />
Folding Sys<strong>te</strong>ms GmbH<br />
Zita<strong>de</strong>llenweg 34<br />
13599 Berlin<br />
Telefon:<br />
Fax:<br />
eMail:<br />
In<strong>te</strong>rnet:<br />
Purpose:<br />
030 369961-3<br />
030 369961-59<br />
info@<strong>es</strong>-<strong>te</strong>.<strong>de</strong><br />
www.<strong>es</strong>-<strong>te</strong>.com<br />
<strong>Automatic</strong> <strong>fol<strong>de</strong>r</strong> <strong><strong>es</strong><strong>te</strong>fold</strong> <strong>4211</strong> <strong>HP</strong><br />
Folding of Documents<br />
Operating Instructions:<br />
Safety<br />
Installation<br />
Operation<br />
Trouble shooting<br />
1<br />
Edition 1.4<br />
May 4, 2009
Con<strong>te</strong>nts<br />
Safety instructions ............................................................................................................................................... 3<br />
General ............................................................................................................................................................... 5<br />
Setting up the Fol<strong>de</strong>r ........................................................................................................................................... 5<br />
Dimensions .......................................................................................................................................................... 6<br />
Power Supply ...................................................................................................................................................... 6<br />
Switching on the <strong>fol<strong>de</strong>r</strong> ....................................................................................................................................... 7<br />
Suitable Formats ................................................................................................................................................. 8<br />
Suitable Media .................................................................................................................................................... 8<br />
Aligning documents ............................................................................................................................................. 8<br />
Manual feeding ................................................................................................................................................... 8<br />
Folding programs ............................................................................................................................................... 9<br />
Customize folding programs ............................................................................................................................... 9<br />
Switching Cross Fol<strong>de</strong>r ON and OFF ............................................................................................................... 10<br />
Cross fold 297 – 305 (optional) ....................................................................................................................... 10<br />
Reinforcement Unit (optional) ......................................................................................................................... 11<br />
Rotation Unit for A2 (C-sized) Documents ...................................................................................................... 11<br />
Rotation Unit: ................................................................................................................................................... 11<br />
Position of the light barriers ............................................................................................................................. 11<br />
Operating the Rotation Unit .............................................................................................................................. 11<br />
Position of light barriers in the cross <strong>fol<strong>de</strong>r</strong> ..................................................................................................... 12<br />
Position of light barriers in the cross <strong>fol<strong>de</strong>r</strong> ..................................................................................................... 12<br />
R<strong>es</strong>olving a Paper Jam on the Bridge ............................................................................................................... 13<br />
R<strong>es</strong>olving a Paper Jam in the Fan Fol<strong>de</strong>r ........................................................................................................ 13<br />
R<strong>es</strong>olving a Paper Jam in the Cross Fol<strong>de</strong>r...................................................................................................... 14<br />
Reinforcement Unit ........................................................................................................................................... 15<br />
• Error Co<strong>de</strong> 41:03 ...................................................................................................................................... 15<br />
Error Co<strong>de</strong> List ................................................................................................................................................. 16<br />
Specifications .................................................................................................................................................... 21<br />
Changing Log .................................................................................................................................................... 22<br />
2
Safety instructions<br />
For your pro<strong>te</strong>ction, please read th<strong>es</strong>e safety instructions comple<strong>te</strong>ly before operating the<br />
<strong>fol<strong>de</strong>r</strong> and keep this manual for future reference close to the <strong>fol<strong>de</strong>r</strong>.<br />
Carefully observe all warnings, precautions and instructions on the <strong>fol<strong>de</strong>r</strong> or the on<strong>es</strong><br />
d<strong>es</strong>cribed in the operating instructions.<br />
In or<strong>de</strong>r to guaran<strong>te</strong>e hazard-free operations ES-TE Folding Sys<strong>te</strong>ms (hereaf<strong>te</strong>r called ES-TE)<br />
strongly recommends that any main<strong>te</strong>nance or repair work is only carried out by trained personnel.<br />
Hazard In<strong>te</strong>nsity Levels<br />
DANGER: Indicat<strong>es</strong> an imminently hazardous situation which, if not<br />
avoi<strong>de</strong>d, WILL r<strong>es</strong>ult in <strong>de</strong>ath or serious injury.<br />
WARNING: Indicat<strong>es</strong> a po<strong>te</strong>ntially hazardous situation which,<br />
if not avoi<strong>de</strong>d, COULD r<strong>es</strong>ult in <strong>de</strong>ath or serious injury.<br />
CAUTION: Indicat<strong>es</strong> a po<strong>te</strong>ntially hazardous situation which,<br />
if not avoi<strong>de</strong>d, MAY r<strong>es</strong>ult in minor or mo<strong>de</strong>ra<strong>te</strong> injury.<br />
Main<strong>te</strong>nance and Modifications<br />
To avoid the risk of introducing hazards, all modifications and<br />
main<strong>te</strong>nance activiti<strong>es</strong> to ES-TE equipment are strictly r<strong>es</strong>erved to<br />
properly qualified and trained service <strong>te</strong>chnicians.<br />
In daily use, any electrical equipment may be subject to parts wear and<br />
eventual failure. In or<strong>de</strong>r to maintain safety and reliability, the Customer<br />
Engineer (hereaf<strong>te</strong>r called CE) must perform regular main<strong>te</strong>nance<br />
inspections.<br />
General<br />
• Make sure that the <strong>fol<strong>de</strong>r</strong> is placed on a level, horizontal surface<br />
of sufficient strength. See the r<strong>es</strong>pective <strong><strong>es</strong><strong>te</strong>fold</strong> specifications<br />
sheet for the weight of the equipment.<br />
• Always use ma<strong>te</strong>rials recommen<strong>de</strong>d by ES-TE for the r<strong>es</strong>pective<br />
<strong>fol<strong>de</strong>r</strong>. Ma<strong>te</strong>rials not approved by ES-TE can cause faults in your<br />
<strong>fol<strong>de</strong>r</strong>.<br />
• Do not use the <strong>fol<strong>de</strong>r</strong> when it is emitting unusual sounds.<br />
Remove the plug from the power socket or turn off the fixed<br />
connection to the electricity grid and contact Customer Service.<br />
• Do not use the <strong>fol<strong>de</strong>r</strong> in rooms which are subject to exc<strong>es</strong>sive<br />
vibration.<br />
• Move the <strong>fol<strong>de</strong>r</strong> careful and slow using two persons.<br />
• Set the adjustable feet on the ground when the <strong>fol<strong>de</strong>r</strong> is in the<br />
d<strong>es</strong>ired position<br />
3<br />
Warning
Main connection cable<br />
Do not use different mains connector cable, as <strong>de</strong>livered by ES-TE.<br />
When replacement of the power supply cable is required because of<br />
damage or <strong>de</strong>fect, contact your CE for proper replacement of this power<br />
supply cable.<br />
Mains connection<br />
• Do not use an ex<strong>te</strong>nsion lead to connect the machine.<br />
• This machine is not d<strong>es</strong>igned for connection to an IT power<br />
supply sys<strong>te</strong>m. An IT power sys<strong>te</strong>m is a voltage network in which<br />
the neutral wire is not connec<strong>te</strong>d to earth.<br />
• When the machine is connec<strong>te</strong>d through a wall-socket, place the<br />
machine near a wall-socket that is easily acc<strong>es</strong>sible.<br />
• When the machine is connec<strong>te</strong>d through a fixed connection to<br />
the electricity grid, the disconnect <strong>de</strong>vice in the fixed connection<br />
must be easily acc<strong>es</strong>sible.<br />
• The machine must be connec<strong>te</strong>d to an earthed mains socketoutlet.<br />
Measur<strong>es</strong> to take in case of an acci<strong>de</strong>nt<br />
1. If an acci<strong>de</strong>nt has occurred, the distributor who has been notified<br />
first must immedia<strong>te</strong>ly take emergency measur<strong>es</strong> to provi<strong>de</strong> relief<br />
to affec<strong>te</strong>d persons and to prevent further damage.<br />
2. If a report of a serious acci<strong>de</strong>nt has been received from a<br />
customer, an on-si<strong>te</strong> evaluation must be carried out quickly and<br />
ES-TE must be notified.<br />
3. To <strong>de</strong><strong>te</strong>rmine the cause of the acci<strong>de</strong>nt, conditions and ma<strong>te</strong>rials<br />
must be recor<strong>de</strong>d through direct on-si<strong>te</strong> checks, in accordance<br />
with instructions issued by ES-TE.<br />
4. For reports and measur<strong>es</strong> concerning serious acci<strong>de</strong>nts, follow<br />
the regulations specified by every distributor.<br />
Disclaimer<br />
Warning<br />
Th<strong>es</strong>e safeguards have been compiled to the b<strong>es</strong>t of our knowledge. They are in<strong>te</strong>n<strong>de</strong>d as a compact<br />
gui<strong>de</strong> to the safe handling of the product. We r<strong>es</strong>erve the right to revise specification data sheets, as<br />
new information becom<strong>es</strong> available. It is the user´s r<strong>es</strong>ponsibility to <strong>de</strong><strong>te</strong>rmine the suitability of this<br />
information for the adoption of safety precautions as may be nec<strong>es</strong>sary. It is the user´s r<strong>es</strong>ponsibility<br />
to contact ES-TE to make sure that the specification data sheets are the lat<strong>es</strong>t on<strong>es</strong> issued. If and in<br />
so far as limitation of liability is permit<strong>te</strong>d un<strong>de</strong>r the applicable laws, we do not accept liability for any<br />
inaccuracy that may occur in this information.<br />
4
General<br />
Es<strong>te</strong>fold <strong>4211</strong> <strong>HP</strong> is an automatic <strong>fol<strong>de</strong>r</strong> that folds large format plans prin<strong>te</strong>d on an <strong>HP</strong> color plot<strong>te</strong>r.<br />
There are eight fold programs available which can be selec<strong>te</strong>d through the in<strong>te</strong>rface. Details of the<br />
selec<strong>te</strong>d program are displayed on the in<strong>te</strong>rface.<br />
Large format plans will be fol<strong>de</strong>d length- and crosswise and discar<strong>de</strong>d onto a conveyor belt. The<br />
ergonomic height of the conveyor belt allows the user to easily collect the fol<strong>de</strong>d plans without<br />
bending down.<br />
The specially d<strong>es</strong>igned bridge transports the plot from the prin<strong>te</strong>r to the <strong>fol<strong>de</strong>r</strong>.<br />
Plans which are not supposed to be fol<strong>de</strong>d will be <strong>de</strong>ployed in the unfol<strong>de</strong>d print bag.<br />
In or<strong>de</strong>r to control the folding proc<strong>es</strong>s, the documents pass the automatic bridge to the <strong>fol<strong>de</strong>r</strong>‘s inlet.<br />
A switcher at the bridge’s entrance selects the plots that are not supposed to be fol<strong>de</strong>d and directs<br />
them into the unfol<strong>de</strong>d print bag.<br />
Af<strong>te</strong>r the plot en<strong>te</strong>rs the bridge it is transpor<strong>te</strong>d to the <strong>fol<strong>de</strong>r</strong>’s entrance where it remains motionl<strong>es</strong>s<br />
until the prin<strong>te</strong>r cuts the plan from the paper supply roll. As soon as the cutting proc<strong>es</strong>s is comple<strong>te</strong>d,<br />
the <strong>fol<strong>de</strong>r</strong> will start working.<br />
This procedure allows the <strong>fol<strong>de</strong>r</strong> work in<strong>de</strong>pen<strong>de</strong>ntly from the prin<strong>te</strong>r speed.<br />
Through a sliding rail on the bridge it is also possible to feed plans manually into the <strong>fol<strong>de</strong>r</strong>.<br />
The gas spring supports the bridge to be til<strong>te</strong>d into an almost vertical position. This generat<strong>es</strong> an easy<br />
acc<strong>es</strong>s to the plot<strong>te</strong>r.<br />
Setting up the Fol<strong>de</strong>r<br />
5<br />
Environment<br />
The room in which the <strong>fol<strong>de</strong>r</strong> is to be placed should be dry and dust free. Humidity should be about<br />
20-80% with room <strong>te</strong>mperature of 15° C to 35° C (59°- 95°F).<br />
The <strong>fol<strong>de</strong>r</strong> must stand horizontally aligned and very stable without shaking.<br />
Make sure that the <strong>fol<strong>de</strong>r</strong> to place the <strong>fol<strong>de</strong>r</strong> in a way that do<strong>es</strong> not block exits and allows an<br />
ergonomic workflow.<br />
Only ES-TE trained personnel should set up the<br />
<strong>fol<strong>de</strong>r</strong>.<br />
Set Up by Experts only
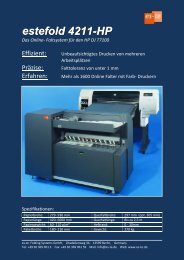
Dimensions<br />
Power Supply<br />
120<br />
1015<br />
535<br />
1100<br />
Ablageerwei<strong>te</strong>rung optional/<br />
ex<strong>te</strong>n<strong>de</strong>d stacker optionally<br />
Aufs<strong>te</strong>llmaße <strong>4211</strong> <strong>HP</strong> 4500<br />
Dimensions <strong>4211</strong> <strong>HP</strong> 4500<br />
1120<br />
1670<br />
free acc<strong>es</strong>s<br />
freier Zugang<br />
min. 600<br />
free acc<strong>es</strong>s<br />
freier Zugang<br />
min. 500<br />
2000<br />
free acc<strong>es</strong>s<br />
freier Zugang<br />
min. 500<br />
The power supply box is at the right bottom si<strong>de</strong> of the <strong>fol<strong>de</strong>r</strong>. Please use only the connecting cable<br />
<strong>de</strong>livered with the <strong>fol<strong>de</strong>r</strong>. . The <strong>fol<strong>de</strong>r</strong> is pre-adjus<strong>te</strong>d to 230 Volts/50 cycl<strong>es</strong>. Make sure that the mains<br />
supply voltage is i<strong>de</strong>ntical with your supply.<br />
Do not use a multi-outlet power strip.<br />
Th<strong>es</strong>e cords will not stand the power consumption of plot<strong>te</strong>r and <strong>fol<strong>de</strong>r</strong>.<br />
6
Switching on the <strong>fol<strong>de</strong>r</strong><br />
The main switch is at the <strong>fol<strong>de</strong>r</strong>’s front si<strong>de</strong>. Switch on the red main switch.<br />
Error Co<strong>de</strong> is:<br />
Fan: 22,00<br />
There are three LEDs on top of the <strong>fol<strong>de</strong>r</strong>’s display:<br />
The display shows a short m<strong>es</strong>sage as indica<strong>te</strong>d.<br />
For a short time the Firmware versions are<br />
shown in the display.<br />
First window:<br />
The versions of the several components are<br />
shown.<br />
Af<strong>te</strong>r that the display shows “<strong>es</strong><strong>te</strong> Foldsys<strong>te</strong>m”<br />
including <strong>fol<strong>de</strong>r</strong> software version and release.<br />
The paper switcher go<strong>es</strong> down to the “unfold”<br />
position and a double beep sounds.<br />
At the same instance, you will notice the green<br />
LED on top of the display illumina<strong>te</strong>.<br />
You will see the folding program last used<br />
displayed.<br />
In case an error is <strong>de</strong><strong>te</strong>c<strong>te</strong>d during the self t<strong>es</strong>t<br />
phase, a m<strong>es</strong>sage will be shown in the display<br />
af<strong>te</strong>r “<strong>es</strong><strong>te</strong> Foldsys<strong>te</strong>m“ has disappeared.<br />
The m<strong>es</strong>sage contains error and localization<br />
co<strong>de</strong>. Furthermore, a red LED on top of the<br />
display will be illumina<strong>te</strong>d. .<br />
Refer to the Error Co<strong>de</strong> List at the end of this<br />
manual.<br />
You will have to clear the error and then pr<strong>es</strong>s<br />
button � in or<strong>de</strong>r to r<strong>es</strong>tart the <strong>fol<strong>de</strong>r</strong>.<br />
• The green LED indicat<strong>es</strong> the <strong>fol<strong>de</strong>r</strong> being ready for safe and normal operation.<br />
• The red LED is illumina<strong>te</strong>d in case of any error.<br />
• The yellow LED indicat<strong>es</strong> that the <strong>fol<strong>de</strong>r</strong> is busy folding.<br />
Program number<br />
Margin width<br />
Panel width<br />
Icon Cross Fol<strong>de</strong>r<br />
Status Rotation Unit<br />
7<br />
Reinforcement Unit off/on<br />
Status switchable<br />
Cross fold<br />
Status online/manual
There are 8 folding programs available.<br />
Through the keys � and � you select the d<strong>es</strong>ired folding program.<br />
The selec<strong>te</strong>d program number will appear on the left hand si<strong>de</strong> of the display.<br />
The centre of the display shows an image of the selec<strong>te</strong>d fold style.<br />
In Or<strong>de</strong>r to change the status of the cross <strong>fol<strong>de</strong>r</strong> or the rotation unit pr<strong>es</strong>s �<br />
- the cursor will start to blink.<br />
Buttons � and � move the cursor from icon to icon.<br />
Selec<strong>te</strong>d icons blink frequently.<br />
Pr<strong>es</strong>sing buttons � and � edit the blinking settings.<br />
Suitable Formats<br />
Longitudinal folding:<br />
All documents with length from 420 mm up to<br />
6.000 mm (80 gr. Paper) and width up to max.<br />
930 mm. Longer copi<strong>es</strong> will stop with the error<br />
m<strong>es</strong>sage: “too many folds”<br />
The paperweight should not be l<strong>es</strong>s than 60 g/m²<br />
and not more than 110 g/m².<br />
Suitable Media<br />
We recommend the following media:<br />
Standard paper 80 gr/m² uncoa<strong>te</strong>d<br />
Standard paper 90 gr/m² uncoa<strong>te</strong>d<br />
For application of other media typ<strong>es</strong>, please<br />
contact your supplier.<br />
Aligning documents<br />
Cross folding:<br />
Maximum paper length of 2500 mm.<br />
Longer copi<strong>es</strong> will not be transpor<strong>te</strong>d into the<br />
cross <strong>fol<strong>de</strong>r</strong> but to the opposi<strong>te</strong> direction.<br />
Film or ma<strong>te</strong>rials with glossy shiny surfac<strong>es</strong> are<br />
not suitable.<br />
In any case the title block (legend) has to be on the leading edge of the document en<strong>te</strong>ring the <strong>fol<strong>de</strong>r</strong><br />
(on the right hand si<strong>de</strong> of the leading edge) except if you are using an A 2 rotating unit. The title block<br />
position has to be set in the plot software you are using.<br />
Manual feeding<br />
Switch icon to manual mo<strong>de</strong> by pr<strong>es</strong>sing button � twice.<br />
8<br />
You may also insert documents into the <strong>fol<strong>de</strong>r</strong><br />
manually.<br />
Insert the sheet face down - title block must be in<br />
front.<br />
Please try to feed the paper in as straight as<br />
possible.
Folding programs<br />
Required Style<br />
Example:<br />
Icon at the display<br />
Program 1 should proc<strong>es</strong>s packag<strong>es</strong> uncalcula<strong>te</strong>d:<br />
- Select folding program 1 with button � or �.<br />
- Pr<strong>es</strong>s button�<br />
- Pr<strong>es</strong>s button � until the fold package icon blinks.<br />
Select the program you need by pr<strong>es</strong>sing Button<br />
� or �<br />
D<strong>es</strong>cription<br />
Calcula<strong>te</strong>d<br />
Package folding<br />
Calcula<strong>te</strong>d<br />
Package folding<br />
With binding margin<br />
Uncalcula<strong>te</strong>d<br />
Package folding<br />
(usually program 5)<br />
- Pr<strong>es</strong>s buttons � or � in or<strong>de</strong>r to select the folding style.<br />
- Pr<strong>es</strong>s button� within three seconds in or<strong>de</strong>r to store the new value.<br />
Customize folding programs<br />
All folding programs can be edi<strong>te</strong>d in increments of 1 mm within the following range:<br />
• Filing margin: 0 – 30 mm<br />
• panel width: 180 – 210 mm<br />
In Or<strong>de</strong>r to change valu<strong>es</strong> pr<strong>es</strong>s � - the cursor will start to blink.<br />
Buttons � and � move the cursor from icon to icon.<br />
Selec<strong>te</strong>d icons blink frequently.<br />
9
Pr<strong>es</strong>sing buttons � and � edit the blinking settings.<br />
Example:<br />
Program 1 should proc<strong>es</strong>s packag<strong>es</strong> 185 mm wi<strong>de</strong> with a filing margin of 25 mm.<br />
- Select folding program 1 with button � or �.<br />
- Pr<strong>es</strong>s button�<br />
- Pr<strong>es</strong>s button � until the number below the fold package icon blinks.<br />
- Pr<strong>es</strong>s buttons � or � in or<strong>de</strong>r to set the package width to 185 mm.<br />
- Move the cursor forward to the figure repr<strong>es</strong>enting the margin width<br />
- With buttons � or � select 25 mm.<br />
- Pr<strong>es</strong>s button� within three seconds in or<strong>de</strong>r to store the new valu<strong>es</strong><br />
Please notice that the adjustable width of the package must be at least 180 mm up to a maximum of<br />
230 mm. The range of adjustment of the margin is 0 – 30 mm. Therefore a package of 165/35 is not<br />
adjustable.<br />
Switching Cross Fol<strong>de</strong>r ON and OFF<br />
Cross fold 297 – 305 (optional)<br />
10<br />
- Pr<strong>es</strong>s button �<br />
- Pr<strong>es</strong>s Button� until Icon blinks.<br />
- Button � switch<strong>es</strong> cross <strong>fol<strong>de</strong>r</strong> on.<br />
- Button � switch<strong>es</strong> the cross <strong>fol<strong>de</strong>r</strong> off.<br />
The icon will be transparent then.<br />
- Pr<strong>es</strong>s button �<br />
This optional feature enabl<strong>es</strong> the <strong>fol<strong>de</strong>r</strong> to switch<br />
between the cross fold siz<strong>es</strong> 297 or 305<br />
(11” or 12” for US)<br />
- Pr<strong>es</strong>s button �<br />
- Pr<strong>es</strong>s button �until icon 297 blinks.<br />
- Pr<strong>es</strong>sing button � switch<strong>es</strong> to 305<br />
- Pr<strong>es</strong>sing button � switch<strong>es</strong> to 297<br />
- Pr<strong>es</strong>s button �
Reinforcement Unit (optional)<br />
Rotation Unit for A2 (C-sized) Documents<br />
It is possible, b<strong>es</strong>i<strong>de</strong> the automatic proc<strong>es</strong>s, to<br />
use the cross <strong>fol<strong>de</strong>r</strong> manually.<br />
Put the fol<strong>de</strong>d package onto the roll carrier. Use<br />
the switch at the end of the roll carrier. The paper<br />
runs into the cross <strong>fol<strong>de</strong>r</strong> and will be ejec<strong>te</strong>d on<br />
the <strong>de</strong>livery tray.<br />
Proceed accordingly for every other document<br />
that is to be cross fol<strong>de</strong>d.<br />
- Pr<strong>es</strong>s button �<br />
- Pr<strong>es</strong>s Button� until Icon blinks.<br />
- Button � switch<strong>es</strong> cross <strong>fol<strong>de</strong>r</strong> on.<br />
- Button � switch<strong>es</strong> the cross <strong>fol<strong>de</strong>r</strong> off.<br />
The icon will be transparent then.<br />
- Pr<strong>es</strong>s button �<br />
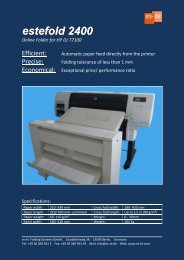
A rotation unit may be nec<strong>es</strong>sary if you want to plot ISO A2 from a 594 mm or a 22”-24” wi<strong>de</strong> media<br />
roll in landscape orientation and have this document proc<strong>es</strong>sed by a <strong>fol<strong>de</strong>r</strong> automatically.<br />
This is because ES-TE <strong>fol<strong>de</strong>r</strong>s require the document to be fed in portrait style with the title block<br />
being in the upper right corner while the document is prin<strong>te</strong>d in landscape orientation.<br />
The rotating unit will rota<strong>te</strong> the document by 90° anti clockwise.<br />
The title block has to be in the document’s lower right corner before the unit rotat<strong>es</strong> the document.<br />
All documents being from 415 up to 445 mm long and being from 560 up to 620 wi<strong>de</strong> will be<br />
consi<strong>de</strong>red rota<strong>te</strong> able by the unit. The unit may rota<strong>te</strong> even 22“ and 24“ wi<strong>de</strong> documents.<br />
LB33<br />
LB21<br />
LB20<br />
LB4<br />
LB3<br />
594mm<br />
LB1<br />
LB2<br />
PIN<br />
Y3<br />
Plot<strong>te</strong>r<br />
Operating the Rotation Unit<br />
LB32<br />
LB31<br />
LB30<br />
adjustable<br />
dv-hp.wmf<br />
Rotation Unit:<br />
Position of the light barriers<br />
The rotation unit is switched on and off on the <strong>fol<strong>de</strong>r</strong>’s operating panel. Like for the cross<br />
<strong>fol<strong>de</strong>r</strong> and the reinforcement unit the operating status for the rotating unit will be shown in<br />
the display.<br />
The rotating unit can only be switched on or off in general but not for single fold styl<strong>es</strong> only.<br />
Rotating Unit on:<br />
Rotating Unit off:<br />
- Pr<strong>es</strong>s button�<br />
- Pr<strong>es</strong>s Button � until icon blinks.<br />
- Button � will switch the rotating unit on<br />
- Button � will switch the rotating unit off. The icon for the rotating unit will be transparent.<br />
- Pr<strong>es</strong>s �<br />
11
Position of light barriers in the cross <strong>fol<strong>de</strong>r</strong><br />
LB 4<br />
LB 3<br />
LB 2<br />
LB 1<br />
Position of light barriers in the cross <strong>fol<strong>de</strong>r</strong><br />
LB 0<br />
12
R<strong>es</strong>olving a Paper Jam on the Bridge<br />
R<strong>es</strong>olving a Paper Jam in the Fan Fol<strong>de</strong>r<br />
In case the LED on top of the display is red and<br />
the icon for the fan <strong>fol<strong>de</strong>r</strong> blinks it indicat<strong>es</strong> an<br />
error either on the bridge or in the fan <strong>fol<strong>de</strong>r</strong>.<br />
Af<strong>te</strong>r pr<strong>es</strong>sing button � once, the display shows<br />
an error co<strong>de</strong> indicating type and location of the<br />
error.<br />
The most probable cause for a cut light barrier is<br />
that there is still a part of a document on the<br />
bridge.<br />
In or<strong>de</strong>r to remove the document from the bridge:<br />
Switch on the <strong>fol<strong>de</strong>r</strong> and pr<strong>es</strong>s � button for<br />
automatic release.<br />
As soon as you have lif<strong>te</strong>d the cover, you may lock<br />
it in the raised position by ex<strong>te</strong>nding the<br />
suspending link.<br />
You can now inspect the bridg<strong>es</strong> insi<strong>de</strong> and<br />
remove any paper leftovers.<br />
Pr<strong>es</strong>s button � once in or<strong>de</strong>r to r<strong>es</strong>tart your job.<br />
In case the LED on top of the display is red and the icon for the fan <strong>fol<strong>de</strong>r</strong> blinks it indicat<strong>es</strong> an error<br />
either on the bridge or in the fan <strong>fol<strong>de</strong>r</strong>. Af<strong>te</strong>r pr<strong>es</strong>sing button � once, the display shows an error co<strong>de</strong><br />
indicating type and location of the error. The most probable cause for a cut light barrier is that there is<br />
still a whole or a part of a document in the fan <strong>fol<strong>de</strong>r</strong>.<br />
In or<strong>de</strong>r to remove the document from the fan<br />
<strong>fol<strong>de</strong>r</strong>:<br />
Switch on the <strong>fol<strong>de</strong>r</strong> and pr<strong>es</strong>s � button for<br />
automatic release.<br />
In or<strong>de</strong>r to remove the document in the fan <strong>fol<strong>de</strong>r</strong><br />
manually you have to lift the fan <strong>fol<strong>de</strong>r</strong>s top cover.<br />
The <strong>fol<strong>de</strong>r</strong> will be without power as soon as a<br />
safety switch on the top cover cuts power.<br />
13
R<strong>es</strong>olving a Paper Jam in the Cross Fol<strong>de</strong>r<br />
As soon as you lift the cover, you will see the fan<br />
<strong>fol<strong>de</strong>r</strong>’s insi<strong>de</strong>.<br />
Retrieve documents stuck between the fold rollers<br />
by simply turning the fold rollers manually.<br />
The paper piec<strong>es</strong> will appear either at the <strong>fol<strong>de</strong>r</strong>’s<br />
top or its rear <strong>de</strong>pending on the direction you are<br />
rotating the fold rollers.<br />
Close the top cover as soon as the leftovers have<br />
been removed. Pr<strong>es</strong>s button � once in or<strong>de</strong>r to<br />
r<strong>es</strong>tart your job.<br />
In case the LED on top of the display is red and the icon for the cross <strong>fol<strong>de</strong>r</strong> blinks it indicat<strong>es</strong> an error<br />
in the cross <strong>fol<strong>de</strong>r</strong>. Af<strong>te</strong>r pr<strong>es</strong>sing button � once, the display shows an error co<strong>de</strong> indicating type and<br />
location of the error. The most probable cause for an error in the cross <strong>fol<strong>de</strong>r</strong> is a light barrier cut by a<br />
document or document piec<strong>es</strong>.<br />
14<br />
In or<strong>de</strong>r to remove the document in the cross<br />
<strong>fol<strong>de</strong>r</strong> you have to open the cross <strong>fol<strong>de</strong>r</strong> door.<br />
As soon as you open the cross <strong>fol<strong>de</strong>r</strong> door, you<br />
will see the cross <strong>fol<strong>de</strong>r</strong>’s insi<strong>de</strong>. The <strong>fol<strong>de</strong>r</strong> will<br />
be without power as soon as the safety switch<br />
on the cross <strong>fol<strong>de</strong>r</strong> door cuts power.<br />
Retrieve documents stuck between the fold<br />
rollers by simply turning the fold rollers<br />
manually.<br />
You may also acc<strong>es</strong>s the cross-<strong>fol<strong>de</strong>r</strong> by<br />
opening the door of the Reinforcement Unit in<br />
case you do not get hold of the jammed<br />
document through the cross <strong>fol<strong>de</strong>r</strong> door.<br />
There is another safety switch behind this door.<br />
Close the doors as soon as you removed the<br />
leftovers. Pr<strong>es</strong>s button � once in or<strong>de</strong>r to<br />
r<strong>es</strong>tart your job.<br />
You may have to call for a service engineer in<br />
case either paper was not the cause to the error<br />
or you were not able to retrieve all of the paper.
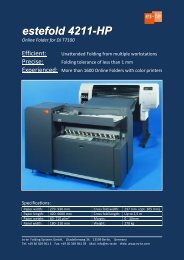
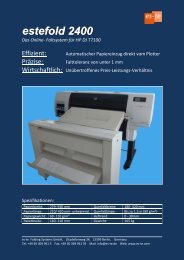
Reinforcement Unit<br />
• Error Co<strong>de</strong> 41:03 = “No Tape”<br />
• Replace the roll according to the drawing below.<br />
Please clean<br />
th<strong>es</strong>e knif<strong>es</strong><br />
whenever you<br />
replace the<br />
roll!<br />
knife and<br />
<strong>de</strong>vice for<br />
holding down<br />
felt element<br />
knife guidance<br />
Pos. 3<br />
upper <strong>de</strong>vice for<br />
holding down<br />
15<br />
Pos. 2<br />
pr<strong>es</strong>sing<br />
bracket<br />
no-load m<strong>es</strong>sage<br />
removal of<br />
tape cover<br />
tape cover<br />
guiding pla<strong>te</strong> for adh<strong>es</strong>ive tape<br />
knurled head<br />
screw Pos. 1<br />
Open the<br />
brackets 2+3<br />
and pass the<br />
cover strip as<br />
shown<br />
Gui<strong>de</strong> the<br />
strip to the<br />
cover strip<br />
take-off unit.
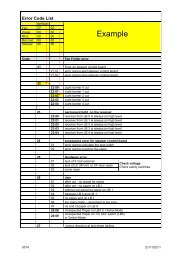
Error Co<strong>de</strong> List<br />
ERROR<br />
Fan: 22 02<br />
Cross: 00 00<br />
RFU: 00 00<br />
Rot.Unit: 00 00<br />
Stacker: 00 00<br />
Co<strong>de</strong> Fan Fol<strong>de</strong>r error<br />
21 Error on s<strong>te</strong>pper control board<br />
21:01 error during start s<strong>te</strong>pper control board<br />
21:02 error during stop s<strong>te</strong>pper control board<br />
22<br />
22:00 Light barrier 0 cut<br />
22:01 Light barrier 1 cut<br />
22:02 Light barrier 2 cut<br />
22:03 Light barrier 3 cut<br />
22:04 Light barrier 4 cut<br />
23 permanent light on the receiver<br />
23:00 receiver from LB 0 is always on high level<br />
23:01 receiver from LB 1 is always on high level<br />
23:02 receiver from LB 2 is always on high level<br />
23:03 receiver from LB 3 is always on high level<br />
23:04 receiver from LB 4 is always on high level<br />
24 proc<strong>es</strong>sing error for s<strong>te</strong>pper control board<br />
01 error during calcula<strong>te</strong> the s<strong>te</strong>p width<br />
02 error during counting the s<strong>te</strong>ps<br />
16<br />
Example
25 Hardware error<br />
01 lack of 5 Volt ex<strong>te</strong>rnal<br />
02 lack of LF 38 Volt or CF door open<br />
03 cover open<br />
26 Jam<br />
01 af<strong>te</strong>r cut - no signal for ready<br />
02 af<strong>te</strong>r cut - no paper on LB 1<br />
03 without cut signal no paper on LB 1<br />
04 between LB 0 and LB 1<br />
05 no paper end on LB 1<br />
06 too many folds – document is too long<br />
07 no end of paper on LB 0<br />
26:08 Unexpec<strong>te</strong>d Paper on LB4 in Online-Mo<strong>de</strong><br />
26:09<br />
Unexpec<strong>te</strong>d Paper on “no fold” switch (LB5)<br />
in Online-Mo<strong>de</strong><br />
27 wrong direction at last sheet folding<br />
Cross Fol<strong>de</strong>r error<br />
80 Hardware error<br />
01 lack of 5 Volt ex<strong>te</strong>rn<br />
02 lack of LF 38 Volt or CF door open<br />
03 lack of 28 Volt<br />
81 Error on s<strong>te</strong>pper control board<br />
01 error during start s<strong>te</strong>pper control board<br />
02 error during stop s<strong>te</strong>pper control board<br />
82 light barrier cut<br />
82:01 LB 12 cut<br />
82:02 LB 11 cut<br />
82:03 LB 10 cut<br />
17<br />
Check voltage<br />
Check safety switch<strong>es</strong><br />
Check voltage<br />
Check safety switch<strong>es</strong>
82:04 LB 13 cut<br />
83 permanent light on the receiver<br />
83:01 receiver from LB 12 is always on high level<br />
83:02 receiver from LB 11 is always on high level<br />
83:03 receiver from LB 10 is always on high level<br />
83:04 receiver from LB 13 is always on high level<br />
84 Timeout<br />
84:01 LB 11 stop<br />
02 LB 12 – check 1 st knife – clean LB12<br />
03 LB 13 – clean LB 13<br />
04 en<strong>te</strong>r CF output switch<br />
05 fallback CF output switch<br />
06 Jam at LB 10<br />
85 Jam<br />
01 LB 11<br />
02 LB 12<br />
86 error on end stage roll tray motor<br />
01 on forward direction<br />
02 on reverse direction<br />
03 on stop function<br />
04 on initial the end stage<br />
41<br />
RFU unit error<br />
01 RFU unit is not ready (busy -Flag)<br />
02 Error on motor end stage<br />
03 no tape or LB is damaged<br />
04 Jam near the knife<br />
rotation unit error (module 0)<br />
18
01 xx In case of any co<strong>de</strong> starting with number 1:<br />
Check light barriers<br />
02 Initialization error<br />
03 Error on linear activator<br />
Stacker error (module 1)<br />
02 Initialization error<br />
Pivoting RFU (module 2)<br />
01 0x01 Switch pos. 198<br />
0x02 Switch pos. 210<br />
02 Initialization error<br />
10<br />
11<br />
comunication error between QF and WebC<br />
01 no communication<br />
02 checksum error<br />
03 bad quality of data stream<br />
04 bad quality of byt<strong>es</strong><br />
01 no communication<br />
02 checksum error<br />
03 bad quality of data stream<br />
04 bad quality of byt<strong>es</strong><br />
communication between modul<strong>es</strong> and WebC<br />
20 communication between Module0 and WebC<br />
21 communication between Module1 and WebC<br />
22 communication between Module2 and WebC<br />
19
23 communication between Module3 and WebC<br />
01 no communication<br />
02 checksum error<br />
03 bad quality of data stream<br />
04 bad quality of byt<strong>es</strong><br />
F1CA CAN-bus error<br />
20
24BU<br />
Specifications<br />
Document Length 420 – 6000 mm, cross fold max. 2.500 mm<br />
Document Width From 297 up to 914 mm<br />
Paper Quality From 60 up to 110 g/m 2<br />
Panel Width 180 – 210 mm<br />
Folding Speed 2,5 – 18,00 m/min<br />
Margin Width 0 – 30 mm<br />
Folding Programs 8<br />
Environment:<br />
Temperature 15°-35°C (59°-95°F)<br />
Humidity 20%-80% R.H. not con<strong>de</strong>nsing<br />
Power Supply 115 / 230V, 50 / 60Hz, 8,0 / 6,0A<br />
Power consumption – standby 40 W<br />
Power consumption – maximum 300 W<br />
Fol<strong>de</strong>r:<br />
Weight 260 kg<br />
Width 1020 mm<br />
Height 1310 mm<br />
Length 1830 mm<br />
Height of Bridge from 380 up to 1400 mm<br />
With box:<br />
Weight 306 kg<br />
Width 1050 mm<br />
Height 1350 mm<br />
Length 1850 mm<br />
21
Changing Log<br />
Da<strong>te</strong> Subject Author<br />
22<br />
Edition<br />
04.05.2009 Creation Legarth 1.4