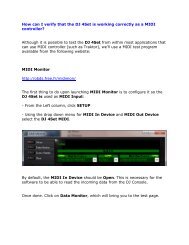
![[English - PC] 290 Kb - Hercules](https://img.yumpu.com/26583395/1/500x640/english-pc-290-kb-hercules.jpg)
[English - PC] 290 Kb - Hercules
[English - PC] 290 Kb - Hercules
[English - PC] 290 Kb - Hercules

Create successful ePaper yourself
Turn your PDF publications into a flip-book with our unique Google optimized e-Paper software.
<strong>Hercules</strong> Technical Support<br />
http://ts.hercules.com<br />
DJ Console RMX – Windows Audio Firmware Update Procedure<br />
1) Make sure that USB errors are reported. In order to be sure of this, open the<br />
Device Manager (click Start/Run and enter the following command: devmgmt.msc<br />
press Enter), then open the USB section, and for each host controller:<br />
- Double click on the host controller icon<br />
- Open the "Advanced" tab<br />
- Make sure that the "Don't tell me about USB errors" checkbox is unchecked<br />
2) Download the latest package from the web: ts.hercules.com<br />
3) Install the package. When asked to connect your DJ Console Rmx, just click on<br />
Next (do NOT plug in the device) until it reaches the end and completes the<br />
installation process<br />
At this point, a message saying that the Drivers are older than expected.. will<br />
appear. This is perfectly normal since no console was connected during the<br />
installation process. Click OK and proceed to Step 4<br />
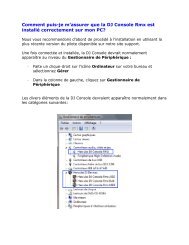
4) Make sure the Control Panel (=<br />
CPL) is closed.<br />
- Open Windows Task Manager<br />
- In the Process tab, select<br />
HDJSeriesCPL.exe<br />
- Click the End Process button<br />
5) Open the Device Manager if not already open<br />
6) Press and hold the MIC On/Off button on the console<br />
1
<strong>Hercules</strong> Technical Support<br />
http://ts.hercules.com<br />
Plug in the device, while still holding the MIC On/Off button<br />
Hold until the Device Manager sees the device arrival OR there is a "Found New<br />
Hardware" dialog.<br />
If there is a "Found New Hardware" dialog, then proceed with the installation of the<br />
device.<br />
If neither occur, unplug the device and try<br />
again, making sure to press and hold the<br />
Mic On/Off button before plugging in the<br />
device, and maintaining the hold thereafter<br />
2
<strong>Hercules</strong> Technical Support<br />
http://ts.hercules.com<br />
7) Check the status of the bulk device (<strong>Hercules</strong> DJ Console RMX Bulk) in the<br />
Device Manager.<br />
Whether or not the bulk device (<strong>Hercules</strong> DJ Console RMX Bulk) is enumerated<br />
correctly, right-click on it and select Uninstall.<br />
Then, click in an empty area of the Device Manager, and from the Action menu,<br />
select Scan for Hardware changes. This will insure the latest driver is used.<br />
8) Launch the manual updater. For that click Start/Run and enter the following<br />
command (including quotes):<br />
"C:\Program Files\<strong>Hercules</strong>\Audio\DJ Console Series\firmware\HDJSeriesUpdater.exe" –manual<br />
If the updater sees the device, make sure that under Current column (in the DJ<br />
Console Series – Firmware Updater), the Firmware Controller should be boot and<br />
under Flash column, the Firmware Audio is selected.. If not, unplug and re-plug<br />
again following the same procedure as described in Step 6.<br />
3
<strong>Hercules</strong> Technical Support<br />
http://ts.hercules.com<br />
9) Click the Open Audio button, then browse for the RMX TUSB (RMX_TSUB.dja)<br />
firmware and click Open<br />
Then click Update! in the DJ Console – Firmware Updater in order to continue<br />
10) THE CONSOLE MUST NOT BE UNPLUGGED until the manual updater<br />
confirms completion and advises to do so.<br />
4
<strong>Hercules</strong> Technical Support<br />
http://ts.hercules.com<br />
When prompted by the updater, unplug the device<br />
11) Plug in the device in normal mode (without pressing any buttons on the console)<br />
In the Device Manager, uninstall the bulk device (<strong>Hercules</strong> DJ Console RMX<br />
Bulk), (see Step 7) and reinstall all DJ devices for which there is a "Found New<br />
Hardware" dialog<br />
12) Within the manual updater, confirm that the Firmware audio version is 31. If not,<br />
then start again from the beginning (step 5).<br />
The procedure is complete<br />
5