VirtualDJ DJC Mk4 - Hercules
VirtualDJ DJC Mk4 - Hercules
VirtualDJ DJC Mk4 - Hercules

Create successful ePaper yourself
Turn your PDF publications into a flip-book with our unique Google optimized e-Paper software.
CONTENTS<br />
<strong>VirtualDJ</strong> <strong>DJC</strong> <strong>Mk4</strong><br />
INTRODUCTION...........................................................................................................................3<br />
1) SYSTEM REQUIREMENTS................................................................................................3<br />
a) PC ................................................................................................................................3<br />
b) Mac ..............................................................................................................................3<br />
2) VIRTUALDJ <strong>DJC</strong> MK4 OVERVIEW ...................................................................................4<br />
a) Browser area: folders area + files area........................................................................4<br />
b) Deck A .........................................................................................................................5<br />
c) Mixer ............................................................................................................................6<br />
d) Deck B .........................................................................................................................8<br />
e) Waveform area ............................................................................................................8<br />
3) FIRST USE OF VIRTUALDJ <strong>DJC</strong> MK4..............................................................................9<br />
a) Serial number ..............................................................................................................9<br />
b) Browser area................................................................................................................9<br />
i) Folders area...................................................................................................10<br />
ii) File browser ...................................................................................................11<br />
c) BPM (Beats Per Minute) rate of your music files.......................................................11<br />
i) Analyze your music files’ BPM rates..............................................................12<br />
ii) Run the BPM analysis in advance, not during a party! ..................................12<br />
iii) BPM rate display............................................................................................13<br />
d) Information about the music tracks............................................................................13<br />
i) Customizing the tag display ...........................................................................13<br />
ii) Sorting the music files....................................................................................14<br />
iii) Searching.......................................................................................................14<br />
4) PLAYING AN AUDIO FILE...............................................................................................15<br />
a) Loading and playing an audio file ..............................................................................15<br />
b) Supported audio formats ...........................................................................................17<br />
i) File extensions ...............................................................................................17<br />
ii) DRM protected files .......................................................................................17<br />
iii) Video files ......................................................................................................17<br />
c) Previewing a track .....................................................................................................17<br />
i) Target.............................................................................................................17<br />
ii) Equipment......................................................................................................18<br />
iii) Steps ..............................................................................................................18<br />
d) Moving within a music track.......................................................................................18<br />
e) Setting a Cue point ....................................................................................................19<br />
ESPAÑOL ITALIANO NEDERLANDS DEUTSCH FRANÇAIS ENGLISH
<strong>VirtualDJ</strong> <strong>DJC</strong> <strong>Mk4</strong><br />
i) Placing a Cue point ....................................................................................... 19<br />
ii) Changing the position of the Cue point ......................................................... 20<br />
iii) Going to the Cue point .................................................................................. 20<br />
iv) Deleting a Cue point...................................................................................... 20<br />
5) BEAT MATCHING MUSIC FILES.................................................................................... 20<br />
a) Sync button on DJ Console <strong>Mk4</strong> (= Beatmatch) ....................................................... 22<br />
b) Pitch fader ................................................................................................................. 23<br />
i) Pitch fader ..................................................................................................... 23<br />
ii) Master Tempo = Keylock .............................................................................. 25<br />
iii) Pitch scale ..................................................................................................... 25<br />
iv) Action of the pitch fader in <strong>VirtualDJ</strong> ............................................................. 26<br />
c) Pitch Bend buttons (“Pitch Bend –” and “Pitch Bend +”)........................................... 28<br />
i) Using Pitch Bend........................................................................................... 28<br />
ii) See the action of Pitch Bend in <strong>VirtualDJ</strong> ..................................................... 28<br />
d) Jog Wheels................................................................................................................ 29<br />
6) LOOPS AND EFFECTS ................................................................................................... 30<br />
a) Loops......................................................................................................................... 30<br />
i) Definition........................................................................................................ 30<br />
ii) Loop sizes ..................................................................................................... 30<br />
iii) Procedure ...................................................................................................... 31<br />
iv) In <strong>VirtualDJ</strong> <strong>DJC</strong> <strong>Mk4</strong> .................................................................................... 31<br />
b) Effects ....................................................................................................................... 32<br />
i) Flanger .......................................................................................................... 33<br />
ii) Beatgrid ......................................................................................................... 34<br />
iii) Flippin Double ............................................................................................... 34<br />
iv) Overloop ........................................................................................................ 35<br />
7) SCRATCH, SAMPLER..................................................................................................... 35<br />
a) Scratch ...................................................................................................................... 35<br />
i) Scratch mode ................................................................................................ 35<br />
ii) Action............................................................................................................. 36<br />
iii) Jog wheel accuracy....................................................................................... 36<br />
b) Sampler ..................................................................................................................... 36<br />
i) Function......................................................................................................... 36<br />
ii) Procedure ...................................................................................................... 36<br />
iii) Commands on each sample.......................................................................... 37
<strong>VirtualDJ</strong> <strong>DJC</strong> <strong>Mk4</strong><br />
INTRODUCTION<br />
<strong>VirtualDJ</strong> <strong>DJC</strong> <strong>Mk4</strong> is a dedicated version of <strong>VirtualDJ</strong>, developed by<br />
Atomix Productions, tailored for <strong>Hercules</strong> DJ Console <strong>Mk4</strong>. Atomix<br />
Productions and its suppliers retain all intellectual property rights to the<br />
software.<br />
Welcome to <strong>VirtualDJ</strong> <strong>DJC</strong> <strong>Mk4</strong><br />
This powerful DJ mixing software is adapted to your <strong>Hercules</strong> DJ Console<br />
<strong>Mk4</strong>, offering instant access to key DJing functions and deep integration of<br />
the software with the hardware in the Windows XP®, Windows Vista®,<br />
Windows 7 and Mac OS® environments.<br />
This dedicated version of <strong>VirtualDJ</strong> requires <strong>Hercules</strong> DJ Console <strong>Mk4</strong> to<br />
be installed and connected to the computer’s USB port (or to a hub<br />
connected to the computer’s USB port); so, before running <strong>VirtualDJ</strong> <strong>DJC</strong><br />
<strong>Mk4</strong>, <strong>Hercules</strong> DJ Console <strong>Mk4</strong> must be installed and connected to your<br />
computer’s USB port (or connected to the computer via a USB hub).<br />
In Windows XP, Vista and 7: if you see the <strong>Hercules</strong> DJ Console Series<br />
icon in your taskbar with no red cross, then DJ Console <strong>Mk4</strong> is connected<br />
and detected.<br />
If you see the DJ Console <strong>Mk4</strong> icon in your taskbar with a red cross, your<br />
DJ Console <strong>Mk4</strong> is not properly detected on any of your PC’s USB ports,<br />
so running <strong>VirtualDJ</strong> <strong>DJC</strong> <strong>Mk4</strong> Edition is not possible as long as the red<br />
cross has not disappeared.<br />
1) SYSTEM REQUIREMENTS<br />
a) PC<br />
• Desktop/laptop PC with 1.5GHz processor or higher<br />
• 1GB RAM<br />
• Operating system: Microsoft Windows XP®, Vista® or 7<br />
• USB 2.0 or USB 1.1 powered USB port (or USB hub)<br />
• <strong>Hercules</strong> DJ Console <strong>Mk4</strong><br />
• Headphones or amplified stereo speakers<br />
• CD-ROM or DVD-ROM drive<br />
• 1024x600 video resolution or higher, 16-bit<br />
• Microphone, Internet connection + 100MB free hard disk space<br />
b) Mac<br />
• Desktop/laptop Mac with Intel 1.5GHz processor or higher<br />
• 1GB RAM<br />
• Operating system: Mac OS® 10.5 (Leopard) and 10.6 (Snow Leopard)<br />
• USB bus-powered port (or USB hub) (NB: the USB port on Mac<br />
keyboards is not powered)<br />
• <strong>Hercules</strong> DJ Console <strong>Mk4</strong><br />
• Headphones or amplified stereo speakers<br />
ESPAÑOL ITALIANO NEDERLANDS DEUTSCH FRANÇAIS ENGLISH<br />
3/39 – User Manual
<strong>VirtualDJ</strong> <strong>DJC</strong> <strong>Mk4</strong><br />
• CD-ROM or DVD-ROM drive<br />
• 16-bit, 1024x768 video resolution<br />
• Microphone, Internet connection + 100MB free hard disk space<br />
2) VIRTUALDJ <strong>DJC</strong> MK4 OVERVIEW<br />
The <strong>VirtualDJ</strong> <strong>DJC</strong> <strong>Mk4</strong> interface can be split into 5 areas:<br />
Waveform<br />
Deck A<br />
Mixer<br />
Deck B<br />
Browser area: folders + files areas<br />
a) Browser area: folders area + files area<br />
In this area, you can browse through your computer or network drive to<br />
select the audio files you will load onto a deck and mix with. The browser<br />
area consists of 2 subsections:<br />
the folders browser on the left: use this area to select a folder, a disk<br />
or remote access location,<br />
the files browser on the right: use this area to select the music track<br />
you want to load on each deck of the player.<br />
User Manual – 4/39
<strong>VirtualDJ</strong> <strong>DJC</strong> <strong>Mk4</strong><br />
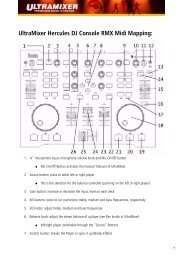
b) Deck A<br />
This is the virtual deck on the left. You can:<br />
load music files on this deck,<br />
move within the track,<br />
play the music file loaded on this deck,<br />
add a bookmark to a position (called a Cue point),<br />
change the pitch (the playback speed),<br />
view the BPM, pitch variation, elapsed and remaining time.<br />
ESPAÑOL ITALIANO NEDERLANDS DEUTSCH FRANÇAIS ENGLISH<br />
01 Music tag: Artist name on top – Song name on second line<br />
02 Pitch slider: down = speed up / up = slow down<br />
03 Virtual vinyl record: scratch on the virtual record with your mouse /<br />
drag and drop music onto the virtual record with your mouse<br />
5/39 – User Manual
<strong>VirtualDJ</strong> <strong>DJC</strong> <strong>Mk4</strong><br />
04 Pitch bend adjustment buttons: Pitch bend left = slower, and<br />
Pitch bend right = faster<br />
05 Time counter: elapsed time / remaining time<br />
06 Wave form overview (vertical bar = cue point)<br />
07 BPM counter (129.21 = 129.21 Beats Per Minute)<br />
08 Pitch scale (click on it to change pitch scale)<br />
09 Cue button = lets you set the cue point position 1, or return to the last<br />
selected cue point<br />
10 Effects: click on the name to enable the function, and click on the<br />
arrow pointing downwards to select different effects<br />
11 Pause and Play<br />
12 Sync = synchronize the deck with the other deck<br />
13 Loop In / Loop Out = enter loop mode<br />
14 Smart Loop mode: when this mode is enabled (orange lock icon),<br />
clicking the Loop Out button creates a continuous loop based on the<br />
selected loop size (above the Loop Out button)<br />
15 Sampler: control for audio samples<br />
16 Hot Cue: set additional Cue Points<br />
17 Smart Play mode: synchronize playback with the music on the other<br />
deck<br />
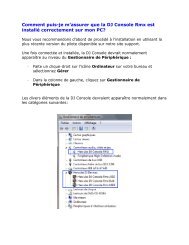
c) Mixer<br />
The virtual mixer area, in the centre, lets you set:<br />
the volumes of both decks,<br />
the equalization (EQ) of both decks,<br />
the cross fader,<br />
the gain on each deck,<br />
which deck you are previewing.<br />
It also includes 3 buttons: Mixer, Video and Scratch, to bring up 3<br />
dedicated menus.<br />
User Manual – 6/39
<strong>VirtualDJ</strong> <strong>DJC</strong> <strong>Mk4</strong><br />
01 PFL = Preview Deck A. Click the PFL button: it turns blue, so you<br />
preview deck A, and in the waveform display, the deck A wave (in<br />
blue) comes to the foreground, while the deck B wave (in red) goes<br />
to the background<br />
02 Gain for deck A: rotary knob setting the gain on deck A<br />
03 Volume fader for deck A: up = louder / down = lower<br />
04 Level VU-meter for deck A<br />
05 EQ on deck A: 3 rotary knobs to independently set the level of bass,<br />
medium and treble on deck A<br />
06 Key: sets the tone on deck A<br />
07 Level VU-meter for deck B<br />
08 PFL = Preview Deck B. Click the PFL button: it turns red, so you<br />
preview deck B, and in the waveform display, the deck B wave (in<br />
red) comes to the foreground, while the deck A wave (in blue) goes<br />
to the background<br />
09 Gain for deck B: rotary knob setting the gain on deck B<br />
10 Volume fader for deck B: up = louder / down = lower<br />
11 Mixer: displays the mixer menu (default)<br />
12 EQ on deck B: 3 rotary knobs to independently set the level of bass,<br />
medium and treble on deck B<br />
13 Key: sets the tone on deck B<br />
14 Cross fader<br />
15 Video: displays the video mixer (mix video in a small window)<br />
16 Scratch: displays a scratch mixer, with vertical waveforms.<br />
ESPAÑOL ITALIANO NEDERLANDS DEUTSCH FRANÇAIS ENGLISH<br />
7/39 – User Manual
<strong>VirtualDJ</strong> <strong>DJC</strong> <strong>Mk4</strong><br />
d) Deck B<br />
This is the virtual deck on the right. You can:<br />
load music files on this deck,<br />
move within the track,<br />
play the music file loaded on this deck,<br />
add a bookmark to a position (called a Cue point),<br />
change the pitch (the playback speed),<br />
view the BPM, pitch variation, elapsed and remaining time.<br />
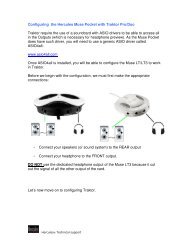
e) Waveform area<br />
This area shows 2 waveforms:<br />
- the waveform for deck A (left deck) in blue,<br />
- the waveform for deck B (right deck) in red.<br />
The music track you hear on your headphones has its waveform in the<br />
foreground, while the music track on the other deck is in the background.<br />
User Manual – 8/39
<strong>VirtualDJ</strong> <strong>DJC</strong> <strong>Mk4</strong><br />
01 Waveforms of 2 audio tracks<br />
- blue waveform = track on deck A<br />
- red waveform = track on deck B<br />
- blue is in the foreground = you are previewing deck A<br />
02 Beat marks: the blue rectangle shows the beat of deck A, and the<br />
red rectangle shows the beat of deck B<br />
03 Red Cue 1: bookmark on the track played on deck B<br />
3) FIRST USE OF VIRTUALDJ <strong>DJC</strong> MK4<br />
a) Serial number<br />
The first time you run <strong>VirtualDJ</strong> <strong>DJC</strong> <strong>Mk4</strong>, you are asked to enter a serial<br />
number.<br />
This serial number is found on the paper envelope of your installation CD.<br />
This serial number belongs to you: you cannot change it, and you must<br />
not share it with any other user of <strong>VirtualDJ</strong> <strong>DJC</strong> <strong>Mk4</strong>; otherwise, you<br />
won't be able to register on the <strong>VirtualDJ</strong> website, which will not let you<br />
access <strong>VirtualDJ</strong> service updates, plug-ins, or upgrades. Keep both the<br />
CD envelope and the installation CD in a safe place, since both the serial<br />
number and the installation CD are required if you re-install your system,<br />
or change your computer. The serial number format is xxxx-xxxx-xxxxx/.<br />
b) Browser area<br />
When you run <strong>VirtualDJ</strong> <strong>DJC</strong> <strong>Mk4</strong> for the first time, the browser area<br />
displays no music files.<br />
ESPAÑOL ITALIANO NEDERLANDS DEUTSCH FRANÇAIS ENGLISH<br />
9/39 – User Manual
<strong>VirtualDJ</strong> <strong>DJC</strong> <strong>Mk4</strong><br />
i) Folders area<br />
On the left of the browser area, you can see the list of the folders and disk<br />
units on your computer: the active folder is highlighted.<br />
You know you are in the folders area because the folder button in the<br />
centre of the DJ Console <strong>Mk4</strong> is backlit.<br />
Go to the folders area by pushing the button with a folder symbol .<br />
Move within the folders area to reach the folders you want by:<br />
- pushing the DJ Console <strong>Mk4</strong>’s buttons with Up and Down arrows to<br />
change the active folder,<br />
- expanding the active level by pushing the Folder button.<br />
01 Active folder (virtual or real), highlighted<br />
02 Other folders, not highlighted<br />
03 Graphic slider to move through the list<br />
04 Lock/unlock, to lock the Files area (if the lock is open, the folder<br />
area can expand and hide the files area).<br />
05 Add Virtual Folder button:<br />
You can create a Virtual Folder (which is a playlist) by clicking the<br />
button with a + and a red folder symbol<br />
the folders area.<br />
, on the top right of<br />
User Manual – 10/39
<strong>VirtualDJ</strong> <strong>DJC</strong> <strong>Mk4</strong><br />
ii) File browser<br />
Once you have reached the directory where your music files are stored:<br />
- you can leave the folders area to reach the files area by pushing the<br />
DJ Console <strong>Mk4</strong>’s button labeled Files,<br />
- you can move through the file browser by pushing the buttons with up<br />
or down arrows (to move to the previous or next line),<br />
- to move faster through the music list, keep the Up or Down button<br />
pressed and turn the DJ Console <strong>Mk4</strong>’s jog wheel for the deck you want to<br />
preview: this lets you move through the list more quickly.<br />
Once you reach the file you want to load on your virtual deck, press the<br />
<strong>Hercules</strong> DJ Console <strong>Mk4</strong>’s button labeled Load A to load the file on the<br />
left deck, or press the <strong>Hercules</strong> DJ Console <strong>Mk4</strong>’s button labeled Load B<br />
to load the file on the right deck.<br />
c) BPM (Beats Per Minute) rate of your music<br />
files<br />
The BPM rate is the number of beats per minute in the music, which<br />
reflects how fast the music is:<br />
- a BPM rate below 85 is slow,<br />
- a BPM rate over 130 is fast.<br />
ESPAÑOL ITALIANO NEDERLANDS DEUTSCH FRANÇAIS ENGLISH<br />
11/39 – User Manual
<strong>VirtualDJ</strong> <strong>DJC</strong> <strong>Mk4</strong><br />
i) Analyze your music files’ BPM rates<br />
The first time you display your list of music files in a DJ software<br />
application, the Beats Per Minute rate is not calculated: we strongly<br />
recommend that you analyze all of the music files you intend to mix with in<br />
advance, so that you can then read the BPM (Beats Per Minute) rate in<br />
the browsing area, to load only music tracks matching the BPM rate you<br />
need.<br />
To analyze the music files in a directory:<br />
- select the music file(s) in the music list and right-click with your mouse<br />
(or on Mac with no right-click on the mouse, use Ctrl + mouse click): a<br />
pop-up menu lets you select the action Scan for BPMs to analyze the<br />
music files.<br />
ii) Run the BPM analysis in advance, not during a party!<br />
The BPM analysis takes time (1 hour for 120 music files), so starting the<br />
BPM analysis of your complete library just before a party is a very bad<br />
idea. You should therefore carry out the analysis in advance: it’s easy, as<br />
you can analyze your complete hard drive and you don't need to remain in<br />
front of your computer while <strong>VirtualDJ</strong> <strong>DJC</strong> <strong>Mk4</strong> is analyzing the music<br />
files. Please note that the BPM analysis requires a lot of processing<br />
power, so mixing while <strong>VirtualDJ</strong> <strong>DJC</strong> <strong>Mk4</strong> is analyzing your full library is<br />
not recommended, since your computer will not respond as fast as it<br />
should.<br />
The analysis is generally accurate, but occasionally the BPM rate<br />
calculated is not correct: sometimes the BPM calculated is double or half<br />
of the actual BPM rate (the BPM analyzer may count only 1 beat out of 2<br />
in a track, or identify an intermediary sound within a beat as the start of<br />
User Manual – 12/39
<strong>VirtualDJ</strong> <strong>DJC</strong> <strong>Mk4</strong><br />
another beat). If your file is not properly analyzed, you can correct it by<br />
manually entering the BPM rate.<br />
If a music file is not analyzed, loading this file on a deck analyzes it, and<br />
you can read its BPM rate in the <strong>VirtualDJ</strong> display, to the right of the artist<br />
name.<br />
iii) BPM rate display<br />
The BPM rate is displayed in 2 areas:<br />
- if you have analyzed the files, the BPM rates are listed in the browser<br />
area,<br />
- on each deck, to the right of the artist name.<br />
d) Information about the music tracks<br />
The text information inserted in each music file is called a “tag”: audio files<br />
are generally tagged automatically when you import an audio CD via<br />
iTunes or Windows Media Player, or when you buy MP3 files, and the tag<br />
includes the song name, artist name, composer name, album name,<br />
music genre and the date on which the music was recorded.<br />
Once you analyze music files in <strong>VirtualDJ</strong>, the BPM rate is added inside<br />
the tag.<br />
i) Customizing the tag display<br />
You can select which fields of the music tag you want to display in the<br />
music browser by right-clicking with your mouse on the music browser<br />
headlines (or Ctrl + mouse click in Mac OS, using a Mac mouse with only<br />
1 button).<br />
ESPAÑOL ITALIANO NEDERLANDS DEUTSCH FRANÇAIS ENGLISH<br />
13/39 – User Manual
<strong>VirtualDJ</strong> <strong>DJC</strong> <strong>Mk4</strong><br />
You can display the following tags: Title, Artist, Album, Genre, Bpm, Key,<br />
Length, Bitrate, Year, Comment.<br />
ii) Sorting the music files<br />
You can sort your music files by each tag’s data (by song name, artist<br />
name, BPM, music genre...) by clicking the headline of the relevant tag.<br />
iii) Searching<br />
You can also search for songs using the Search field: when you type a<br />
sequence of characters in this field, <strong>VirtualDJ</strong> <strong>DJC</strong> <strong>Mk4</strong> will display all of<br />
the music files which include this sequence of characters in their tags in<br />
the Files area.<br />
You can also define the search area by clicking the circular button located<br />
on the right side of the search field.<br />
User Manual – 14/39
<strong>VirtualDJ</strong> <strong>DJC</strong> <strong>Mk4</strong><br />
4) PLAYING AN AUDIO FILE<br />
a) Loading and playing an audio file<br />
When you have selected an audio file in your music browser, you can load<br />
it:<br />
- on the left deck of <strong>VirtualDJ</strong> by pressing the Load A button on your<br />
DJ Console <strong>Mk4</strong>; or<br />
- on the right deck of <strong>VirtualDJ</strong> by pressing the Load B button on your<br />
DJ Console <strong>Mk4</strong>.<br />
ESPAÑOL ITALIANO NEDERLANDS DEUTSCH FRANÇAIS ENGLISH<br />
15/39 – User Manual
<strong>VirtualDJ</strong> <strong>DJC</strong> <strong>Mk4</strong><br />
Once an audio file is loaded on a deck, you can:<br />
- Play it: press the DJ Console <strong>Mk4</strong>’s Play button on the corresponding<br />
deck,<br />
- Move within the audio file: turn the jog wheel on the corresponding<br />
deck,<br />
- Move faster within the audio file: press the fast forward or rewind<br />
buttons on the corresponding deck.<br />
User Manual – 16/39
<strong>VirtualDJ</strong> <strong>DJC</strong> <strong>Mk4</strong><br />
b) Supported audio formats<br />
i) File extensions<br />
<strong>VirtualDJ</strong> <strong>DJC</strong> <strong>Mk4</strong> supports most digital audio formats such as MP3<br />
(PC/Mac), AAC (PC/Mac), AIFF (Mac), WAV (PC), WMA (PC), OGG (PC)<br />
and CD-Audio.<br />
ii) DRM protected files<br />
<strong>VirtualDJ</strong> <strong>DJC</strong> <strong>Mk4</strong> cannot play files with DRM protection, so if you have<br />
purchased an AAC file with DRM protection, the solution to play the file in<br />
<strong>VirtualDJ</strong> <strong>DJC</strong> <strong>Mk4</strong> is to burn an audio CD with this music file, and mix<br />
using this audio CD instead of the AAC file with DRM protection.<br />
iii) Video files<br />
<strong>VirtualDJ</strong> also supports video files, but in <strong>VirtualDJ</strong> <strong>DJC</strong> <strong>Mk4</strong> the playback<br />
is limited to a small window: to mix video in full screen mode, you need the<br />
<strong>VirtualDJ</strong> Pro version. You can upgrade from <strong>VirtualDJ</strong> <strong>DJC</strong> <strong>Mk4</strong> to<br />
<strong>VirtualDJ</strong> Pro on the http://www.virtualdj.com website.<br />
c) Previewing a track<br />
Previewing an audio track means:<br />
- playing it for the DJ’s ears only,<br />
- while playing another track for the audience.<br />
You usually preview a music file on your headphones while playing<br />
another track for the audience over your speakers. The music the<br />
audience can hear is called the mix.<br />
i) Target<br />
Before playing a music file for the audience, you can preview it to:<br />
- select a music file: check that it fits with the ambiance and beat of the<br />
party,<br />
- add a cue point to the music file: the cue point is the bookmark you<br />
place in the music file to set where you want the audience to start hearing<br />
it. At a party where people are dancing, you need to set a cue point where<br />
people can hear the beat.<br />
- synchronize the music file with the previous track played for the<br />
audience.<br />
ESPAÑOL ITALIANO NEDERLANDS DEUTSCH FRANÇAIS ENGLISH<br />
17/39 – User Manual
<strong>VirtualDJ</strong> <strong>DJC</strong> <strong>Mk4</strong><br />
ii) Equipment<br />
To preview a music file, you must connect your headphones to the DJ<br />
Console MK4 headphone output, on the front of the device.<br />
iii) Steps<br />
To preview a music file:<br />
- You should preferably use low-impedance headphones (below 64<br />
Ohms), to get a strong output level,<br />
- Load the music file on the deck opposite to the side where the cross<br />
fader is positioned (so that the audience cannot hear the preview),<br />
- Press the Listen A or Listen B button on your DJ Console <strong>Mk4</strong> to<br />
preview deck A or Deck B, respectively,<br />
- Preview the music file on your headphones, by pressing the Play<br />
button.<br />
d) Moving within a music track<br />
You can move within a music track using 3 controls:<br />
- Play the music track with the DJ Console <strong>Mk4</strong>’s Play buttons. This is<br />
the simplest way: just press the Play button of the selected deck on your<br />
controller, and you can hear the track on your headphones at the position<br />
you have reached,<br />
- Move within the track by turning the DJ Console <strong>Mk4</strong>’s jog wheels.<br />
This is the most precise way: turn the jog wheel backwards and forwards<br />
and you see your position moving in the waveform window,<br />
- Go forwards and backwards by pressing the Fast forward and<br />
Rewind buttons. This is the fastest way: you see your position within the<br />
music track in the small waveform preview placed over the virtual vinyl<br />
record image in the <strong>VirtualDJ</strong> display.<br />
User Manual – 18/39
<strong>VirtualDJ</strong> <strong>DJC</strong> <strong>Mk4</strong><br />
e) Setting a Cue point<br />
A Cue point is a bookmark of the moment in the music file where you<br />
want to start playing the music file for your audience, to avoid the slower<br />
start of the music track if it is too slow for dancing. This bookmark is<br />
intended to start playing the music file only once its beat is strong enough<br />
for dancing, since a slow introduction of the music with no beat may<br />
interrupt the dancing rhythm.<br />
i) Placing a Cue point<br />
Once the music file is loaded on a deck, preview it for yourself only (on<br />
your headphones) up to the point you choose as bookmark: you can reach<br />
this point by playing the music file, by pushing the fast forward button or<br />
by turning the jog wheel. Then press the Cue button at the spot you want<br />
to place a cue point.<br />
<strong>VirtualDJ</strong> adds:<br />
- a marker with the label Cue 1 in the waveform display<br />
- a vertical bar with a red dot at its base in the waveform preview.<br />
ESPAÑOL ITALIANO NEDERLANDS DEUTSCH FRANÇAIS ENGLISH<br />
19/39 – User Manual
<strong>VirtualDJ</strong> <strong>DJC</strong> <strong>Mk4</strong><br />
ii) Changing the position of the Cue point<br />
Each time you press the Cue button, <strong>VirtualDJ</strong> <strong>DJC</strong> <strong>Mk4</strong> updates the Cue<br />
point’s position.<br />
iii) Going to the Cue point<br />
If the Cue point for an audio file has been defined and saved, you can go<br />
to this Cue point by pressing the Play button, and then pressing the Cue<br />
button while the track is playing. Please note that you must make sure that<br />
the track is playing before pressing the Cue button: otherwise, if the track<br />
is stopped, pressing the Cue button will place a new Cue point instead.<br />
iv) Deleting a Cue point<br />
If the music is loaded with a Cue point, going to the start of the music file<br />
(with the Rewind button) and pressing the Cue button once you have<br />
reached the start of the music file deletes the previously set Cue 1 point.<br />
5) BEAT MATCHING MUSIC FILES<br />
The DJ’s task is to provide the audience with the music they need to<br />
dance, which includes:<br />
- selecting music tracks well-suited to the audience,<br />
- maintaining a dancing rhythm with a good ambiance, and avoiding<br />
anything that may interrupt the rhythm, such as gaps in the music or a<br />
BPM change that is too abrupt,<br />
- making transitions easy for the dancers by synchronizing the next<br />
music track with the current music track wherever possible: this<br />
synchronization is called beat matching.<br />
User Manual – 20/39
<strong>VirtualDJ</strong> <strong>DJC</strong> <strong>Mk4</strong><br />
Beat matching consists of adjusting the playback speed of music track B<br />
until the moment the beats (often marked by drums or bass) of this track B<br />
play at the same time as the beats of track A, to keep the same beat<br />
during 3 steps:<br />
1. when playing track A,<br />
2. then mixing track B together with track A,<br />
3. and then when you stop playback of track A to keep only track B<br />
playing, to spare the dancers a change in the dancing rhythm.<br />
If the BPM rates of 2 music tracks are very far one from the other, you<br />
may synchronize them by setting the BPM rate of the second music track<br />
at half or twice the BPM rate of the first music track, so that the beat of the<br />
second music track is played at the same time as 1 beat out of 2 of the<br />
first music track or vice versa. Typically, you can synchronize a 75 BPM<br />
music track with another track set at 75 BPM, or with a track set at 150<br />
BPM.<br />
<strong>Hercules</strong> DJ Console <strong>Mk4</strong> has 4 controls for beat matching:<br />
1. Pitch fader,<br />
2. Pitch Bend buttons (Pitch Bend -/+),<br />
3. Sync button,<br />
4. Jog wheels.<br />
ESPAÑOL ITALIANO NEDERLANDS DEUTSCH FRANÇAIS ENGLISH<br />
21/39 – User Manual
<strong>VirtualDJ</strong> <strong>DJC</strong> <strong>Mk4</strong><br />
<strong>VirtualDJ</strong> <strong>DJC</strong> <strong>Mk4</strong>’s display includes 5 controls per deck to control the<br />
pitch:<br />
1. The pitch fader,<br />
2. The Pitch bend left and Pitch bend right buttons below the<br />
pitch fader, which gradually change the pitch, and return to the<br />
previous pitch setting once you stop pressing the buttons,<br />
3. The Pitch reset button to the right of the pitch fader, which<br />
gradually restores the default pitch value (to a 0.0% pitch variation),<br />
4. The SYNC button, to the right of the Pause and Play buttons,<br />
5. The pitch scale, above the pitch fader, displays the pitch value (the %<br />
variation of pitch compared to the original speed). Double-clicking the<br />
pitch scale changes the pitch scale between 6%, 8%, 10%, 12%,<br />
20%, 25%, 33%, 50% and 100%.<br />
a) Sync button on DJ Console <strong>Mk4</strong> (= Beatmatch)<br />
Pressing a DJ Console <strong>Mk4</strong> Sync button (or clicking a <strong>VirtualDJ</strong> SYNC<br />
button) on a deck instantly synchronizes the beat of the music loaded<br />
on this deck with the beat of the music file on the other deck: this Beat<br />
matching process is instant and easy.<br />
User Manual – 22/39
<strong>VirtualDJ</strong> <strong>DJC</strong> <strong>Mk4</strong><br />
You can synchronize a music track with another using the Sync button, as<br />
long as the BPM difference between both music tracks is within the limit of<br />
the pitch scale. The pitch scale is the percentage displayed above the<br />
<strong>VirtualDJ</strong> Pitch fader when the pitch button reaches its top or bottom<br />
limits.<br />
The pitch scale can be changed by double-clicking the percentage figure<br />
displayed above the pitch fader,<br />
You can set a pitch scale of 6%, 8%, 10%, 12%, 20%, 25%, 33%, 50% or<br />
100%.<br />
Tip: if you have set a pitch scale of 33%, for example, and you want to<br />
synchronize 2 tracks with a BPM difference exceeding 33% (e.g.<br />
synchronizing a 140BPM audio track with a 100BPM audio track, which is<br />
a 40% difference), you can:<br />
- first change the speed of the reference track, for example change the<br />
100BPM music to 110BPM,<br />
- and afterwards synchronize the incoming 140BPM track to fit with the<br />
new speed of the reference track, 110BPM.<br />
b) Pitch fader<br />
i) Pitch fader<br />
The pitch fader slows down / speeds up playback of the music file.<br />
On DJ Console <strong>Mk4</strong>, you manipulate the pitch fader function using the<br />
Pitch knobs (these knobs have no limits in their rotation).<br />
- Slow down playback = turn the Pitch knob to the right<br />
- Speed up playback = turn the Pitch knob to the left<br />
ESPAÑOL ITALIANO NEDERLANDS DEUTSCH FRANÇAIS ENGLISH<br />
23/39 – User Manual
<strong>VirtualDJ</strong> <strong>DJC</strong> <strong>Mk4</strong><br />
In <strong>VirtualDJ</strong>’s display, the pitch fader is represented by a vertical slider on<br />
the right side of each deck.<br />
Once the pitch fader has reached its maximum value in <strong>VirtualDJ</strong>’s display<br />
(the top or bottom position), there is no point in keeping on turning the<br />
User Manual – 24/39
<strong>VirtualDJ</strong> <strong>DJC</strong> <strong>Mk4</strong><br />
Pitch button on your DJ Console <strong>Mk4</strong> in the same direction, as the level<br />
can go no further.<br />
ii) Master Tempo = Keylock<br />
Master Tempo is a setting allowing you to keep the tone of a track<br />
unchanged while you change the tempo: this is useful to speed up or slow<br />
down a track without making its tone change.<br />
You can turn the Master Tempo function in <strong>VirtualDJ</strong> <strong>DJC</strong> <strong>Mk4</strong> on or off by<br />
clicking on the Keylock logo (a lock logo on top of the pitch fader, just<br />
above the pitch scale display).<br />
If the lock is orange, Master Tempo is ON.<br />
If the lock is gray, Master Tempo is OFF.<br />
ESPAÑOL ITALIANO NEDERLANDS DEUTSCH FRANÇAIS ENGLISH<br />
iii) Pitch scale<br />
The pitch scale is the percentage of speed variation you can achieve with<br />
the pitch fader: a pitch scale of 12% means that the pitch fader’s upper<br />
position in <strong>VirtualDJ</strong> corresponds to a 12% slowdown of the music<br />
playback, and the pitch fader’s lower position corresponds to a 12%<br />
acceleration of the music playback (a 100 BPM rate becomes a 88 BPM<br />
25/39 – User Manual
<strong>VirtualDJ</strong> <strong>DJC</strong> <strong>Mk4</strong><br />
rate when moving the fader to the top, and 112BPM when moving the<br />
fader to the bottom).<br />
The pitch scale can be changed by clicking on the pitch percentage figure<br />
displayed above the pitch fader in the <strong>VirtualDJ</strong> <strong>DJC</strong> <strong>Mk4</strong> software: you<br />
can set a pitch scale of 6%, 8%, 10%, 12%, 20%, 25%, 33%, 50% or<br />
100%.<br />
The lower the pitch scale, the higher the precision of the pitch fader: a low<br />
pitch scale makes the pitch fader more precise, but limits your choice to<br />
music tracks whose BPM is close enough to the BPM of the music already<br />
loaded to be within the pitch scale.<br />
iv) Action of the pitch fader in <strong>VirtualDJ</strong><br />
When you move the pitch fader, you can see its action in 2 ways:<br />
- the BPM counter changes (displayed in <strong>VirtualDJ</strong> <strong>DJC</strong> <strong>Mk4</strong> to the<br />
right of the artist name),<br />
- the scrolling of the music track in the waveform window goes slower<br />
or faster.<br />
However, the best way to note the pitch change is to hear the change in<br />
the music’s speed.<br />
User Manual – 26/39
<strong>VirtualDJ</strong> <strong>DJC</strong> <strong>Mk4</strong><br />
In the <strong>VirtualDJ</strong> waveform window, the start of each beat is marked with a<br />
small square below the waveform, so:<br />
- if the squares of both music tracks overlap, the music tracks are<br />
synchronized,<br />
- if the squares of both music tracks don't overlap, the music tracks are<br />
not synchronized.<br />
ESPAÑOL ITALIANO NEDERLANDS DEUTSCH FRANÇAIS ENGLISH<br />
27/39 – User Manual
<strong>VirtualDJ</strong> <strong>DJC</strong> <strong>Mk4</strong><br />
c) Pitch Bend buttons (“Pitch Bend –” and “Pitch<br />
Bend +”)<br />
The Pitch Bend –/+ buttons slow down/speed up playback of the music<br />
track loaded on a deck. The difference between these functions and the<br />
pitch faders is that the pitch bend action is temporary: when you release<br />
the button, the music track’s playback gradually returns to its previous<br />
speed. Pitch bend is therefore an “elastic setting”.<br />
i) Using Pitch Bend<br />
To beat match 2 music files, you generally:<br />
- set both music files to the same BPM with the pitch fader, and<br />
afterwards,<br />
- align the beats of one track with the beats of the other track by<br />
slowing it down / speeding it up with the pitch bend buttons.<br />
ii) See the action of Pitch Bend in <strong>VirtualDJ</strong><br />
When you press the pitch bend – or pitch bend + button:<br />
- the BPM counter remains unchanged (displayed in <strong>VirtualDJ</strong> <strong>DJC</strong><br />
<strong>Mk4</strong>, to the right of the artist’s name),<br />
- but the scrolling of the music track in the waveform window is slower<br />
of faster.<br />
The best way to note that the pitch bend function has changed the sound<br />
is to hear the change in the music’s speed.<br />
User Manual – 28/39
<strong>VirtualDJ</strong> <strong>DJC</strong> <strong>Mk4</strong><br />
d) Jog Wheels<br />
While music is playing on a deck, the jog wheel on the deck has 2<br />
possible modes:<br />
- Fine Tuning mode (when the Scratch button on DJ Console <strong>Mk4</strong> is<br />
off): you can slow down or speed up the music playback temporarily by<br />
turning the jog wheels, as you would do by pressing the Pitch Bend – or<br />
Pitch Bend + buttons. The action is the same as if you were slowing down<br />
or speeding up a record on a vinyl turntable by putting your fingers on the<br />
edge of the record.<br />
- Scratch mode (when the Scratch button on DJ Console <strong>Mk4</strong> is lit up):<br />
each time you move a jog wheel, you lock the playback of your music<br />
track to the movements of the jog wheel, so that keeping the jog wheel in<br />
place stops the music, turning the jog wheel counterclockwise plays the<br />
music track backward, and turning the jog wheel clockwise plays the<br />
music forward, at the speed of the jog wheel’s rotation. This scratch mode<br />
produces the same action on the music file as if the music were on a vinyl<br />
record and you placed the flat of your hand on the record and moved your<br />
hand to scratch.<br />
ESPAÑOL ITALIANO NEDERLANDS DEUTSCH FRANÇAIS ENGLISH<br />
If the Scratch button is lit up, the jog wheels are in scratch mode.<br />
If the Scratch button is not lit up, the jog wheels are in fine tuning mode.<br />
29/39 – User Manual
<strong>VirtualDJ</strong> <strong>DJC</strong> <strong>Mk4</strong><br />
6) LOOPS AND EFFECTS<br />
The DJ’s task is not only to play music tracks with no gaps between them,<br />
but also to tweak existing music tracks to enhance their energy to<br />
stimulate the dancers.<br />
The functions included in <strong>VirtualDJ</strong> <strong>DJC</strong> <strong>Mk4</strong> Edition are:<br />
- Loops (1-beat, 2-beat, 4-beat, 8-beat)<br />
- Effects (Flanger, Beatgrid, Flippin Double, Overloop) [Please note<br />
that in Mac OS, Overloop is not available].<br />
These functions are controlled on each of the DJ Console <strong>Mk4</strong>’s decks by<br />
5 push buttons in the area labeled Loops/Fx: a Shift button, and 4 buttons<br />
labeled 1, 2, 3, 4 (which become buttons 5, 6, 7, 8 when the Shift button is<br />
enabled).<br />
When the Shift button is not lit up on your controller, you are in Loop<br />
mode, with buttons 1, 2, 3, 4.<br />
When the Shift button is lit up on your controller, you are in Fx mode,<br />
with buttons 5, 6, 7, 8.<br />
a) Loops<br />
i) Definition<br />
A loop is a repeated playback of a portion of the music, generally a fixed<br />
number of beats. Loops are used to remain on a specific part of a music<br />
track without stopping its rhythm.<br />
ii) Loop sizes<br />
When the Shift button is not lit up on your controller, you are in loop<br />
mode and a single press of buttons 1, 2, 3 or 4 makes loops in the music<br />
played on the deck in question.<br />
Button 1: 1-beat loop,<br />
Button 2: 2-beat loop,<br />
Button 3: 4-beat loop,<br />
Button 4: 8-beat loop.<br />
User Manual – 30/39
<strong>VirtualDJ</strong> <strong>DJC</strong> <strong>Mk4</strong><br />
iii) Procedure<br />
The loop starts exactly at the moment you press the button, so the music<br />
plays 1, 2, 4 or 8 beats after the moment you have pressed the button,<br />
then comes back to the start of the loop and the music keeps on going<br />
continuously, as if the loops were the new music track.<br />
When you enter into a loop (using buttons 1, 2, 3 or 4), you remain in this<br />
loop until you decide to exit it. You can exit the loop in 2 different ways:<br />
- pressing the loop button once closes the loop,<br />
- pressing another loop button once changes the length of the loop.<br />
iv) In <strong>VirtualDJ</strong> <strong>DJC</strong> <strong>Mk4</strong><br />
In <strong>VirtualDJ</strong> <strong>DJC</strong> <strong>Mk4</strong>, you see the loop status on each deck:<br />
If there is no loop, the buttons in the Loop area are not lit up onscreen.<br />
ESPAÑOL ITALIANO NEDERLANDS DEUTSCH FRANÇAIS ENGLISH<br />
If a loop is engaged, the Loop Out button is red, and the number of beats<br />
per loop is also displayed in red in the list of possible loop lengths.<br />
31/39 – User Manual
<strong>VirtualDJ</strong> <strong>DJC</strong> <strong>Mk4</strong><br />
b) Effects<br />
When the Shift button is lit up on your controller, you are in Fx mode,<br />
with buttons 5, 6, 7, 8.<br />
The effects mapped on the buttons are:<br />
Button 5 = Flanger<br />
Button 6 = Beatgrid<br />
Button 7 = Flippin Double<br />
Button 8 = Overloop (only in Windows; in Mac OS, button 8 repeats<br />
the last effect)<br />
To change the preset of any of these 4 effects, click the Effects button in<br />
<strong>VirtualDJ</strong>.<br />
User Manual – 32/39
<strong>VirtualDJ</strong> <strong>DJC</strong> <strong>Mk4</strong><br />
i) Flanger<br />
The flanger consists of adding a cycle of stretching and compression on<br />
some frequencies of an audio track while keeping the other frequencies<br />
unchanged, so that you keep the tempo and the tone of the music but<br />
change its sound. Flanger is very often used in techno music.<br />
To set the flanger, press the flanger button; to stop it, press the button<br />
again.<br />
Changing the flanger<br />
You can change the flanger preset in the Effects menu by selecting:<br />
- the delay of the flanger,<br />
- the frequency of the flanger<br />
ESPAÑOL ITALIANO NEDERLANDS DEUTSCH FRANÇAIS ENGLISH<br />
33/39 – User Manual
<strong>VirtualDJ</strong> <strong>DJC</strong> <strong>Mk4</strong><br />
ii) Beatgrid<br />
The beatgrid is a beat repeater: it samples 4 beats of the current music<br />
track and plays this 4-beat pattern over the music, during 4 beats, which<br />
adds intermediary beats on the music:<br />
If you keep the beatgrid button pressed down, the 4-beat pattern is added<br />
continuously as a loop over the music track.<br />
If you release the beatgrid button, the 4-beat pattern stops at the 4 th beat,<br />
while the music track playback goes on.<br />
You can change the pattern of the beatgrid by changing the beatgrid<br />
preset in the Effects menu.<br />
iii) Flippin Double<br />
Flippin Double repeats the music with half a beat delay, as if you had 2<br />
turntables that were both playing the same track, one playing half a beat<br />
behind the other, and you were quickly moving the cross fader to this<br />
second turntable at the end of each beat, resulting in a repetition of the<br />
rhythm.<br />
User Manual – 34/39
<strong>VirtualDJ</strong> <strong>DJC</strong> <strong>Mk4</strong><br />
iv) Overloop<br />
The overloop function sets a 4-beat loop of the current track and plays it in<br />
the background of the track’s playback.<br />
To apply the overloop function, press the overloop button once.<br />
To stop the overloop function, press the overloop button again.<br />
7) SCRATCH, SAMPLER<br />
a) Scratch<br />
Scratching is the action of stopping a vinyl record playing on a turntable<br />
with your hand, and playing a portion of the music backwards and<br />
forwards with your hand. This makes a specific sound, called scratching:<br />
the vinyl record moves at the speed of your hand instead of turning at the<br />
speed of the turntable (since the slip mat placed below the record isolates<br />
the record from the rotations of the turntable).<br />
i) Scratch mode<br />
You can enter into scratch mode by pressing the scratch button, located<br />
over the Up button on your controller: the button lights up, and you can<br />
use the jog wheels to scratch.<br />
ESPAÑOL ITALIANO NEDERLANDS DEUTSCH FRANÇAIS ENGLISH<br />
35/39 – User Manual
<strong>VirtualDJ</strong> <strong>DJC</strong> <strong>Mk4</strong><br />
ii) Action<br />
Once you are in scratch mode, if you turn the jog wheel counterclockwise,<br />
you play the music track backward, and if you turn the jog wheel<br />
clockwise, you play the music forward, at the speed of the jog wheel’s<br />
rotation.<br />
iii) Jog wheel accuracy<br />
Scratching requires the best accuracy for the jog wheel, so in the DJ<br />
Console <strong>Mk4</strong> control panel, you should select the standard jog wheel<br />
accuracy instead of one of the reduced accuracy modes.<br />
You can set the accuracy of the jog wheels in the DJ Console <strong>Mk4</strong> control<br />
panel: for some operations, some DJs may prefer to reduce the accuracy<br />
of the jog wheels, and divide it by 2 or by 4; but for scratching, the higher<br />
the accuracy, the better the results.<br />
b) Sampler<br />
i) Function<br />
The sampler mode is a mode where you record a loop of a music track,<br />
store it and assign it to a button, and play it back later in addition to your<br />
music file. This recorded loop is called a sample.<br />
Playing back a sample over a music track may add a fun dynamic, rhythm<br />
or a stable beat while you are busy preparing the next track.<br />
ii) Procedure<br />
You can enter sampler mode by pressing the button labeled Sampler in<br />
the <strong>VirtualDJ</strong> user interface.<br />
User Manual – 36/39
<strong>VirtualDJ</strong> <strong>DJC</strong> <strong>Mk4</strong><br />
The sampler mode is not controlled by the DJ Console <strong>Mk4</strong>’s buttons; you<br />
control sampler mode using your keyboard and mouse.<br />
<strong>VirtualDJ</strong> includes a few samples stored on the first banks: you can either<br />
keep them or change the contents of the banks by recording your own<br />
samples.<br />
You can record a sample of the music currently playing by selecting the<br />
bank where you want to store the sample and pressing the Rec button:<br />
If you are in a loop, the sample Rec button remains black, and<br />
<strong>VirtualDJ</strong> records a sample of the length of the loop,<br />
if you are not in loop mode, the sample Rec button becomes red, and<br />
<strong>VirtualDJ</strong> keeps on recording the sample as long as you don't click the<br />
Rec button again.<br />
You play back the sample by pressing the sample Play button.<br />
iii)<br />
Commands on each sample<br />
ESPAÑOL ITALIANO NEDERLANDS DEUTSCH FRANÇAIS ENGLISH<br />
You set the volume of each sample using its dedicated volume slider.<br />
37/39 – User Manual
<strong>VirtualDJ</strong> <strong>DJC</strong> <strong>Mk4</strong><br />
You set the sample in loop mode (so that <strong>VirtualDJ</strong> plays the sample nonstop<br />
as long as you don't click the sample Play button again) by clicking<br />
the button with a circular arrow on top of the volume slider.<br />
A sample in non-loop mode has no left and right arrows over the volume<br />
slider.<br />
When you click on the Play area, its color changes and you see the<br />
playback bar fill gradually.<br />
A sample in loop mode has a left and right arrow over the volume slider, to<br />
move backwards and forwards within the sample.<br />
User Manual – 38/39
<strong>VirtualDJ</strong> <strong>DJC</strong> <strong>Mk4</strong><br />
Trademarks<br />
<strong>Hercules</strong>® is a registered trademark of Guillemot Corporation S.A. Intel® and Pentium® are registered trademarks<br />
of Intel Corporation. Microsoft® Windows® XP®, Vista® and 7 are registered trademarks or trademarks of<br />
Microsoft Corporation in the United States and/or other countries. Apple®, Mac OS® and iTunes® are registered<br />
trademarks of Apple Computer, Inc. <strong>VirtualDJ</strong> is a trademark of Atomix Productions. All other trademarks and<br />
brand names are hereby acknowledged and are property of their respective owners. Illustrations not binding.<br />
Contents, designs and specifications are subject to change without notice and may vary from one country to another.<br />
Declaration of conformity<br />
EC COMPLIANCE NOTICE: DJ Console <strong>Mk4</strong> has been tested and found to comply with the limits of the Council<br />
Directive 89/336/EEC of 3 May 1989 on the approximation of the laws of the Member States relating to<br />
electromagnetic compatibility, amended by Directive 93/68/EEC. In a domestic environment this product may cause<br />
radio interference in which case the user may be required to take adequate measures.<br />
CANADIAN COMPLIANCE NOTICE: this Class B digital apparatus meets all requirements of the Canadian<br />
Interference-Causing Equipment Regulations.<br />
Electrostatic Discharge<br />
In the event of electrostatic discharge on the contactors or fasteners, you may be required to reset the device.<br />
Copyright<br />
© 2010 Guillemot Corporation S.A. All rights reserved.<br />
This publication may not be reproduced in whole or in part, summarized, transmitted, transcribed, stored in a retrieval<br />
system, or translated into any language or computer language, in any form or by any means, electronic, mechanical,<br />
magnetic, photocopying, recording, manual or otherwise, without the prior written permission of Guillemot<br />
Corporation S.A.<br />
Disclaimer<br />
Guillemot Corporation S.A. reserves the right to make changes to specifications at any time and without notice. The<br />
information provided by this document is believed to be accurate and reliable. However, no responsibility is<br />
assumed by Guillemot Corporation S.A. either for its use or for the infringement of patents or other rights of third<br />
parties resulting from its use. This product may exist in a light or special version for PC integration or other<br />
purposes. Certain functions detailed in this manual may not be available in these versions. Wherever possible, a<br />
README.TXT will be included on the installation CD-ROM detailing the differences between the supplied product<br />
and the product described in the present documentation.<br />
End-user software license Agreement<br />
Please carefully read the License contract displayed when installing the <strong>VirtualDJ</strong> software. Afterwards, you can view<br />
the text file installed on your computer at any time.<br />
ENVIRONMENTAL PROTECTION RECOMMENDATION<br />
At the end of its working life, this product should not be disposed of with standard household<br />
waste, but rather dropped off at a collection point for the disposal of Waste Electrical and<br />
Electronic Equipment (WEEE) for recycling. This is confirmed by the symbol found on the<br />
product, user manual or packaging. Depending on their characteristics, the materials may be<br />
recycled. Through recycling and other forms of processing Waste Electrical and Electronic<br />
Equipment, you can make a significant contribution towards helping to protect the environment.<br />
Please contact your local authorities for information on the collection point nearest you.<br />
ESPAÑOL ITALIANO NEDERLANDS DEUTSCH FRANÇAIS ENGLISH<br />
39/39 – User Manual


![[English - PC] 290 Kb - Hercules](https://img.yumpu.com/26583395/1/184x260/english-pc-290-kb-hercules.jpg?quality=85)