SC48 Guide - Digidesign
SC48 Guide - Digidesign
SC48 Guide - Digidesign

You also want an ePaper? Increase the reach of your titles
YUMPU automatically turns print PDFs into web optimized ePapers that Google loves.
Snapshots Menu<br />
The Snapshots menu provides tools to manage snapshot-related<br />
plug-in features from within the Plug-Ins screen. Using<br />
the Snapshots menu, you can quickly check to see which existing<br />
snapshots refer to the current plug-in, as well as create,<br />
update, or remove snapshots.<br />
Side-Chain Selector<br />
The Side-Chain selector appears near the top of the Rack view<br />
when you select a plug-in that supports side-chain or “key” input.<br />
In Config mode, the Side-Chain selector lets you establish<br />
a side-chain routing to the plug-in. Once established, you can<br />
route and re-route side-chain signals in both Config and Show<br />
mode. For more information about side-chain signals, see<br />
“Side-Chain Routing” on page 153.<br />
Assigning and Routing Plug-Ins<br />
Before a plug-in can be used to process audio, it must be assigned<br />
to a rack slot. Once assigned, you can use the plug-in as<br />
a channel insert or bus processor.<br />
Before a plug-in can be assigned, it must be installed. See<br />
“Installing and Authorizing Plug-Ins” on page 143.<br />
Assigning Plug-Ins to Rack Slots<br />
To assign a plug-in:<br />
1 Put the system into Config mode.<br />
2 Go to the Plug-Ins page.<br />
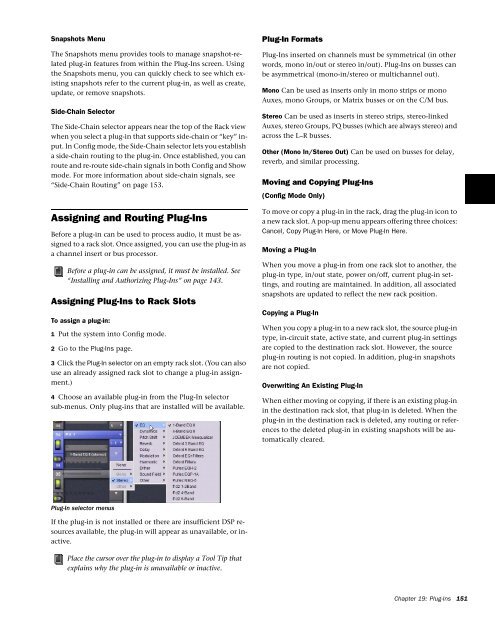
3 Click the Plug-In selector on an empty rack slot. (You can also<br />
use an already assigned rack slot to change a plug-in assignment.)<br />
4 Choose an available plug-in from the Plug-In selector<br />
sub-menus. Only plug-ins that are installed will be available.<br />
Plug-In Formats<br />
Plug-Ins inserted on channels must be symmetrical (in other<br />
words, mono in/out or stereo in/out). Plug-Ins on busses can<br />
be asymmetrical (mono-in/stereo or multichannel out).<br />
Mono Can be used as inserts only in mono strips or mono<br />
Auxes, mono Groups, or Matrix busses or on the C/M bus.<br />
Stereo Can be used as inserts in stereo strips, stereo-linked<br />
Auxes, stereo Groups, PQ busses (which are always stereo) and<br />
across the L–R busses.<br />
Other (Mono In/Stereo Out) Can be used on busses for delay,<br />
reverb, and similar processing.<br />
Moving and Copying Plug-Ins<br />
(Config Mode Only)<br />
To move or copy a plug-in in the rack, drag the plug-in icon to<br />
a new rack slot. A pop-up menu appears offering three choices:<br />
Cancel, Copy Plug-In Here, or Move Plug-In Here.<br />
Moving a Plug-In<br />
When you move a plug-in from one rack slot to another, the<br />
plug-in type, in/out state, power on/off, current plug-in settings,<br />
and routing are maintained. In addition, all associated<br />
snapshots are updated to reflect the new rack position.<br />
Copying a Plug-In<br />
When you copy a plug-in to a new rack slot, the source plug-in<br />
type, in-circuit state, active state, and current plug-in settings<br />
are copied to the destination rack slot. However, the source<br />
plug-in routing is not copied. In addition, plug-in snapshots<br />
are not copied.<br />
Overwriting An Existing Plug-In<br />
When either moving or copying, if there is an existing plug-in<br />
in the destination rack slot, that plug-in is deleted. When the<br />
plug-in in the destination rack is deleted, any routing or references<br />
to the deleted plug-in in existing snapshots will be automatically<br />
cleared.<br />
Plug-In selector menus<br />
If the plug-in is not installed or there are insufficient DSP resources<br />
available, the plug-in will appear as unavailable, or inactive.<br />
Place the cursor over the plug-in to display a Tool Tip that<br />
explains why the plug-in is unavailable or inactive.<br />
Chapter 19: Plug-Ins 151