SC48 Guide - Digidesign
SC48 Guide - Digidesign
SC48 Guide - Digidesign

Create successful ePaper yourself
Turn your PDF publications into a flip-book with our unique Google optimized e-Paper software.
Config Mode and Show Mode<br />
There are two main operating modes, Config Mode and Show<br />
Mode. Use Config mode to set up your system and options;<br />
use Show mode to mix your performance.<br />
Config Mode<br />
Config mode provides access to the configuration settings<br />
that are typically performed as part of system setup (before<br />
mixing). For example, you must be in Config mode to do any<br />
of the following:<br />
• Choose a Main mix format (L–R+M, or L–C–R)<br />
• Designate the number and mono/stereo format of available<br />
auxes and groups, combine two mono channels into<br />
one stereo input channel, or split a stereo input channel<br />
into two mono channels.<br />
• Install plug-ins<br />
• Assign plug-ins in the software racks<br />
• Route side-chain inputs to plug-ins<br />
• Initialize (or reset) hardware devices and options<br />
• Change Matrix Source pickoff points<br />
• Change Master Insert points<br />
• Customize console and software interaction<br />
• Move channels to different fader strips<br />
• Perform system tests and diagnostics<br />
Some Config mode operations interrupt audio throughput.<br />
Show Mode<br />
Show mode is the main operating mode for the system software.<br />
All mixing and routing features are available, based on<br />
your settings made in Config mode.<br />
Toggling Between Config Mode and<br />
Show Mode<br />
To toggle between Config mode and Show mode, do one of the<br />
following:<br />
• Press the Console Mode switch (located above the Bus Assigns).<br />
– or –<br />
• Double-click the Mode display in the Status Bar, located in<br />
lower-right hand corner of the screen.<br />
System Lock<br />
System Lock locks out all manual changes (console and screen<br />
actions), allowing the operator to safely step away from the<br />
system. Audio continues to pass but is not affected by console<br />
controls until the operator disables System Lock.<br />
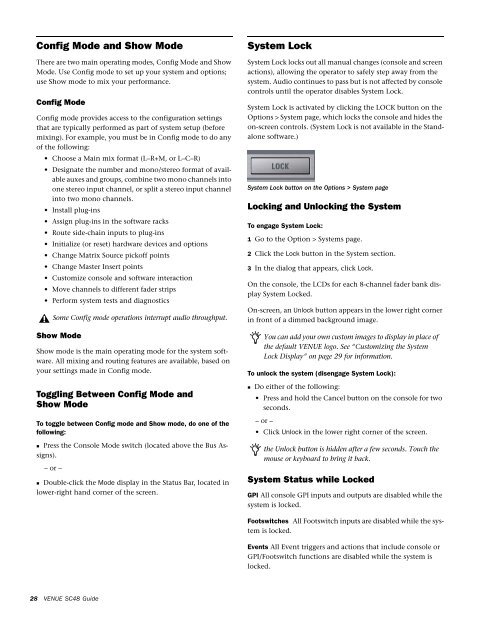
System Lock is activated by clicking the LOCK button on the<br />
Options > System page, which locks the console and hides the<br />
on-screen controls. (System Lock is not available in the Standalone<br />
software.)<br />
System Lock button on the Options > System page<br />
Locking and Unlocking the System<br />
To engage System Lock:<br />
1 Go to the Option > Systems page.<br />
2 Click the Lock button in the System section.<br />
3 In the dialog that appears, click Lock.<br />
On the console, the LCDs for each 8-channel fader bank display<br />
System Locked.<br />
On-screen, an Unlock button appears in the lower right corner<br />
in front of a dimmed background image.<br />
You can add your own custom images to display in place of<br />
the default VENUE logo. See “Customizing the System<br />
Lock Display” on page 29 for information.<br />
To unlock the system (disengage System Lock):<br />
• Do either of the following:<br />
• Press and hold the Cancel button on the console for two<br />
seconds.<br />
– or –<br />
• Click Unlock in the lower right corner of the screen.<br />
the Unlock button is hidden after a few seconds. Touch the<br />
mouse or keyboard to bring it back.<br />
System Status while Locked<br />
GPI All console GPI inputs and outputs are disabled while the<br />
system is locked.<br />
Footswitches All Footswitch inputs are disabled while the system<br />
is locked.<br />
Events All Event triggers and actions that include console or<br />
GPI/Footswitch functions are disabled while the system is<br />
locked.<br />
28<br />
VENUE <strong>SC48</strong> <strong>Guide</strong>